Building Basketball: Duke’s Cameron Indoor Stadium in LEGO
/Best of BrickNerd: Weekend Highlight — Article originally published September 15, 2021.
I often think that growing up Filipino means having basketball in my blood. I am absolutely awful at it. But I love the stories behind each game, and the role it has played in shaping our national psyche. In my basketball-crazy country, you will find a basketball court—or at the very least, a board with a hoop nailed to a post, a tree, or a wall—in practically every village. It is a place of triumph and victory, defeat and despair, and serves more often than not, as the heart of every community.
Basketball courts and stadiums have certainly played a big part in my life—and would have continued doing so had COVID not happened. And so when presented the opportunity to write about the gorgeously detailed Cameron Indoor Stadium at Duke University by LEGO builder (and BrickNerd patron) Scott Walker, of course I jumped at the chance to do so.
Made of 15,000 bricks, this LEGO Cameron is a remarkable copy of the actual building as it is today. It is also packed full of painstakingly accurate details (and puts LEGO’s official stadium sets to shame). Scott was kind enough to walk us through his process in designing and building this masterpiece.

Photo of the Cameron Indoor Stadium by Charlie Ellsworth.
Inez: Hi Scott! As a basketball fan, I absolutely love your LEGO Cameron Indoor Stadium. Before we talk about it though, could you tell us about the actual stadium?
Scott: Cameron Indoor Stadium in Durham, North Carolina, is the home of Duke University basketball and one of the most iconic sports venues in the world. Legend has it that Duke head basketball coach Eddie Cameron sketched out the first designs for Cameron on a matchbook, but formal architectural plans were created by Julian Abele, one of the nation’s first Black architects. After just nine months of construction at a cost of $400,000, the facility hosted its first game in 1940 (a Duke victory over Princeton). Originally dubbed Duke Indoor Stadium, it was renamed to honor Duke’s former head coach in 1972. Over its 80 plus year history, the building has seen lots of changes, but it is probably most treasured for what hasn’t changed from Cameron and Abele’s original vision and design.

The stately exteriors of the Cameron Indoor Stadium makes it look a lot more like an academic institution rather than a stadium! Photo of the LEGO Cameron by Charlie Ellsworth and photo of the actual taken from Google Earth.
Inez: Duke University has some pretty beautiful buildings on campus. Why did you choose to build Cameron?
Scott: I am a Duke grad, a big basketball fan, and Cameron was always my favorite building on campus. I also appreciate how for such a classic building, it has actually been updated and improved upon a lot in its 80 years, which made it a much more interesting subject. And finally, while I have seen some great football and soccer stadiums in LEGO, I couldn't find any really high-quality basketball builds and I was excited at the chance to do something unusual.

Scott with Duke head coach Mike Krzyzewski.
Inez: It certainly is unique! How would you describe it to BrickNerd readers?
Scott: My LEGO model aspires to depict Cameron as it looks today. I started designing it in the fall of 2020 with the intention of eventually giving it as a gift to the Duke basketball program, which I did in August 2021 while attending the K Academy fantasy camp.
The model consists of over 15,000 LEGO pieces. The only non-LEGO components are approximately 30 LED lights and accompanying wires. While the model is held together solely through LEGO connections, a handful of pieces prone to coming loose have been glued for ease of maintenance and transport.
The model is 31” long, 20” wide and 15” high with the roof elevated. It is built at 1:160 scale, meaning one LEGO stud represents a little over four feet. It took approximately 300 hours to design and 100 hours to build, and it provided a huge learning opportunity for me as prior to this I hadn't built an original LEGO creation in 35 years.

LEGO Cameron - Rubenstein Pavillion. Can you spot the microfig bust of Coach Eddie Cameron?
Inez: 35 years is a long time! How did it feel to get back to building LEGO after so long?
Scott: The whole project was a lot more work than I expected, but also much more rewarding. Everything took more time than I thought—rough design, detailed design, sourcing bricks, assembly, photography—but I am very happy because the final results exceeded my expectations, which is pretty fortunate for a first-timer.
Inez: You mentioned that it took you 300 hours to design. Could you walk us through your design process?
Scott: The very first thing I did on the project was to build a backboard and hoop (the final version is depicted in picture #1 below). I wanted to see the smallest thing I could build that would still be recognizable as a basketball hoop. That initial design provided a basic sense of scale that I could apply to the rest of the model.
When it came to sketching out a full plan for the model, I only had two real-world measurements to work from regarding Cameron’s actual size: a regulation basketball court is 94’x50’ and the original building was 262’ x 175’. Those turned out to be all I needed as I was able to take measurements from an early drawing of the stadium (#2) and an overhead shot from Google Earth (#3) and extrapolate the rest of the dimensions of the stadium in proportion to those. I used a spreadsheet (#4) to capture all the ratios and to see the impact of increasing or decreasing the scale before settling on 1:160 as a scale that worked with my sample hoop and would keep the full model relatively small but large enough to depict its key details.

Scott’s step-by-step design process as described in the previous paragraph.
Inez: Was any aspect of recreating the building any more challenging than another? Perhaps your parts selection of making it transportation-friendly?
Scott: Once I had decided on the model’s scale, nearly all the remaining design decisions were just choosing the best combinations of LEGO bricks to create Cameron 160x smaller. But there were a couple of other choices fundamental to defining the look of the final model. One was how to handle the roof. The other was choosing the physical boundaries of the model, which I did based on three guiding concepts:
1) Keep the footprint around the building relatively small to keep the focus on Cameron itself. This meant slicing through the addition that connects the Hall of Honor to Schwartz-Butters at the north corner of the model.
2) Emphasize and echo Cameron’s design by using 45-degree angled corners on the base to match those on the building.
3) Frame the model’s base using wood and brass elements just like those that frame the upper stands inside the stadium.

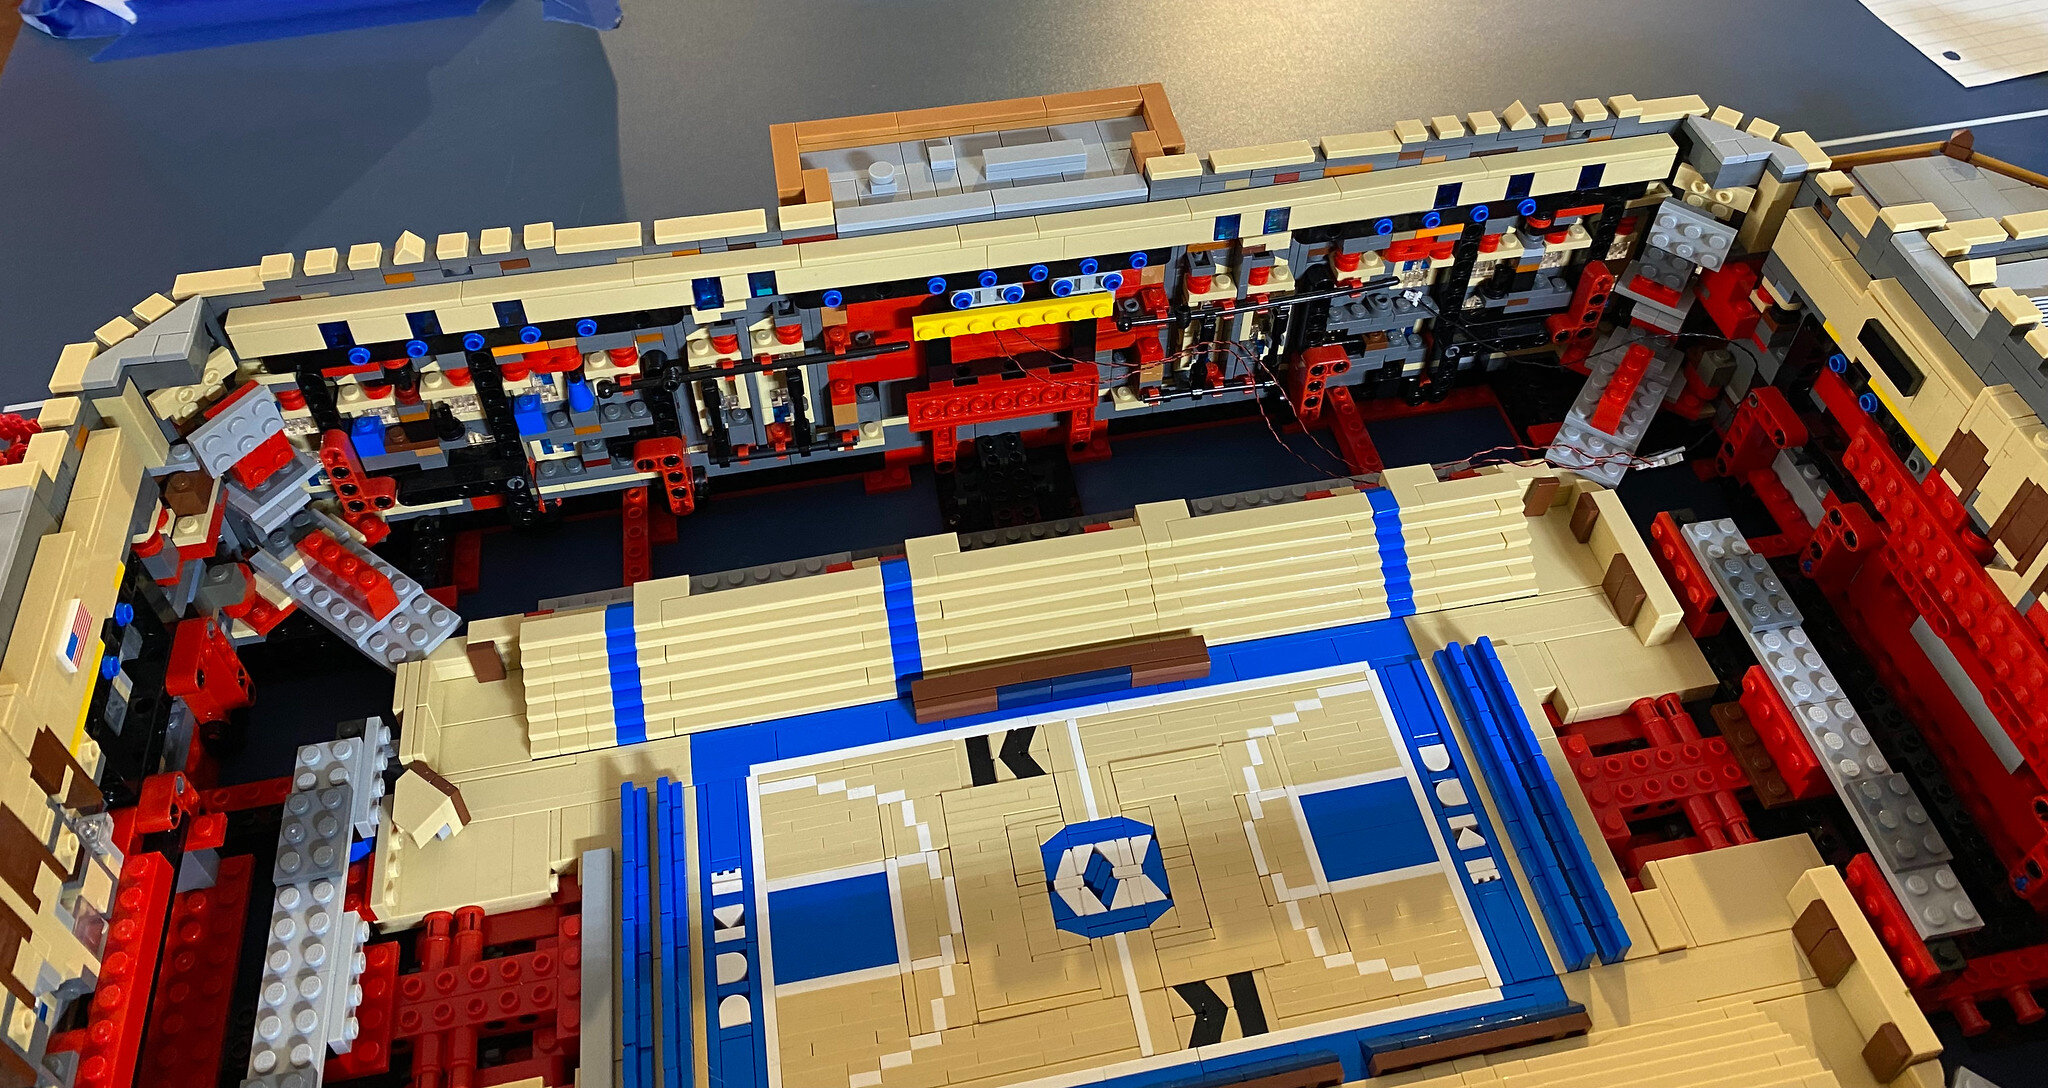
The elevated roof of the LEGO Cameron allows the viewer to see the details inside the stadium as well as on the roof. Photo by Charlie Ellsworth.
Lastly, to allow visibility into the interior of the stadium, I elected to elevate the model's roof on four clear columns. Just as in the real Cameron, the model's roof is covered in light fixtures illuminating the court below and banners honoring the achievements of past teams and players. Blue banners are used by the women’s team, white banners by the men’s. The banners in the foreground represent Duke’s five national championships, the first coming in 1991 when I was a very fortunate freshman. I will never forget the thrill of watching Duke clinch its first title on a big screen in Cameron surrounded by thousands of my screaming classmates.
In a life imitating art moment, I had already committed to this open roof design when I learned that Duke was planning something similar for the real Cameron.
Inez: So much Math!!! But we’re nerds here, and we love it! What did you use to design the model?
Scott: In the early days of the project, I did a lot of sketching of designs on paper. This ranged from attempts to plot out the full plans for the stadium to more detailed studies of small components. When I got bored or stuck, I would start experimenting with actual bricks, but things always went smoother when I took the time to figure out a design on paper before I started searching for pieces.

Paper before plastic.
I also broke the project down into components, and I built small prototypes to see how I might capture a certain part of the model. After I had created individual prototypes like the upper stands, lower stands, court and exterior wall, I would test to see how well they fit together.
After many of the key prototypes were complete, building more complicated structures and putting together a full picture of what I needed to build was really challenging. I spent too much time looking for pieces from my LEGO collection, I wasn’t aware of all the possible pieces and in what colors they were available, and I didn’t have a strategy for how to assemble an accurate shopping list for the thousands of LEGO bricks I would eventually need.
I knew digital design tools existed for LEGO but I thought it would be more intuitive and efficient to use real bricks than virtual ones. I was very, very wrong. After spending an hour learning how to use a free program from BrickLink called Studio, I started doing all of my design work in it. It was a game-changer. Studio’s database of every possible LEGO brick allowed me to quickly evaluate options, it made it easy to build sections of the model separately and then combine them to see how they fit together, and it took just a single click to generate a list of all the pieces in my design and upload it to BrickLink create a shopping cart.

Studio to the rescue!
Inez: Was there any part that was difficult to translate from the design you’ve made into the actual build?
Scott: I had hoped that building the entire model digitally would make assembly very straightforward. But Murphy’s Law held true throughout the project, and it showed up in two different ways during assembly. First were errors in the design where pieces I thought were connected actually weren’t. This happened most acutely in the interior walls where there was a lot of SNOT. I would design a section that was well connected, but then later I’d change part of it and wouldn’t realize the change broke what was holding some pieces together. With real bricks, you’d know this right away, but in Studio it can be hard to tell when something is just hanging in space or very weakly connected. And every time I encountered this during the build phase, I faced the double challenge of figuring out a new design that worked without also needing to order new pieces.
The second issue was how difficult and finicky some sections were to assemble. Attaching the upper stands was a huge pain—once connected they were strong and stable, but until then they were pretty fragile, and it took a lot of patience to place them in between the aisles which were also delicate. Tweezers were a very necessary tool to retrieve pieces that would break off and fall into crevices deep inside the model.
Both of these issues might have been avoided had I taken the time to use Studio to document the actual steps to assemble the model, but at the time I didn’t think that was worth the effort. In hindsight, that extra work upfront might have saved me time in the end, but it’s tough to say. I already spent 3x the time designing and revising the model in Studio than I did building it, and by the end I was pretty impatient to get to using real bricks instead of virtual ones.
Inez: How did you bring the model to Duke?
Scott: First, I lowered the roof and removed items like trees and baskets that were likely to be jostled loose in transit and packed those in bubble wrap inside the model. Then I built a cardboard box and lined it with acoustic foam, placed the model on a 1/4” sheet of MDF, then placed the MDF and model inside the box. I found a cheap red bag for storing an artificial Christmas tree to carry the box in—it even had a set of wheels on the bottom which proved to be very convenient as the full model is heavy and awkward to carry for long distances.
With the roof closed, the completed model is smaller than two side-by-side roller bags. I purchased an extra seat on my flight to secure rights to two spots in the overhead and checked my actual luggage. The model fit in the overhead with room to spare. Opening the box at my hotel in Durham, I was delighted to see that only three pieces had come apart in transit.

Scott and his LEGO Cameron in transit to Duke University.
Inez: That’s incredible! Last question: what’s your favorite aspect or feature of your build?
Scott: The use of wood and brass elements is my favorite because it highlights the feature that leapt out to me the first time I walked inside Cameron: its brass railings. While they look like something from Cameron’s 1940 origins, they were actually added as part of renovations in 1988. Combined with other details like the stained wood paneling added at the same time, the ornate architecture of Cameron elevates the pragmatic functionality of an indoor arena into a venue that celebrates the game of basketball. That sounds pretty corny. But if you’re lucky enough to have ever visited Cameron, or better yet attended a game there, you might understand why someone would build a 15,000 piece LEGO model of it. Of course, you might still think that person was nuts.

Scott’s favorite brass railings, in LEGO form and as you see them at the stadium. Photo of the Coach K Court by Charlie Ellsworth. Photo of the Cameron Indoor Stadium from Duke University.
Inez: I don’t think you’re nuts at all. But then I’m somebody who cries at basketball games. Thank you so much for sharing your amazing build with us!
If you want to read more about Scott’s amazing build, please check out his Flickr!
Have you seen any amazing sports related builds lately? Share them with us and comment below!
Do you want to help BrickNerd continue publishing articles like this one? Become a top patron like Charlie Stephens, Marc & Liz Puleo, Paige Mueller, Rob Klingberg from Brickstuff, John & Joshua Hanlon from Beyond the Brick, Megan Lum, and Andy Price to show your support, get early access, exclusive swag and more.