Evolution of a Cheese Slope Mosaic
/Best of BrickNerd - Article originally published August 16, 2022.
To help preserve some of the best LEGO content from the community, today we are pleased to share a guest article from Katie Walker who walks us through the evolution of a cheese slope mosaic. Katie was originally one of the main contributors at MosaicBricks, a LEGO blog started by Casey McCoy that ended in 2014.

Flash MOC
A few years ago, Sean and Steph Mayo came up with the idea of having a "Flash MOC". It's like a Flash Mob but with LEGO models instead where a bunch of models would show up all at once and all following a similar theme. One of these “Flash MOC” ideas was to have a fantasy world filled with polar bear warriors. You can see the results of the group collaboration, including the storyline, in the Urtican Blitz'ard group on Flickr.
For my contribution, I made a model of a bear divining the future with bones.

It's no secret that my true love is geometric mosaics, and I put them in MOCs mostly just to show them off in a more interesting way (and to show that they could be useful for other builders, too, I suppose). Here is the floor mosaic in a different picture all by itself:

Flower Petals
I felt inspired to write up a step-by-step description of how I came up with this mosaic on Flickr, and I would like to expand on it here just a little. I started with the idea of using curved walls, straight walls, and hinges to make different shapes that could be filled with cheese slopes. Here are some of the shapes I tried first:

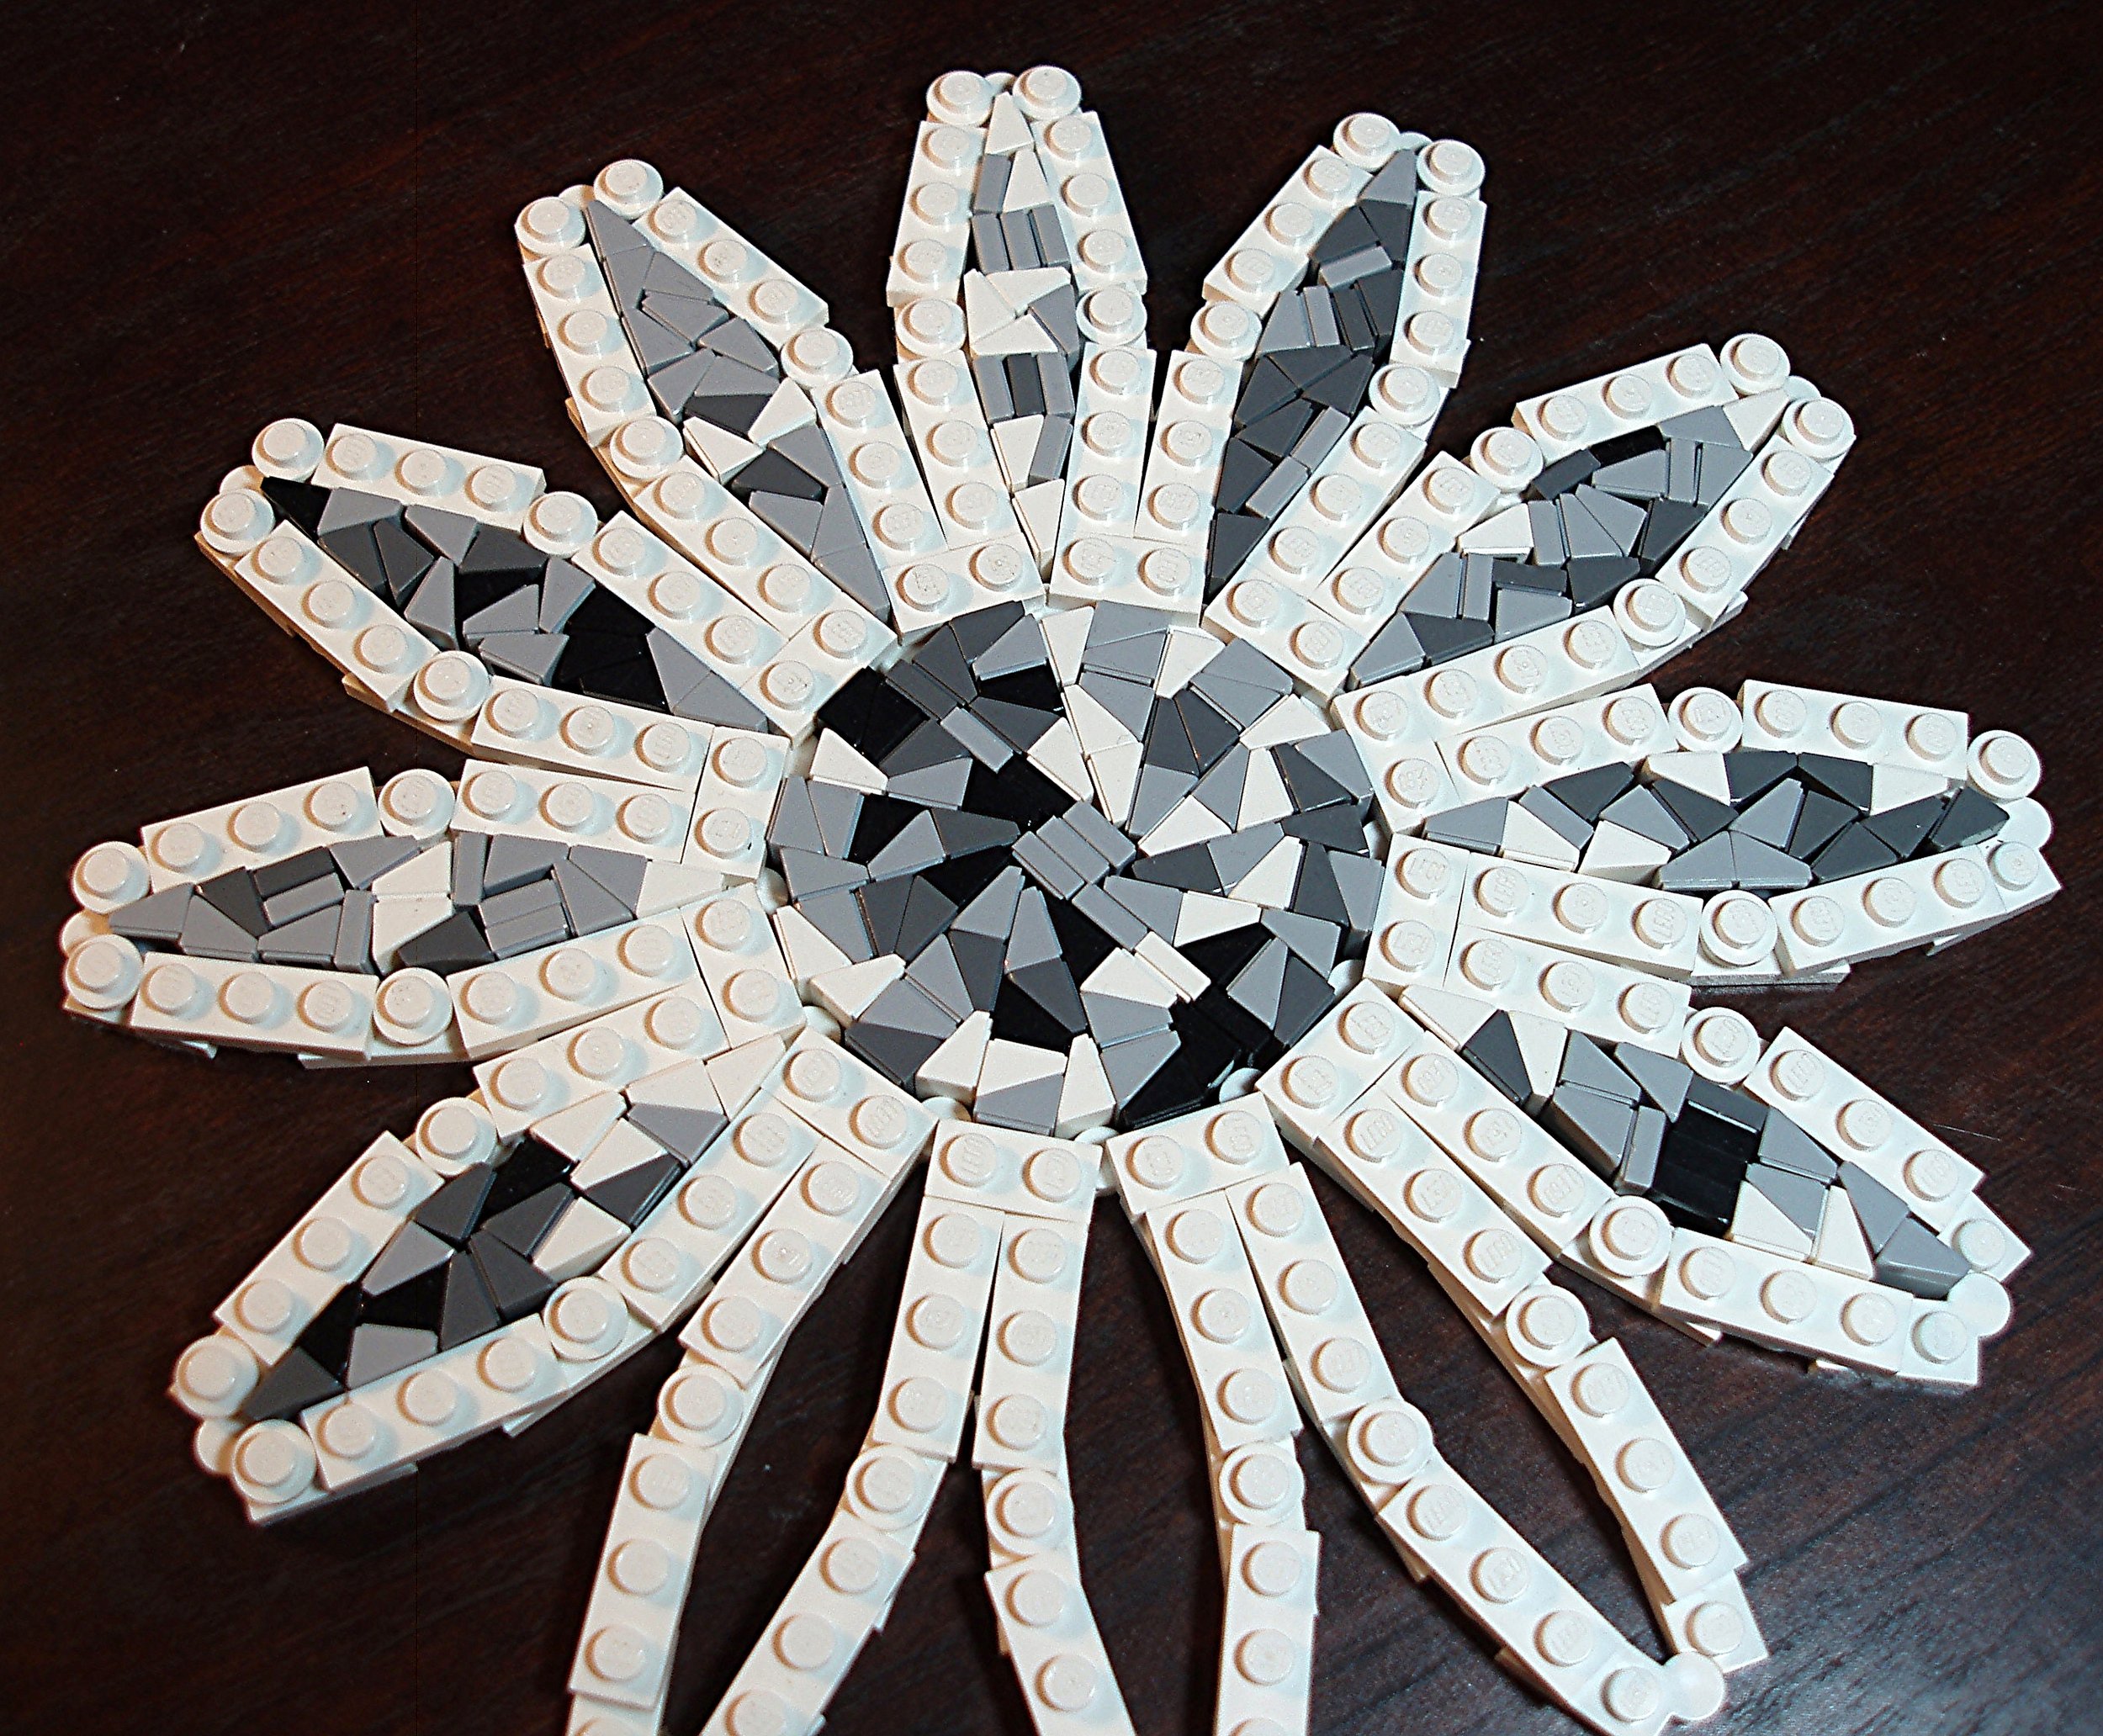
The first mosaic I made with one of these shapes was this flower petal study:

I tried it again, this time blending the colors from white to black a bit more:

After that, I moved on to trying out another of those original shapes. I first tried the skinny petals all the way around to make a flower and then tried connecting it around the outside, too. However, the outside framing was too tight, and the whole frame curved up on the outsides like a bowl.

So I took the outside frame off and just concentrated on filling the center and the petals with cheese slopes and tiles. I probably found four ways to do the center (only one is pictured). Each petal was filled in a different way to see which would turn out the best. Some turned out better than others. An ideal filling would not only have the space completely covered but would also have some symmetry or interesting geometric shaping in the patterns of the cheese slopes for making interesting color designs.
Under Pressure
I picked the designs I thought would work the best and tried them out. Then I tried again to make an outer frame all the way around the petals. I found a way that you can see on the right side of the below picture, but I wanted to make it a little cooler looking. So I added little nubs that stuck out like a snowflake. But that new attempt was too tight, and after I got to about nine of them done, the plates and hinges that make up the center circle couldn't handle the tension and one of them popped apart. The inner circle wasn't all connected together anymore, though you can't really tell from the photo:

I think at that point I started to take the nubs off, because they couldn't handle the tension. And then this happened:
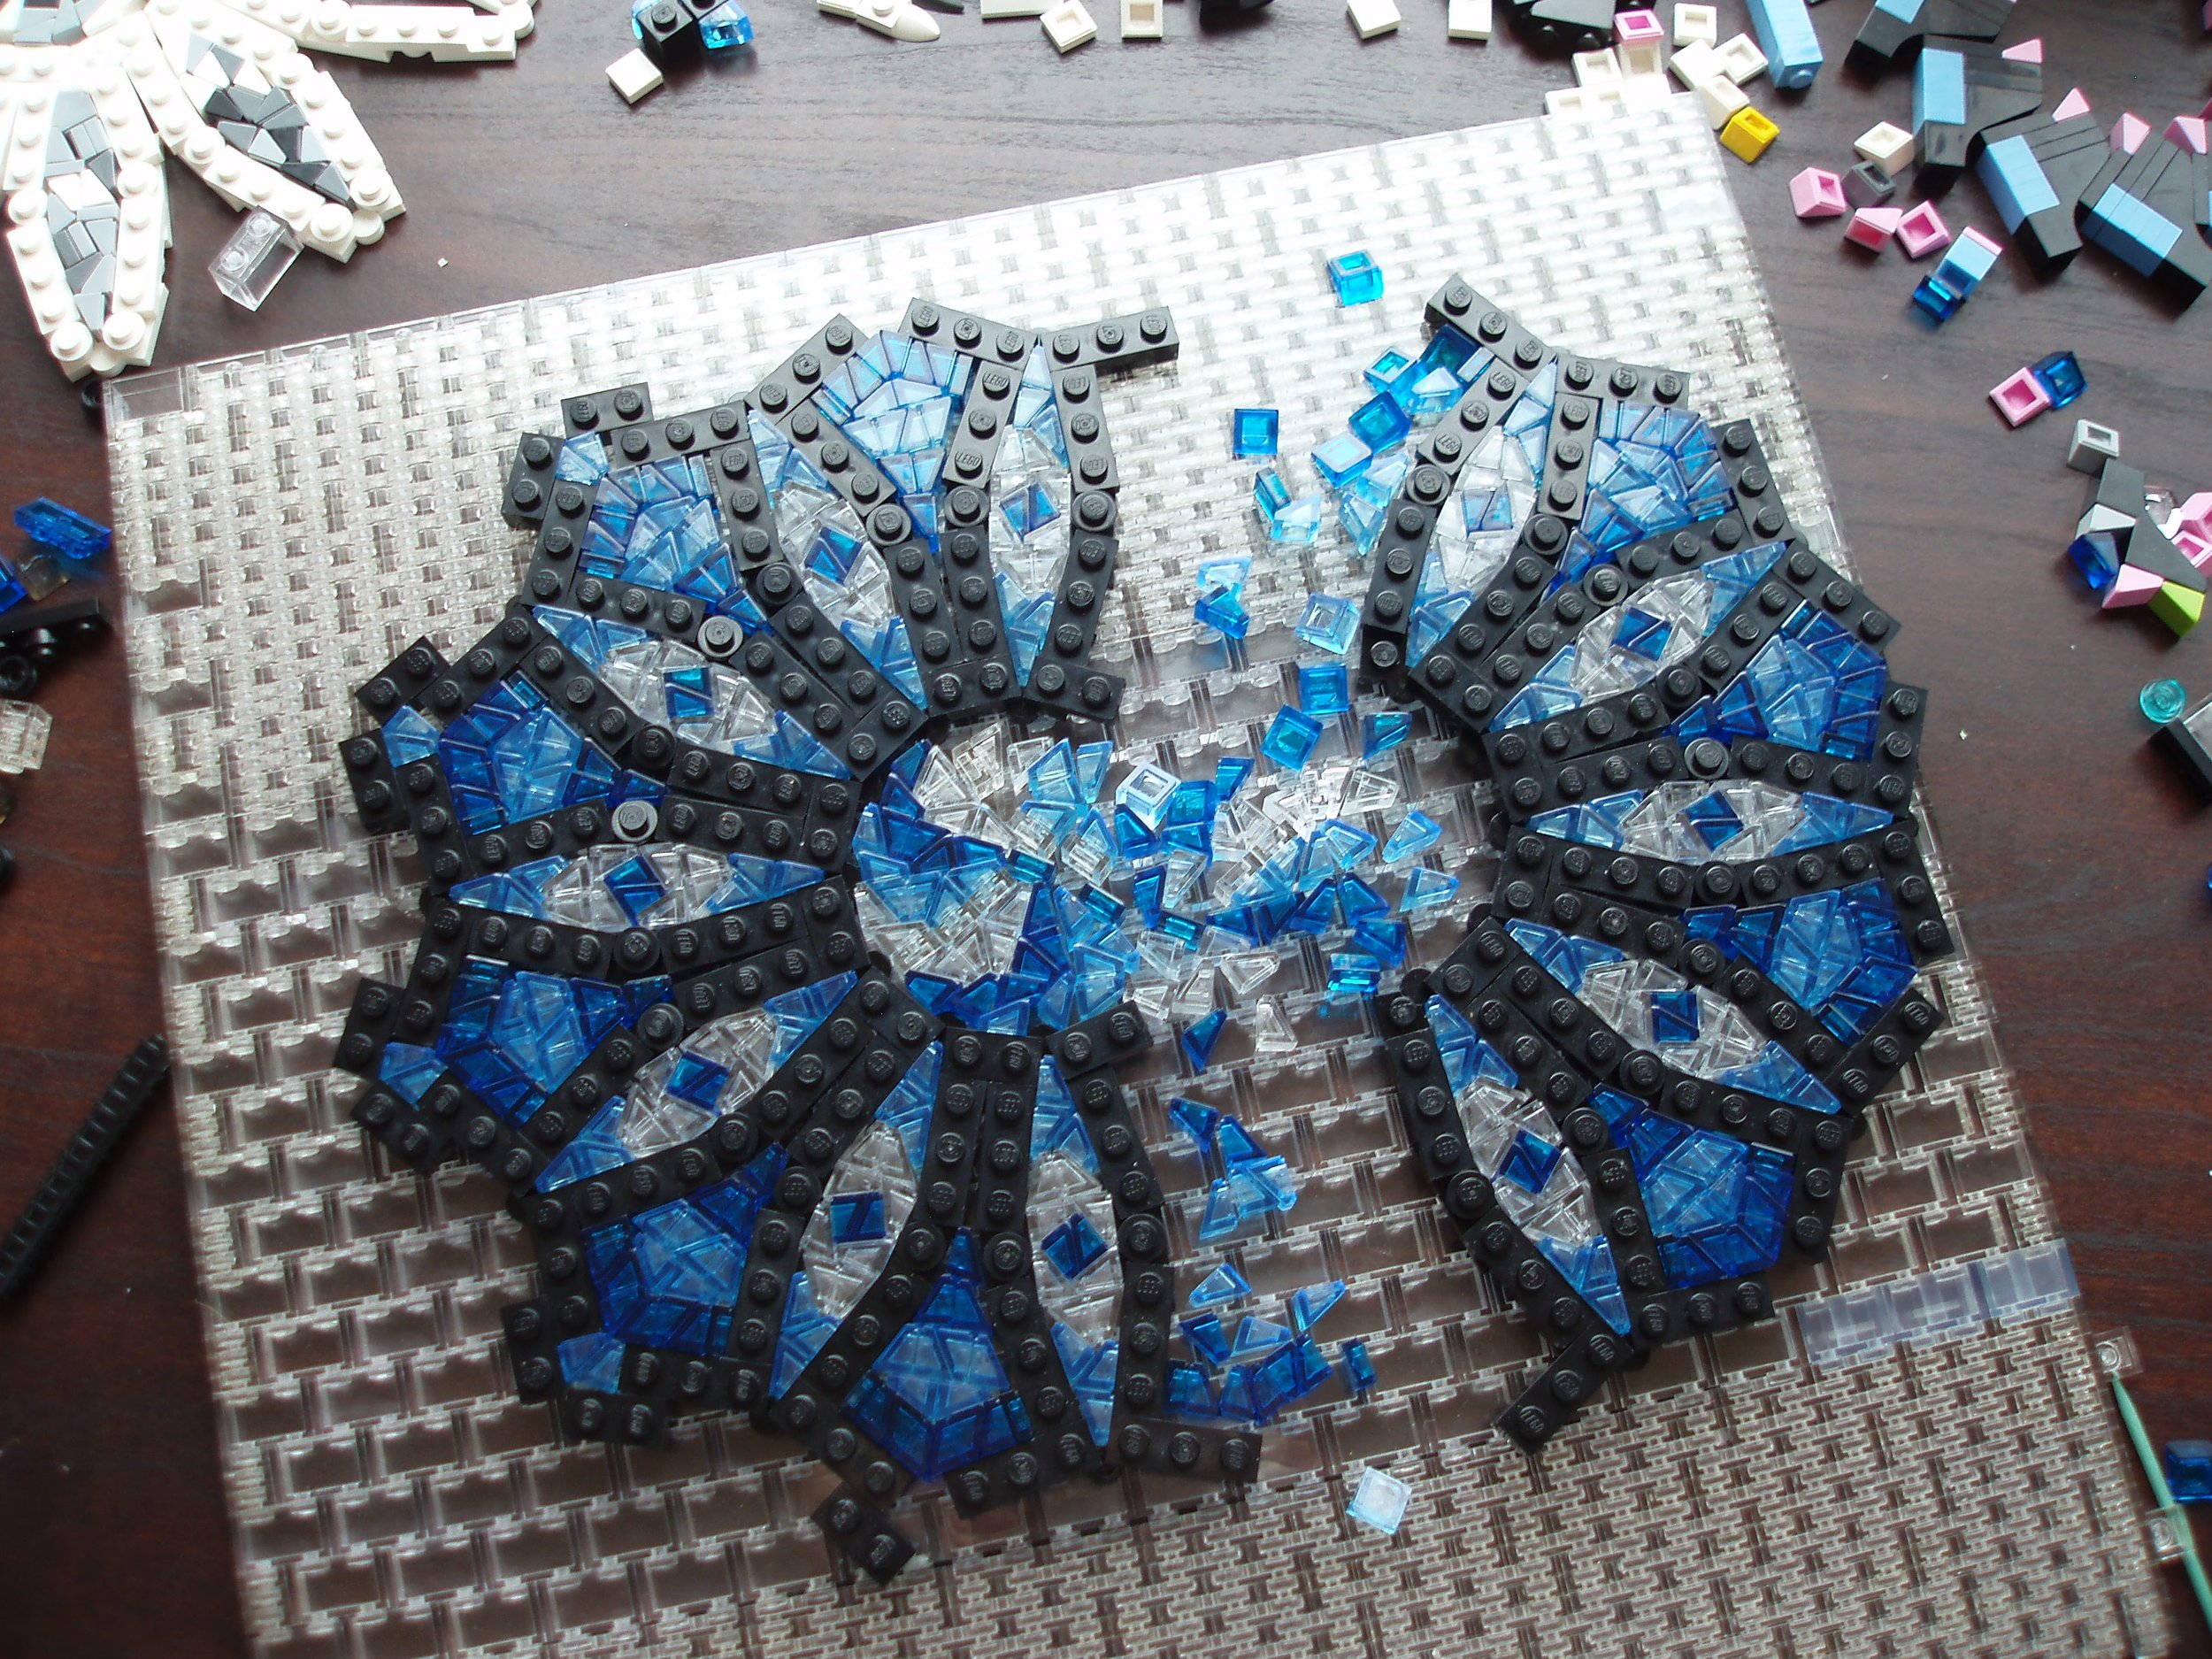
The frame for the innermost circle burst apart at two places. Very clearly my frame was not working. So I went back to the simpler and less interesting frame so that the tension on the inside of the mosaic remained at tolerable levels. And in the meantime, I had a good excuse to redo the middle circle to a colored design that I liked better.

(Sorry it's not the best photograph of the mosaic -- I didn't think to take a better one, since I wasn't done with the whole MOC yet.)
You'll notice that the outside edges don't actually connect, but leave gaps. It's so tight that the cheese slopes stay put anyway. Filling in the outermost shapes was very hard by the end. I had to put the pieces into each shape in a specific order, so that some of the pieces would help to hold the shape more open so that I could cram in the rest of the pieces. The last ones were very difficult.
Lighting Lessons
Then I started working with lights. My kids have little lamps with red and blue lightbulbs, and we have four blacklights (which make the trans-medium blue cheese slopes glow).

For the final MOC, I did a lot of work on the walls, putting double layers of black and double layers of trans for the windows so that gaps wouldn't show through. It was also tricky to do the walls because the corners of the design were too tight, so I couldn't connect the sections at the bottom—instead, I interlaced them. I layered tiles at the junctions, kind of like interlacing your fingers. By the time I got to the top, there was enough give that I could connect all the wall panels together. That really helped with the stability.
For the final lighting, I had two blacklights underneath, one on each side right next to the MOC, a blue light in the back, a reddish light sort of shining in the vicinity, a light on in the nearby closet, and then waved a flashlight on the bear's head to try to fill it in for the photo. It was hard to hold the camera still for the long exposure while holding the flashlight. It took forever to get something passable, and I'm not sure it's as good as I was hoping for, but it works, I guess:

I took some photos with more red in them, which I liked, but it didn't feel as cold as a mystical polar bear place should feel. It was fun to work on a project with friends, and it's always great to have a reason to make another cheesy mosaic!
Stay tuned for even more cheese slope mosaic articles by Katie coming in the near future here at BrickNerd. Until then, check out this cheese slope mosaic MOC round-up and this article on how to make a cheese slope mosaic if you want to learn more!
What other kinds of cheese slope mosaics have you seen? Let us know in the comments below!
Do you want to help BrickNerd continue publishing articles like this one? Become a top patron like Charlie Stephens, Marc & Liz Puleo, Paige Mueller, Rob Klingberg from Brickstuff, John & Joshua Hanlon from Beyond the Brick, Megan Lum, Andy Price, John A., Lukas Kurth from StoneWars, Wayne Tyler, LeAnna Taylor, Monica Innis, and Dan Church to show your support, get early access, exclusive swag and more.