Jack Stone’s Cockpit: A Molding Manufacturing Mystery
/
Jack Stone is a theme known by many but loved by few. It was one of the earliest LEGO themes which introduced specialized elements intended to keep construction simple for very young children, including an oversized figure of the titular character. But the theme has a bad reputation among AFOLs for littering bulk used brick with large and difficult-to-use pieces, often ones that could be constructed similarly with smaller parts.
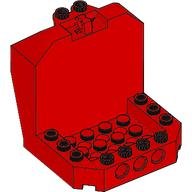
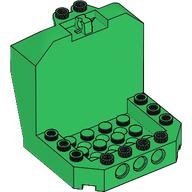
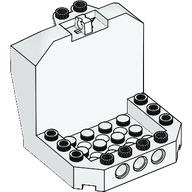
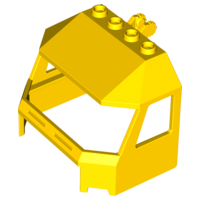
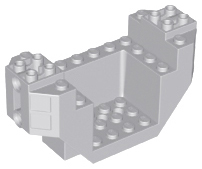
The part we are examining today, Cockpit 6 x 6 x 5 with Hinge (part 30619), is no exception. Its large size and unusual features reveal a surprising amount about the difficulties of injection molding plastic bricks.
Elemental History
At first glance, it may seem that the cockpit element is rather limiting—something you would throw into a bin of big, bulky parts never to be seen again. It came in five colors and was intended to be combined with several complementary elements to create the cab of a truck, helicopter or more. It also had a similar element for an even more elongated cockpit and one that was tapered for more sleek aircraft.
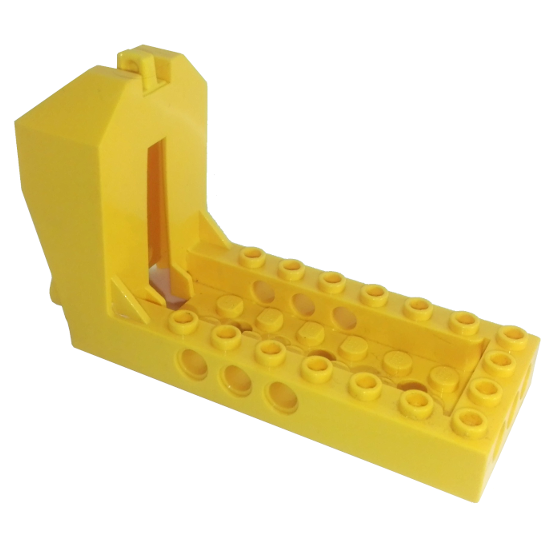
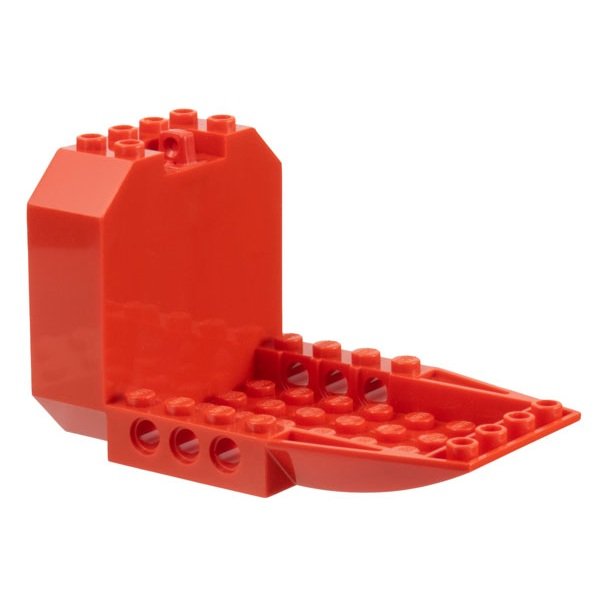
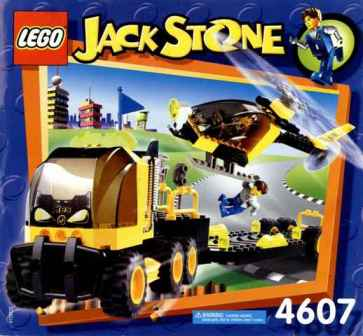
“Cockpit 6 x 6 x 5 with Hinge” was only ever released in 11 sets in the early 2000s. And yes, one set actually came with both cockpit elements in a single set, 4607 Copter Transport.


There are more modern cockpit elements that feel like they could be from the same design family as the ones from Jack Stone, including the Vidiyo box base. Each element is similarly big and bulky—using them in a MOC would be a challenge, but it cannot be denied that manufacturing these parts must be a feat in and of itself.

Premeditated Design Choices
Before we take a deep dive into the features of “Cockpit 6 x 6 x 5 with Hinge” which are unavoidable results of manufacturing limitations, let’s briefly appreciate the unusual features of this brick which were a result of purposeful design.

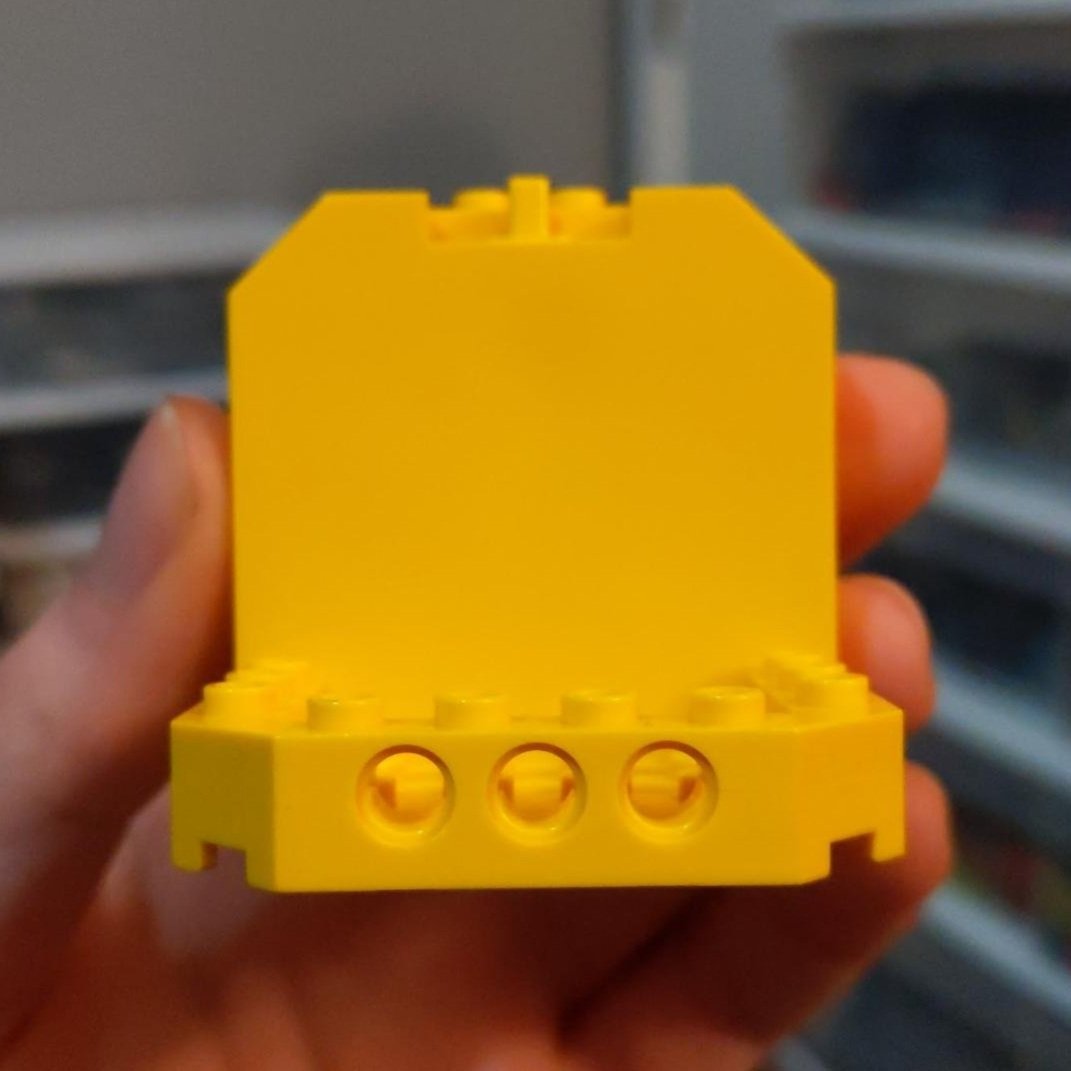
One of the first unusual things you may notice about this brick is the chamfered—and in one case rounded—edges. As a brick created for a junior theme, safety during play is a top priority. 90-degree angles are kept to a minimum as much as possible—a relief to parents’ feet everywhere.

The next feature—which requires some play to discover—is that the front and side walls of the cockpit aren’t actually the same width as a typical brick. This allows a brick placed in the cockpit to be removed more easily by tilting it towards the outside wall. This feature won’t help much if you place something like a 4x3 modified tile (part 88646) in there, but the designers graciously also included Technic holes in the bottom which allow any Technic axle or rod to push a stuck tile out of the base.
The thinner walls also point toward our first feature indicating a manufacturing limitation. Most Technic bricks feature a ring around both sides of the pinhole, which acts as a channel for the lips on the pin to snap into, as well as a stopper for the middle ring of the pin so that it can’t be pushed further in. However, it would be difficult to mold this ring from the inside of the cockpit without a very complicated mold shape! A thinner wall is a sneaky workaround, by allowing the pin lips to snap outward into empty space where the ring would be.

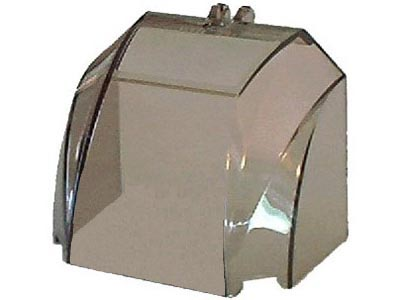
Image via Bram Lambrect
Overcoming Manufacturing Limitations: Strength
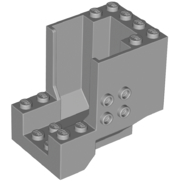
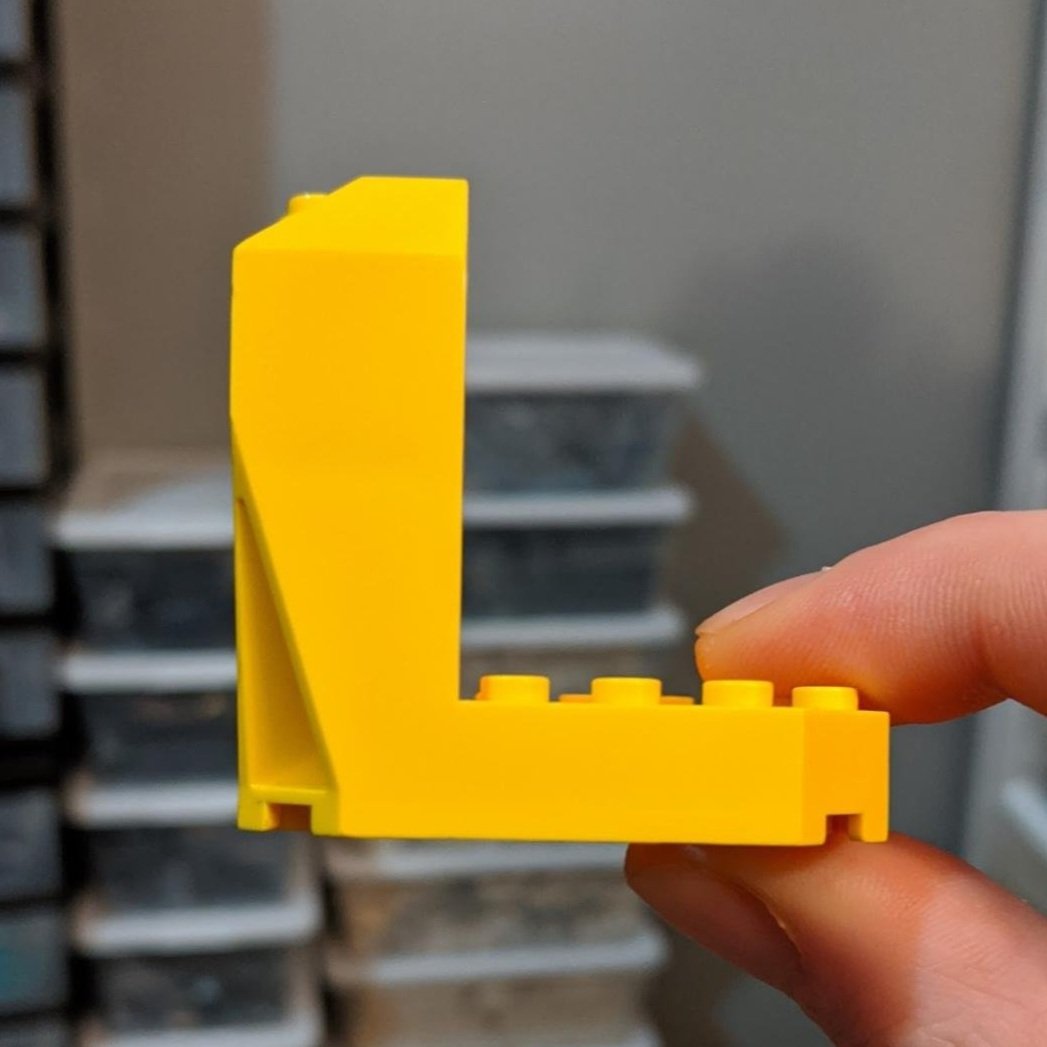
A first glance at the back of this brick will probably come as a surprise to anyone who hasn’t seen it before. The unusual structure is very different from what we are used to in the LEGO design language! I used to write it off as a wacky aesthetic choice (perhaps one that would be called out for NPU if used in some Art-Deco way), but I’ve come to understand that every feature here serves a purpose.

Most of the strange shapes on the base of the cockpit are present for support. With a brick as tall as this one (coming in at six bricks high!), designing it with a featureless wall similar to brick 1 x 6 x 5 (part 44590) would not be an option,as the 2-module wide back section would too easily buckle under force. By making it hollow on the back, all support structures can be included easily by the same mold piece. And there needs to be a lot of them!
Quite frankly I’m not sure why the designers chose to support the side walls with diagonal supports. My best guess is that they better protect the part from vertical forces. But this choice inadvertently provides a clue to the next design constraint in the form of the most puzzling feature yet!
Overcoming Manufacturing Limitations: Wall Thickness
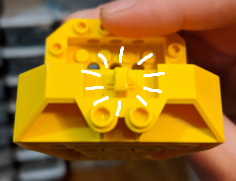
It took me a while to notice this feature, but ultimately it was what inspired me to write this article. On both sides of the part, there is a small but distinct depression in the wall, best seen by a reflection of light or felt with your hand.

At first, I didn’t even believe it was a design choice; I thought it was a defect! I sought out more copies of the piece, and to my surprise, I found that this “defect” was present in all of them. It’s a bit difficult to see in the picture, so if you own this piece I urge you to see for yourself.
This is not an indication of a drop in the renowned quality of LEGO bricks or evidence that this element was stepped on, but it is actually a necessary workaround to an overly thick wall created by the shallow angle of the diagonal support. According to rapid prototyper Protolabs, it is recommended that ABS plastic be molded with thickness strictly within the range of 1.14 mm to 3.55 mm. If it is too thick, the plastic will be unable to cool properly; too thin and it will break easily.
However as you probably know, LEGO adheres to strict tolerances when it comes to manufacturing where even a small deviation from 1.7 mm is unacceptable. This is a reason why Technic bricks have hollow studs; the walls of the pin holes combined with the top surface of the brick are too thick already to have a solid stud added on top. The stud is made hollow so that it has some room to breathe!

Wall thickness is also the reason for the final and most hilarious feature. There is a large hollow section on the back of the element.
The larger trapezoidal section exists to provide an empty space for pins to snap into, as discussed before. But the hollow section continues all the way up the back of the part with a small tube leading up to... a finger hinge at the top!
This hinge is too thick to be molded onto the part without a small hole underneath to reduce wall thickness. You can see a similar hole underneath part 30383 (Hinge Plate 1x2 Locking with 1 Finger On Top), and even the humble 1x2 plate! However, in order for the mold to reach this height on our cockpit, the hole isn’t quite so small!
Conclusion
So whenever you look at an awkward or oversized LEGO element, know that each bit of plastic used is for a specific purpose. (I have been noticing interesting and unique features in everyday parts ever since taking this deep dive.) And who knows, with a little imagination those molding mysteries could land you in our next NPU round-up, especially since Jack Stone’s cockpit is only a few cents each on BrickLink!
What other oversized LEGO elements have internal detailing you don’t know the purpose of? Let us know in the comments!
Do you want to help BrickNerd continue publishing articles like this one? Become a top patron like Charlie Stephens, Marc & Liz Puleo, Paige Mueller, Rob Klingberg from Brickstuff, John & Joshua Hanlon from Beyond the Brick, Megan Lum, Andy Price, John A. and Lukas Kurth from StoneWars to show your support, get early access, exclusive swag and more.