
Vinyl Decals 101: How to Make Your Own LEGO Decals
/Best of BrickNerd: Weekend Highlight — Article originally published October 19, 2021.

Michael Bushong’s Award winning bookshelf featureing many vinyl decals
Our guest article today is by Michael Bushong. He recently discovered the crafty world of vinyl cutting and has applied it to his LEGO hobby. This is an adaptation of an excellent presentation he gave at Brick Days this summer. While at Brick Days, he won “Best Large Creation” for his Bookshelf MOC that featured several vinyl stickers!
Vinyl Decals 101: How to Make Your Own Decals
Many of us love to create LEGO designs in all sorts of shapes and sizes, but as we all know, the standard building block of LEGO itself—the brick—is relatively small. This makes it easy to scale up a design to allow for more brick-built intricacies. But what about when your MOC can’t be blown up to massive proportions? Oftentimes, there simply aren’t small enough LEGO parts in existence to complete your fabulous design. Take letters on a 1x2 license plate tile, for example. Even LEGO doesn’t try to brick-build those adorably necessary elements.
That’s where decals come in! While the world of decals and sticker sheets that LEGO has produced is quite vast, most of them tend to be quite specific in shape, color or design, often making it near impossible to find the perfect embellishment to complete your MOC. This is exactly why I set out to learn how to be able to produce my very own LEGO decals, and at a relatively affordable price, too!
Examples of my first decal creations include customizing minifigure shields, trains, smile boxes, LEGO themed encyclopedias and even a lug bumper sticker for my car.
After poking around a few brick blogs, forums and groups, I couldn’t seem to find a reliable, consistent method of creating decals for LEGO, so I started devising a system! The two main hurdles I foresaw were proficiency and cost. As someone who loves art, but lacks the ability to freehand a straight line to save my life, I thought it must require a certain level of digital design software proficiency or computer programming skill to achieve a desirable result.
Without much research under my belt, the process seemed like it could get pretty expensive as well. I originally thought I would have to do something like hire a company to custom produce a special die just so I could stamp out blank LEGO taped decals. Luckily, I didn’t have to worry about anything like that! I was able to find and use a few existing tools and materials that helped streamline my process, and ultimately provided me with the ability to make almost any decals I can imagine!
Tools Needed

During my research, I quickly found that there are many cutting machines on the market that also happen to be excellent for making decals for LEGO! Cutting machines range in both price and features. Some of the top-of-the-line machines can set you back as much as the Colosseum set, about $400 US, but others can be obtained for much less, closer to the cost of a passenger train, around $150-$200. Nearly any of the current models will work for LEGO decal making, so no need to aim for the high-end machines.
But if you want a machine that gives you more abilities beyond the basics, like the ability to cut other materials such as wood and leather, then I might suggest looking into the pricier models. Anyone who knows me, knows I like to get a deal when I can, so keep my number one LEGO rule in mind when purchasing a cutting machine, LOOK FOR A DEAL! I lucked out and scored a $200 Cricut machine on sale for around $150 from a big box retailer, and spent around $50 on additional materials, weeding tools, and a few different colored sheets of vinyl to get me started. Just for reference, with my $200 investment, I had everything I needed to produce hundreds of decals before having to purchase more vinyl!

While the primary tool you will need to unlock the ability to make your own decals is a cutting machine, there are a few other items you will want to pick up that will greatly help you along the decal-making process. I highly recommend picking up a cheap set of weeding tools to help you work with, produce, and apply your decals. “Weeding” is the process of removing excess vinyl from around your decal after your machine has cut it out on a sheet of vinyl.

There are many 3-5 piece weeding tool kits that range from $15-$25, they all work great but the main tool you’re after is the needle-point weeding tool itself which resembles a curved needle on a long handle. They kind of look like they belong on a dentist’s tool tray, but I promise it will become your most trusted tool in the decal-making process! I use my weeding tool to help remove excess vinyl, applying transfer tape, lift corners off of the grip mat, and I even use the backside of my weeding tool to help apply decals smoothly toward the end of the process.
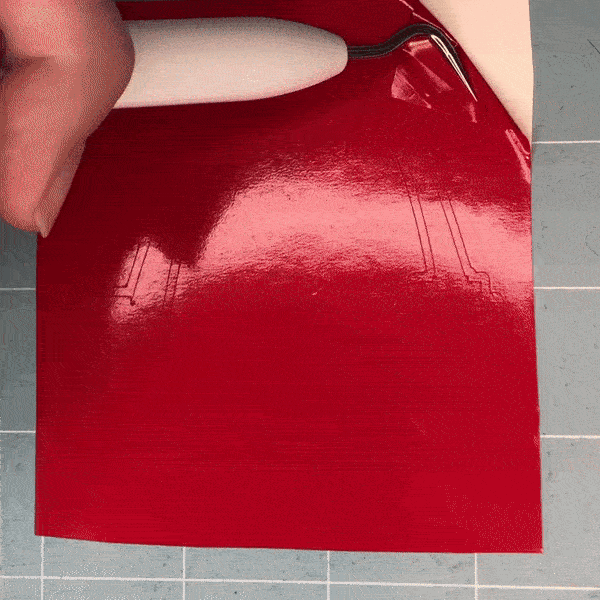
Weeding! The first step to applying your new decal!
Most cutting machines require a 12”x12” grip mat, but they typically come included with the machine if they are required, so you shouldn’t have to purchase a mat separately. There are larger grip mats on the market, but unless you plan on making a decal larger than 1 ft in any direction, there is no need to spring for a larger mat. Mats come in various grip strengths as well. Most are either “light grip” or “standard grip”. Standard grip being the much sticker mat than the “lighter” grip mat. Just a simple, light grip mat works best when working with LEGO-sized decals.
You will also need some adhesive-backed sheets of vinyl and transfer tape. Sheets of adhesive vinyl can be found in a myriad of colors, prints and designs. While you can find a pretty decent selection of vinyl at your local Target, Walmart or craft store for around $1 per 12”x12” sheet, I have found much wider selections to choose from (as well as much better prices) when I shop for vinyl at a local, mom-and-pop craft store, so make sure to buy local if you can! Transfer tape can also be found at any store that sells vinyl, it is typically packaged the same as regular vinyl, so keep an eye out, they can be tricky to spot on a shelf sometimes.

Shopping for vinyl at my favorite local vinyl shop. Right: 12”x12” sheets of vinyl in various colors with a green roll of 12”x36” vinyl.
How to Make a Decal
There are two primary methods of decal creating when using these machines: the single-color “cut” process and the multi-color “print then cut” process. Both work great for LEGO decal making, but we will primarily focus on the single-color “cut” process as the two only slightly differ. The standard ‘cut’ process makes single-color designs out of any color or pattern of vinyl you choose. You can also overlay multiple decals to obtain a multicolor decal effect in a pinch.

A single color decal applied to a MOC. Right: Two individual decals laid on top of each other to create multicolor effect without a color printer.
First, you will want to create your design and get it ready to be created into a decal. You can digitally create your design however you like! Personally, I use the free programs on my MacBook like “Preview”. It does everything I need to be able to generate my decals. But there is nothing wrong with using better, more expensive photoshop software if you happen to have them and the proficiency to use them.

Hard at work digitally designing my latest decal.
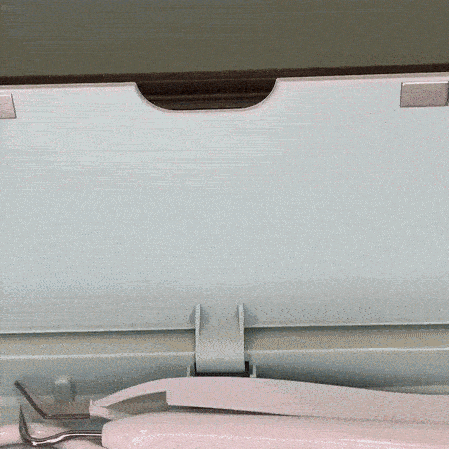
Once you have your desired design digitally created, all you have to do is upload it to your cutting machine’s software, which will help you turn it into a full-fledged decal! Once you have your design uploaded, you will want to digitally size it to accurately fit its final surface: your MOC. I recommend measuring your surface twice, just to be sure you will wind up with the correct sized decal. Measure twice, cut once!

Screenshot of sizing an image with my cutting machines included software.
Aside from double checking your measurements, I also recommend first printing out your design on a regular piece of paper so you can hold it up to its final surface, and make sure your size and quality are exactly where you want them before potentially wasting vinyl material. At $1-$3 per sheet, adhesive vinyl isn’t too expensive, but it definitely isn’t free! Even when double checking my measurements, I still burned through a fair bit of vinyl before I started paper test cutting, so this is probably my biggest tip for the process.
If you happen to have a decent printer, you will also have the ability to create multi-color printed designs by utilizing the advanced “print then cut” process. When doing so, you will want to use printable vinyl and follow your machine’s software prompts that will walk you through printing out your design. Essentially, the software prints your design via your printer and it generates registration marks around your design that the cutting machine will scan for and use to pinpoint and precisely cut your decal out for you after it has been printed. The “print then cut” process does require “printable vinyl” which is one of the more premium-priced materials closer to $5 per sheet, so if you plan to dabble in the “print then cut” process, make sure to spring for a sheet or two of printable vinyl while doing your vinyl shopping.
On my way to the printer to begin a multi-color “print then cut” decal.
How to Apply a Finished Decal to a Surface
Cut a piece of transfer tape about 1 inch bigger than your decal and lay it flat on top of your decal, pressing firmly to adhere the two together. You can use a press tool to help adhere the transfer tape onto the decal, but I just use the back of my weeding tool or press firmly with the pads of my fingers instead of fiddling with another tool. Next, carefully lift the transfer tape with the decal on it from the vinyl backing and grip mat. Now, simply press your decal onto your finished surface, and slowly remove the transfer tape, leaving your decal on its final resting place: your now gloriously adorned MOC! The transfer tape should peel right off. Just remove the transfer tape slowly, starting from any corner so as to not pull a part of your decal off with it by mistake.
The transfer tape taco method at work!
When applying a decal to a surface, I use what I call “The Taco Method” where I hold the decal on the transfer tape by the left and right edges with the middle of the decal hanging down close to the final surface, like the shape of a taco shell! I align the center of the decal with where I want to apply it and start by gently running my finger or weeding tool up and down the center of the decal to make sure it is flat and secure down the middle.
Then, I slowly flatten the decal from the center out toward each side. Starting in the center with the Taco Method seems to be much more helpful in lining up a decal as opposed to starting at a corner or any one edge and hoping it winds up square when you get to the opposite edge.
Purity: Is it Pure?
I completely respect both sides of the never-ending debate of purity within the LEGO Community. Purity was and still is a large aspect of my personal building style. Considering myself more of a purist than anything, I couldn’t help but debate the purity of my decal process. On one hand, I am creating something from non-traditional materials in shapes that have never existed within the LEGO multiverse (System, Technic, Duplo, etc). On the other hand, LEGO utilizes decals and custom printing techniques all the time to further define detail to help create nearly every modern set, so it really is no different.
While the materials, process and scale may differ, I ultimately concluded that the question of purity may remain in a slightly ‘blay’ area. I am following a decal usage precedent that has been set time and time again by LEGO, so I don’t personally see anything ‘impure’ about using custom decals, especially since they share the same intention of helping elevate building abilities by creating otherwise unobtainable details.
To Stick or Not to Stick?
To conclude, I would like to note that there is always more than one way to skin a cat (do people even say that anymore? Sorry, cat lovers!) so I am sure there are many other methods of producing decals and stickers for LEGO MOCs. This is just my own way of skinning the decal cat that I have refined since I started making custom decals, which was about 500 decals ago.
It has always been and will always be a great joy of mine to share my creativity and love of LEGO with others, so thank you so much for reading, and I hope these tips will help you bring your amazing creations to life in ways you never thought possible!

Now that you’ve seen how to do it, are you eager to get into the arts-and-crafts process that is custom sticker creation? What would be your first project? Let us know in the comments below.
Do you want to help BrickNerd continue publishing articles like this one? Become a patron like Charlie Stephens, Marc & Liz Puleo, Paige Mueller, Rob Klingberg from Brickstuff, John & Joshua Hanlon from Beyond the Brick, and Megan Lum to show your support, get early access, exclusive swag and more.


