Hacking Studio: How To Get Better Renders Like Blender
/Today’s guest article comes from BrickNerd patron Wayne Tyler. We’ve featured Wayne’s work numerous times and always marvel at his technical prowess and stunning renders. Today he shares the secrets behind bending BrickLink Studio to his will.
Render Like Blender
A picture is worth a thousand words, so what is a digital render worth? It depends on the quality of the render! Before I’ve talked about the lighting options in Studio, but today we are going to talk about how to get that perfect shot of your digital MOC, but only if you are brave and want to explore how to hack the process.
My approach to using BrickLink Studio digital LEGO software is a little different than most folks. The final output for me is an interesting image, not necessarily an accurate rendering of a LEGO model or a list of parts and instructions to build a MOC in real life. With that in mind, this article will show you how to get more out of the Studio rendering process—to create images that usually could not be accomplished without exporting your MOC to a professional 3D graphics program like Blender.

Fair warning: this article will appeal to those folks who like to make and manipulate computer images and to those who like to look under the hood and explore what can happen by using the Command Line Interface (CLI). It’s not exactly for the people who make a virtual model or create instructions so they can order the parts through BrickLink to build it in real life, but hey, this is Nerdvember we are talking about so let’s go all-in. This article is for those people who really like CGI in the movies and want that kind of control and power at home.
If that isn’t you, this article begins with a tutorial on how to make renders in Studio and then you can scroll quickly to the bottom for some fun pictures of some cool renders previously thought impossible.
How to Render in BrickLink Studio
The sequence of screengrabs below shows what will be displayed when you use the default Studio rendering interface. You can scroll through each one, and the images will be referenced later in the article.


The developers of Studio make the process of creating images of digital LEGO builds and scenes as simple and easy as possible.

That’s great for most Studio users. But behind the scenes, more is going on than you may realize. For those who want more control over the final image, we will expose what the developers have hidden to give you more power and freedom to create a final image the way YOU want! Let’s draw back the curtain and see what's really going on.
Overview of the Rendering Process
First, let’s do a general overview of the Studio rendering pipeline. The renderer used by Studio is called Eyesight and is based on the Cycles photorealistic renderer that ships with the Blender 3D software. The code for the Cycles renderer is open-source and can be modified and compiled as a stand-alone program, which is what the Studio development team did in 2018.
However, in the years since then, the Cycles renderer has been updated and improved many times, but Eyesight hasn't changed since first being introduced (except once, to allow more current NVidia graphics cards to be used for GPU-based rendering).
When you start a render, the first thing Studio does is create and save a .dae file that contains all the information Eyesight needs to render an image. DAE stands for Digital Asset Exchange, a file format based on the COLLADA XML standard used for 3D information transfer between a wide variety of graphics software. The exporting dialog shown in Image #2 displays the progress of creating the .dae file. On a PC the resulting file gets written to the directory:
C:\ProgramData\Studio\After creating the .dae file, Studio invokes the Eyesight renderer using parameters you have set in the render dialog window. These parameters include things like the following:
The size of the output
How many samples will be used when rendering
Will there be a colored background
How the scene will be lit
What type of image file will be created
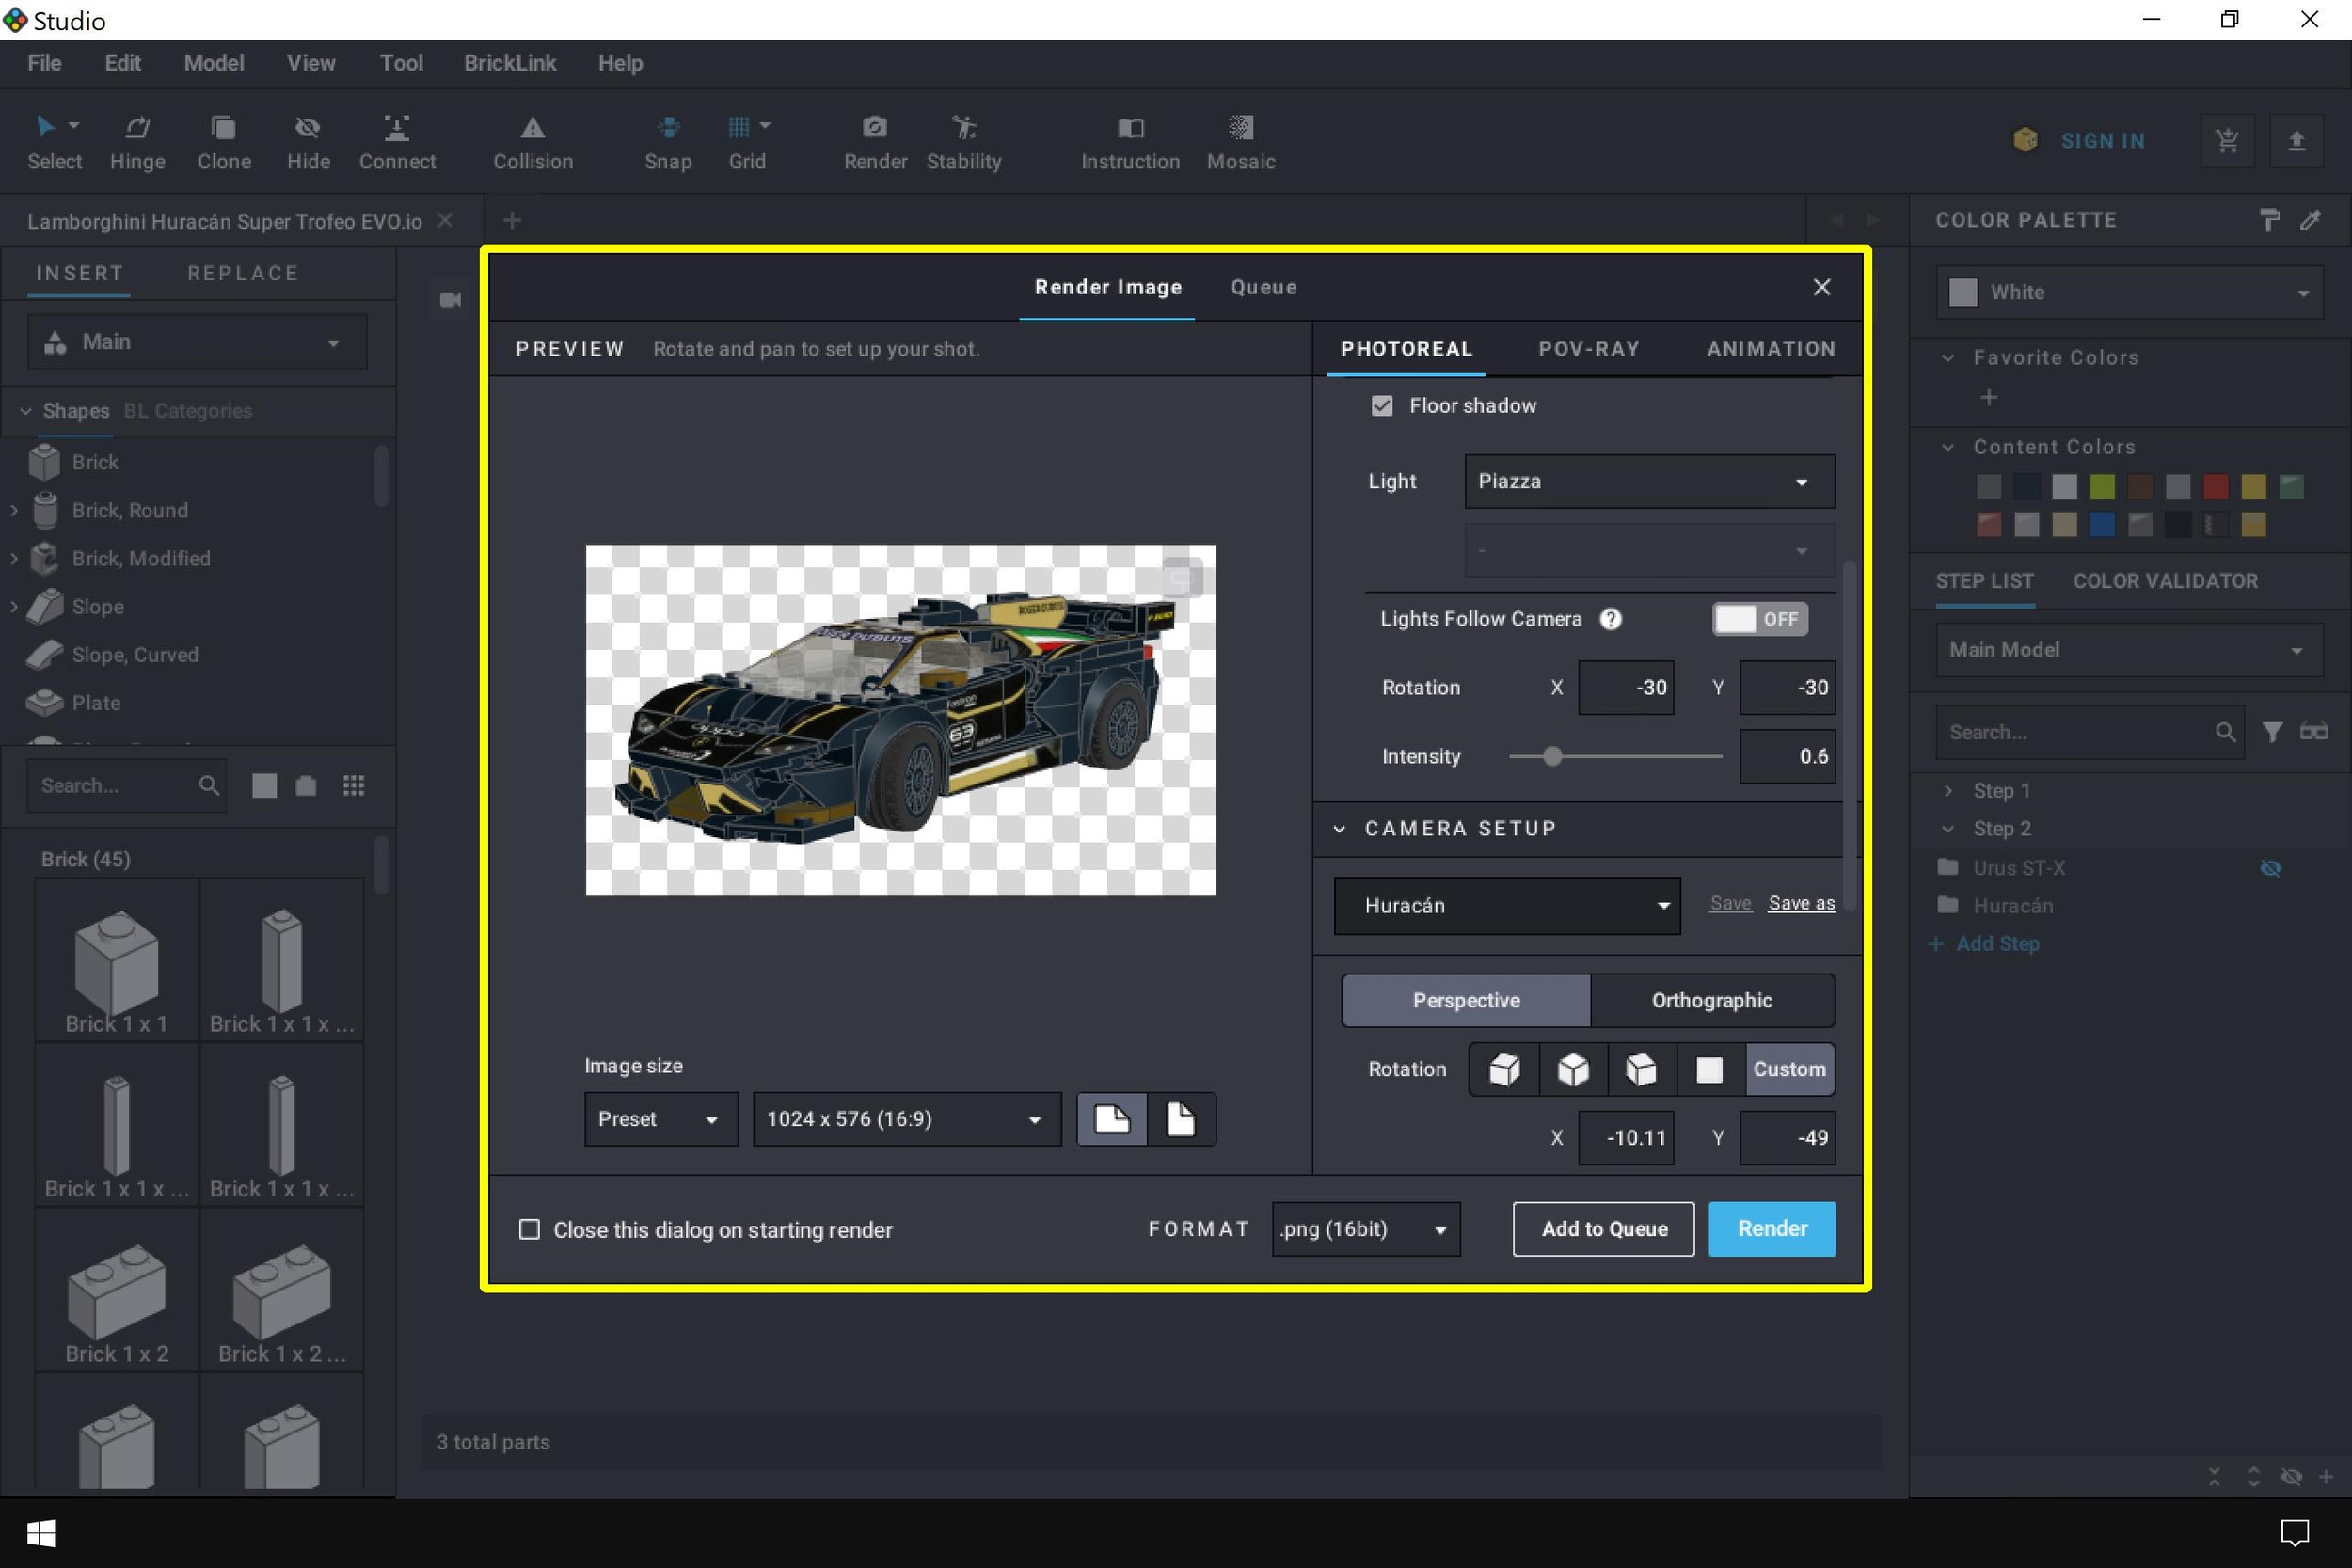
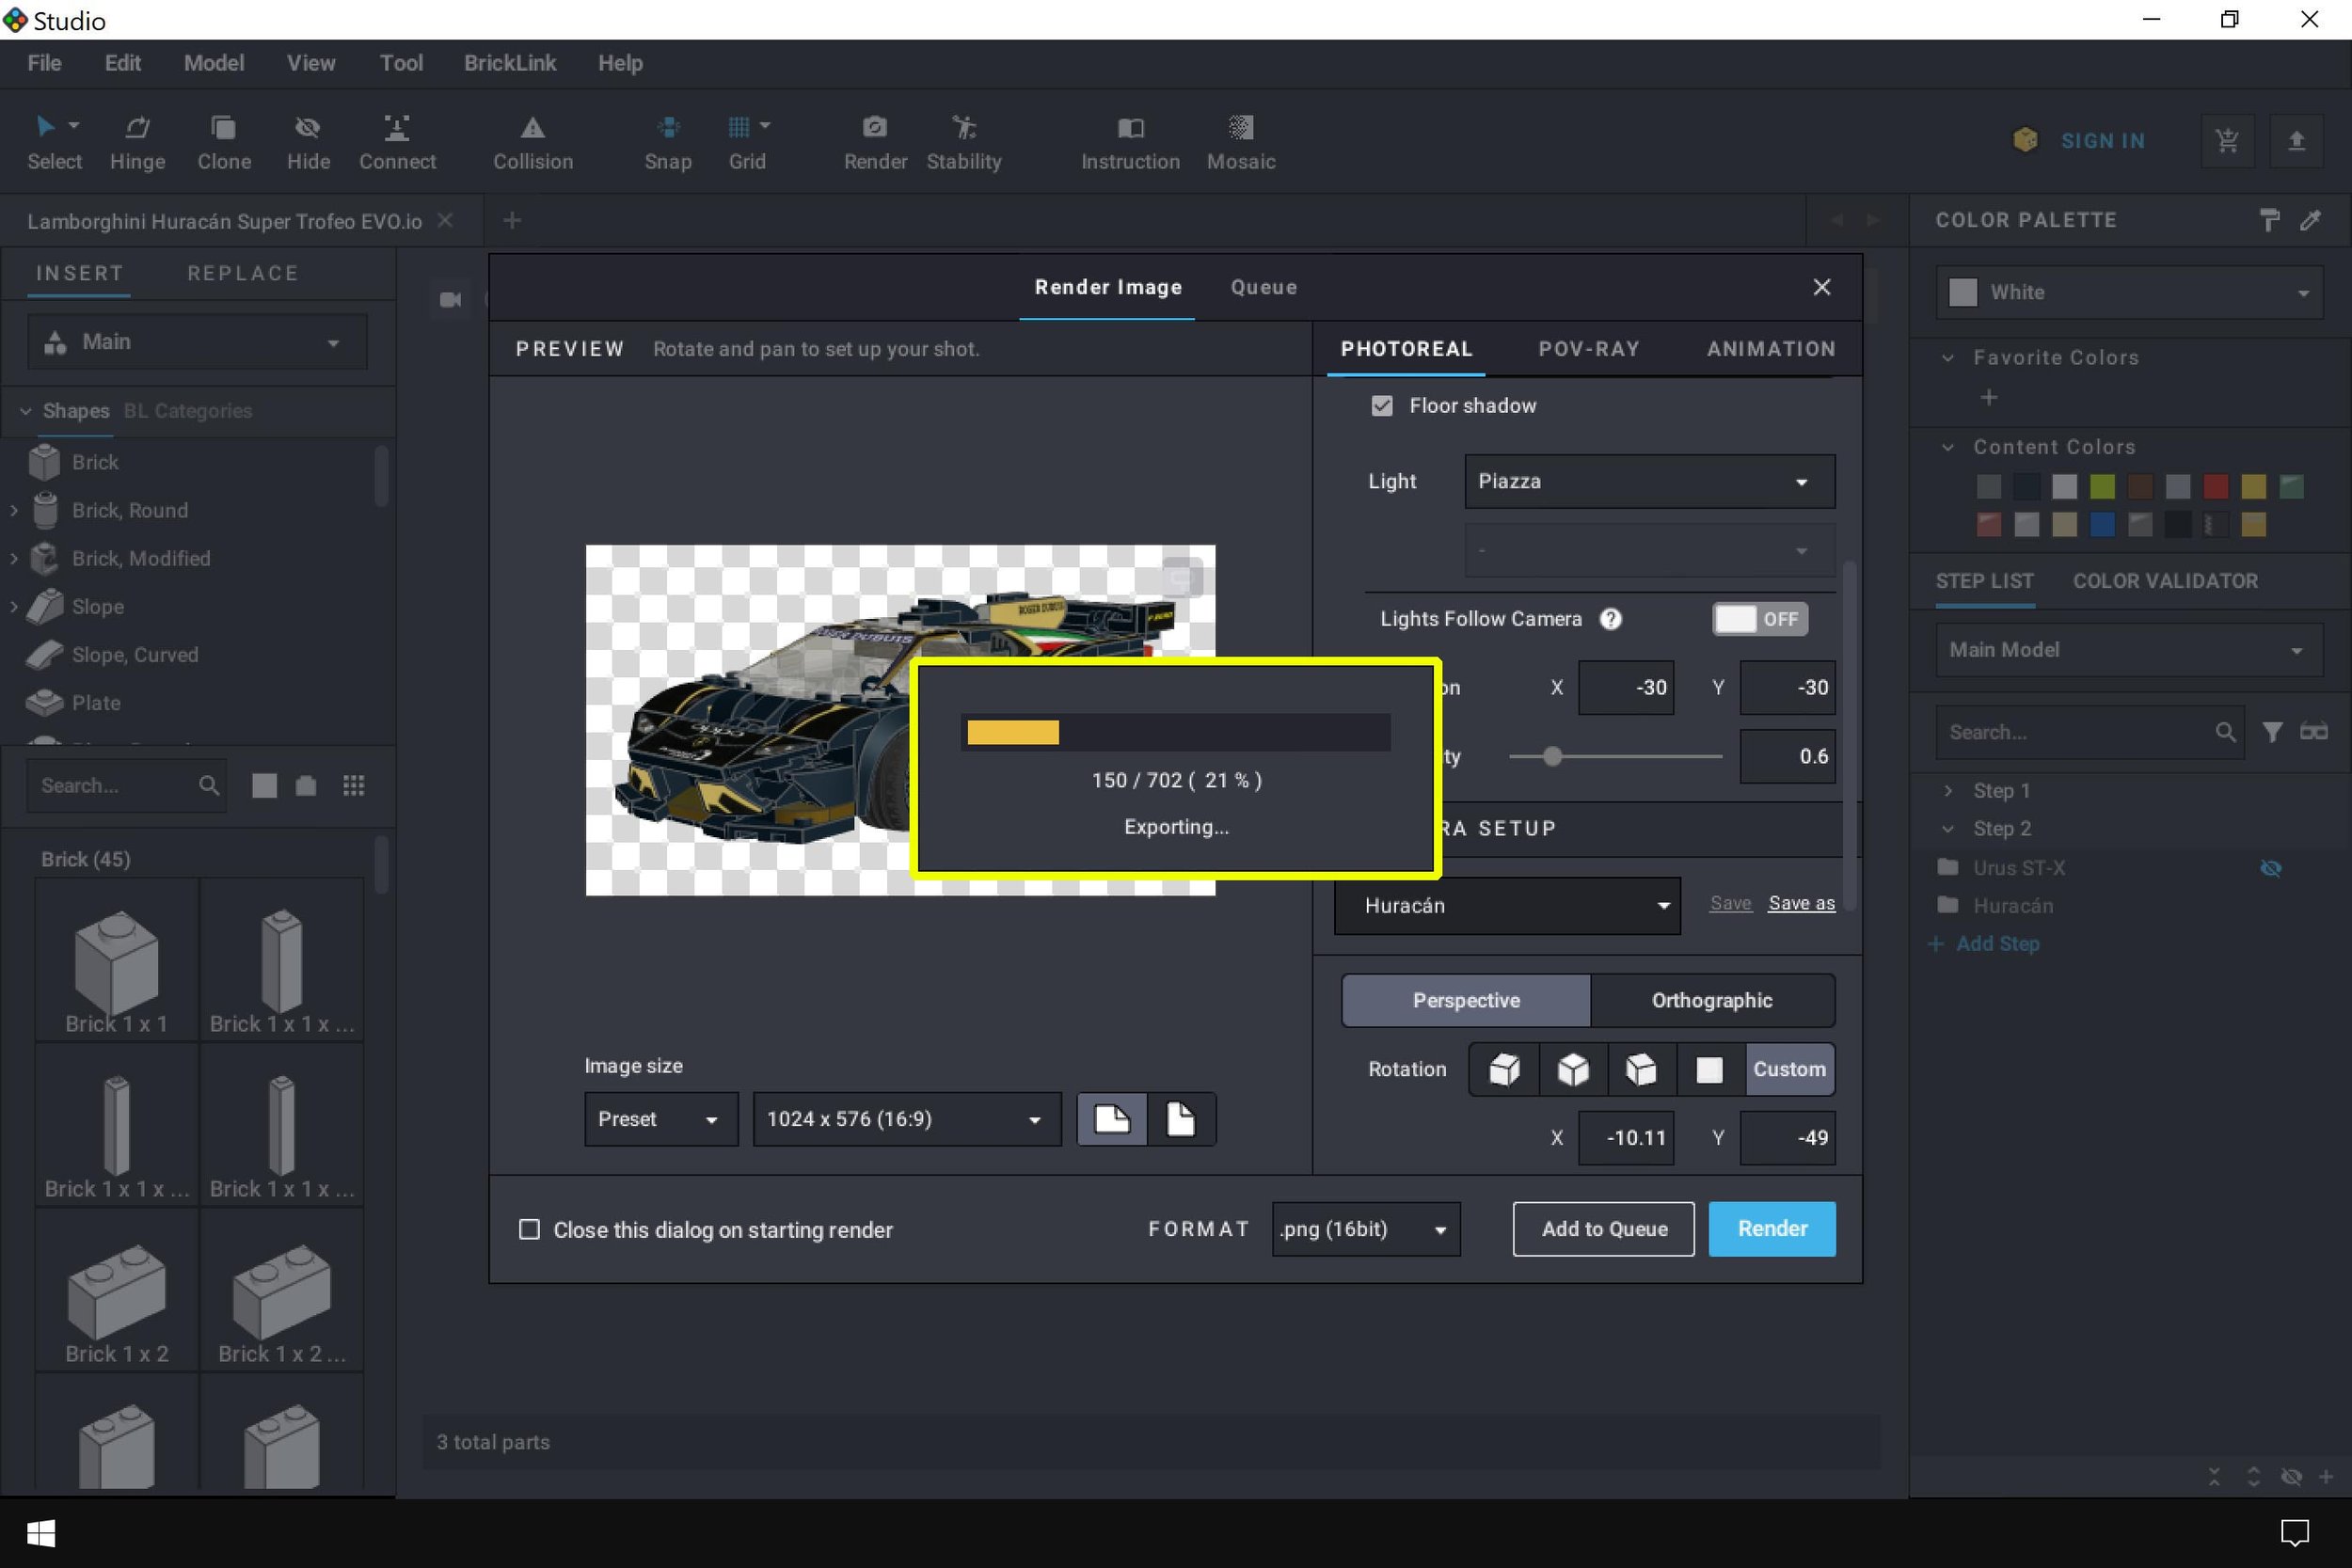
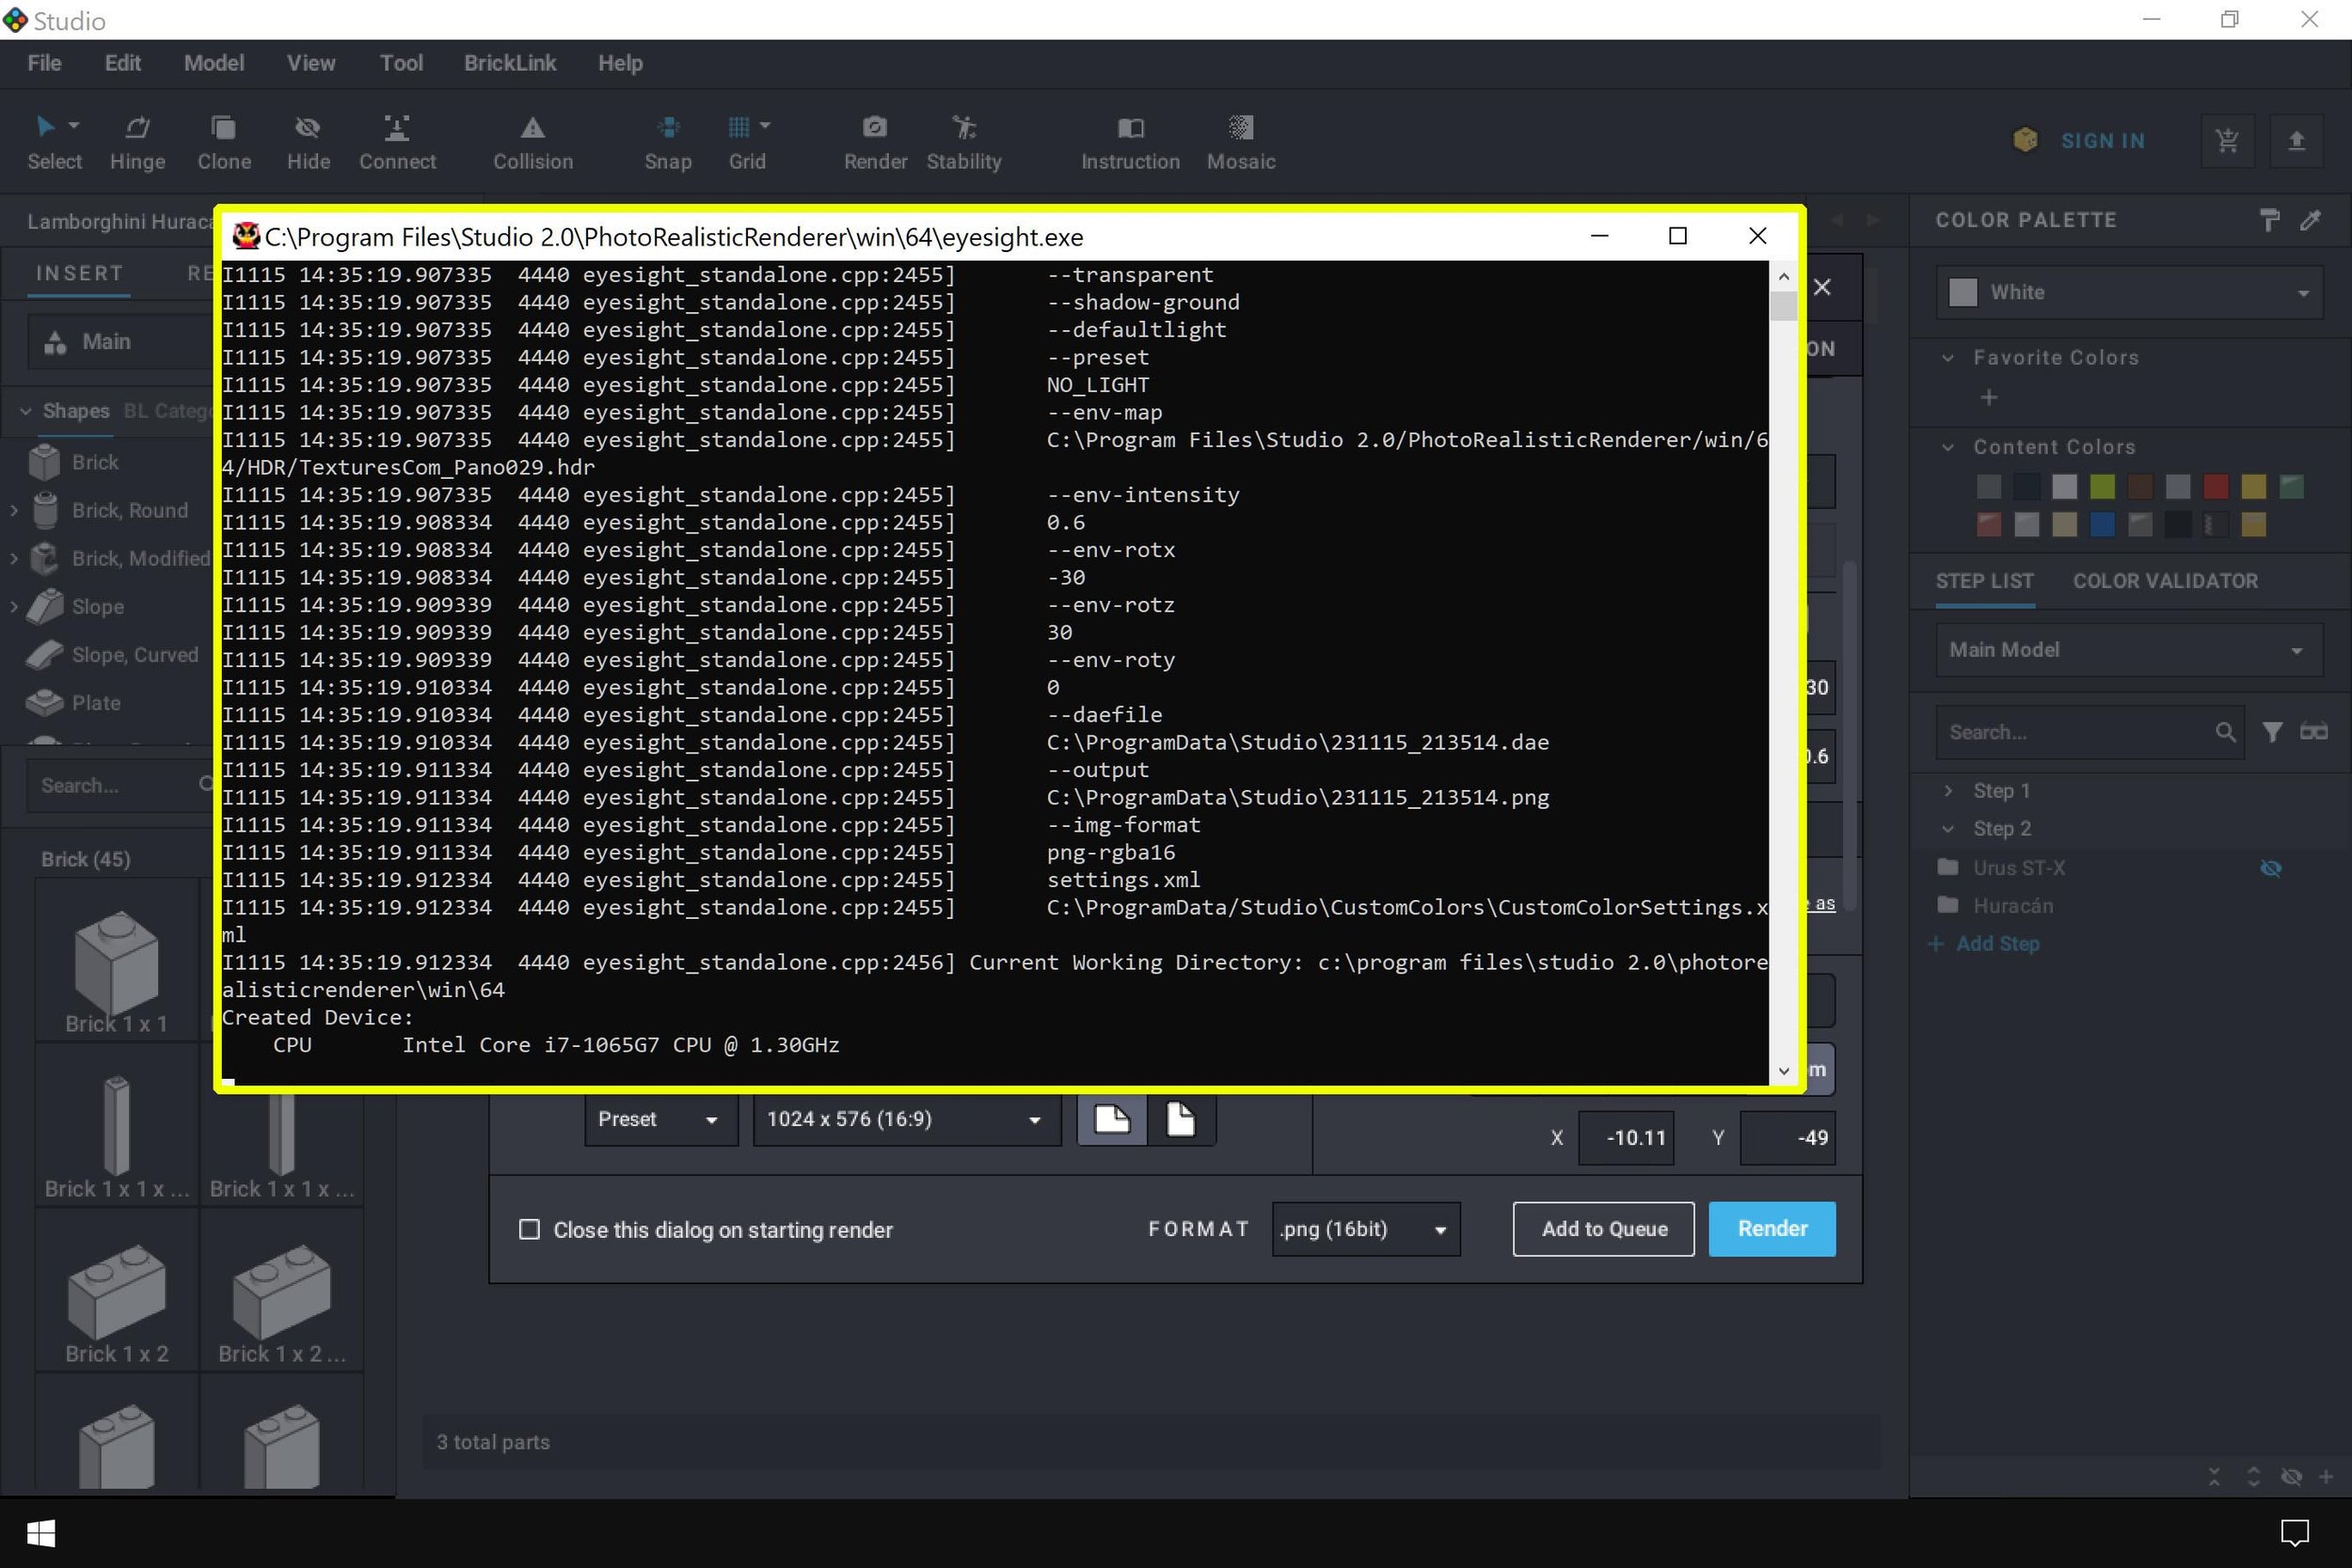
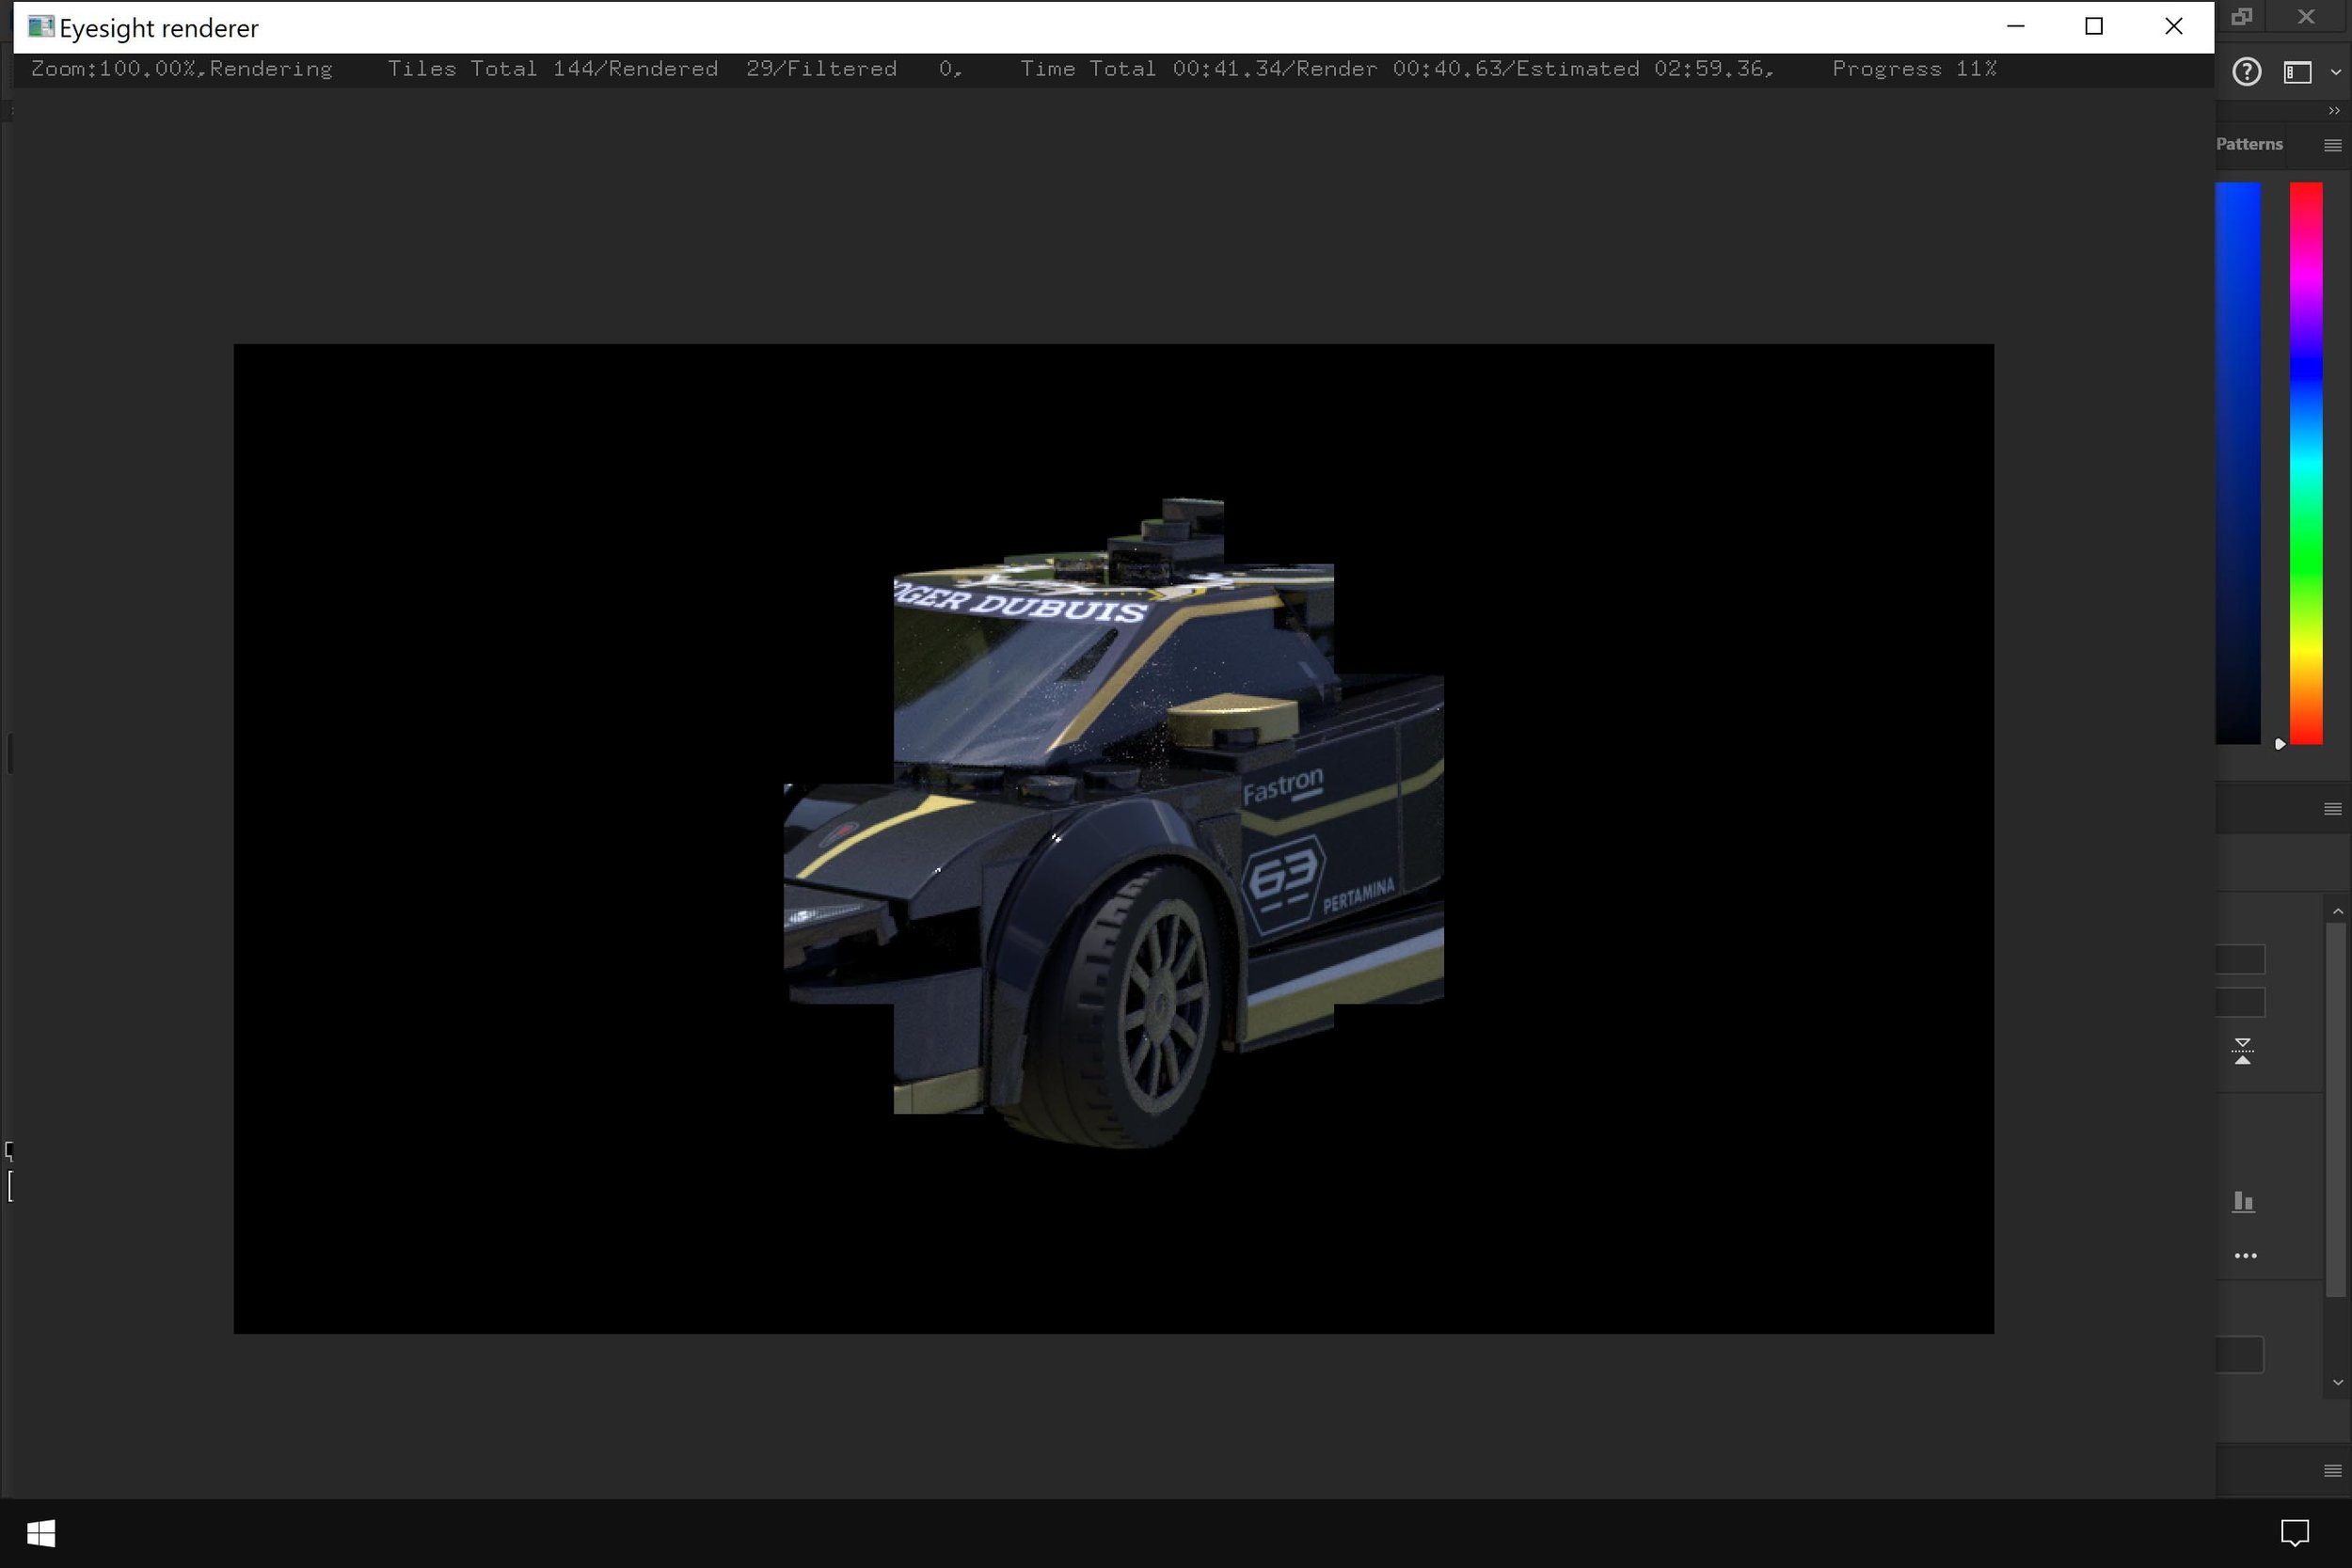
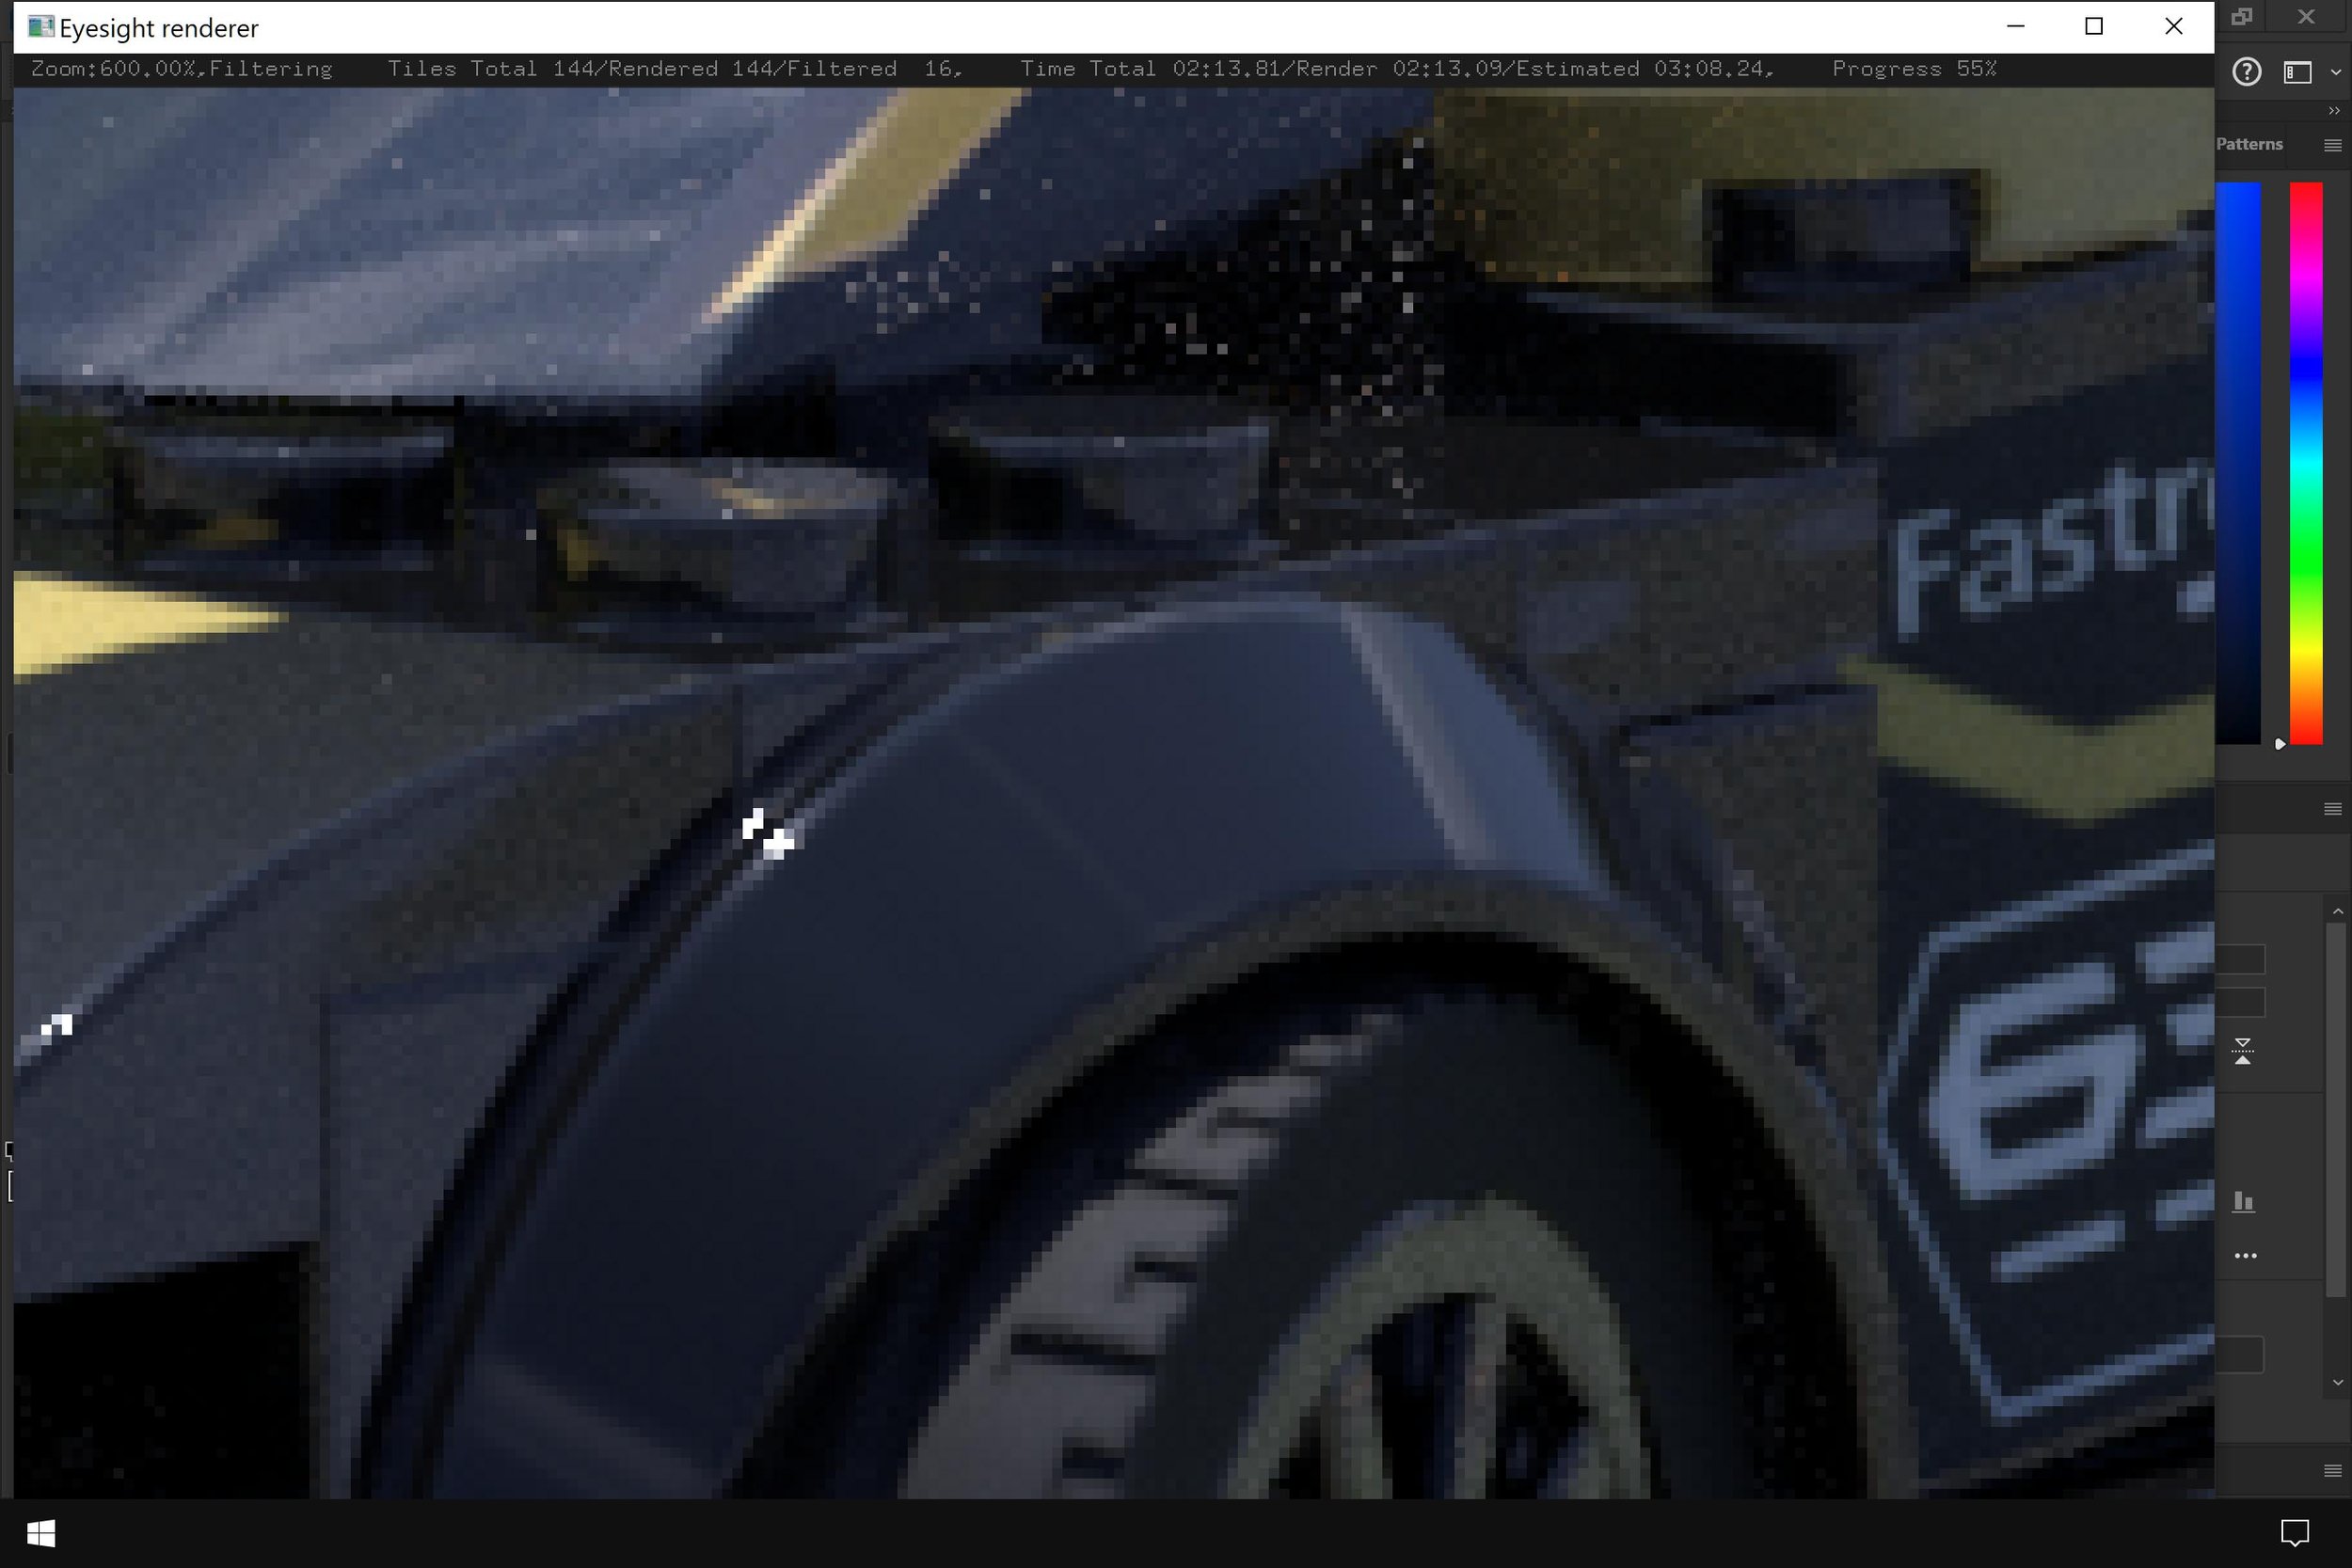
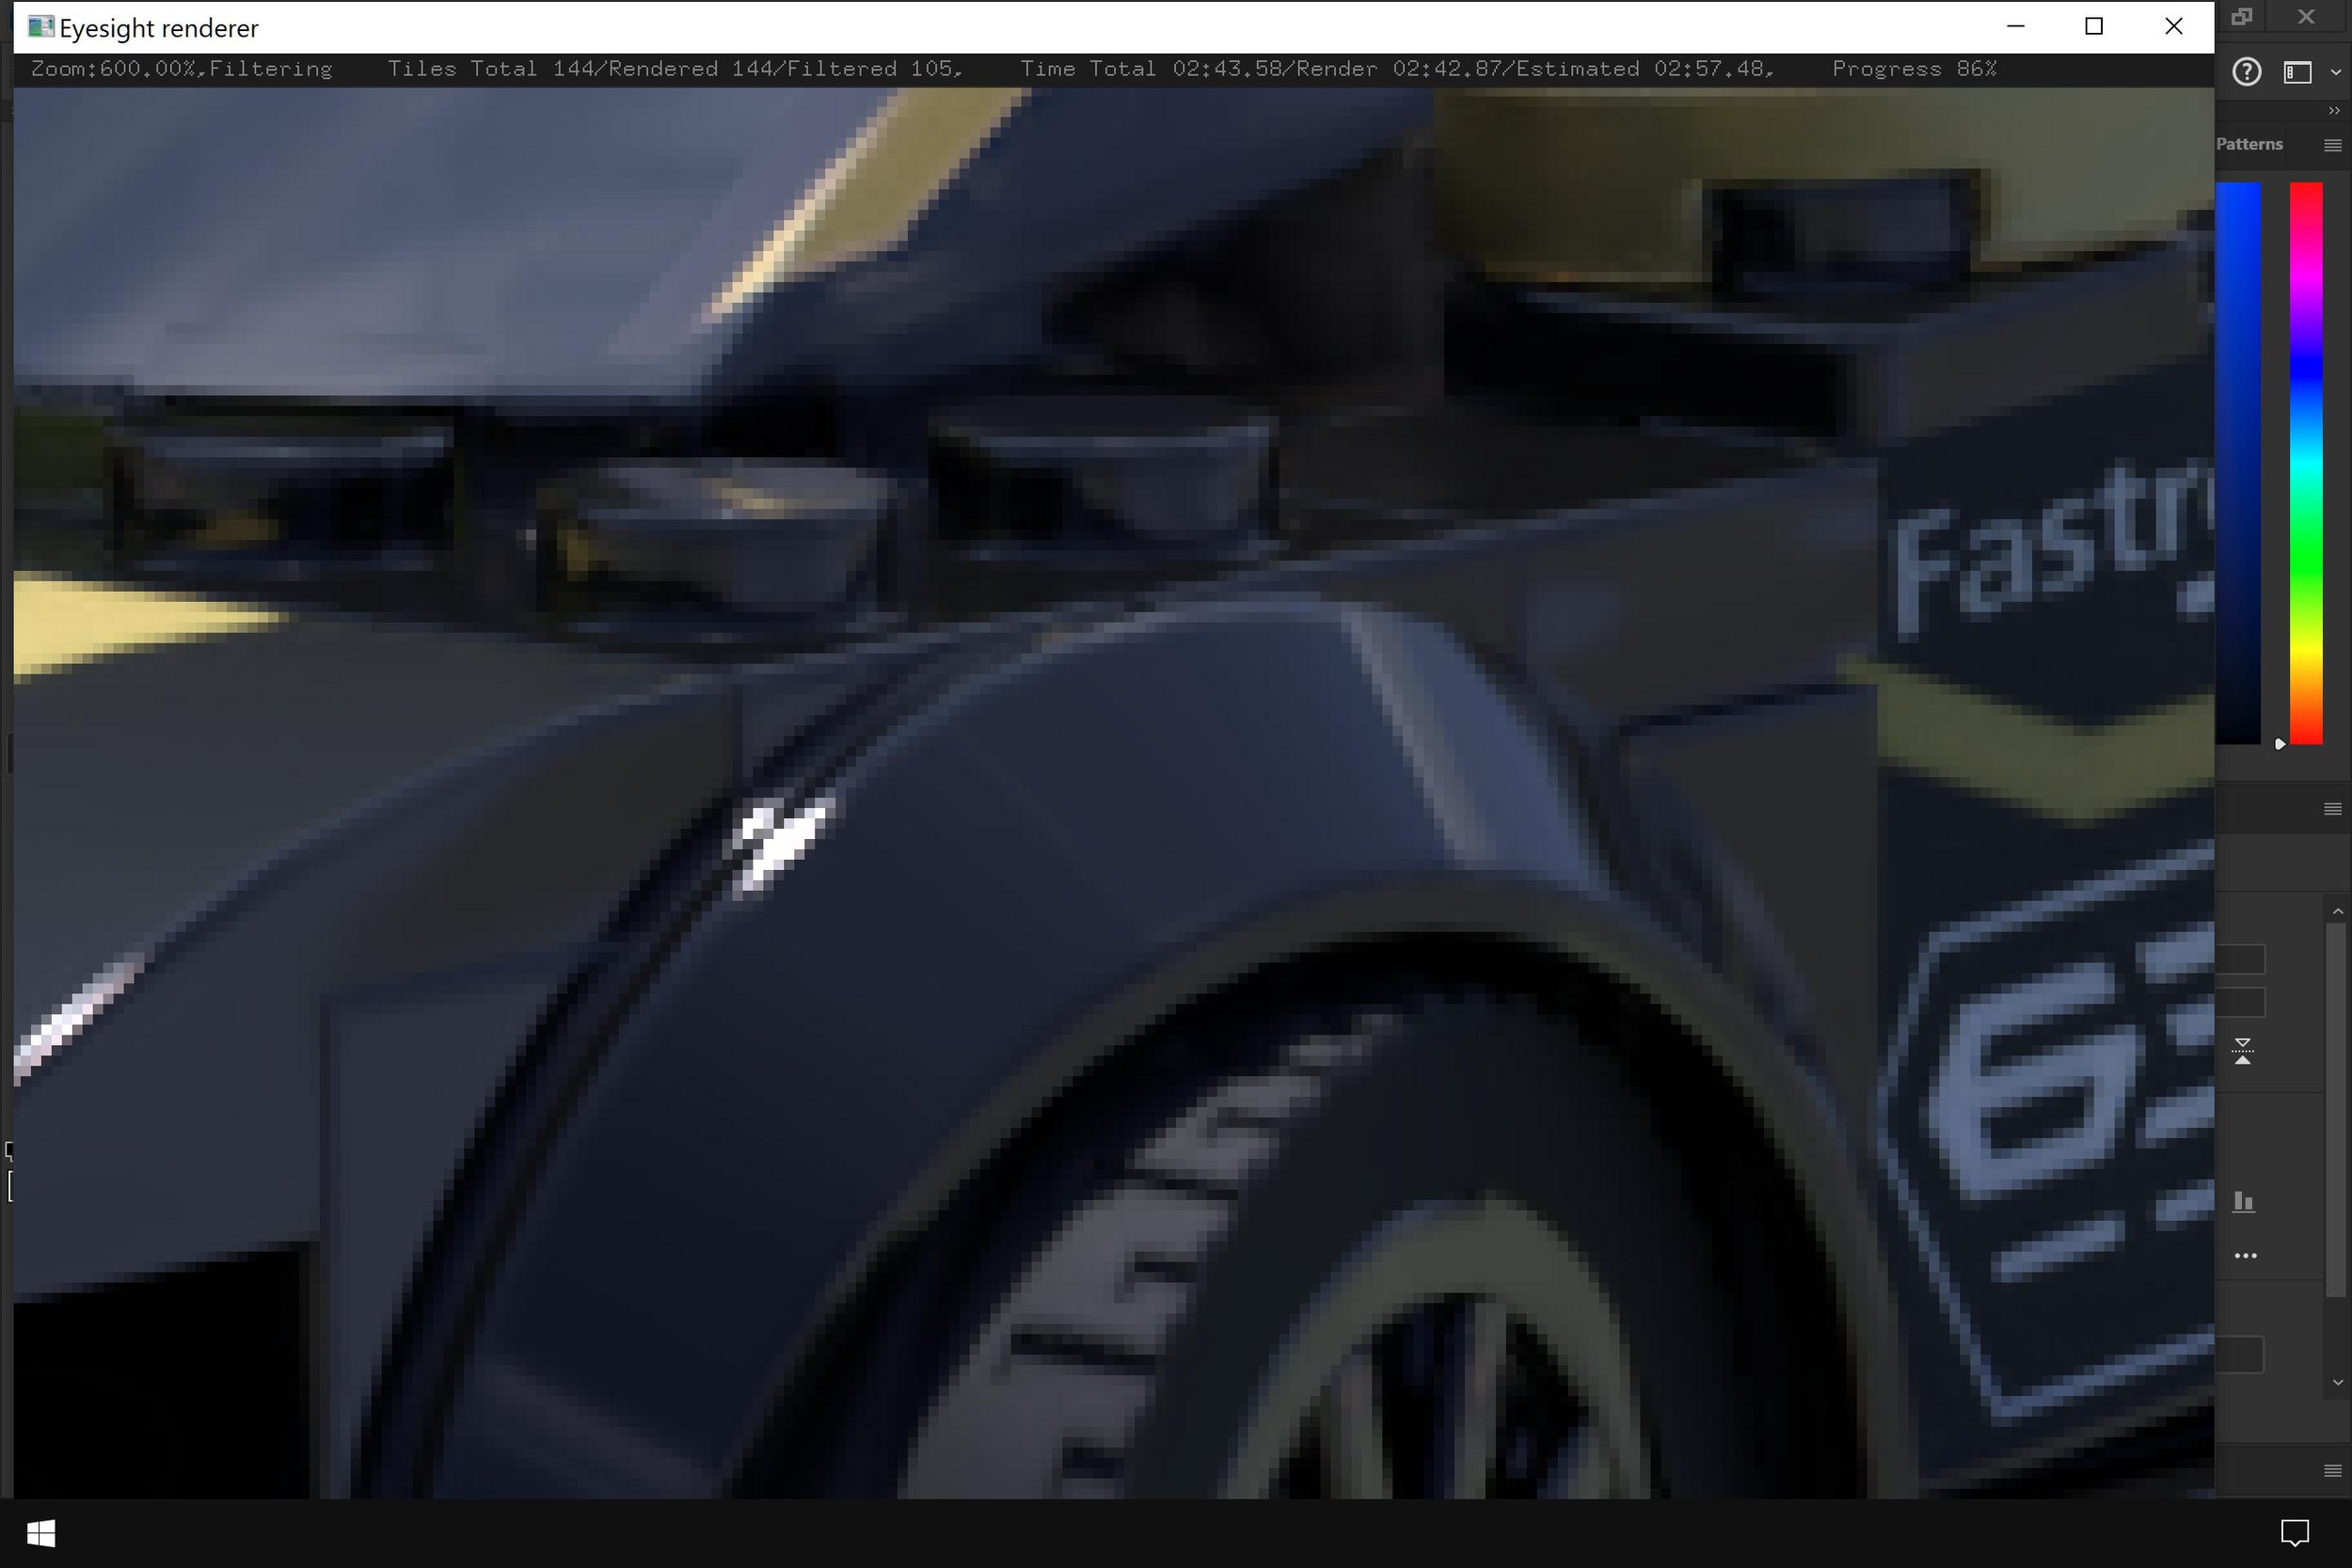
Image #3 shows the parameters being used by Eyesight in the render text window. Next, a render display window pops up where you can watch Eyesight render your scene, as seen in Images #5 and #6. After the scene is rendered, Eyesight then runs a denoising filter over the entire image to smooth out the side effects created during rendering, illustrated in Images #7 and #8. When finished, Eyesight then saves the rendered image using the file format you selected in the file folder you specified, as shown in the final Image #9.
A Menu Of Options
All that is great, but try this. Open a command line window. (Yes, you are going to feel like you are in a tech movie hacking away but this is pretty standard.) If you have Studio installed and if you are on a PC, hold the Windows button on the keyboard and tap the letter R. Type cmd in the text box and hit the Enter key. Then go to the directory where eyesight.exe resides by entering the following and hitting Enter:
cd C:\Program Files\Studio 2.0\PhotoRealisticRenderer\win\64\Now type eyesight in the command line window and hit Enter. You will first see this window:

Followed by something like this window:

Look familiar? It’s the same render display window you see when starting a render from within Studio, only this time Eyesight doesn’t have any data to render so it’s rendering...nothing. The program is just open and waiting for instructions.
Now, close the render display window, go back to the command line window and type:
eyesight -menuNOTE: the syntax is as follows: eyesight[space][dash]menu
Surprise! The render display window now reveals a hidden menu bar at the top. This will be very useful a little later.

Hidden Help of Eyesight
That wasn’t so scary, now was it? Next, we’re going to see everything that Eyesight can really do. Close the render display window, go back to the command line window and type:
eyesight -helpNote: the syntax is as follows: eyesight[space][dash]help
A long list of Eyesight parameters will be shown in the command line window. Welcome to the power of the CLI! This is the entire list of parameters that Eyesight can potentially use when rendering.
C:\Program Files\Studio 2.0\PhotoRealisticRenderer\win\64>eyesight -help
Usage: eyesight [options] [settings.xml] [inc_settings.xml] ...
    --param  %d %s           Shader parameter
    --device %s              Devices to use: CPU
    --device-count %d        # of devices in a multidevice mode
    --device-index %d        index of device to be used
    --daefile  %s            Collada .dae file path
    --daewindingorder %s     Collada vertex winding order ( 'clockwise' / 'counterclockwise' )
    --dae-transx %f          Translate the following collada scene along x-axis (in centimeters.)
    --dae-transy %f          Translate the following collada scene along y-axis (in centimeters.)
    --dae-transz %f          Translate the following collada scene along z-axis (in centimeters.)
    --dae-rotx %f            Rotate the following collada scene about x-axis (in degrees.)
    --dae-roty %f            Rotate the following collada scene about y-axis (in degrees.)
    --dae-rotz %f            Rotate the following collada scene about z-axis (in degrees.)
    --dae-scale %f           Scale the following collada scene.
    --dae-material-scale %f  Inform the material scale of the following collada scene.
				If omitted, --dae-scale is used instead.
    --dae-ao-scale %f        Inform the ambient occlusion distance scale of the following collada scene.
				If omitted, --dae-material-scale or --dae-scale is used instead.
    --dae-overlap-tolerant   Allow mesh triangles overlap in the following collada scene.
    --defaultlightcamera     Use default light/camera settings
    --defaultlight           Use default light settings
    --adddefaultlight        Add default light settings
    --preset %s              Active preset config used for rendering
    --defaultlight-rotx %f   Rotate default light settings about x-axis (in degrees, deprecated.)
    --defaultlight-roty %f   Rotate default light settings y-axis (in degrees, deprecated.)
    --defaultlight-rotz %f   Rotate default light settings z-axis (in degrees, deprecated.)
    --light-rotx %f          Rotate default light settings about x-axis (in degrees.)
    --light-roty %f          Rotate default light settings about y-axis (in degrees.)
    --light-rotz %f          Rotate default light settings about z-axis (in degrees.)
    --light-red %f           Modulate red channel of default light
    --light-green %f         Modulate green channel of default light
    --light-blue %f          Modulate blue channel of default light
    --light-intensity %f     Modulate intensity for default light
    --showlight              Make lights visible
    --defaultcamera          Use default camera settings
    --camera %s              Active camera used for rendering
    --viewall                View all objects in the scene
    --viewasis               Use the camera settings as is
    --postprocess %s         Active postprocess effect
    --ground                 Place a ground plane under the scene
    --shadow-ground          Place an invisible plane under the scene as a shadow catcher
    --ground-red %f          Ground color (red)
    --ground-green %f        Ground color (green)
    --ground-blue %f         Ground color (blue)
    --ground-intensity %f    Ground color intensity
    --ground-height %f       Ground height (in centimeters.)
    --ground-elevation %f    Ground elevation (in centimeters.)
    --ground-material %s     Ground material name
    --env-map %s             Environment texture
    --env-red %f             EnvirfEnvEffectonment color (red)
    --env-green %f           Environment color (green)
    --env-blue %f            Environment color (blue)
    --env-intensity %f       Environment color intensity
    --env-projection %s      Environment projection ( equirectangular / mirrorball / lightprobe )
    --env-rotx %f            Environment rotation about x-axis (in degrees.)
    --env-roty %f            Environment rotation about y-axis (in degrees.)
    --env-rotz %f            Environment rotation about z-axis (in degrees.)
    --env-effect %f          Lighting effect of environment
    --transparent            Make the scene background transparent
    --alpha-adjust           Adjust the alpha channel to mix with background better
    --background             Render in background, without user interface
    --progress               Dump progress info at separate lines
    --menu                   Use a basic menu-based UI
    --quiet                  In background mode, don't print progress messages
    --autoexit               Exit the application after finishing rendering & saving
    --samples %d             Number of samples to render
    --output %s              File path to write out the rendered result
    --threads %d             CPU Rendering Threads. 0:utilizing all threads, -#:utilizing all threads minus #
    --width  %d              Window width in pixels
    --height %d              m_vecDaeFilepathWindow height in pixels
    --list-devices           List information about all available devices
    --animation              Animation
    --cyclic                 Cyclic Animation
    --anim-format %s         Force animation file format
    --img-format %s          Force image file format
    --fps %d                 Animation frames per sec
    --fps-base %f            Animation frames per sec base
    --time-start %f          Animation start time in sec
    --time-end %f            Animation end time in sec
    --frame-start %d         Start frame
    --frame-end %d           End frame
    --frame-current %d       Current frame
    --frame-sub %f           Subframe (0.0~1.0)
    --logpath %s             Log file path
    --debug                  Enable debug logging
    --verbose %d             Set verbosity of the logger
    --hide                   Hide console
    --help                   Print help message
    --version                Print version number
    --benchmark              Minimize non-simulation overhead for precise benchmark test
    --random-seed %d         Seed the random generator with the given number
    --device-occupation %d   Device occupation level ( 0:interactive <-> 8:performance)
    --tmp-dir %s             Temporary directory
    --spotname %s            A spot name to use
What can you do with all this? Studio helps us out there. Look back at Image #3. You will see the text displayed in the render text window shows some of the parameters found in the list above. You just need to copy the information in the render text window, do a little editing, and create a batch file that will do the same thing as hitting the render button in Studio’s render dialog window.
Catching It In The Act
Great! But how do you do that? First, I set the Image size in Studio’s render dialog window to something very large and start a render. This gives me enough time to get the information needed. As previously discussed, when a render is started from the render dialog window, two new windows are created. The render text window shows information about the render and the render display window shows the rendering in progress.
Open up a text editor. On a PC, you can use Notepad. [Notepad is found at C:\Windows\notepad.exe)]
Go to the render text window and select all the text (Ctrl-A). [You can also go to C:\ProgramData\Studio\log and open up an existing log file in a text editor.]
Copy it (Ctrl-C)
Paste it into the empty text editor (Ctrl-V)
It will look something like this (you can scroll horizontally to see all the code):
I1115 20:47:33.905612  5368 eyesight_standalone.cpp:2451] START LOGGING TO c:\programdata\studio\log\log_231116_034727.dae_
I1115 20:47:33.906638  5368 eyesight_standalone.cpp:2453] Commandline Parameters
I1115 20:47:33.907140  5368 eyesight_standalone.cpp:2455]       C:\Program Files\Studio 2.0\PhotoRealisticRenderer\win\64\eyesight.exe
I1115 20:47:33.907626  5368 eyesight_standalone.cpp:2455]       --daewindingorder
I1115 20:47:33.908095  5368 eyesight_standalone.cpp:2455]       clockwise
I1115 20:47:33.908095  5368 eyesight_standalone.cpp:2455]       --autoexit
I1115 20:47:33.908095  5368 eyesight_standalone.cpp:2455]       --device-occupation
I1115 20:47:33.908095  5368 eyesight_standalone.cpp:2455]       5
I1115 20:47:33.908095  5368 eyesight_standalone.cpp:2455]       --dae-overlap-tolerant
.
. [multiple lines not included here]
.
background : false
tile size : 64 64
Now delete all the text at the start of each line and the extraneous text at the end of the file so you get this:
C:\Program Files\Studio 2.0\PhotoRealisticRenderer\win\64\eyesight.exe
--daewindingorder
clockwise
--autoexit
--device-occupation
5
--dae-overlap-tolerant
.
. [multiple lines not included here]
.
C:\ProgramData/Studio\CustomColors\CustomColorSettings.xml
Then combine the various parameters with their values. NOTE: Notice that parameters start with a double dash (- -). The result should look like this:
"C:\Program Files\Studio 2.0\PhotoRealisticRenderer\win\64\eyesight.exe"
--daewindingorder clockwise
--autoexit
--device-occupation 5
--dae-overlap-tolerant
--device CPU
--logpath C:\ProgramData\Studio\log\log_231116_202855.dae_
--width 1024
--height 576
--samples 128
--shadow-ground
--param 0 "0.5035714 0.5035714 0.5035714"
--defaultlight
--preset BUILD_FL
--light-rotx 0
--light-rotz 0
--light-intensity 0.7
--daefile C:\ProgramData\Studio\231116_202855.dae
--output C:\ProgramData\Studio\231116_202855.png
--img-format png-rgba16
settings.xml
LEGO_StudioSet.xml
C:\ProgramData/Studio\CustomColors\CustomColorSettings.xml
This is the basis for a batch file that will render your scene as if you had started it from Studio’s render dialog window. Save the file to the C:\Program Files\Studio 2.0\PhotoRealisticRenderer\win\64\ directory and give it a .bat file extension instead of a .txt extension. I’ll name this one RenderIt.bat.
Translating to Plain English
Let's go through this batch file line-by-line.
"C:\Program Files\Studio 2.0\PhotoRealisticRenderer\win\64\eyesight.exe"This is the directory path to the Eyesight executable. I place it inside quotes because Windows batch files get confused when there are spaces in directory paths.
--daewindingorder clockwiseThis tells Eyesight about the data in the .dae file... specifically, how to determine what is the outside and what is the inside of the parts used in your Studio scene.
--autoexit
This tells Eyesight to close all windows that were created when the rendering started. NOTE: I replace this line with --menu (the syntax is: [double-dash]menu) because I want the windows to remain open after the render finishes, and I will be using selections from the menu bar.
--device-occupation 5
This tells Eyesight how much of the available CPU power to use when rendering. Values range from 1 to 5, with 5 using the maximum available CPU capacity. Studio defaults to a value of 5, so when your computer gets hot when rendering, it’s because Studio is driving your CPU as hard as it can go. This is something you can adjust using the CLI that you cannot set using the render dialog window in Studio.
--dae-overlap-tolerant
This reduces some rendering problems when the geometry of a part isn’t clean.
--device CPU
This tells Eyesight to use the CPU for calculating the image. I don't have a compatible GPU, so I do not know what the setting looks like for that.
--logpath C:\ProgramData\Studio\log\log_231116_202855.dae_This tells Eyesight where to write out information about the render.
--width 1024
--height 576
This gives the dimensions of the rendered image.
--samples 128
This gives the number of samples used when rendering the image. Studio’s render dialog window lists this under RENDER QUALITY as Medium, High, Very High and Custom. Medium is the same as 128 samples, High is 256 samples, and Very High is 512 samples.
--shadow-ground
This turns on the floor shadow for the render. It’s the same as checking the Floor Shadow box in the render dialog window.
--param 0 "0.5035714 0.5035714 0.5035714"This sets the background to a solid color. The last three numbers are the RGB (red, green and blue) values of the color in decimal form. The RGB numbers must be enclosed with quotes. There are many color converters online, just search for “RGB decimal color converter”.
--defaultlight
This says to use the default light settings.
--preset BUILD_FL
This is one of the built-in light setups. BUILD is the Building setup you would select in the render dialog window. The other setup is MECHANIC. The _FL indicates a Front Left orientation. You can also use _FR, _RL and _RR for Front Right, Rear Left, and Rear Right respectively.
--light-rotx 0.0
--light-rotz 0.0
This rotates the orientation of the light setup and is the same as the values entered in the rotation text fields in the render dialog window. NOTE: light-rotx is the X rotation; however, light-rotz is the Y rotation as seen in the render dialog window.
--env-intensity 0.7
This is the brightness of the lighting. It is the same as the intensity setting in the render dialog window.
--daefile C:\ProgramData\Studio\231116_202855.daeThis is the directory path to the .dae file that contains the 3D data output by Studio for the Eyesight renderer. I will discuss this in more detail later.
--img-format png-rgba16This specifies the file type for the output image. It is the same as selecting a file type from the FORMAT dropdown menu at the bottom of the render dialog window. NOTE: there are more file types that can be written out than appear in the dropdown menu. You can output JPGs, PNGs, TGAs, TIFs, GIFs and HDRs at various color depths and compressions... but that's a discussion for another Hacking Studio article.
--output C:\ProgramData\Studio\231116_202855.pngThis is where the image gets saved. When using the render dialog window, this file gets renamed and moved to where you specified in the Save File dialog box. However, using the CLI, this IS the final image.
settings.xml
LEGO_StudioSet.xml
C:\ProgramData\Studio\CustomColors\CustomColorSettings.xml
These are the directory paths to various files needed for information about colors, light rigs, camera settings and the like. You shouldn't make any changes to these unless you know what you are doing.
Since this IS a batch file, the parameters cannot be on separate lines, rather they must be separated by single spaces. So the final batch file looks like this:
"C:\Program Files\Studio 2.0\PhotoRealisticRenderer\win\64\eyesight.exe" --daewindingorder clockwise --menu --device-occupation 5 --dae-overlap-tolerant --device CPU --logpath C:\ProgramData\Studio\log\log_231116_202855.dae_ --width 1024 --height 576 --samples 128 --shadow-ground --param 0 "0.5035714 0.5035714 0.5035714" --defaultlight --preset BUILD_FL --light-rotx 0 --light-rotz 0 --light-intensity 0.7 --daefile C:\ProgramData\Studio\231116_202855.dae --output C:\ProgramData\Studio\231116_202855.png --img-format png-rgba16 settings.xml LEGO_StudioSet.xml C:\ProgramData/Studio\CustomColors\CustomColorSettings.xml
Getting Your Files In Order
Now that we’ve got a batch file to work with, we need to create a .dae file to render. Because of the way Studio sets up the data files and feeds them to the Eyesight renderer, there is one reliable way that I have found to do this.
As I mentioned earlier in the article, I set the dimensions of a render in the render dialog windows to be very large so I have time to grab the render parameters from text window that pops up. Also during this time, I make a copy of all the temporary files needed by Eyesight to render the image.
If you go to C:\ProgramData\Studio\ while the rendering is still going, you will find the .dae data file generated by Studio plus any textures that are used in your scene. It should look something like this:

Copy the .dae and all the .png files and paste them in a different directory. Why copy? When Eyesight finishes a render, Studio deletes all those temporary files (it cleans up after itself!). NOTE: Don’t cut and paste. If you cut the files, that will stop the render. And if the render stops, the files are deleted before you have a chance to finish.
Go back to Studio and cancel the render you started. You now have all the elements required to use the Eyesight CLI.
First, copy the .dae and .png files (if there were any) back in the C:\ProgramData\Studio\ directory.
Second, look at the name of the .dae file... it will be six digits with an underscore and another six digits
Last, edit the batch file so that the log, dae and the output file names match the .dae filename. In the example above the name is 231116_202855.
Double-click on the batch file. It will open up an Eyesight display window with the menu bar and begin to render the image. Keep in mind that if you make ANY changes to the Studio file, you will need to generate an updated .dae file.
I can hear you say, “Wow, that's a whole lot of work to create an image that can be produced by just selecting the Render button in Studio.” Yes, but by going through this process, you see what all is going on behind the scenes. And you are moments away from seeing power that is now available to you.
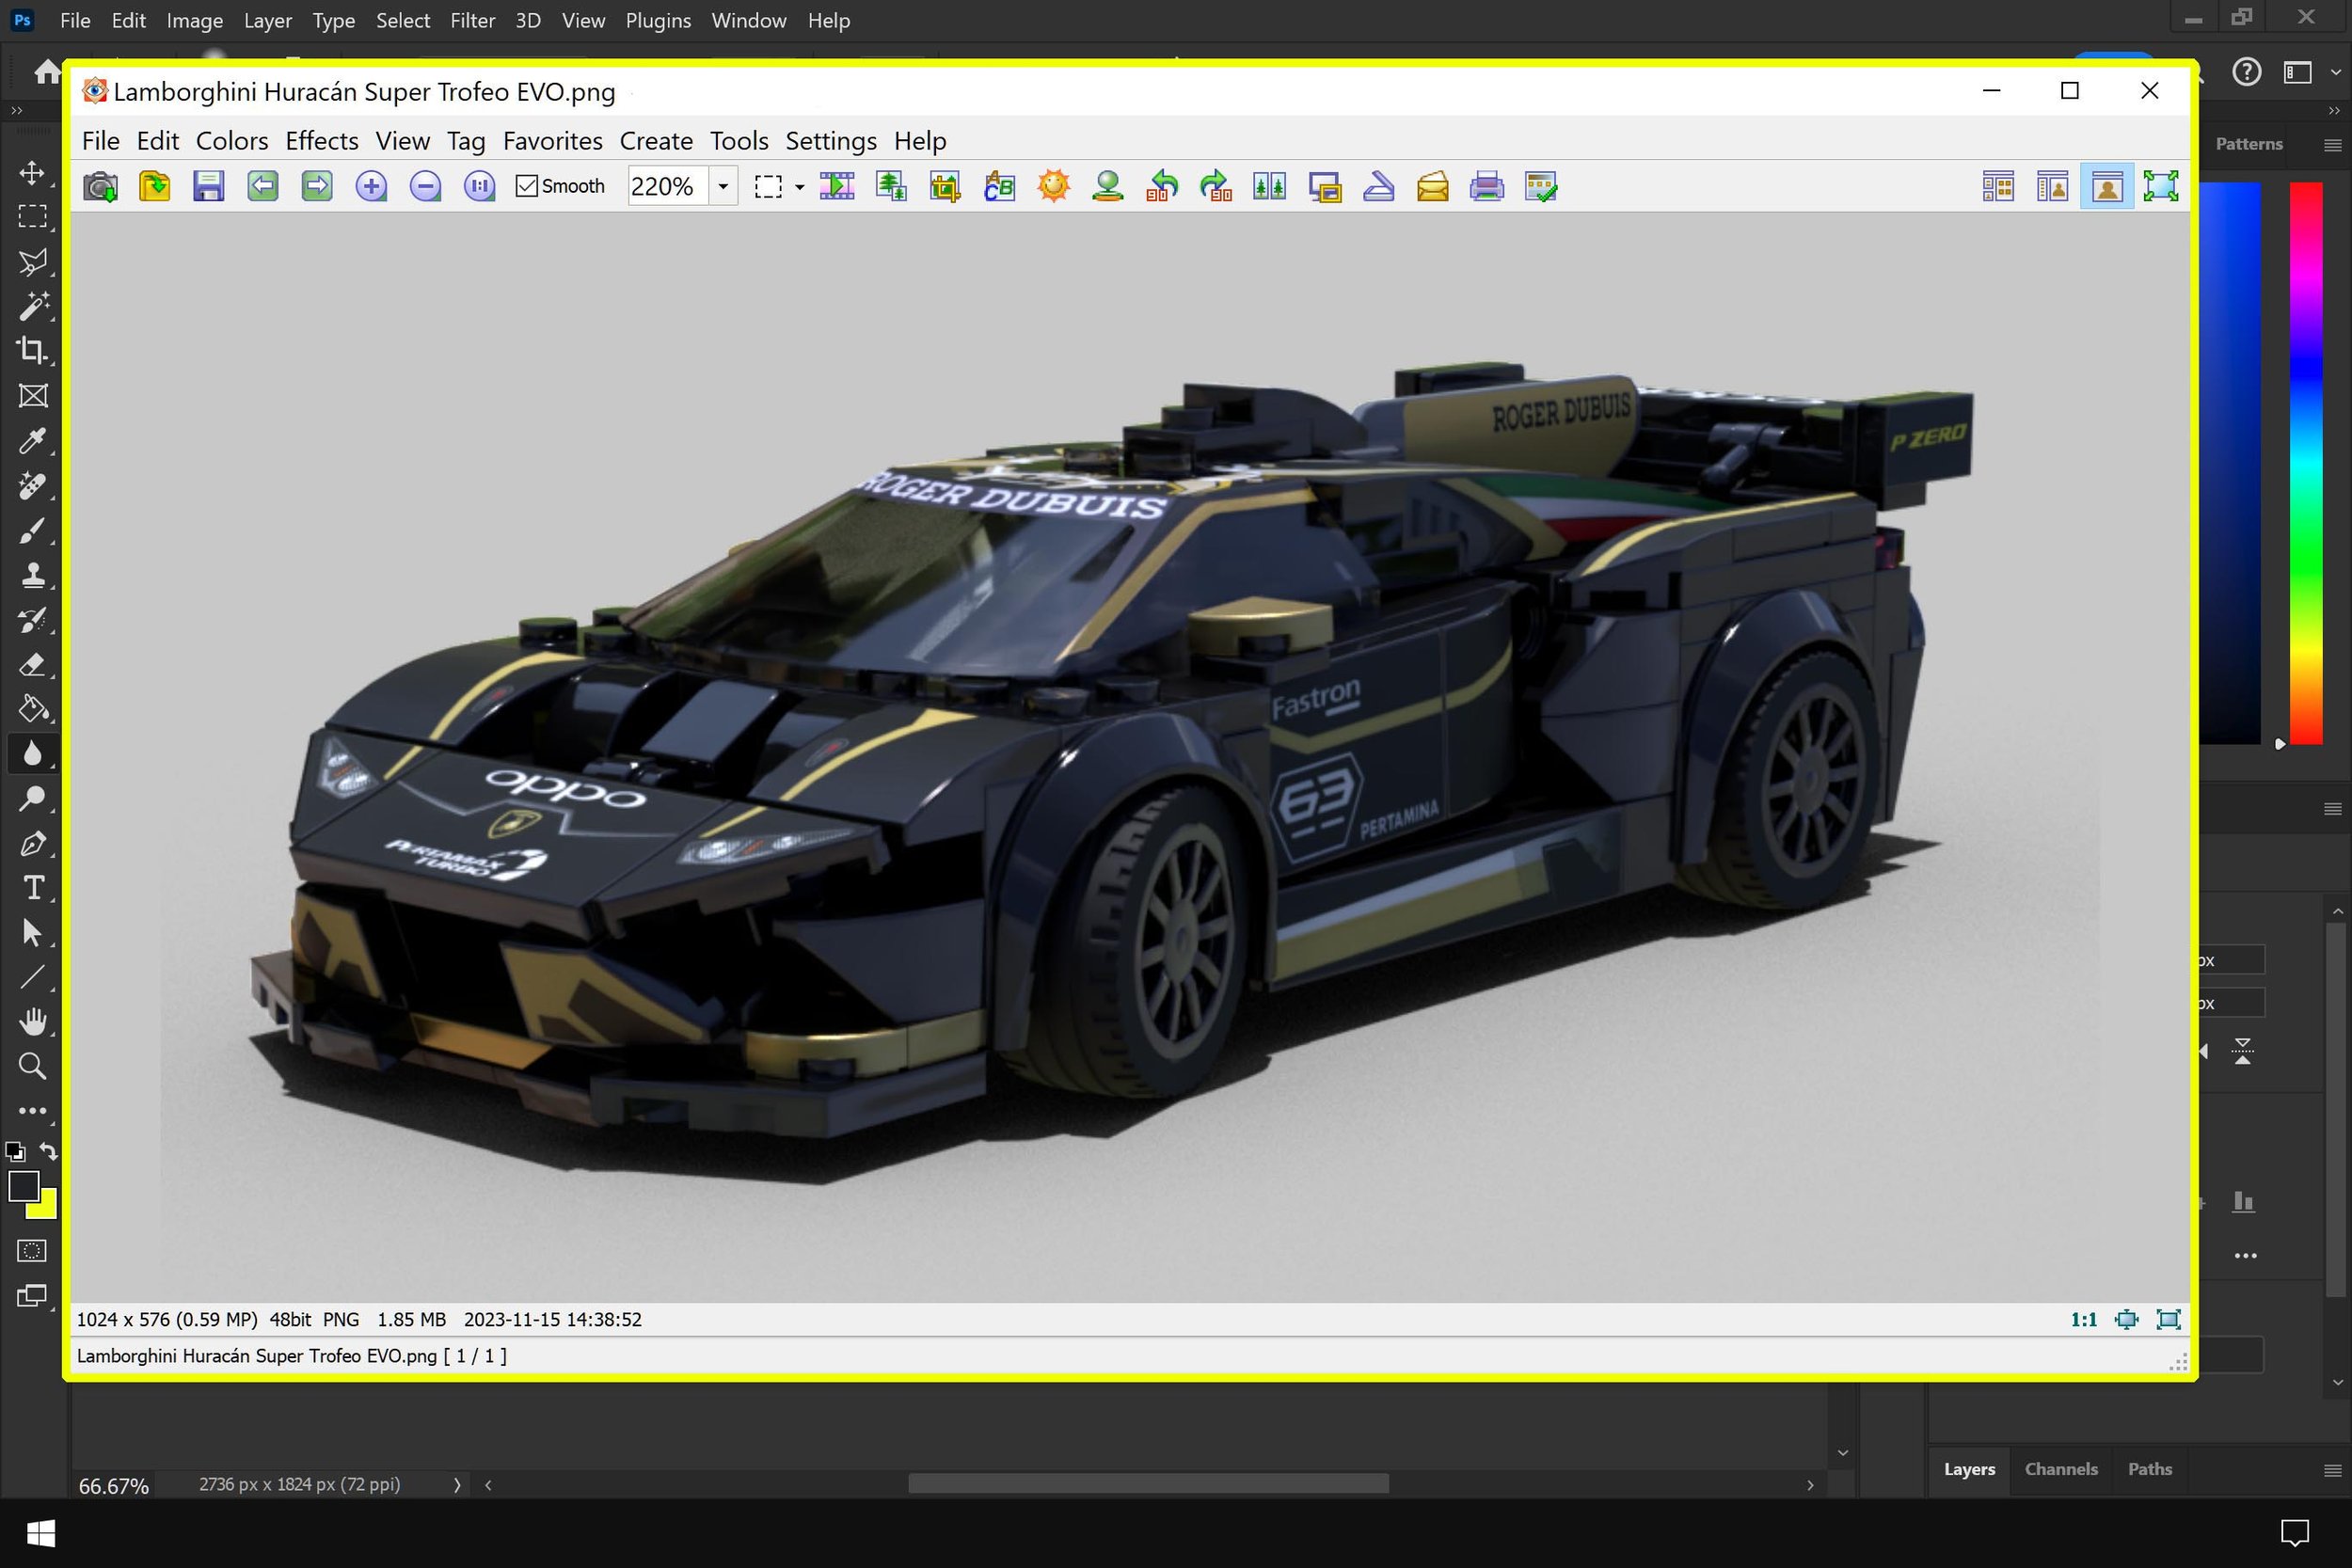
Here’s just a taste. This is an example of what you can create using the Eyesight CLI (and a little help from a photo editing app).

Pushing Buttons
Remember the Eyesight menu bar we discovered a the top of this article? Let’s closer look at the Eyesight CLI display window and that menu.

Here’s what you will find in the menu bar (from left to right):
File: You can save the layers through this tab.
View: You can adjust how the render is displayed in the Eyesight display window. You can also change which rendered layer is being displayed.
Window: You can activate or close a text output window. This is just like the render text window created by Studio when a render starts.
Help: If you select About from the dropdown menu, you get information about who developed Eyesight and when.
We are now going to discuss the View and Window functions in more detail.

In the View Menu, you can adjust how the render is displayed in the Eyesight display window. You can also change which rendered layer is being displayed.
The Window Menu is where you can activate or close a text output window. I have not discovered how to use the other options on this menu (yet).

The Layers on the View Menu id where things get really interesting. For context, the Cycles renderer in Blender calculates a variety of layers (like shininess or transparency or fog) when it creates an image. Within Blender, you can access those layers individually and combine them how you want.
Since Eyesight is based on Cycles, it calculates a variety of layers too. With some additional parameters added to the C:\Program Files\Studio 2.0\PhotoRealisticRenderer\win\64\settings.xml file used by the Eyesight renderer, you can also access those layers individually.

Here’s the Layers Menu with the added parameters included in the settings.xml file.
What happens when you only render using one of those layers? Take a look. These are what some of those individual layers look like, each representing a different aspect that can be combined.

True Selection
Let’s put all the layers together to create a final image. Time to go back to your text editor! (WARNING: Before you do anything else, make a backup of the settings.xml file!)
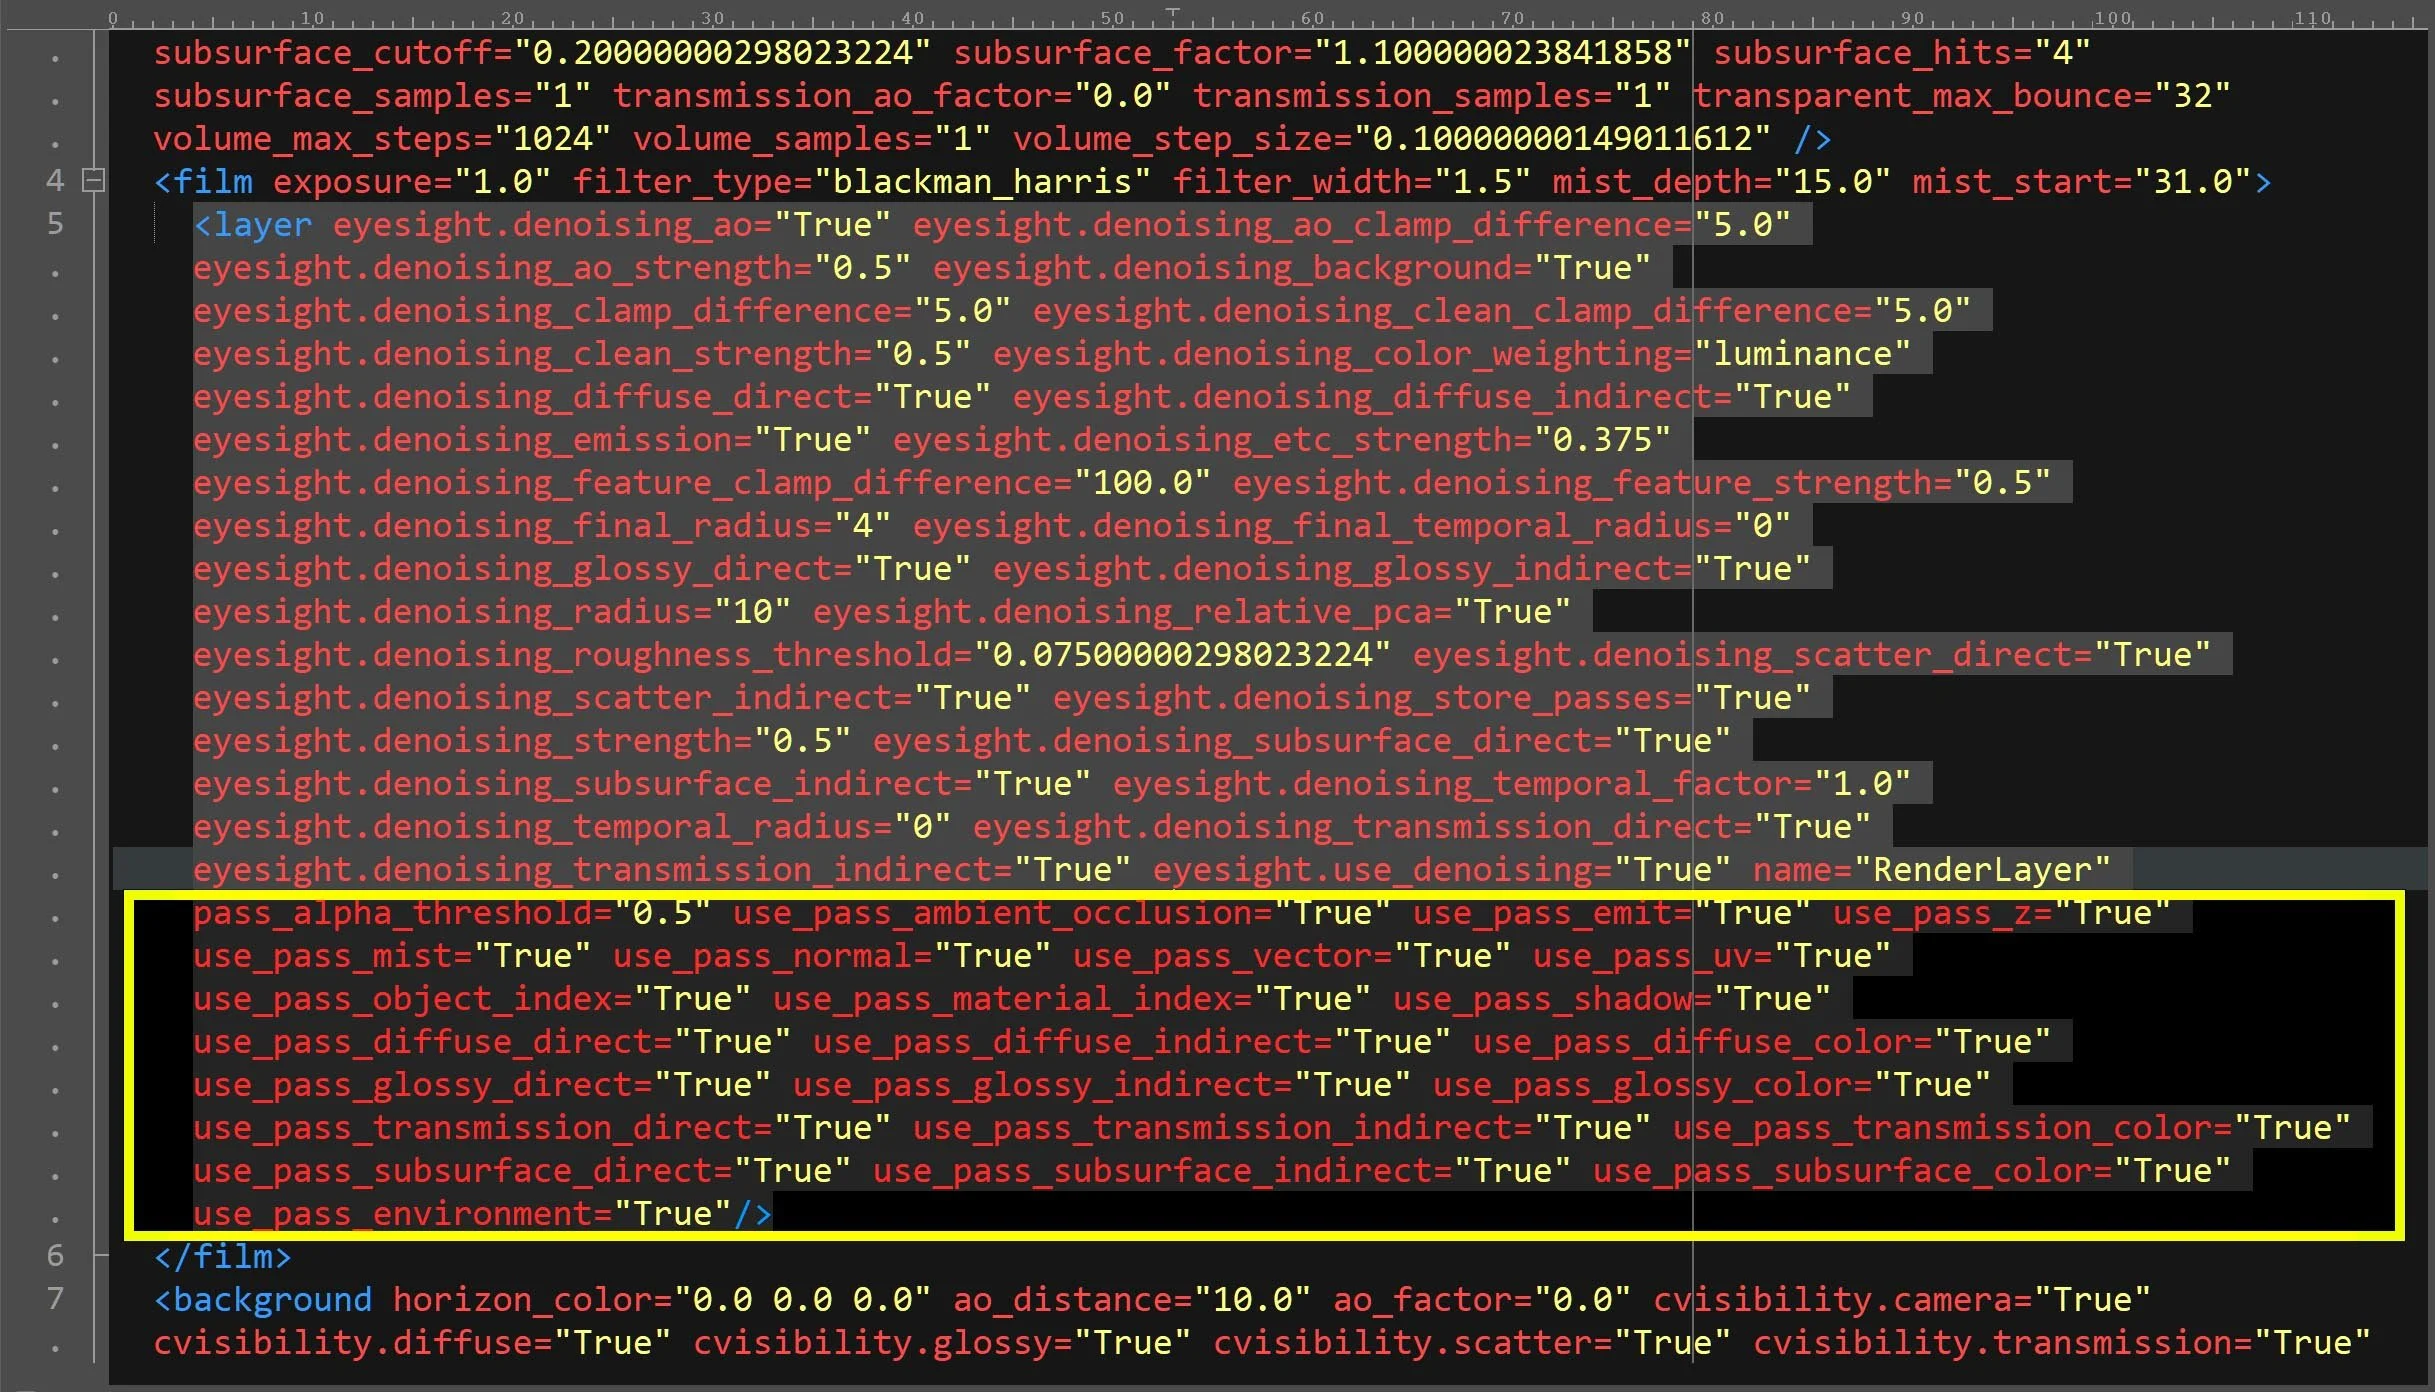
Open the settings.xml file listed above. Towards the top of the file you will find a section that begins with the tag <film and ends with the tag </film>. Between those two tags are several eyesight_denoising parameters that are set to False. They all need to be changed to True. The parameters are:
eyesight.denoising_background="True"
eyesight.denoising_diffuse_direct="True"
eyesight.denoising_diffuse_indirect="True"
eyesight.denoising_emission="True"
eyesight.denoising_relative_pca="True"
eyesight.denoising_store_passes="True"
eyesight.denoising_subsurface_direct="True"
eyesight.denoising_subsurface_indirect="True"
The denoising parameters that need to be changed to True are circled below.

Also, after the last parameter in the line indicated by the arrow, and just before the </film> line you need to add the following parameters with a space between each one.
use_pass_ambient_occlusion ="True"
use_pass_emit="True"
use_pass_z="True"
use_pass_mist="True"
use_pass_normal="True"
use_pass_vector="True"
use_pass_uv="True"
use_pass_object_index="True"
use_pass_material_index="True"
use_pass_shadow="True"
use_pass_diffuse_direct="True"
use_pass_diffuse_indirect="True"
use_pass_diffuse_color="True"
use_pass_glossy_direct="True"
use_pass_glossy_indirect="True"
use_pass_glossy_color="True"
use_pass_transmission_direct="True"
use_pass_transmission_indirect="True"
use_pass_transmission_color="True"
use_pass_subsurface_direct="True"
use_pass_subsurface_indirect="True"
use_pass_subsurface_color="True"
use_pass_environment="True"
The changes will look like this:
Layering Techniques
Now that everything is finally in place and it’s time to go exploring! Double click on the batch file to start a render and let the render finish. While the rendering is taking place, try changing the render display window settings using the View Menu. Zoom in and out. Select different layers to see what they look like.
NOTE: If a layer other than Combined is selected during a render, the render display window doesn’t update. However, even though the display isn’t updating, the rendering is still being calculated. Once you return to the Combined layer, the render display window will update to show the current progress.
After the render is finished, go through and look at the different layers. Some show nothing but black or red, some show a layer that has been denoised, and others show a layer that hasn't been denoised. These layers are your artistic palette you can now combine.
Using that same car render, here are a few layer option created when we go exploring. Notice the difference between layers like Diffuse Direct, Diffuse Indirect, and Diffuse Color.

The Diffuse Direct layer shows the diffuse (or matte) shading in the scene due to the direct illumination from the lights. The Diffuse Indirect layer shows the diffuse shading in the scene due to the bounced and ambient lighting. The Diffuse Color layer shows colors in the scene.
When you composite the three layers in an image editing program (using the appropriate blending modes) you can create a shaded color version of the render that has no reflections or transparency. Or you can keep finetuning the layers until you get a blended image like this:

Saving Your Masterpiece
As mentioned earlier, Eyesight can save renders to a variety of file types. You can do the same with the layers available in Eyesight CLI display window... but there’s a catch. You have to know what you want because the menu bar isn’t going to help you.
When you select Save from the File Menu dropdown, you get this dialog.

Notice that the Save as type is set to image files, but there is no way to select what type of image file you want. How do you get a .jpg or .png or .tif? When you add the appropriate file extension to the file name, the Eyesight CLI automatically saves the file using the correct format. So if you want a .jpg, you would enter output.jpg as the file name. For a .png it would be output.png. You can also save it as output.tga, output.tif, or output.hdr.
NOTE: JPGs, PNGs, TGAs, and TIFs are all saved as 24-bit color files. The HDR is saved as a 96-bit color file. I have yet to figure out a way to save 48-bit versions of the PNG [listed as .png (16-bit) in the render dialog window when using Studio]. I usually save all the layers as HDRs and use a photo editing program to change the color depth to what I want.
Fixing It (Or Creating It) In Post
And there you have it. After all that work, you now have the ultimate freedom to make your renders look like whatever you want them to. You’ve created a multitude of layers that you can now combine any way you want using image editing software. But there a few things to keep in mind:
Not all the layers are denoised. I haven’t found a way to change this. You may want to denoise or blur those layers in your image editing program.
Not all the layers that are available in Blender can be produced with the Eyesight CLI. Specifically, glow and z-depth layers are not generated.
I would recommend setting up renders with different settings in the Studio render dialog and seeing how the parameters change in the render text window.
Now have fun and explore! See what you can do with your layers. Explore all your lighting options. You’ll find that Studio’s renderer is capable of do much more that the default settings allow. And all it took was a little bit of Hacking Studio.
With this knowledge, you can now be the wizard behind the curtain creating rendered images that far exceed what you get using Studio’s render dialog window. But be careful how you use your newfound knowledge lest you be accused of using magic (or AI) to create your stunning images!
Let’s end with a 1940s Hollywood-esque portrait of Nerdly created using the Eyesight CLI (and image editing software).
Good luck... and have fun creating images you didn’t think were possible using Studio!
Best of BrickNerd - Article originally published on November 28, 2023.
What would be the first thing you want to render using this new process? Leave your thoughts below.
Do you want to help BrickNerd continue publishing articles like this one? Become a top patron like Marc & Liz Puleo, Paige Mueller, Rob Klingberg from Brickstuff, John & Joshua Hanlon from Beyond the Brick, Megan Lum, Andy Price, Lukas Kurth from StoneWars, Wayne Tyler, LeAnna Taylor, Monica Innis, Dan Church, Roxanne Baxter, and Steven Laughlin to show your support, get early access, exclusive swag and more.