Building a LEGO Bathroom: Renovation Works
/Sometimes I find a build that just speaks volumes to me. One such build is Renovation Works by Marion aka Brixe (Flickr). I was curious about the story behind it, so I reached out to Marion and asked her a few questions. Again, as often happens in the LEGO community, people amaze me with their stories and inspiration.
This is a master class in renovation, so if you’re planning one, just sit tight and take notes.
Dan: Hi there! Tell us a bit about yourself. Where are you from and how your LEGO story began?
Marion: My name is Marion, I’m from Germany, 58 years old and I have been building with LEGO (again) for 22 years. I originally bought my first LEGO for my son when he was just six months old. But then I built it myself. At first, I did it secretly because I was ashamed to “play” with LEGO as a grown woman. It wasn’t until later that I learned that there are a lot of adults who build with LEGO.
Dan: I’ve followed your work for some time now and I love it. You build in different genres and styles, but recently one scene caught my eye. What inspired you to build your “Renovation Works”?
Marion: I built my model for a building contest at 1000Steine, a German LEGO forum. The task was to build your wishes or dreams for 2022.
Since I was bored with the usual wishes like peace on earth, end of the pandemic, etc., I built what I had planned years ago, but never started: my plan to finally renovate our ugly bathroom.
Dan: How did you choose the colors? (I'm guessing you don't like the bathroom in tan.) The new design will be in white and blue. I would say bright bluish-green, but it might be a different shade.
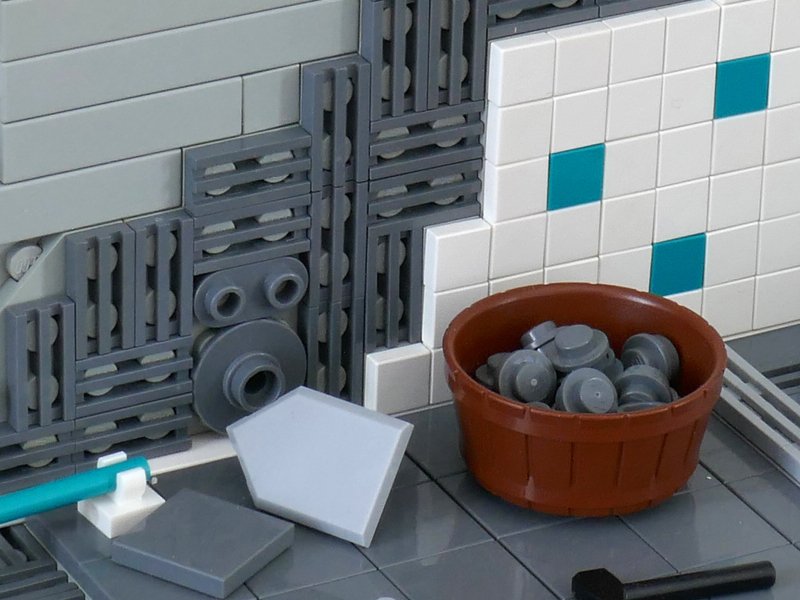
Marion: The bathroom should become brighter with a lot of white and a few color accents. Since I did not have enough white 1x1 tiles, I had to install a few more colored tiles. Whether the real bathroom should be like that, I still don’t know.
Dan: Can you walk us through the details? There are a lot—you even threw a trowel in there.
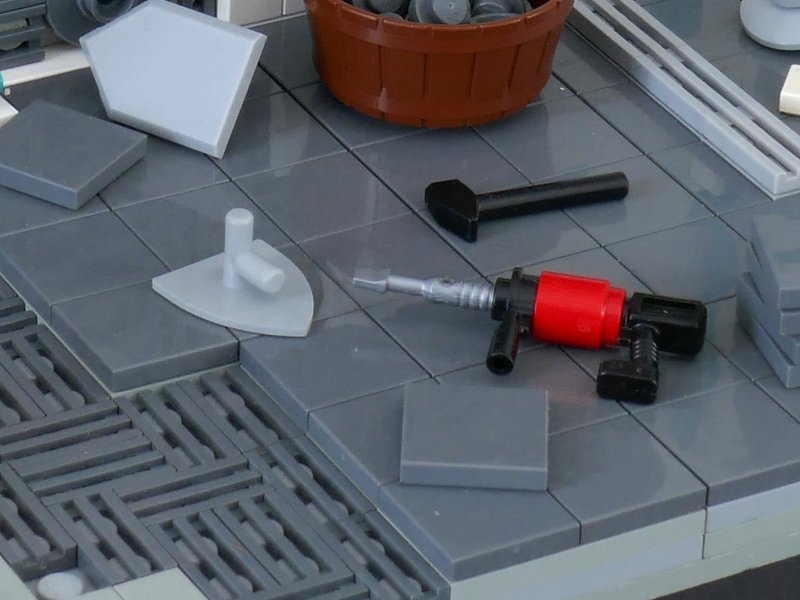
Marion: In my model, you can find almost everything you need to re-tile a room. I say almost because, unfortunately, I forgot the tile cutter.
First you remove the tiles with a hammer drill. Then you should plaster or clad the walls to become straight. In one of the vats is the plaster. In the other vat is the tile adhesive, which is applied with a notched trowel. In my bathroom, there are also towel holders and a shower head with a hose.
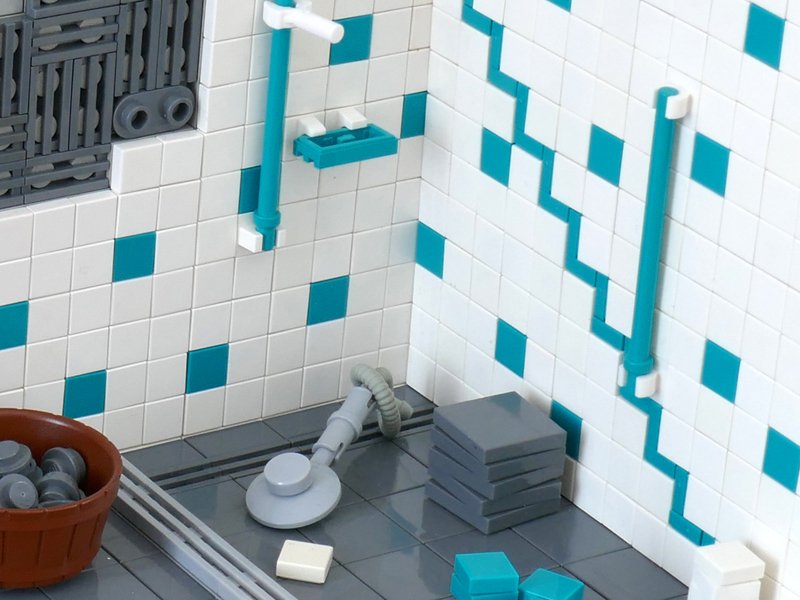
Dan: There is a cable hanging from the wall. Will there be some sort of lighting?
Marion: Yes, a lamp is going to be connected to the cable above the sink.

Dan: Are you planning on building the same room, but finished?
Marion: I’m already planning to build a finished room—not out of LEGO but for real in our house.
Dan: This would be even better and it seems that you have the whole process already thought out. Is there anything else you would like to share about the build?
Marion: Actually, no. I'm just hoping that this year I can finally get my act together to tackle the renovation.
Dan: Then I wish you to build your new bathroom in 2022 exactly the way you did your MOC but for real this time. Thank you for chatting with me! I'm a big fan of your builds.
Marion: Thank you as well. I myself am also a big fan of yours.
Here are a few more builds from Marion that I like very much:


Have you ever sketched a dream of yours or an idea with LEGO first and then built it in real life? Let us know in the comments section below!
Do you want to help BrickNerd continue publishing articles like this one? Become a top patron like Charlie Stephens, Marc & Liz Puleo, Paige Mueller, Rob Klingberg from Brickstuff, John & Joshua Hanlon from Beyond the Brick, Megan Lum, and Andy Price to show your support, get early access, exclusive swag and more.