Everything You Want To Know About Cheese Slope Mosaics
/To help preserve some of the best LEGO content from the community, today we are pleased to share a guest article from Katie Walker who walks us through the secrets behind LEGO cheese slope mosaics. Katie was originally one of the main contributors at MosaicBricks, a LEGO blog started by Casey McCoy that ended in 2014.
Cheese slope mosaics are a fun, but often tricky, way to add more detail to LEGO creations. The use of the small slopes allows for angles in a mosaic that are difficult to obtain with more traditional methods. This tutorial will attempt to explain how to create your own cheese slope mosaic and why you might want to do so.
Part 1: What Is a Cheese Slope Mosaic?
A cheese slope mosaic is a mosaic made of up of “cheese slopes” (which on BrickLink are called “Slope 30 1 x 1 x 2/3”). The mosaic is made up of slopes (and sometimes small plates or tiles) arranged into patterns or images. A cheese slope mosaic might be of a recognizable image, text, geometric pattern, or other ornamentation. Sometimes it will be a stand-alone mosaic, but more often it will be used as part of a larger creation. Builders have used cheese slope mosaics to make many different things: stained glass windows, tiled floors, fancy carpets, paintings in art galleries, signs in cities, insignia on vehicles, designs on flags, text and images on buildings, etc. Sometimes it is fun to experiment with cheese slopes, just for fun, to see what patterns and shapes can be discovered.
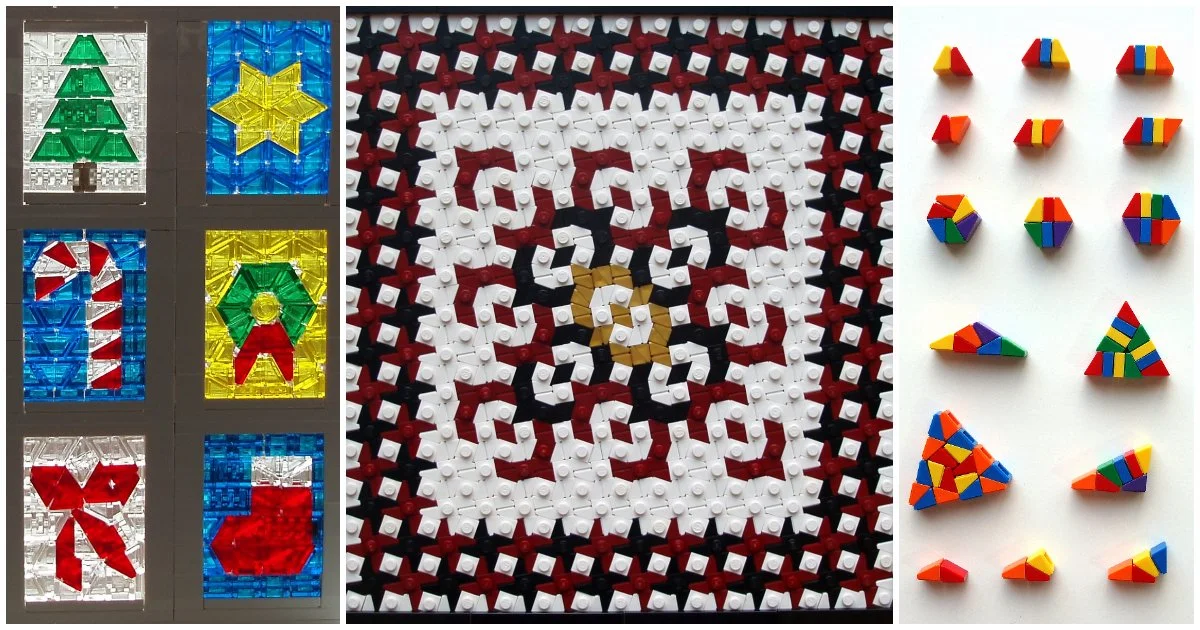
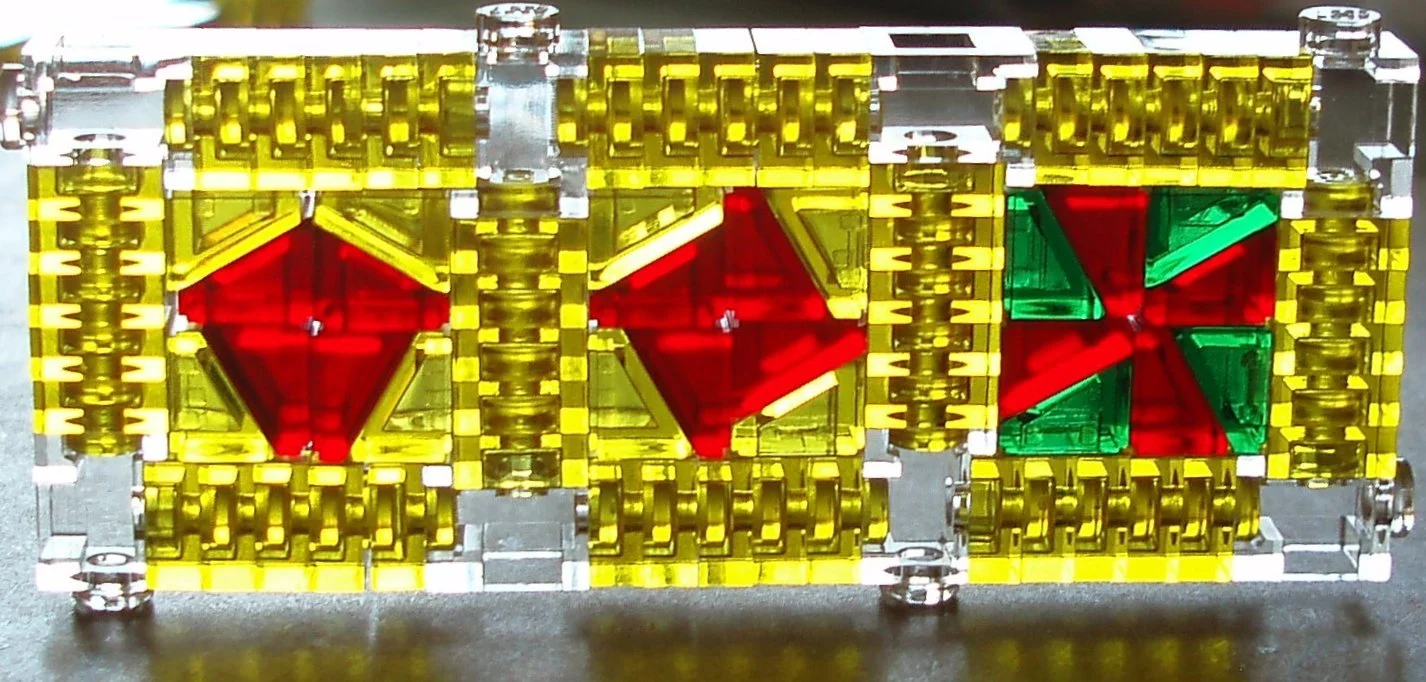
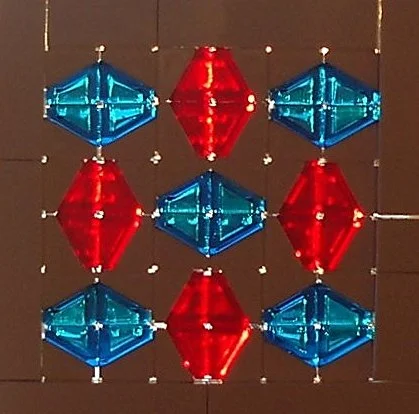
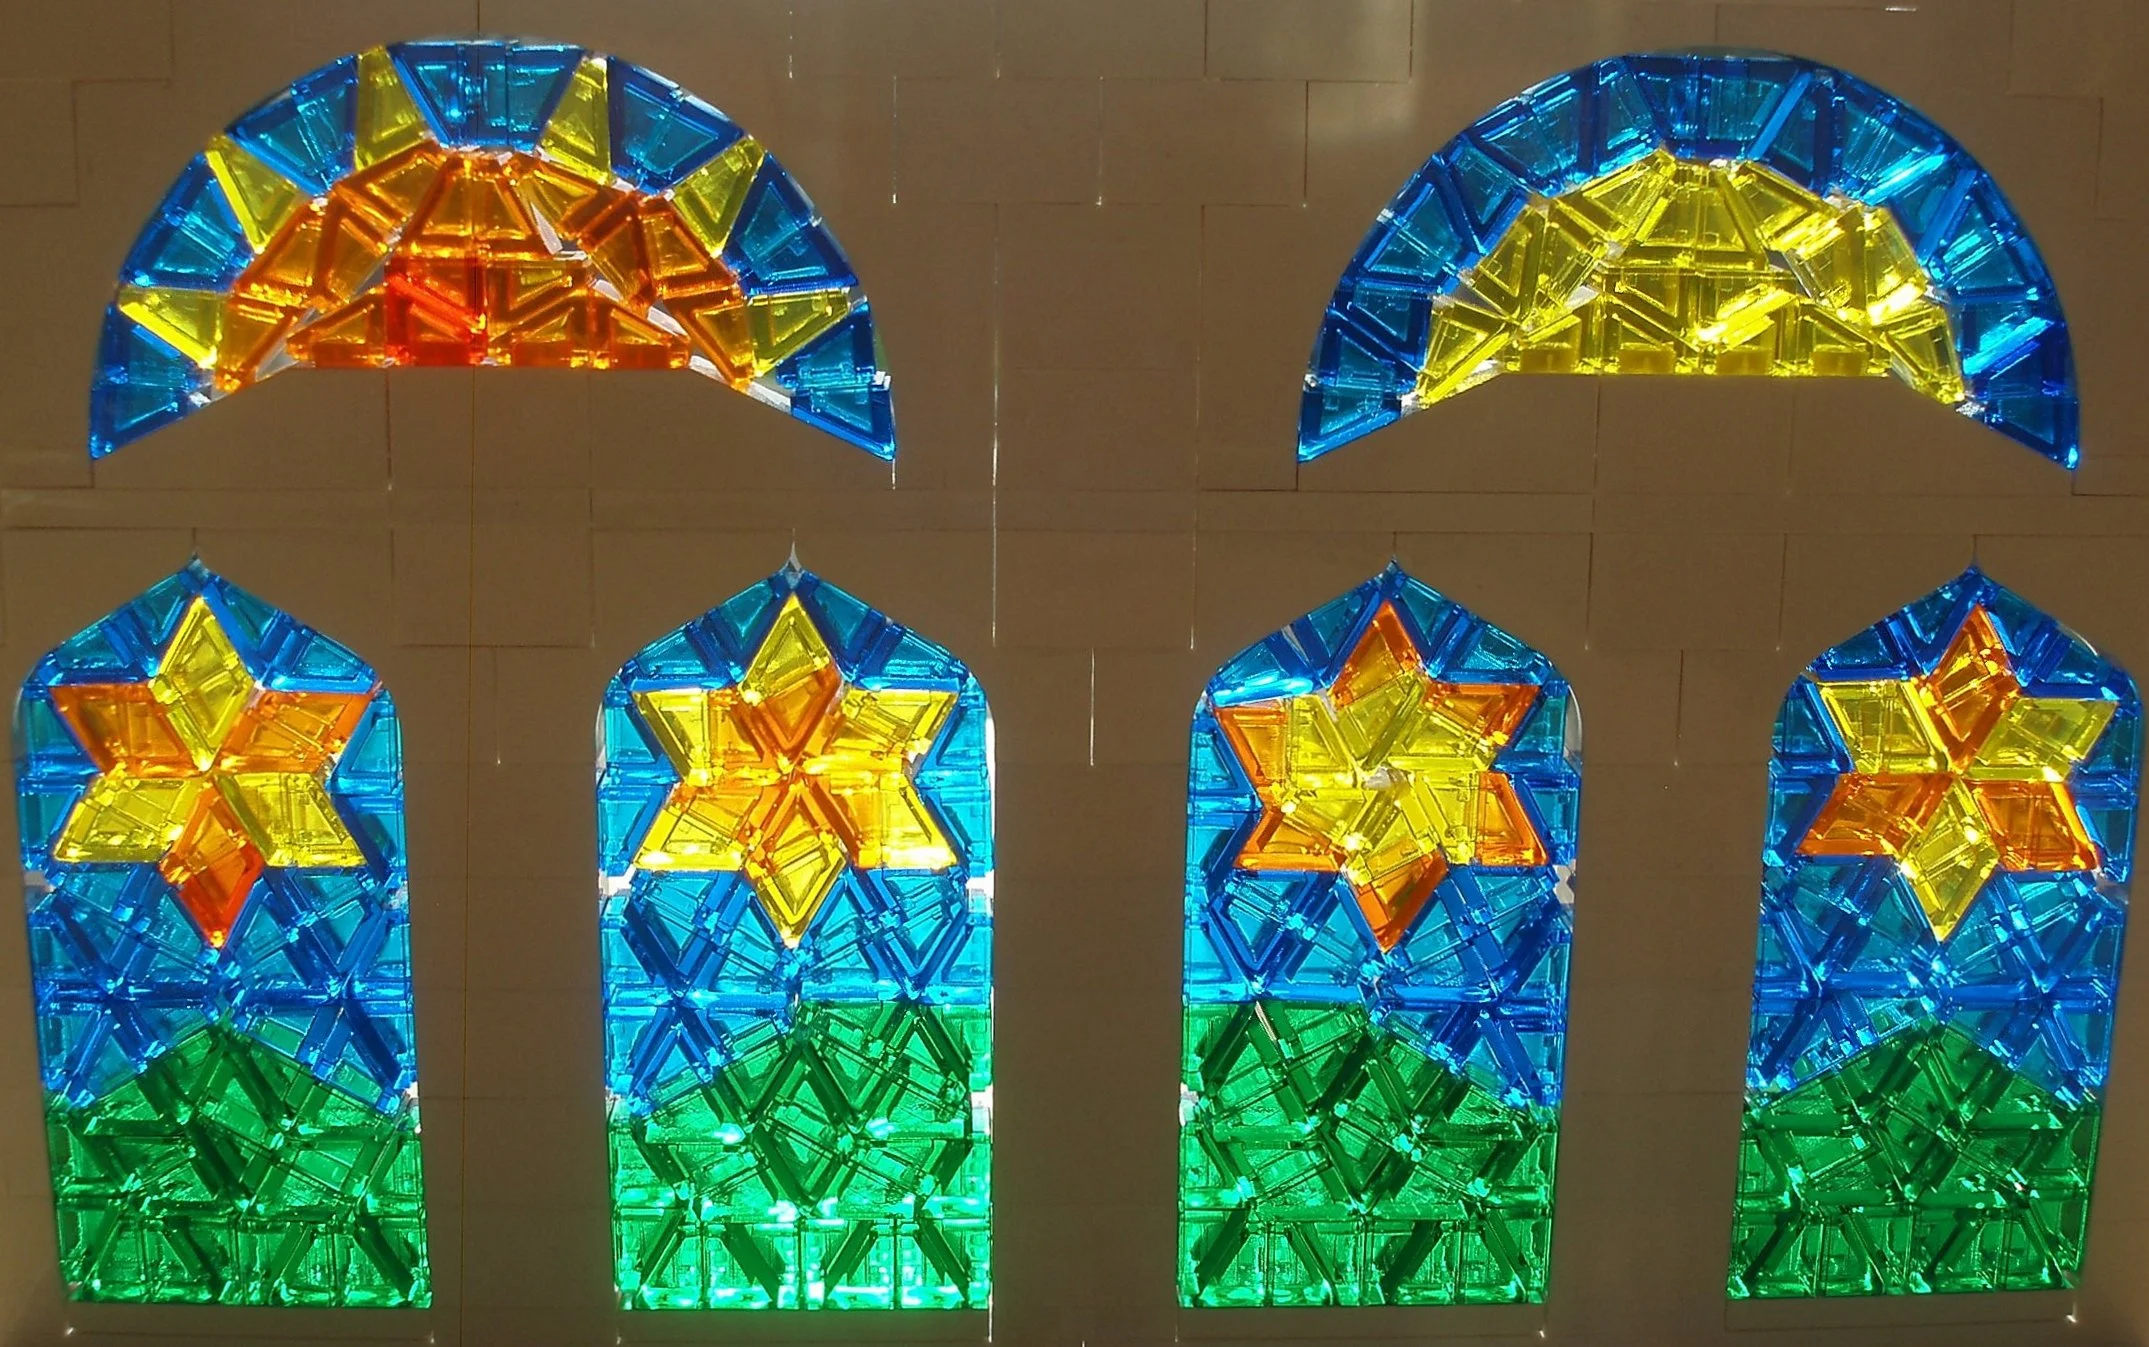
Here are a few things I have made that show some different uses for cheese slope mosaics. Image 1.1 shows a stand-alone mosaic, a Christmas window that could be used for holiday decorations. Image 1.2 shows stained-glass windows, used to decorate a fancy palace room.
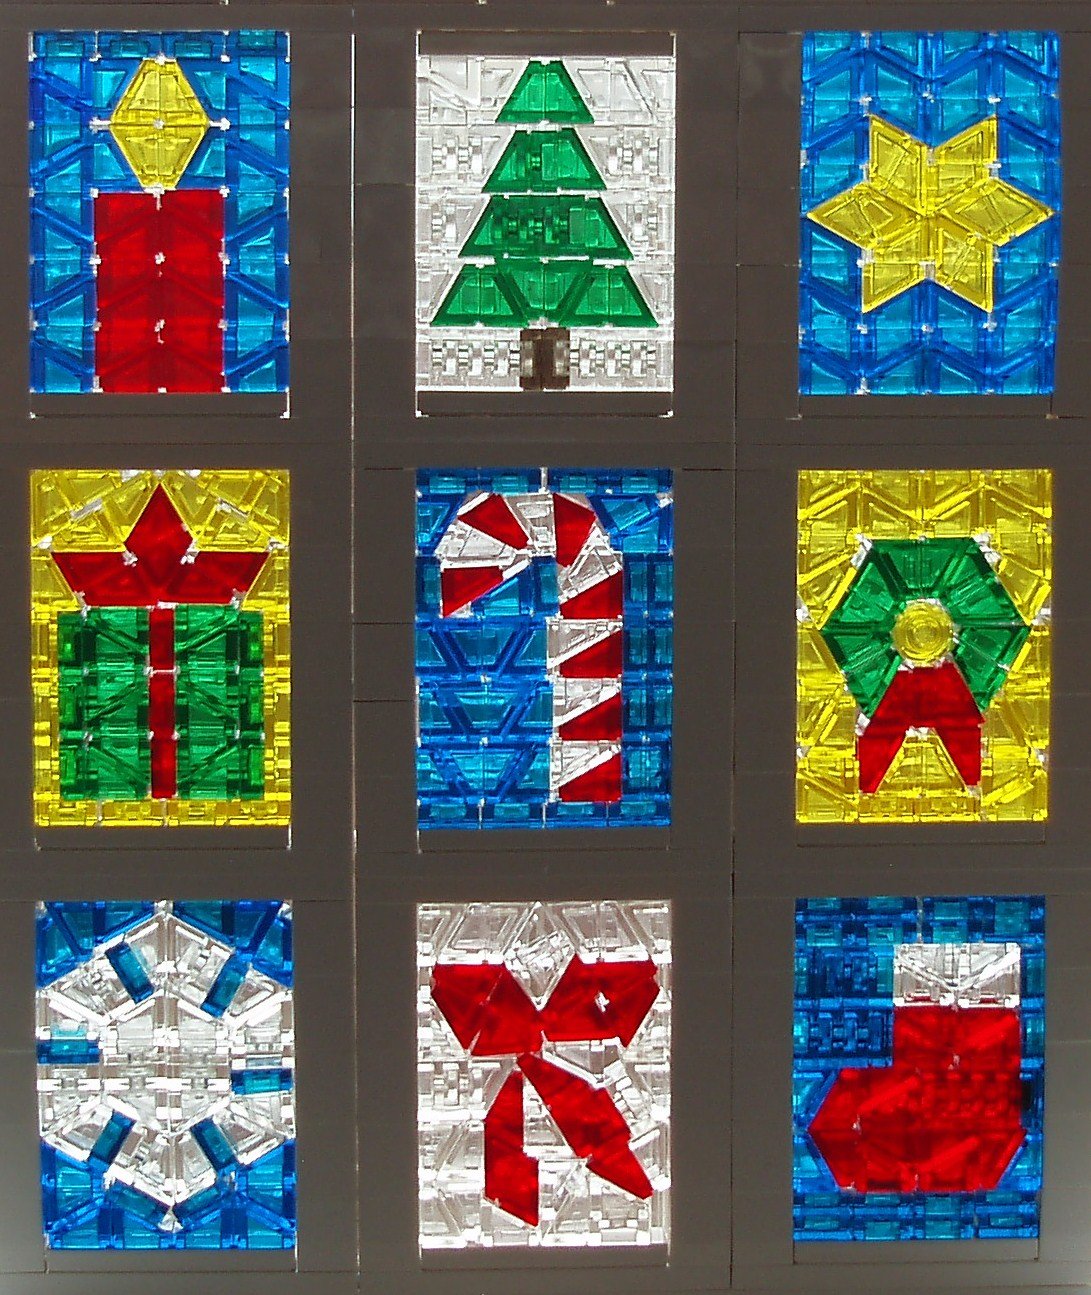
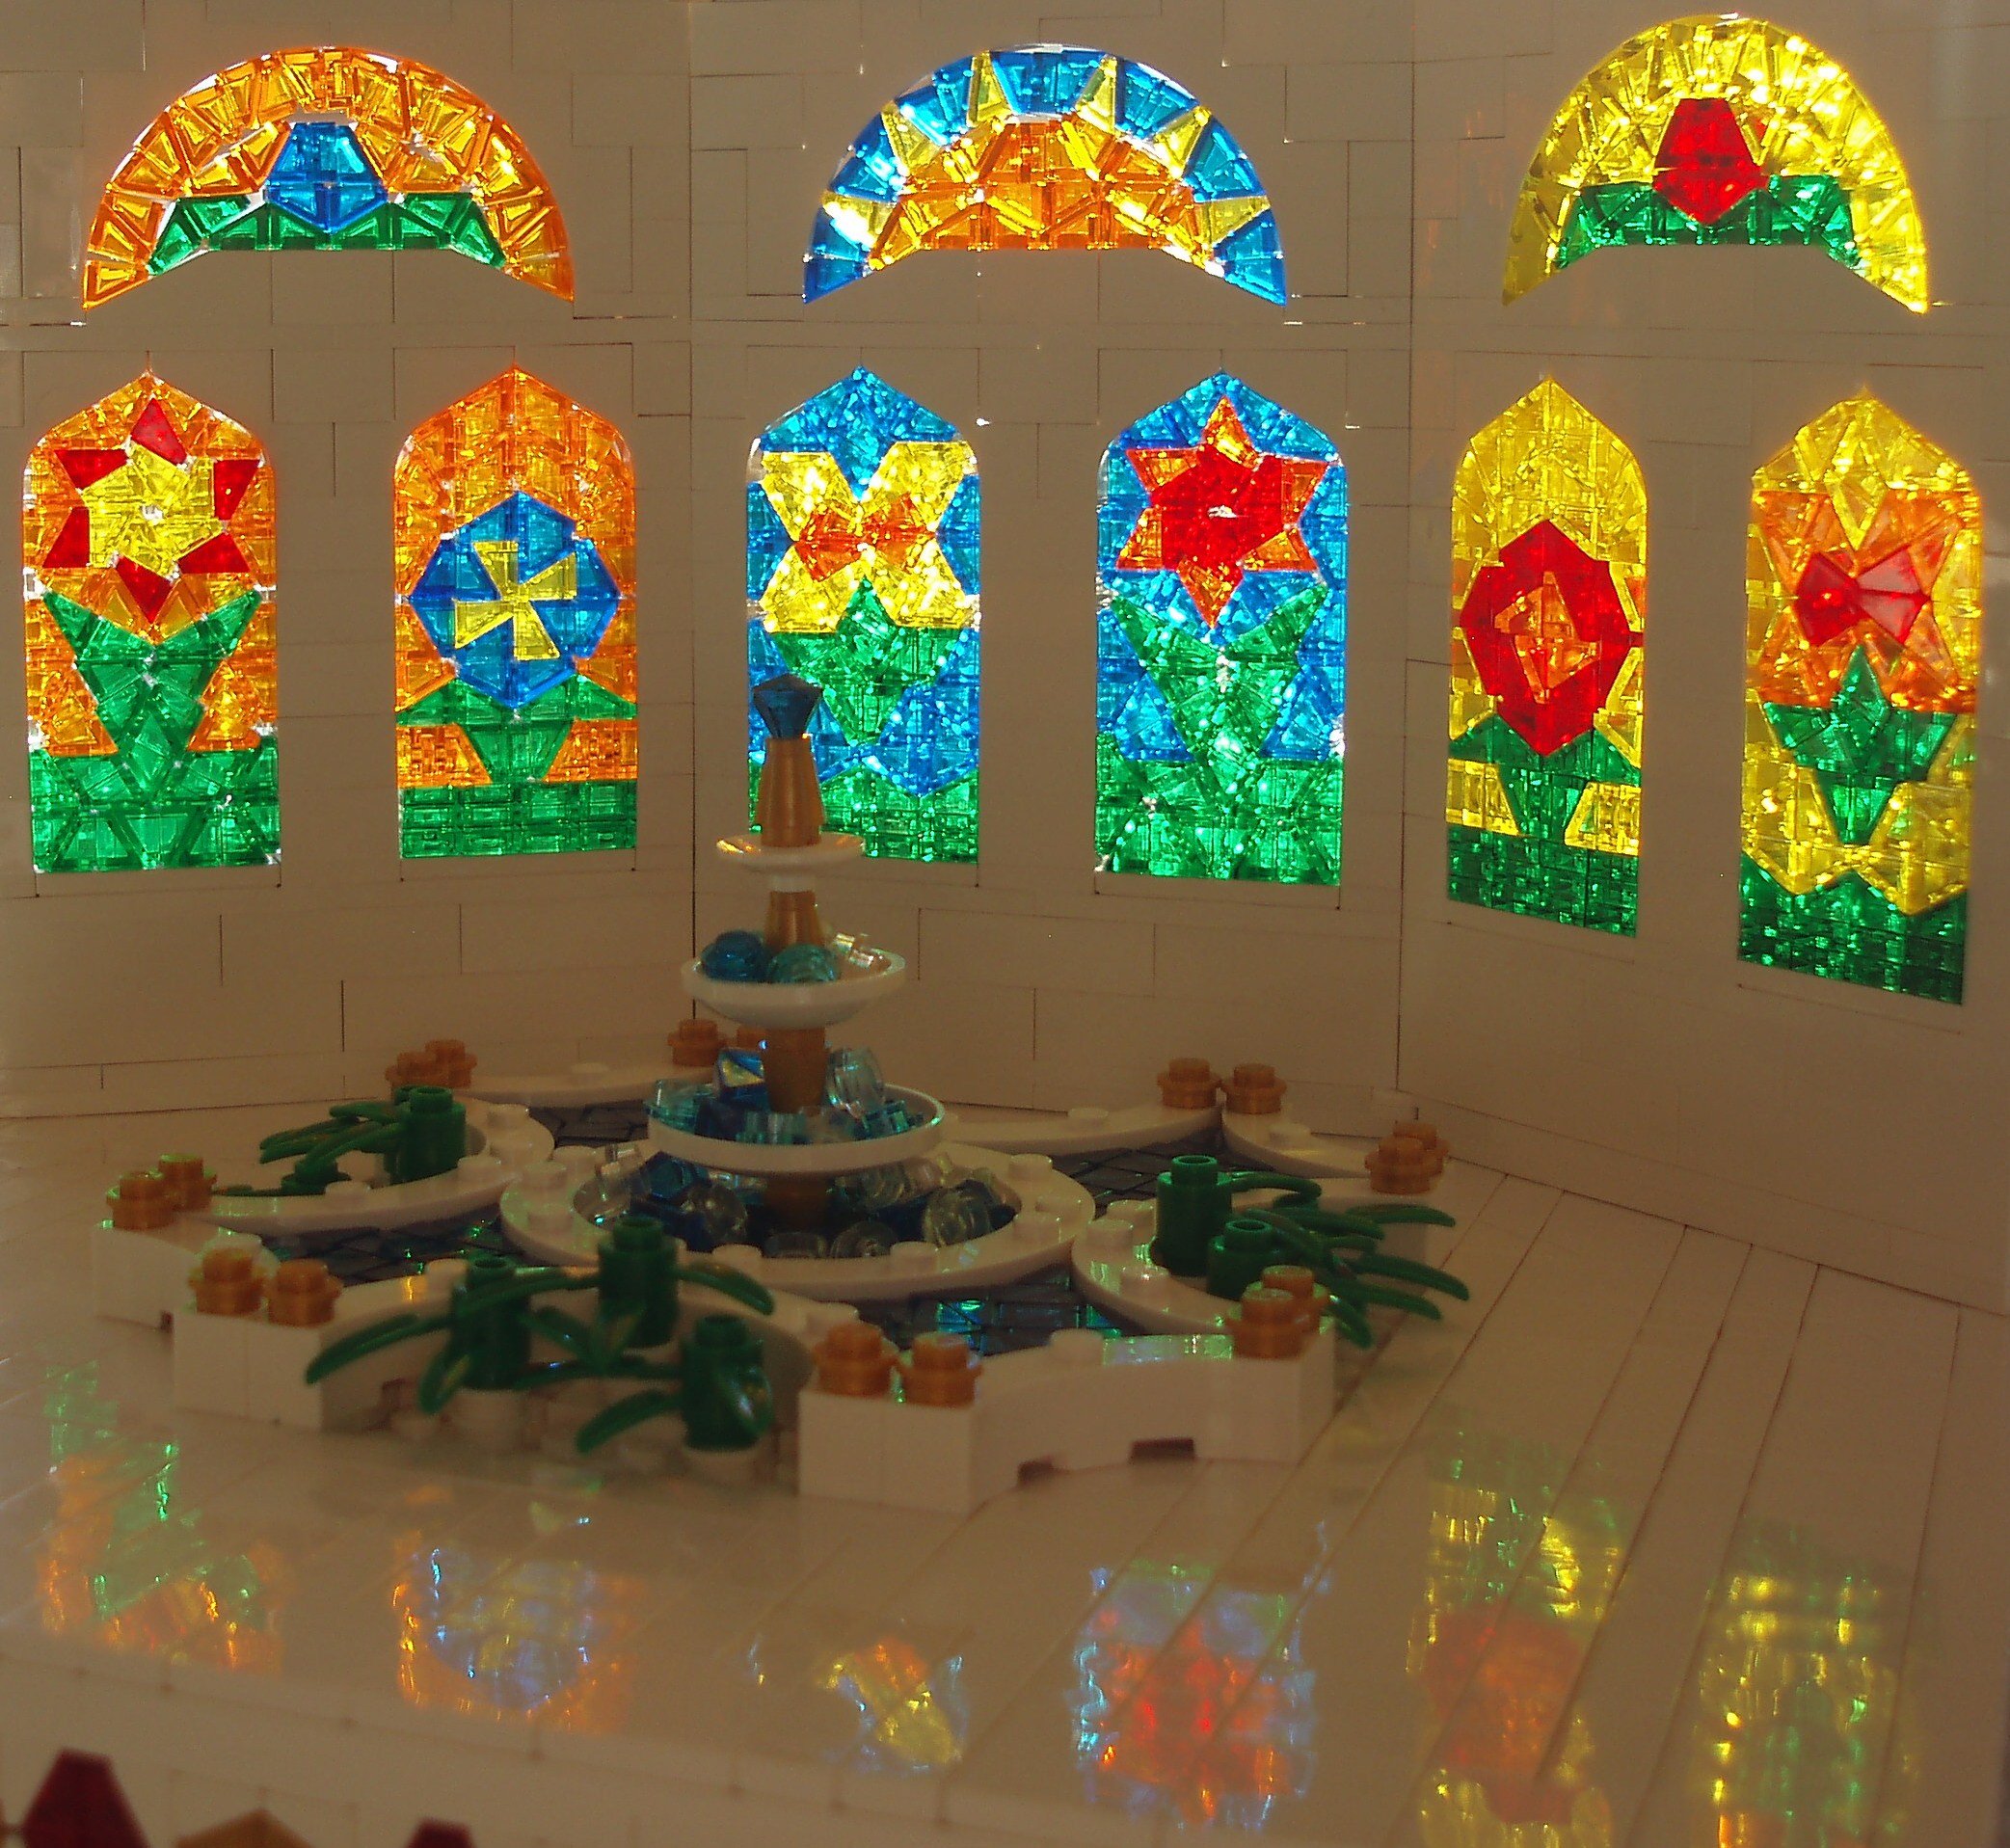
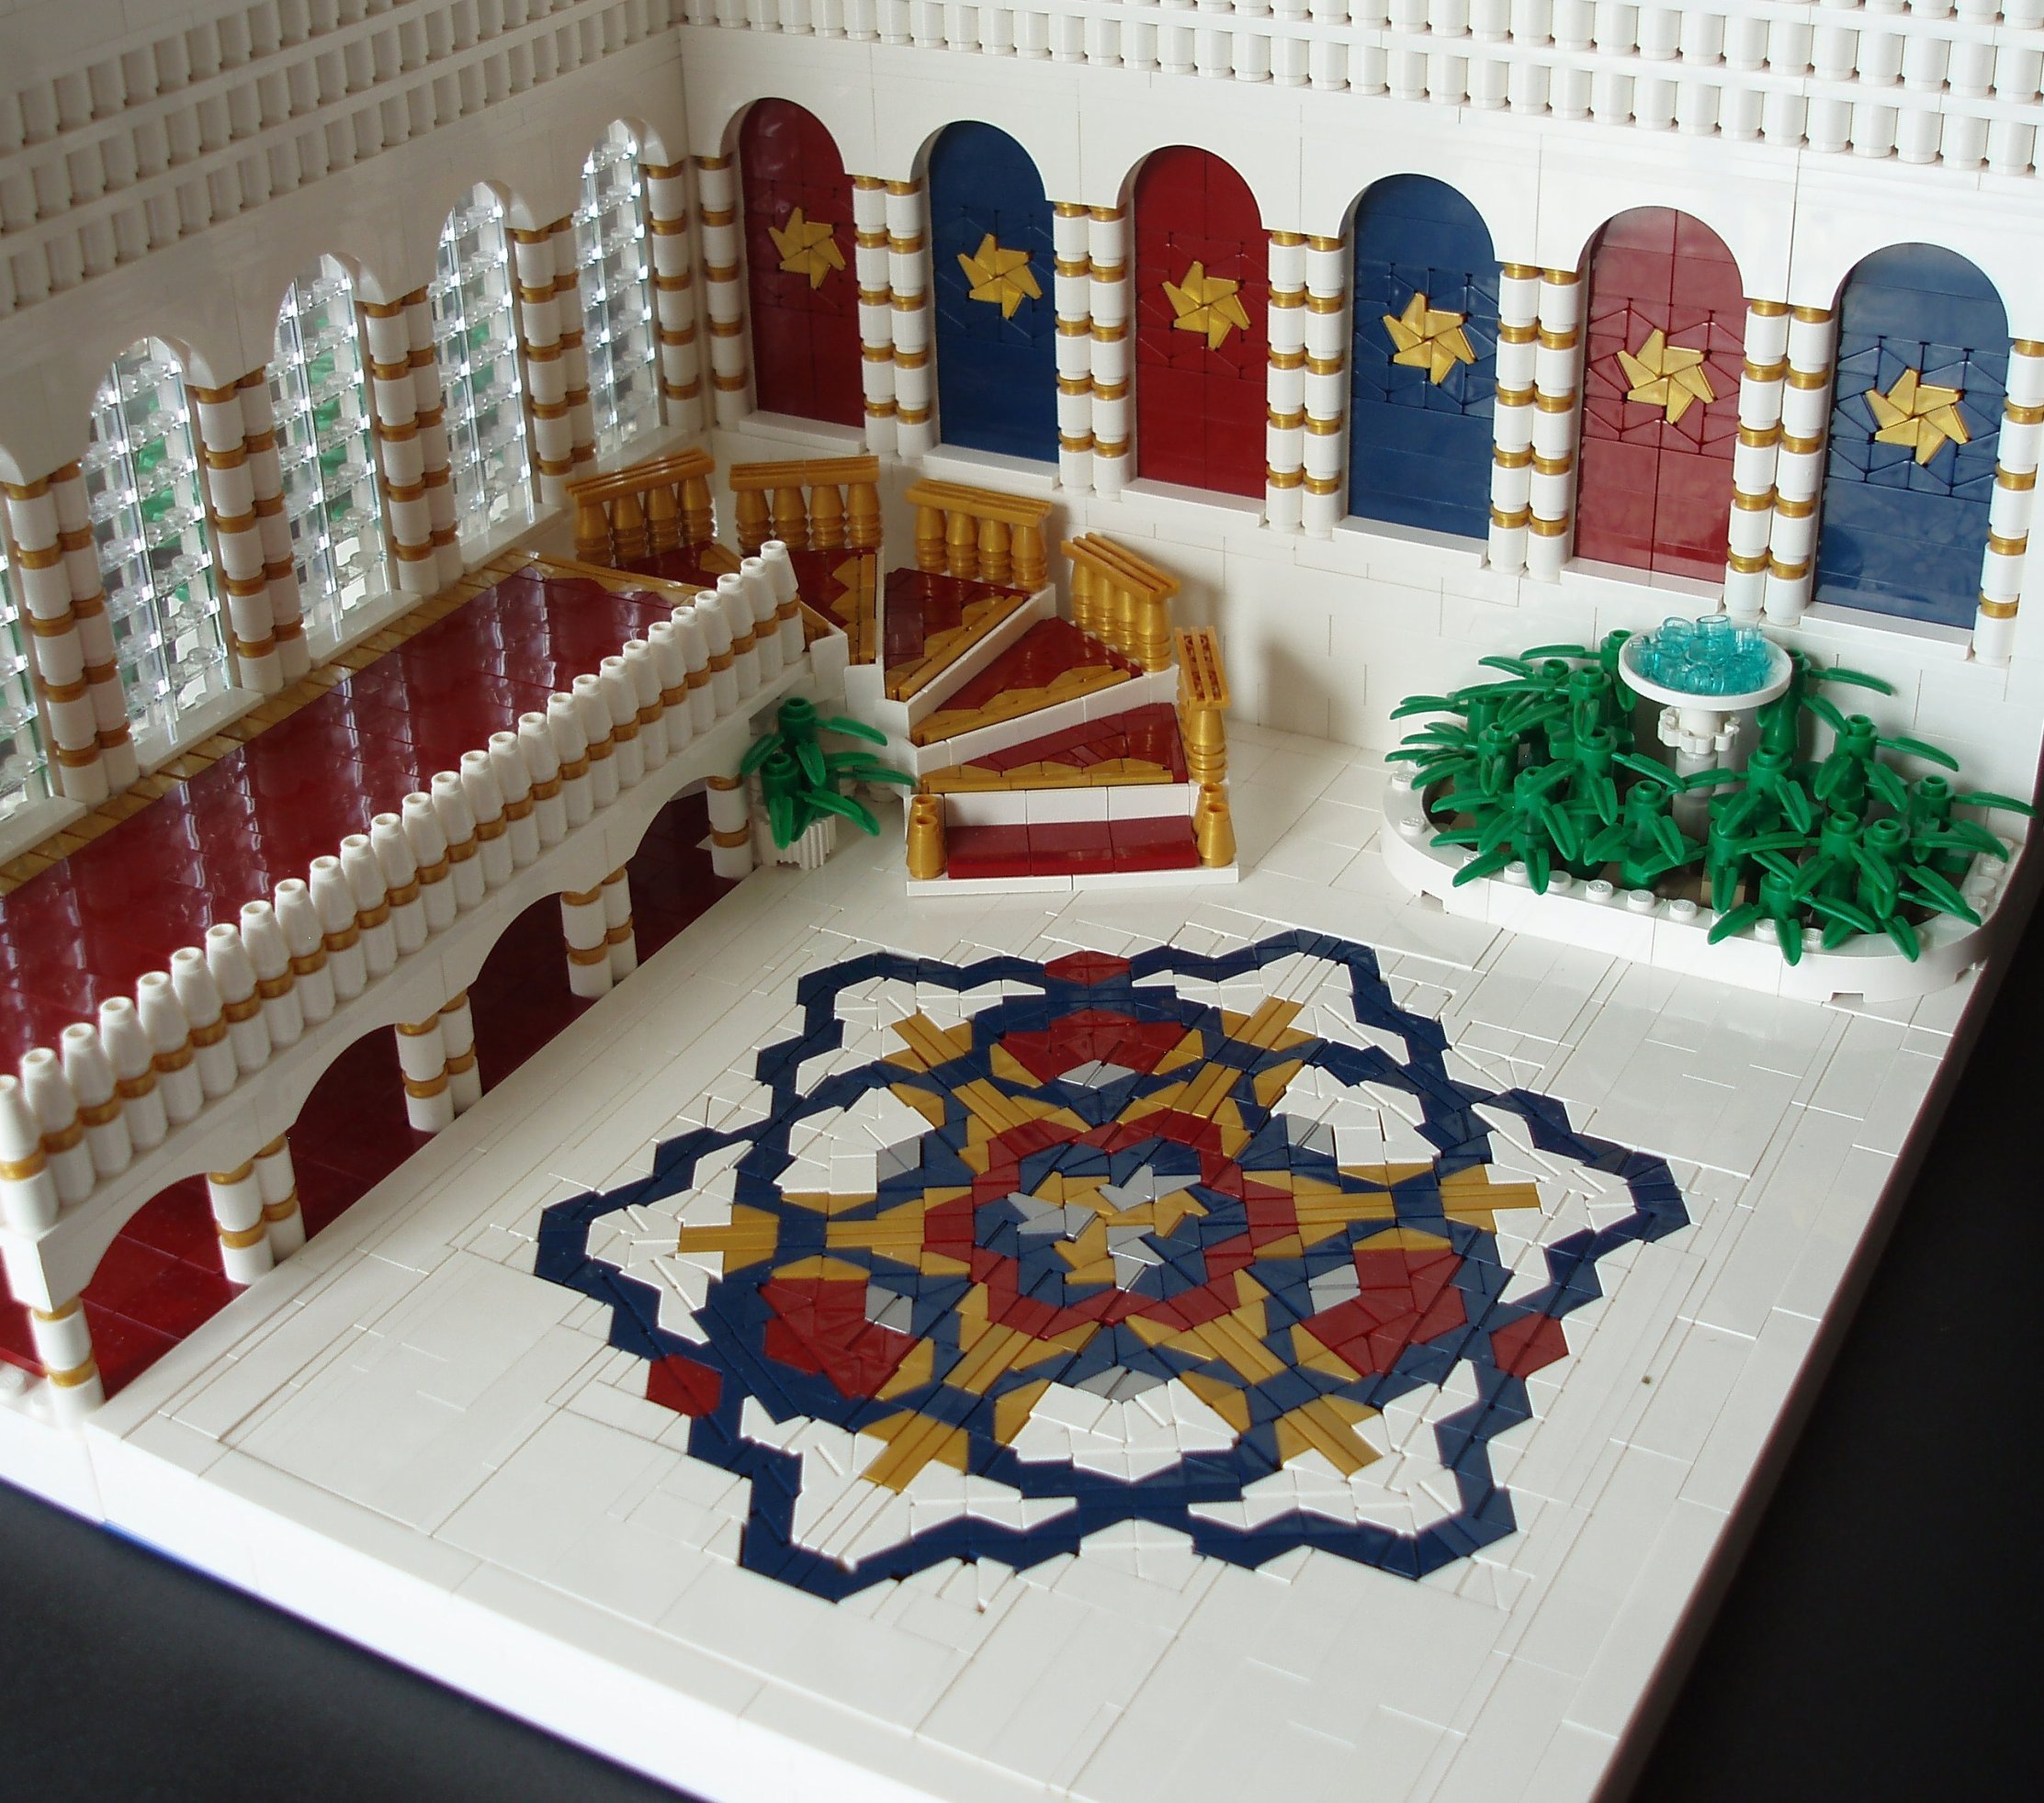
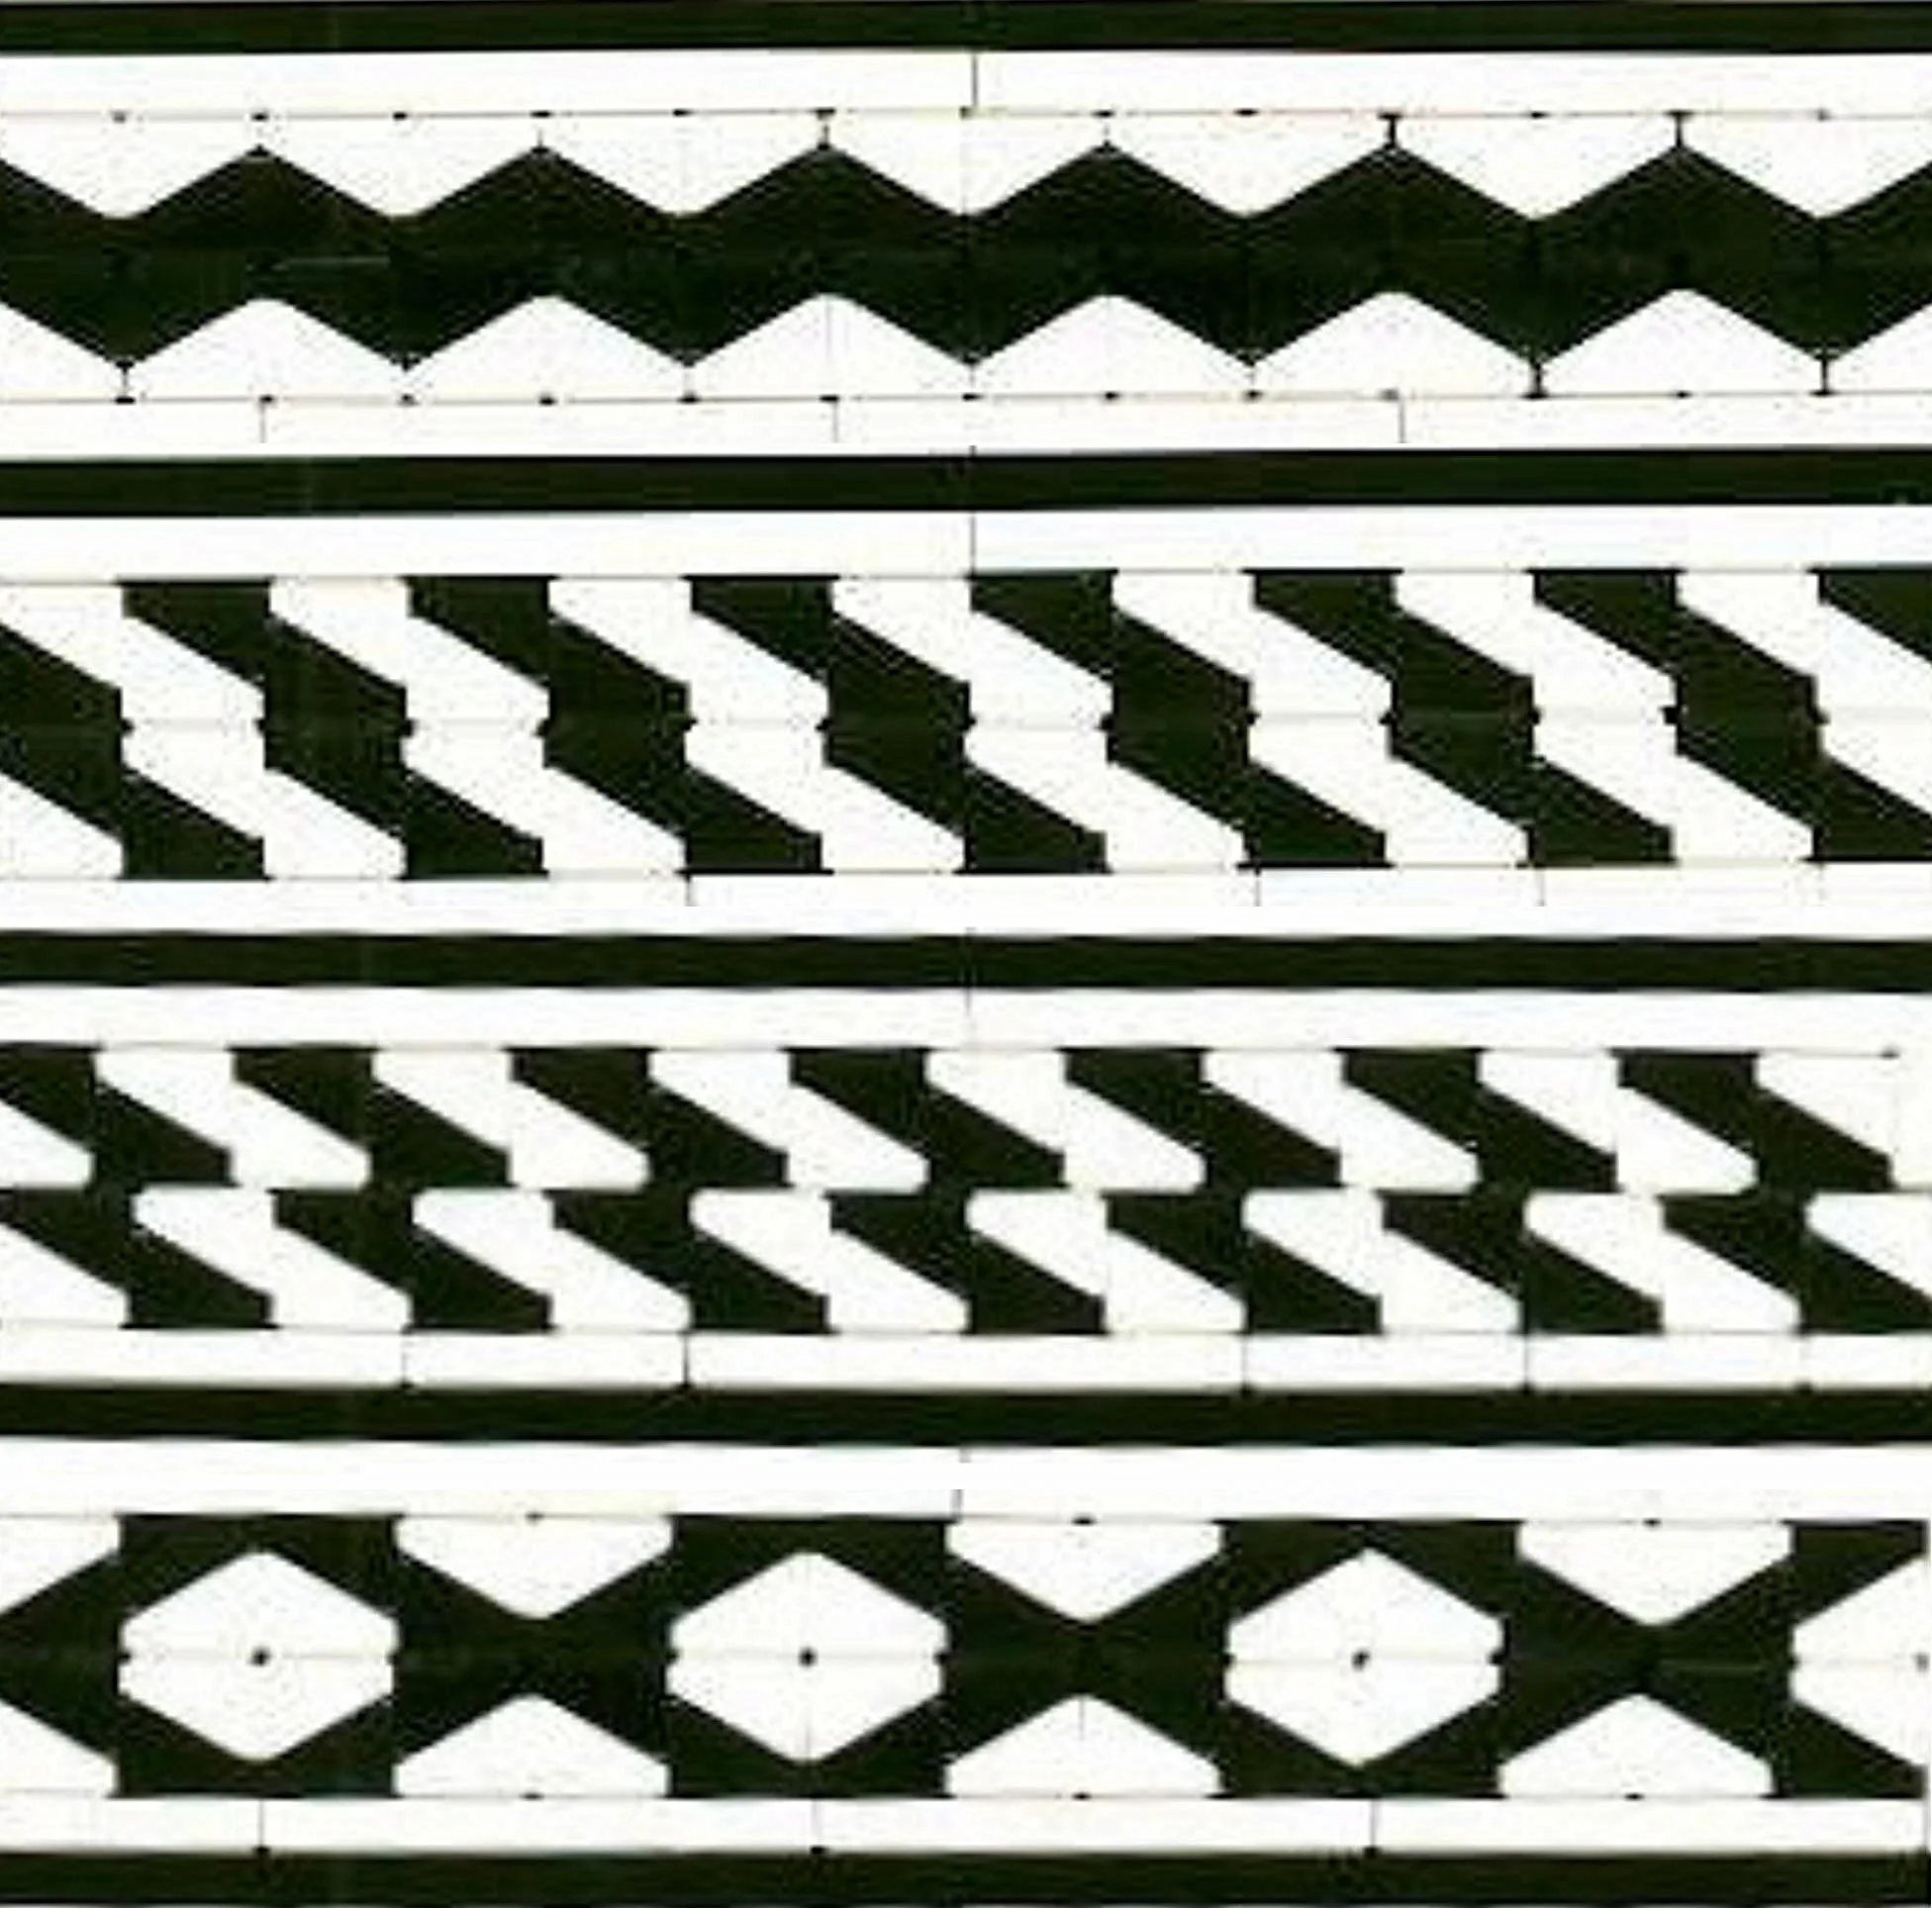
Image 1.3 is a fancy tiled floor, and there are cheese slopes in the stairs and the wall decorations, too. Finally, Image 1.4 shows an example of text done in a cheese slope mosaic.

1.4 Cheese Slope Mosaic Text
How Do Cheese Slope Mosaics Stay Together?
The pieces in a cheese slope mosaic are usually not attached to each other. Instead, they are pushed together tightly and held into place by a brick-built frame. If you do it well, you can even tip it upside down, and the pieces won’t fall out. Usually, some sort of supporting wall is used behind mosaics that will be displayed vertically, to add another layer of security.
And although not necessary (or purist), sometimes builders will use clear, double-sided tape to hold their mosaics in place, especially if the creation is going to be shown at a public event. Techniques for framing cheese slope mosaics can be found in Part 5.
Part 2: Measurements and Shapes
For the following discussion, I will use measurements in terms of half-plates. As shown in Image 2.1, a 1x1 plate would be 5 half-plates long and 2 half-plates high. Since 3 plates stacked on top of each other are the height of a brick, a 1x1 brick would be 5 half-plates long and 6 half-plates high.
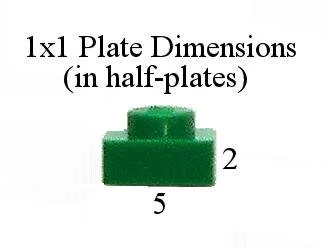
Image 2.1: Dimensions of a 1x1 plate
When using cheese slopes in a mosaic, they are placed on their sides. The length along the bottom is 5 half-plates, and the height is 4 half-plates. See Image 2.2 for the approximate dimensions of a cheese slope.
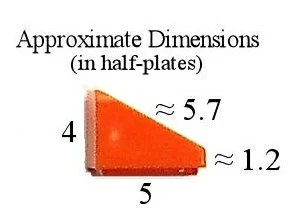
Image 2.2: Cheese Slope Dimensions
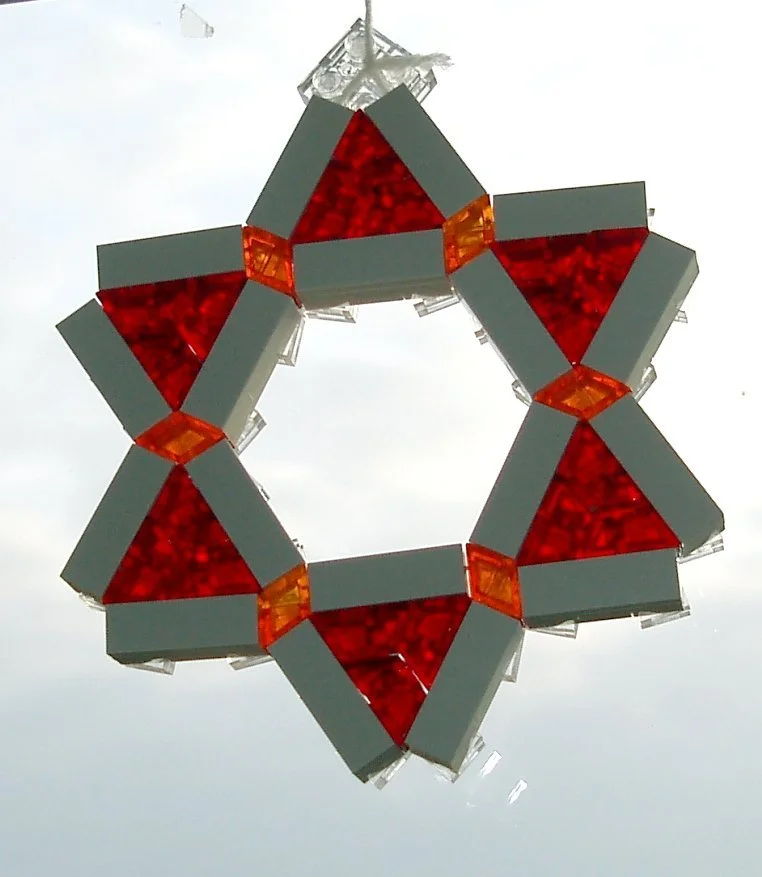
Although it is easy to look at a cheese slope and think that it is a simple 30°-60°-90° triangle, that is not the case. The corner with the 30° degree angle has a blunt tip, approximately 1.2 half-plates in height. Because of this blunt tip, cheese slopes become more difficult to arrange than actual triangles would be. If cheese slopes were perfect triangles, it would be possible to perfectly fit 12 of the 30° angles around a center point. However, Image 2.3 shows how putting 12 of the blunt ends together will create gaps. This can become problematic if the mosaic needs to be gap-free.

Image 2.3: Gappy Cheese
Another difficulty with cheese slope measurements comes when arranging two of them together to make a “square”, as seen in Image 2.4. Although they appear to be squares, the measurements are slightly off. The bottom side (where the stud goes) is 5 half-plates, but the sides are 4 half-plates + 1.2 half-plates, making 5.2 half-plates. Over small sections in a mosaic, this slight difference can be ignored, essentially treating the rectangle as a square. Over larger areas, however, this difference adds up, and will have to be compensated for.
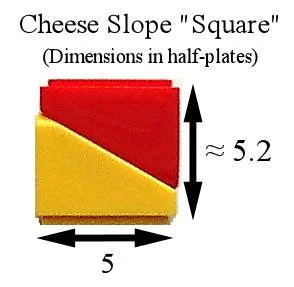
Image 2.4: Cheese Slope "Square" Dimensions
Part 3: Techniques For Arranging Cheese Slopes
There are many different methods to use when arranging cheese slopes. Here is a summary of a few of them.
Squares
One of the easiest and most common ways of arranging cheese slopes is to line up rows of cheese slope “squares” and then use different colors to create an image or pattern. The cheese slope squares can be oriented in four different ways, as shown below:
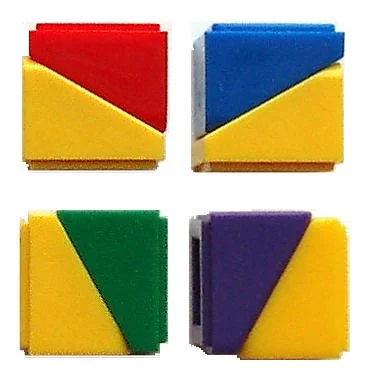
Image 3.1: Cheese Slope "Square" Orientations
Occasional problems can arise with this method, since the apparent squares are do not have sides of perfectly equal length. These difficulties will be dealt with in the sections of this article dealing with framing the mosaic and eliminating the gaps.
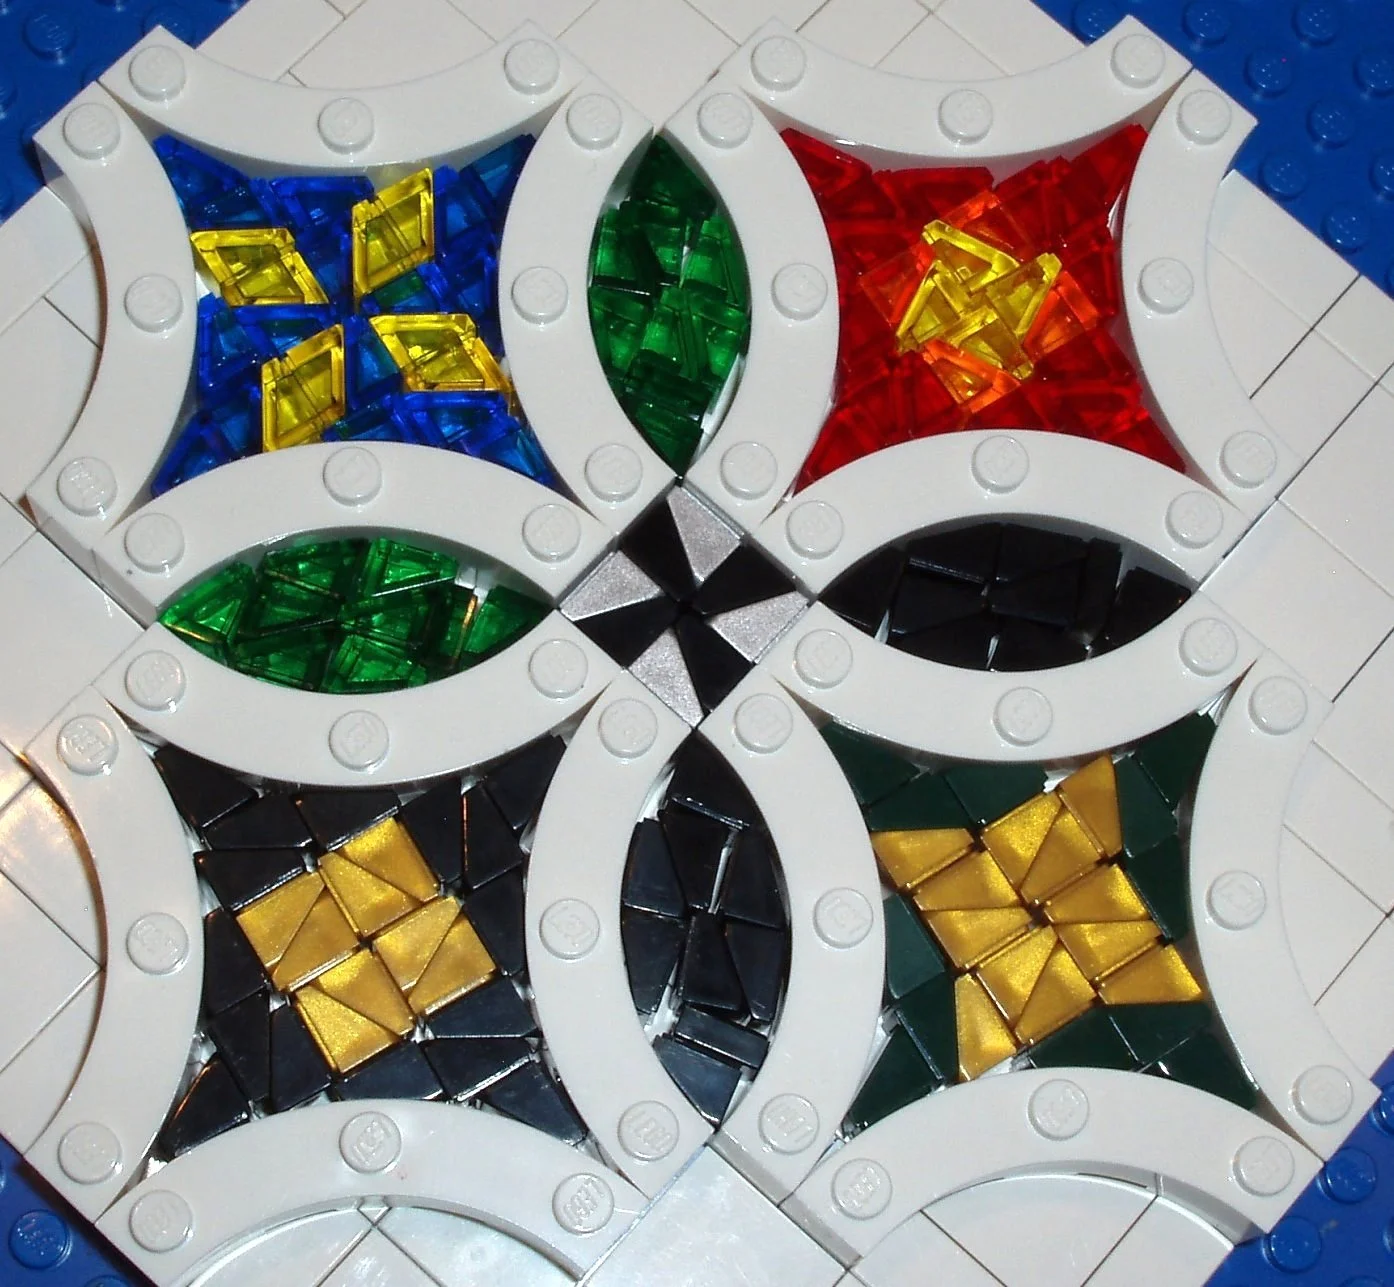
A lot of different patterns and geometric designs can be made with these squares. Images 3.2, 3.3, and 3.4 show various examples. Many other kinds of non-geometric images can be made as well.
Other Shapes
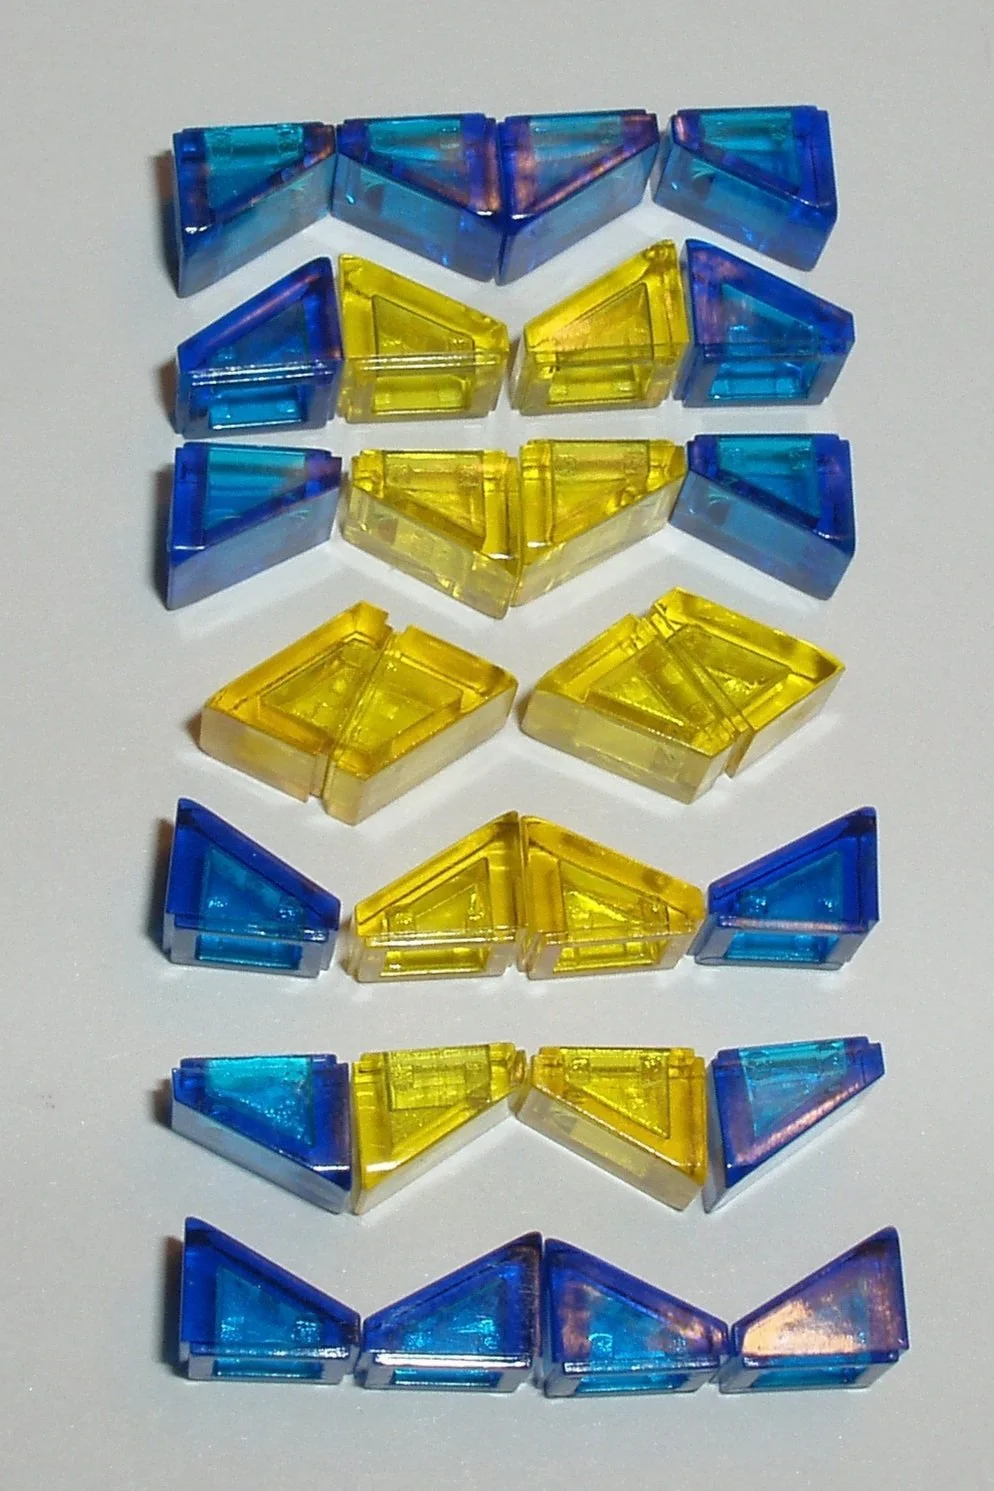
There are other shapes that can be used to create interesting patterns and designs. Some that I have found to be useful are trapezoids, rhombuses (and other parallelograms), triangles, rectangles, and hexagons. A few of these shapes are shown in Image 3.5. Tessellating these shapes, or variations thereof, with careful attention to color, will result in all sorts of potentially fascinating designs.
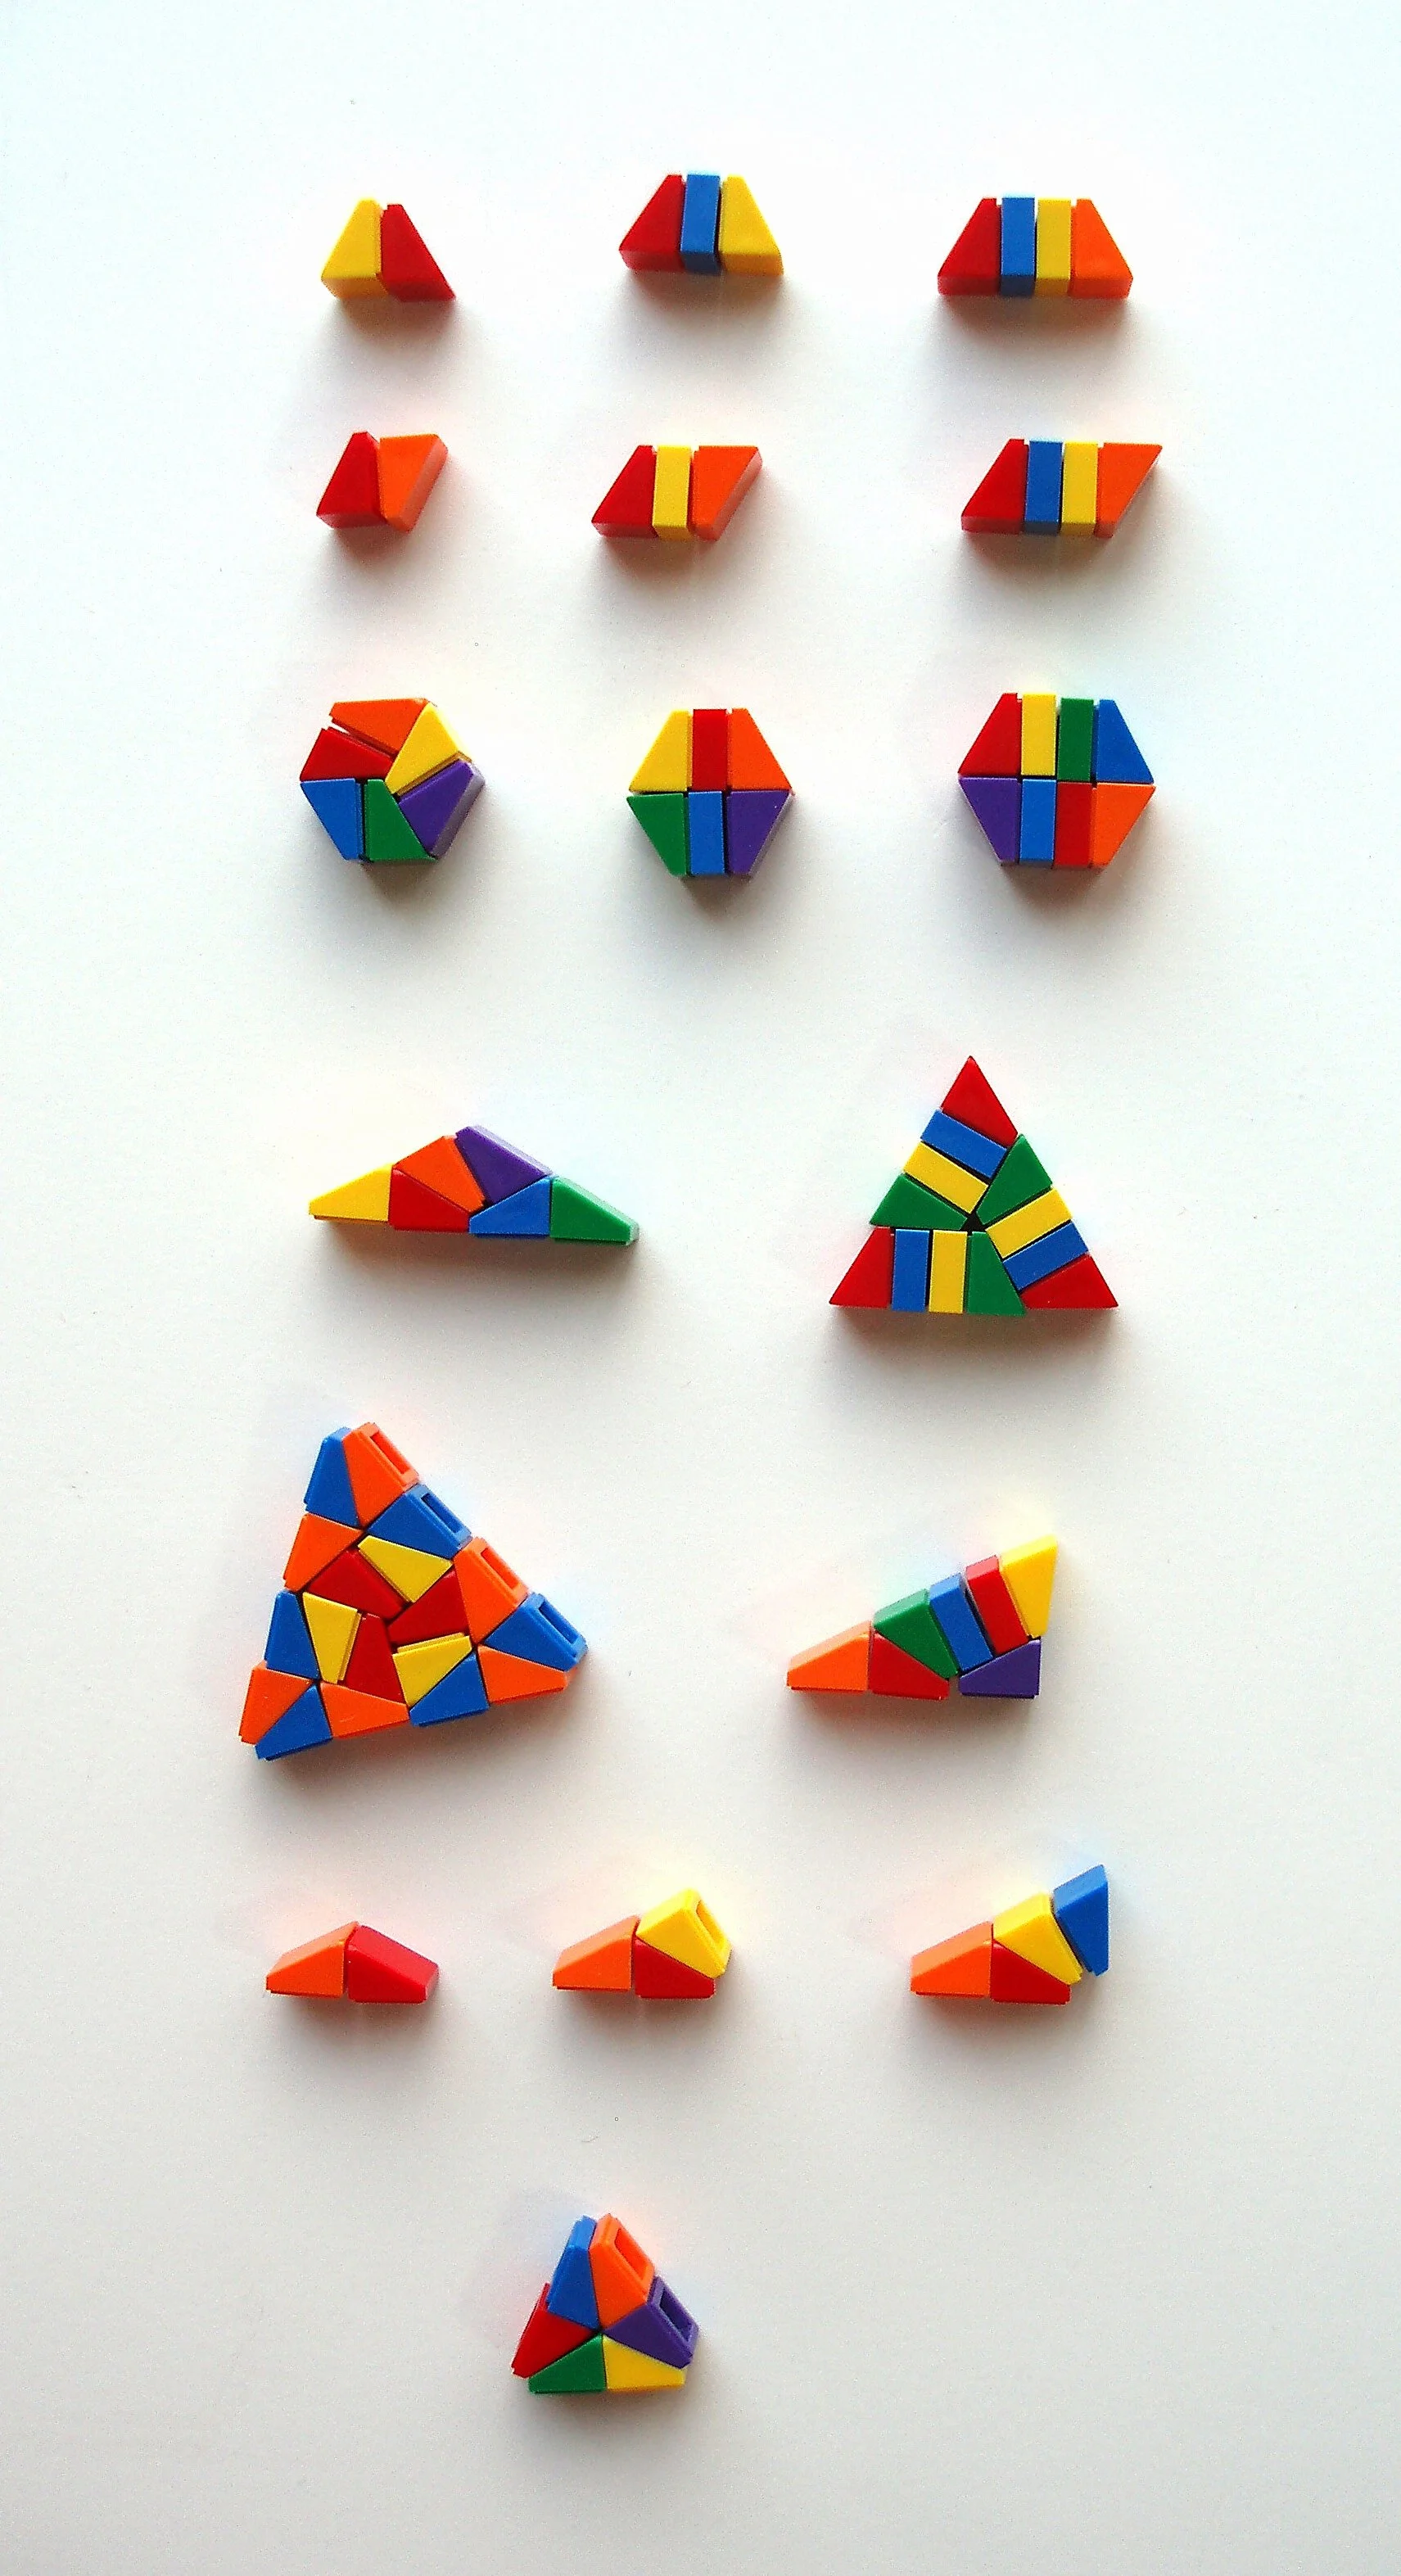
Image 3.5: Useful Shapes for Cheese Slope Mosaics
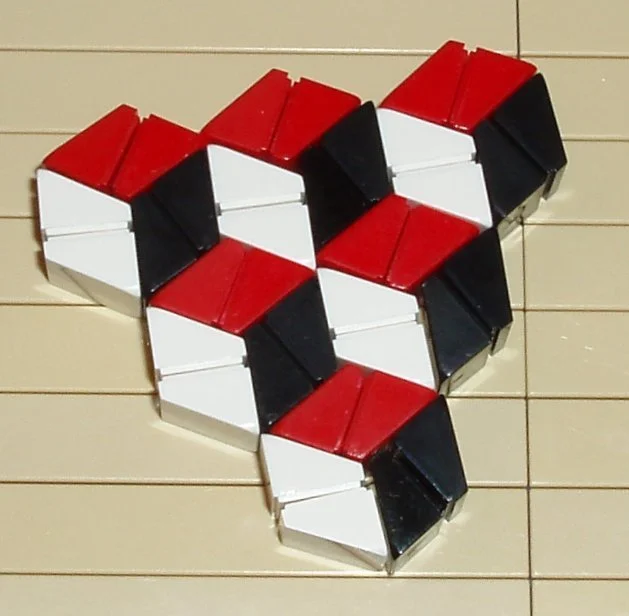
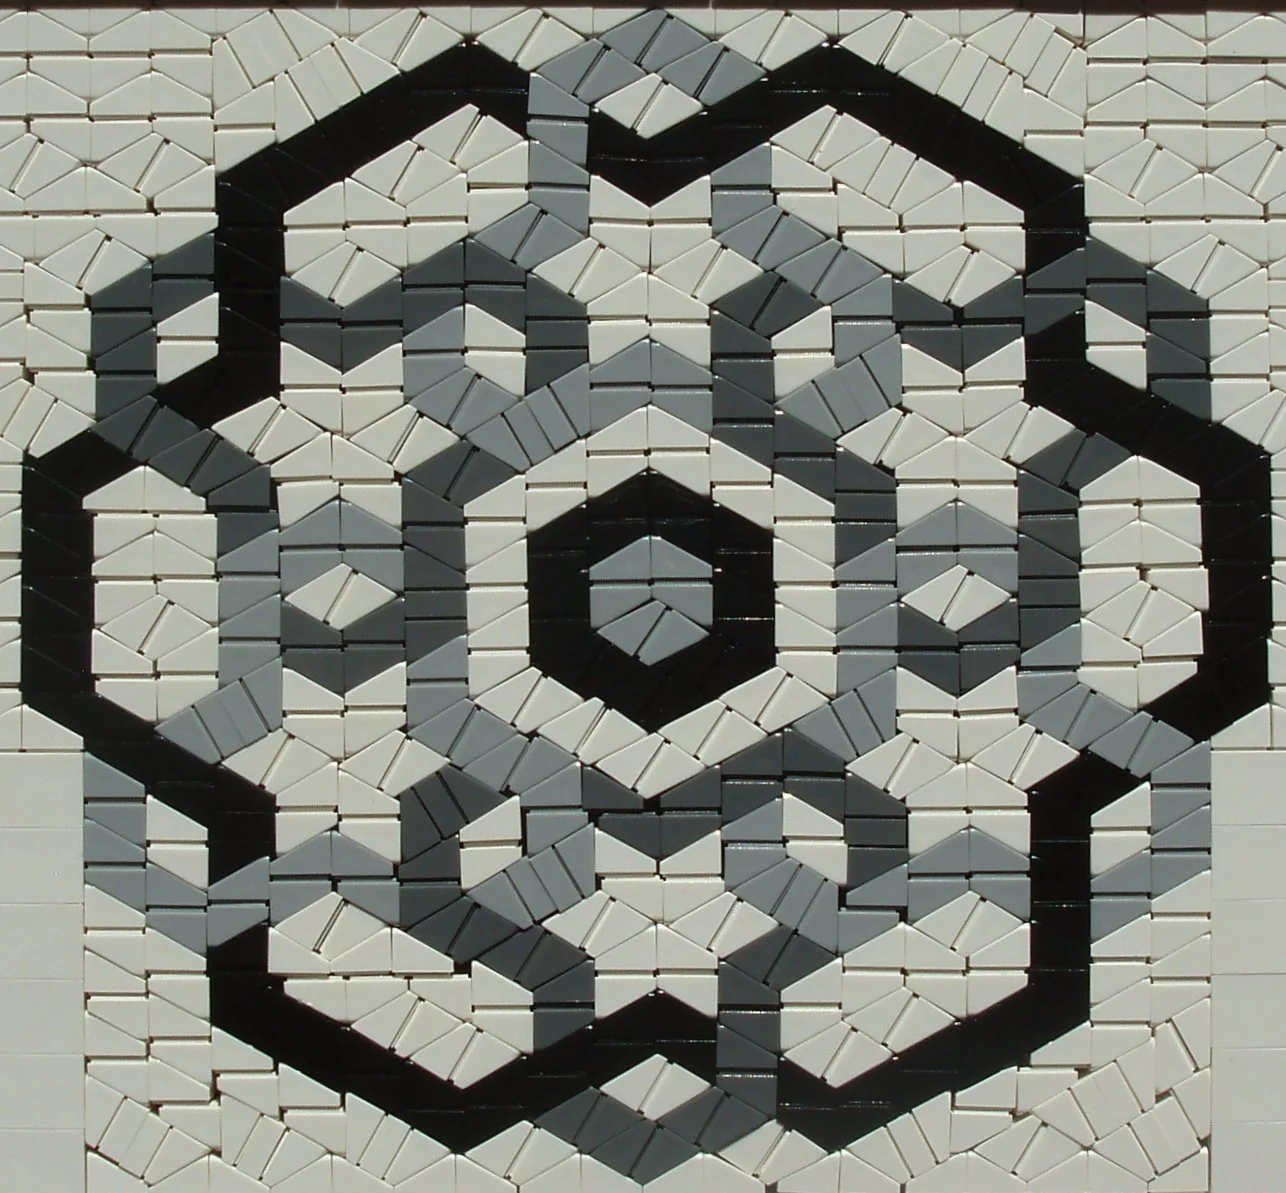
Here are two examples of designs made using some of the shapes in Image 3.5. The one in Image 3.6 is done mostly with a two-piece rhombus (the first shape in the second row) arranged into hexagons (the first shape of the third row). The design in Image 3.7 is made from triangles (the second shape in the fourth row) made out of trapezoids (third shape, top row). Image 5.7 shows another example of a hexagonal tessellation.
A Crazy Jumble
Sometimes you want to make a mosaic that cannot be accomplished by arranging cheese slopes in any sort of orderly fashion. Once you have a specific image in mind, first try to create the shape with cheese slopes and 1x1 tiles (or plates and bricks). Then try to fill in the gaps with other slopes and tiles.
For example, with the spider mosaic in Image 3.8, I first arranged the white slopes and tiles into a shape that approximated that of a spider’s body. The harder part was to go back and work to fill in all the negative space with black. I kept experimenting with different shapes and angles, trying to fill in the gaps as best as I was able. All sorts of different shapes were used to fill in the black area: lots of rectangles, triangles, trapezoids, and hexagons. There were still a few small gaps when I finished the mosaic, but black is a particularly forgiving color, so the small gaps that remained were not very noticeable.
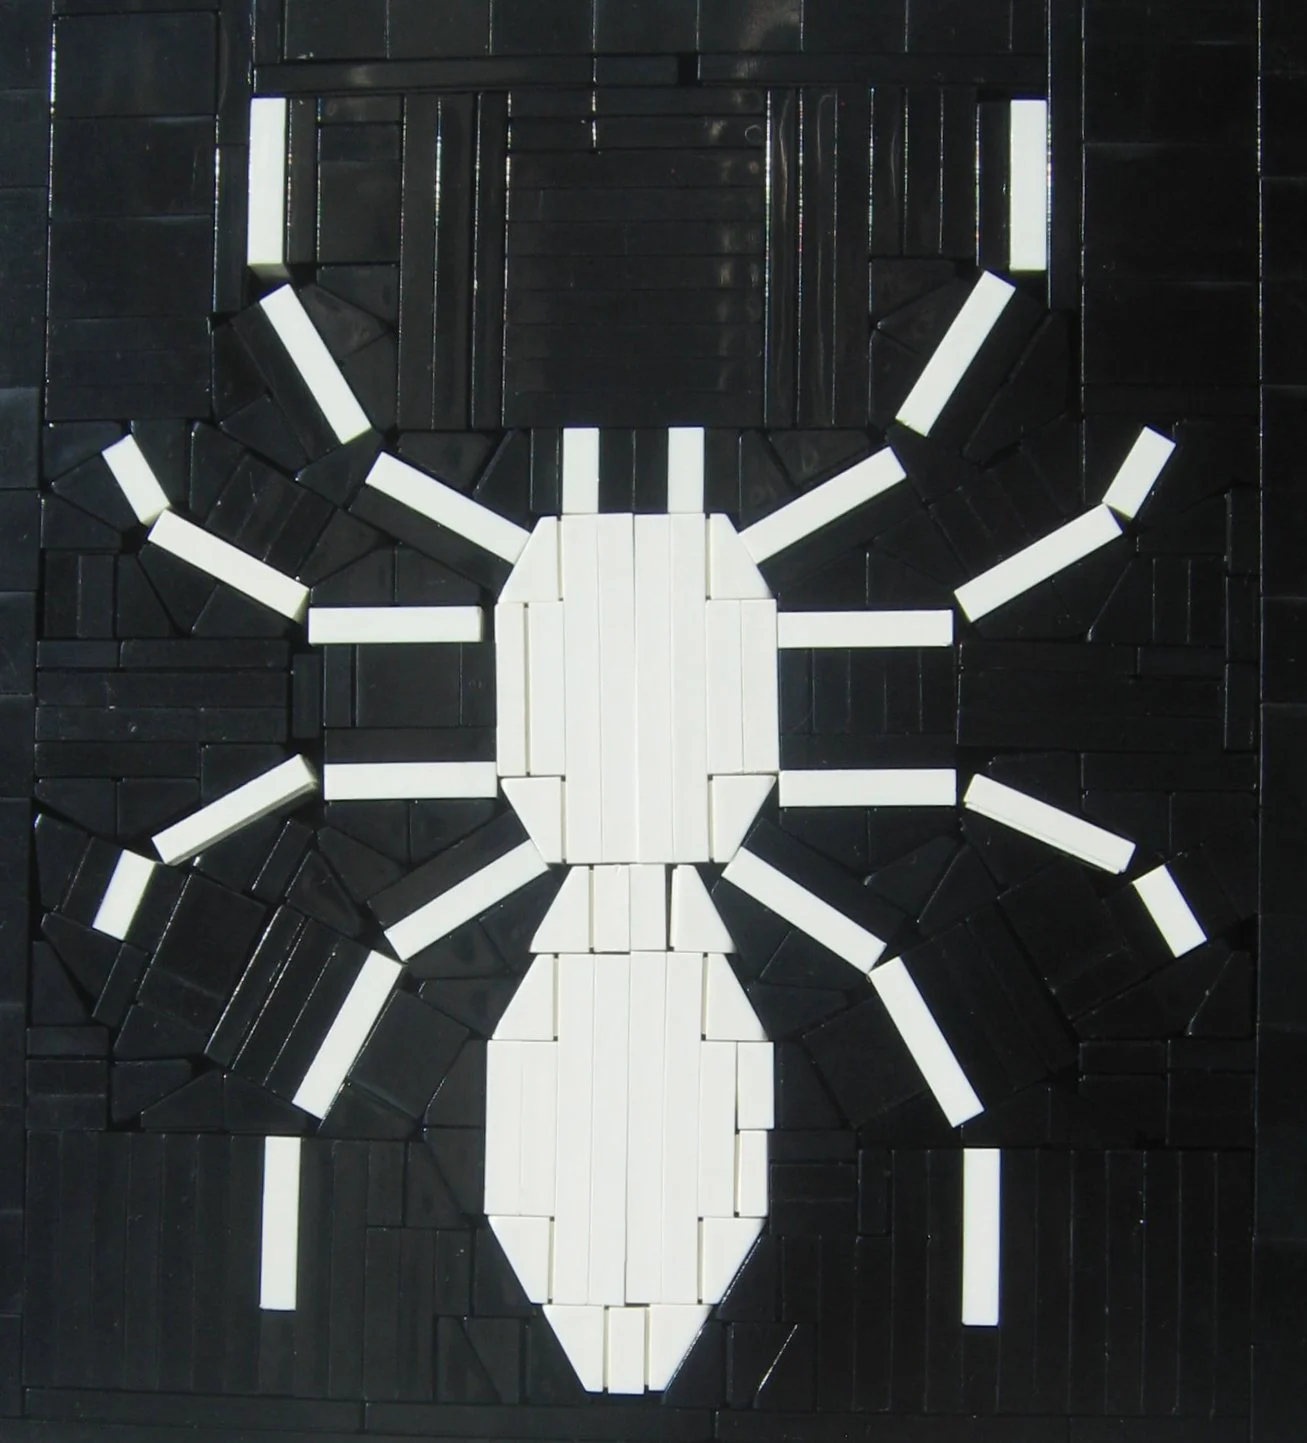
Image 3.8: Spider Mosaic
A large part of making a cheese slope mosaic is just approximating shapes, and slowly filling in the gaps, till you have something that is “good enough”. Rarely will it all fit together perfectly in a frame; just try to get it as good as you can, without noticeable gaps (although if necessary, the color black is good for hiding gaps that you just can’t get rid of).
Part 4: Planning a Cheese Slope Mosaic
Sometimes it is fun to jump right in and make your mosaic. Other times, it helps to have a plan. Here are some ideas to help with that.
Experiment and document
I have spent many hours just playing around and experimenting with cheese slopes. Then I documented the different patterns and arrangements that I found and developed a “library” of potential designs I could use for future projects. These are collected in a few sets on Flickr. Now, when I want a mosaic for a specific project, I will look at those sets to get ideas. If you do spend time experimenting, make sure to take clear photos of what you discover. Then when you want to incorporate a mosaic into a larger creation, you will have several possibilities which you could use.
Do Research
It is also a good idea to see what has been done before by others. The internet is a great resource for finding ideas. You could then adapt a design to suit your own purposes, varying a few shapes, changing a few colors, modifying the size, etc. There are some links to some helpful places included at the end of this article.
Draw the design on paper
Sometimes (but not always!) it can be helpful to plan a design out on paper. Graph paper can be helpful for this. If you are planning on making a mosaic with just cheese slope “squares”, you could get graphing paper with squares (or print it from the internet), and draw out potential designs. Just draw the diagonal line to indicate the two cheese slopes in each square. Remember that two cheese slopes can be placed together into a square with four different orientations (as shown in Image 3.1). You can also find hexagonal graph paper on the internet that can be printed and then sketched on. I use these for working on patterns made primarily of rhombuses, trapezoids, and hexagons.
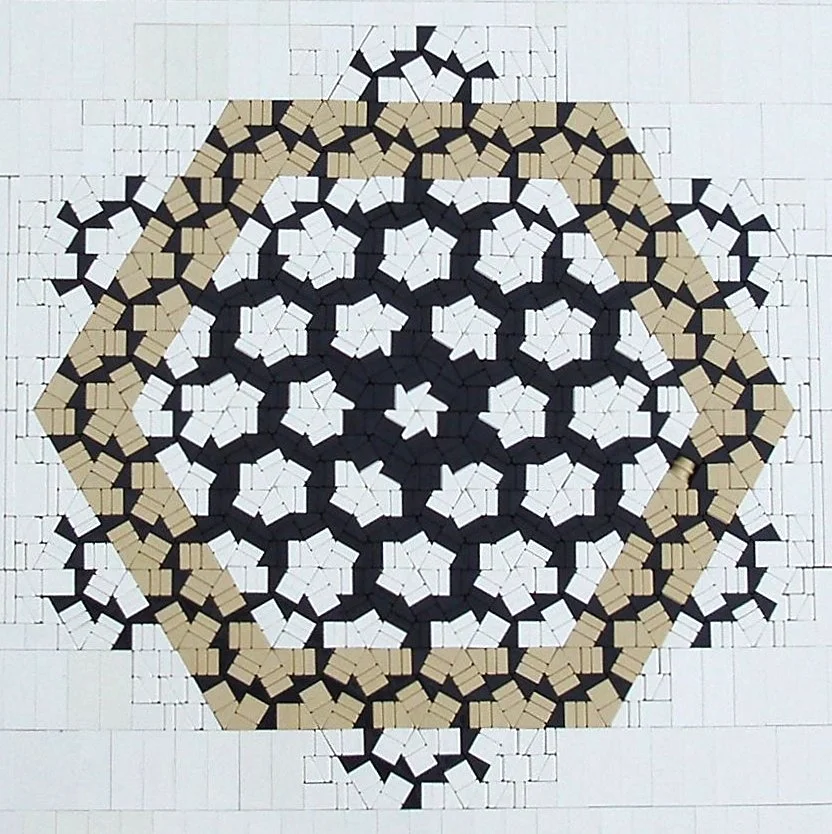
Images 4.1 and 4.2 show an example of using hexagonal graphing paper to plan out a design. Image 4.1 shows the plans made on the graphing paper. For each hexagon, I sketched in the arrangement of rhombuses or trapezoids that I wanted. Image 4.2 shows the finished result.

Make coloring sheets
I find this to be especially useful for geometric patterns. If I find an interesting configuration of shapes, I will usually want to try to color it in many different ways, to see what patterns can be highlighted. Actually making a cheese slope mosaic for each possibility is a ton of work. Instead, I will make one all in white. Then I will take a picture of it and print off multiple copies. It is much quicker to draw in the different color possibilities than to try each one out with real cheese slopes. (You can also test color changes easily using digital building software.)
Images 4.3 through 4.6 show an example of this process. First, after coming up with an arrangement of shapes that I liked, I took a photo of an all-white version (Image 4.3). (The basic design consists of 1x1 bricks attached to a baseplate at an angle, surrounded by a cheese-slope rhombus on each side).
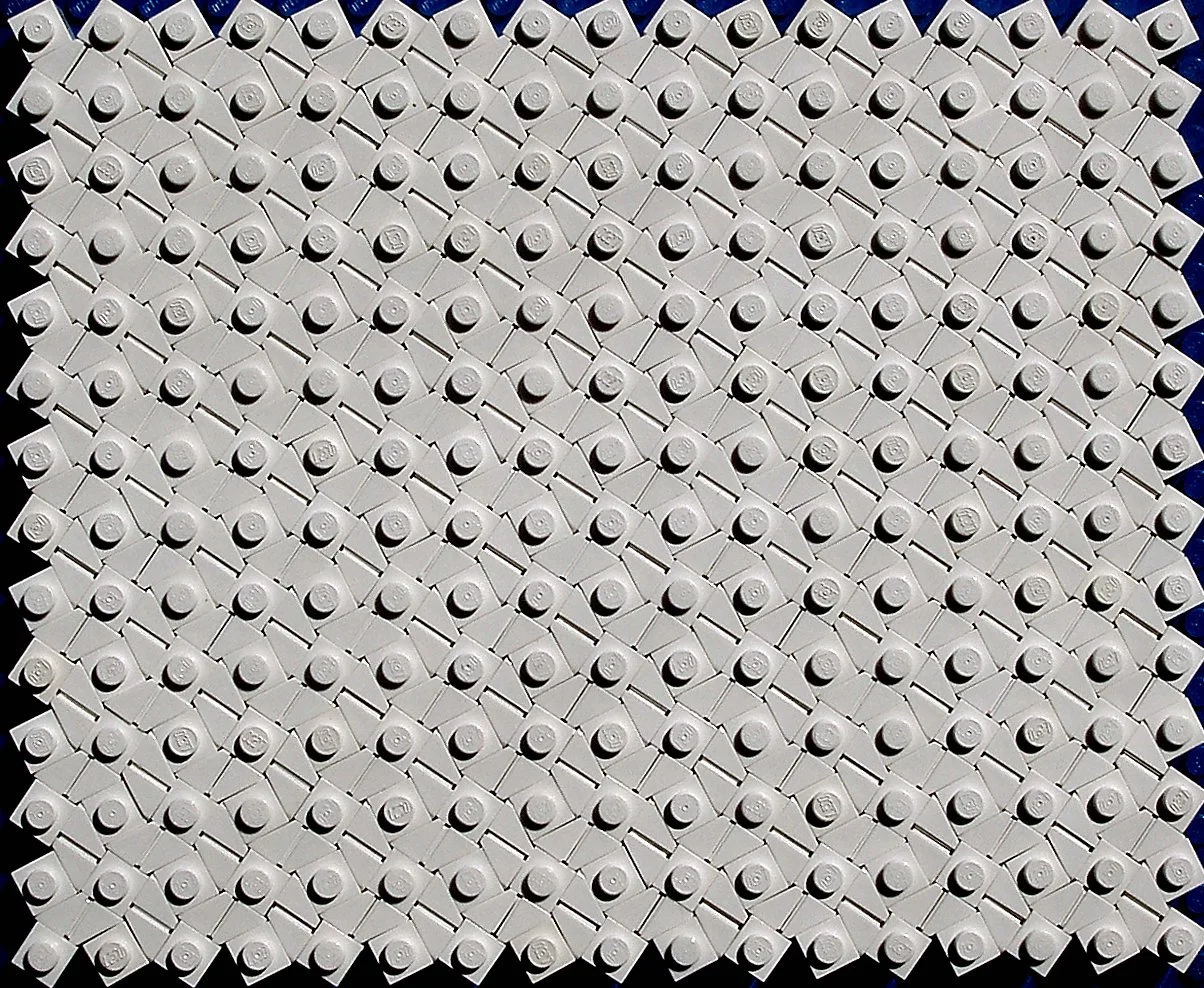
Image 4.3: Blank Coloring Sheet
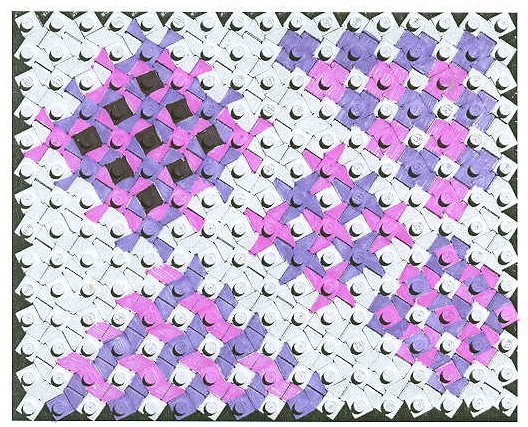
Next, I printed out several copies, and experimented with coloring in the pieces in different ways, as is shown in Images 4.4 and 4.5.
Then it was much easier to make the actual mosaic (with somewhat different colors), as shown in Image 4.6. The outside border follows a pattern drawn out in Image 4.4, and the inside design was planned out in Image 4.5.
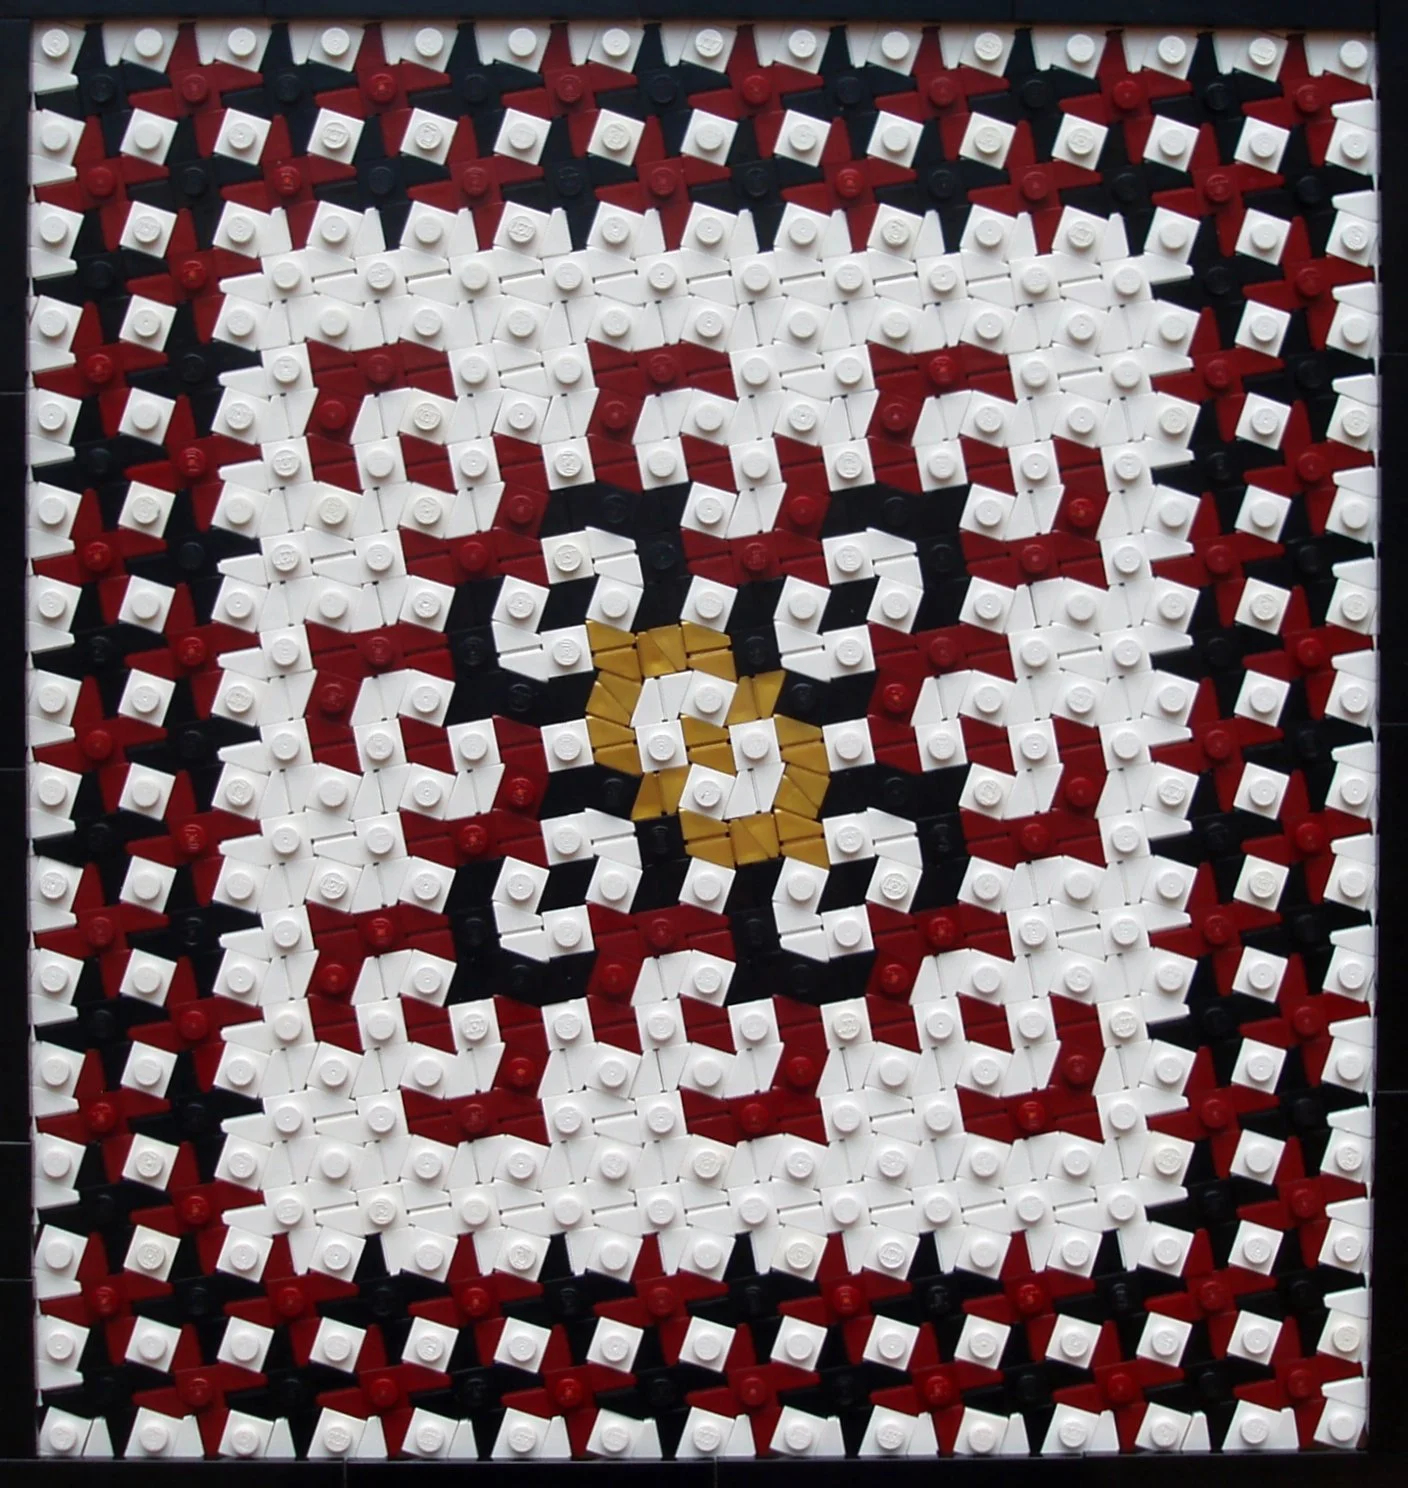
Image 4.6: Mosaic based on coloring sheet in Image 4.5
Experiment and document some more
I highly recommend experimenting and exploring, and then documenting all the results that you find. If you sketch out designs on graph paper, or take photos of small doodles, or color a design several different ways – document it. That way you will have a growing repertoire of designs that you can use in the future. And if you don’t mind sharing, upload your findings to the internet: there are many other builders out there who would appreciate them.
Part 5: Framing a Cheese Slope Mosaic
There are several factors to take into consideration when framing a cheese slope mosaic. It can be built in different ways, depending on what it is going to be used for.
Frame Orientation
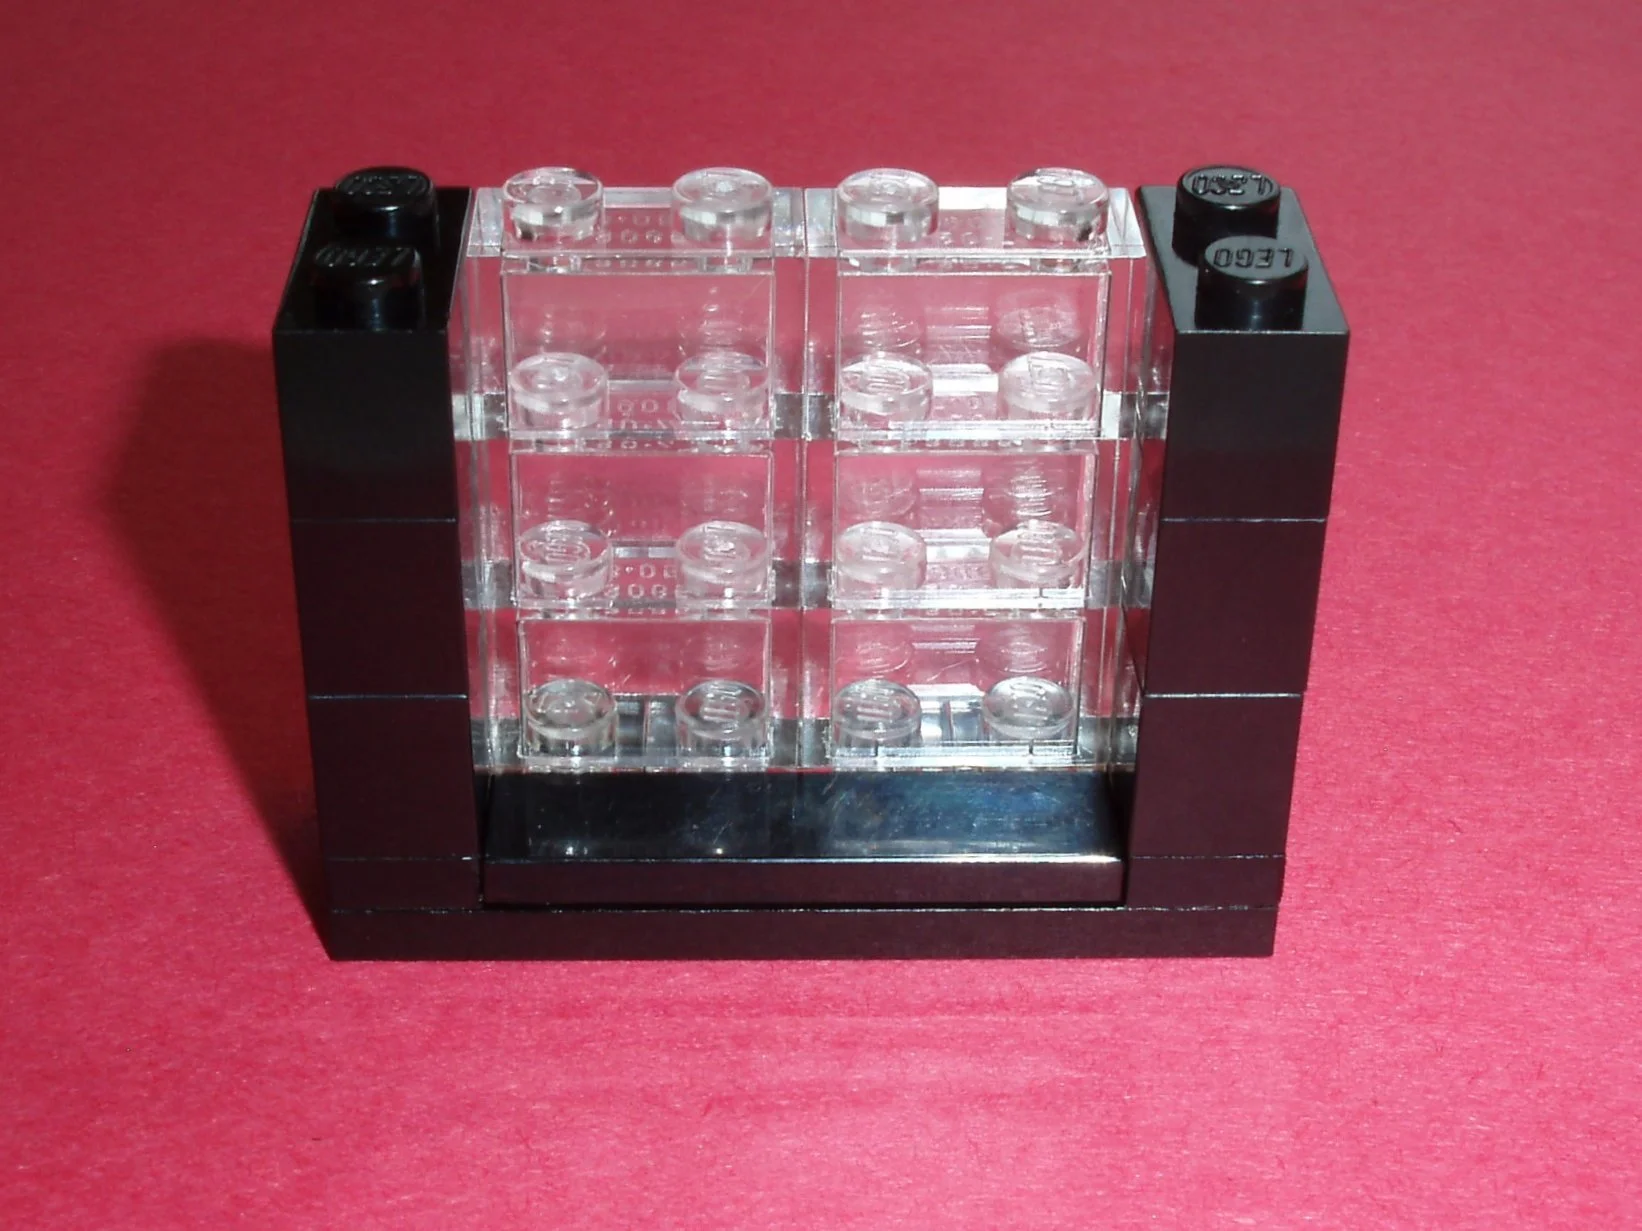
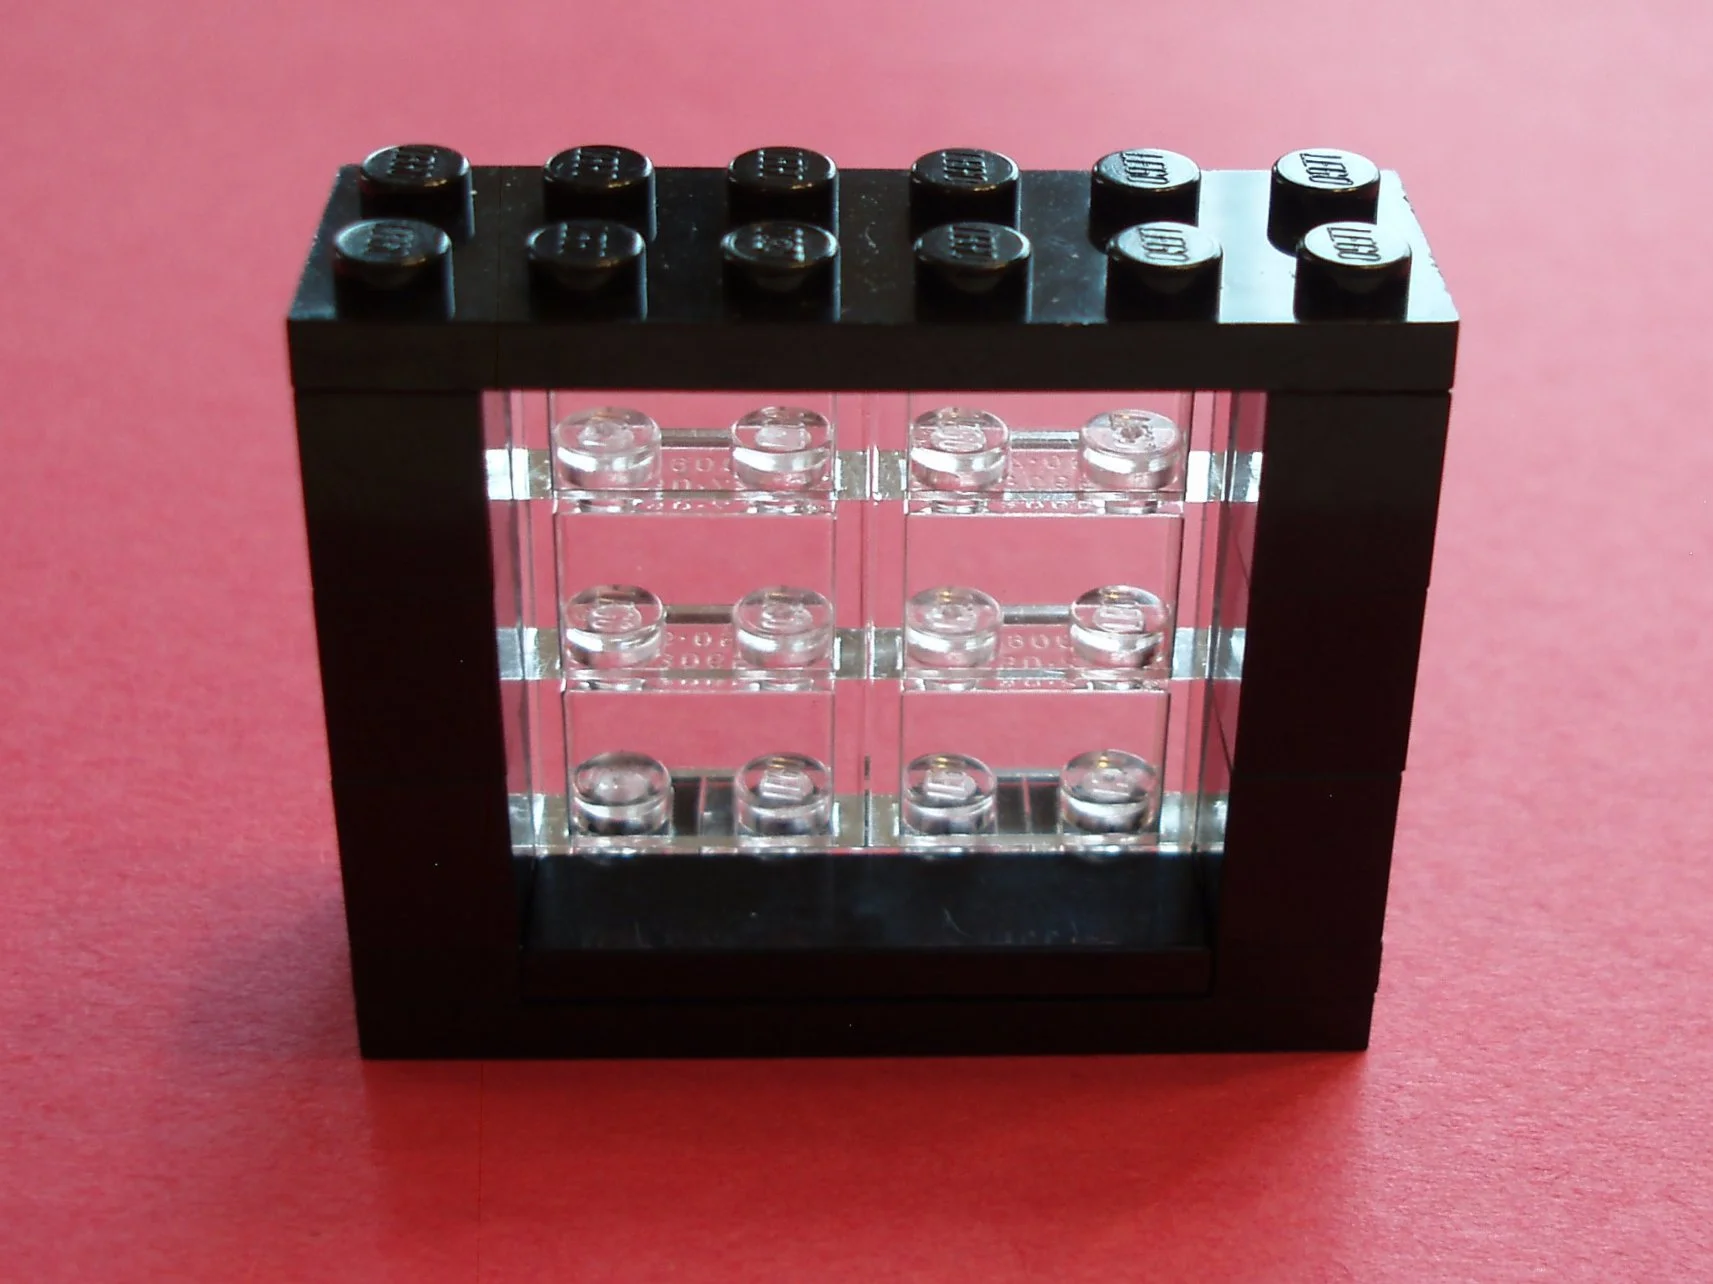
For mosaics that will be displayed vertically, such as in a wall or window, it works well to build the frame on a plate two studs thick, with whatever length is required. Build up a back wall and two sides, and then top it off with another plate. For stained glass windows, use transparent bricks for the back wall, so that light can come through.
Image 5.1 shows an example of a vertical frame with transparent bricks used for a supporting back wall. Notice that tiles cover the exposed studs on the bottom plate. This may or may not be necessary, depending on the design being used. The frame in Image 5.1 is shown without the top plate, to show more clearly how it is set up. Image 5.2 shows the completed frame, with the top in place.
For mosaics that will be displayed horizontally, such as floor decoration, the mosaic can be made on tiles attached to the top of a layer of bricks or plates. Image 5.3 shows a partially filled-in example of this technique.
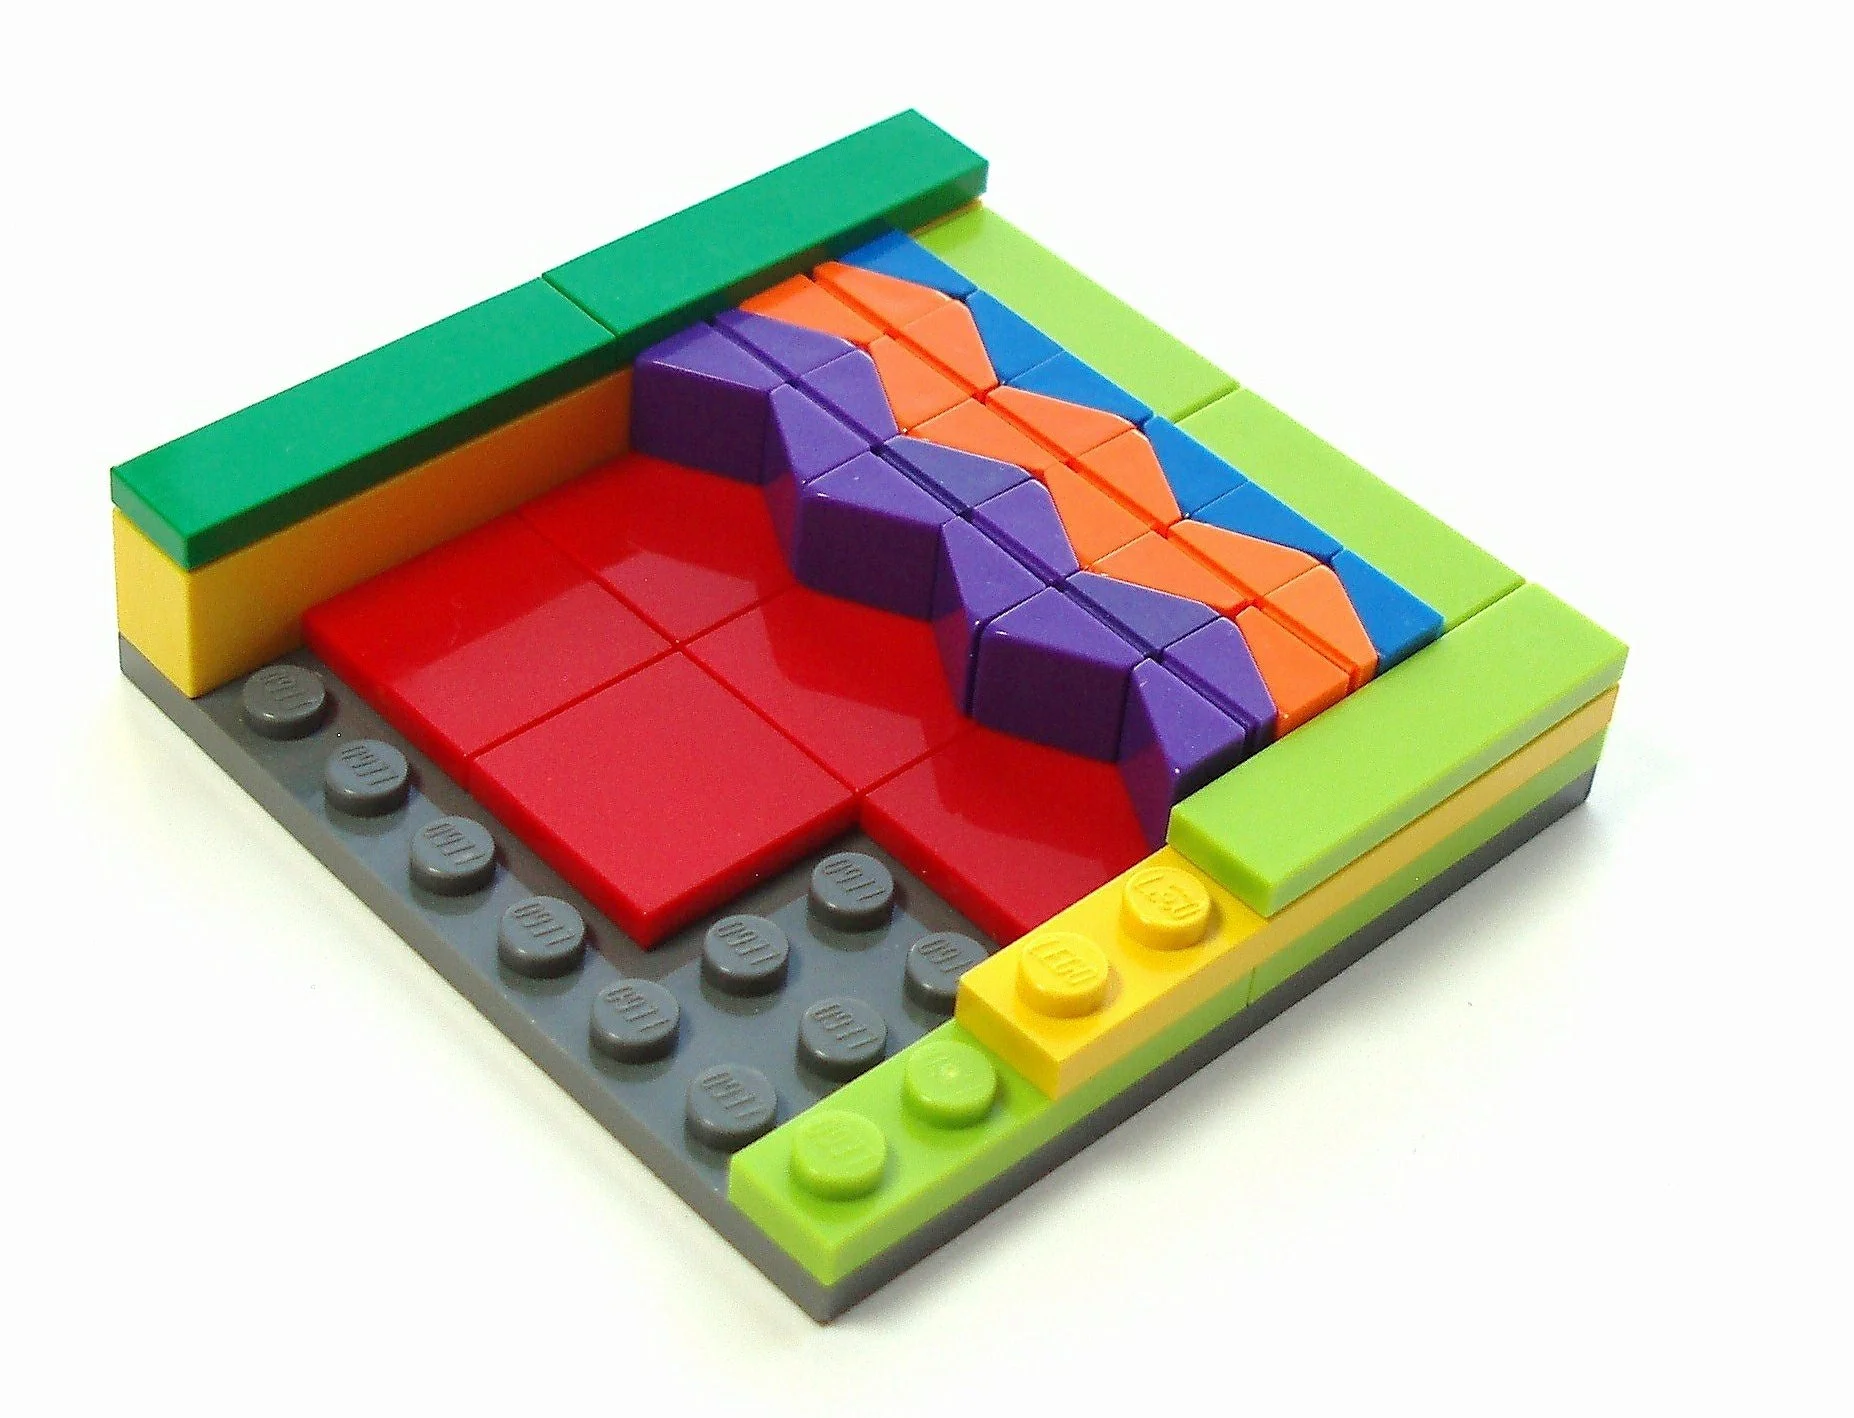
Image 5.3: Simple Horizontal Frame (Uneven)
However, with this simple set-up, the mosaic will not sit evenly with the surrounding floor. It will be one (or more) half-plates higher or lower, depending on how high you build the frame. This can sometimes be a good thing, especially if you are making a rug which would normally sit up a little bit higher than the surrounding floor anyway. In Image 5.3, the back wall is made with green tiles on top of a single layer of yellow bricks. The green tiles are 1 half-plate higher than the mosaic. The other two sides are made with a layer of two plates, topped with lime tiles. The mosaic is elevated 1 half-plate over this section.
It is also possible to get the mosaic level with the surrounding frame. One way to do this is to insert a level of bricks lying sideways between the tiles and the pieces of the mosaic. This will take up more vertical space, but the mosaic will be able to lie flat with the surrounding floor. Image 5.4 shows how this is done. On the bottom is a tan base. On top of that is a layer of red tiles. Next comes a stack of yellow bricks lying sideways. In this case, the stack of side-lying bricks is topped with a plate and then a tile to achieve a perfect fit. The mosaic is built on top of the yellow bricks, and will be perfectly even with a frame two bricks high (black and grey in this photo). For an even smoother finish, replace the top gray brick of the frame with a layer of two plates, and then top it off with tiles.
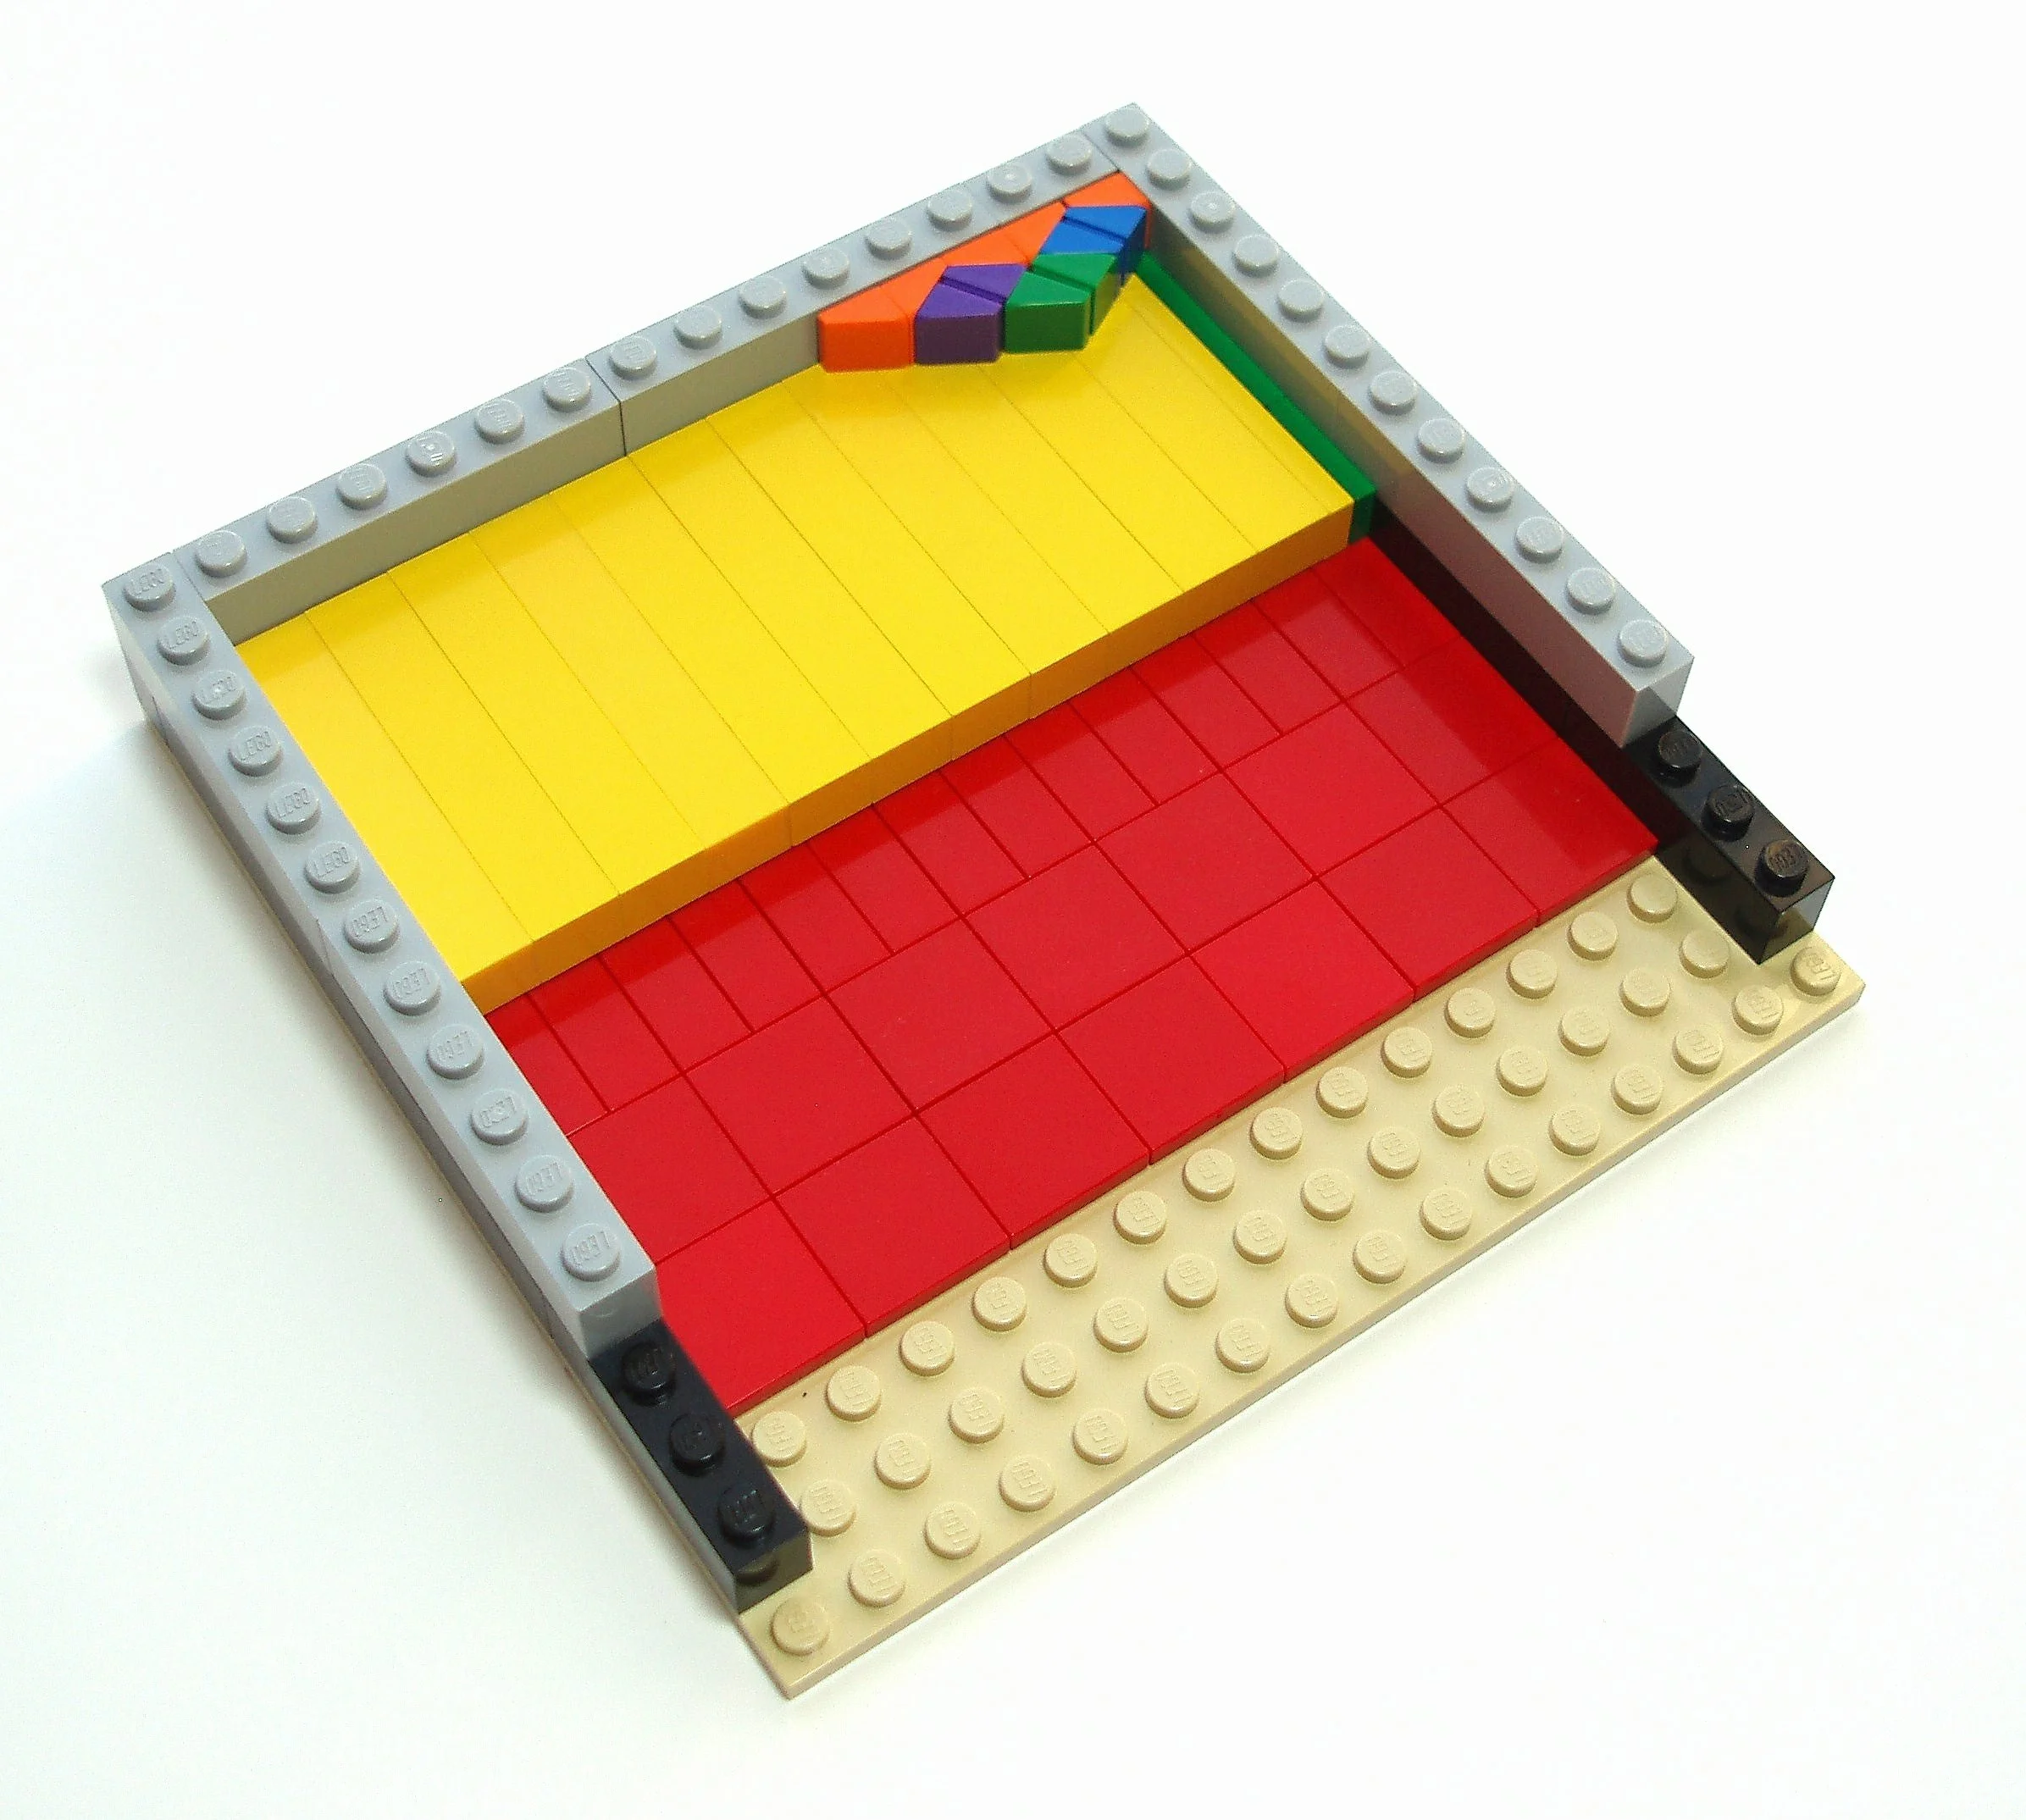
Image 5.4: Technique for Making a Horizontal Mosaic Even with the Frame
Frame Shape
Rectangles are the most common shape for framing a mosaic, but many other shapes can be used, too. It is possible to use crescents, hexagons, various curved shapes, and more. It will usually take a lot of trial and effort to try to get the cheese slope mosaic to fill in the frame with as few gaps as possible. Images 5.5, 5.6, 5.7, and 5.8 show a few mosaics done in non-rectangular frames.
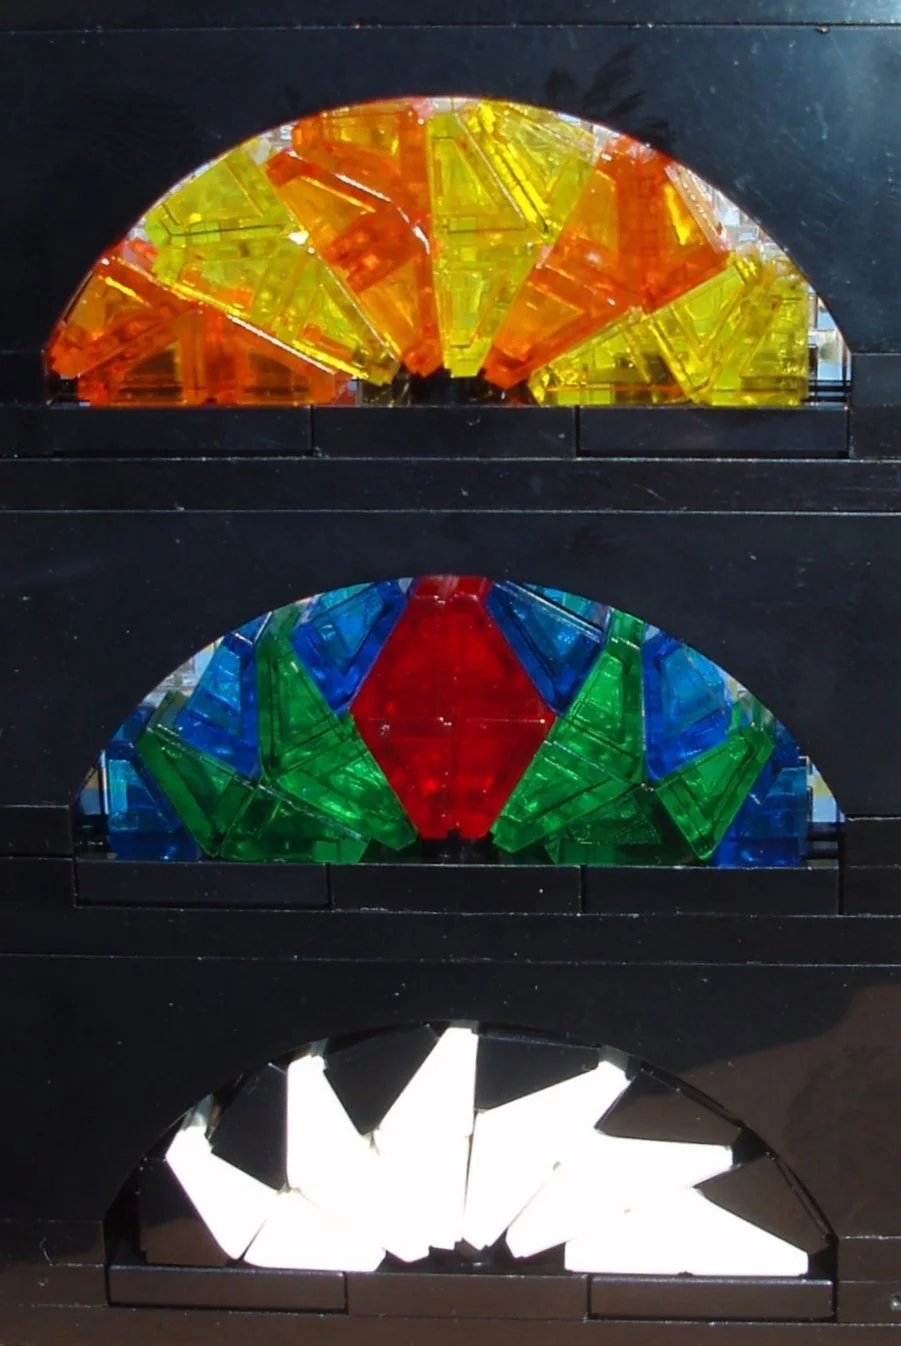


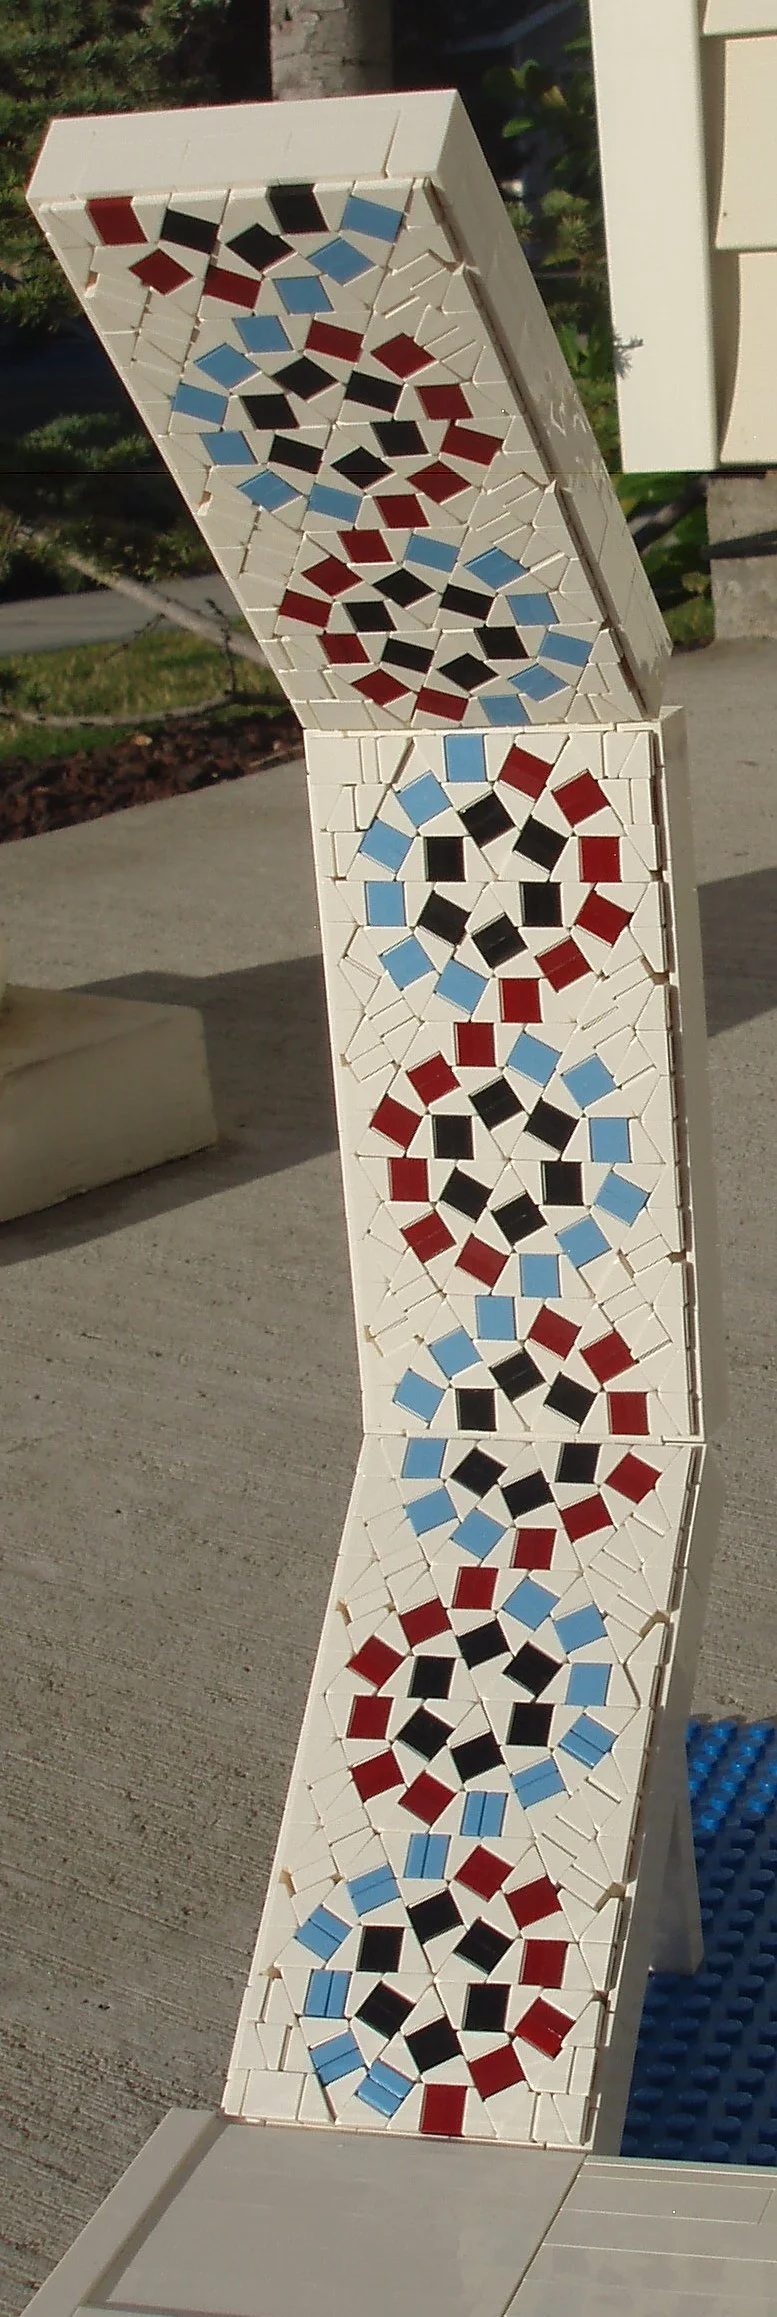
Panels and panel corner pieces can be used to make a thinner frame. This can be useful for various things, such as curving mosaics (Image 5.11) or making staircases (Image 5.12).

A lot of patterns made with headlight bricks and other pieces can have gaps that can be filled in with cheese slopes. For example, the pattern in Image 5.13, which uses a lot of headlight bricks and slopes, resulted in a gap the shape of an 8-pointed star.
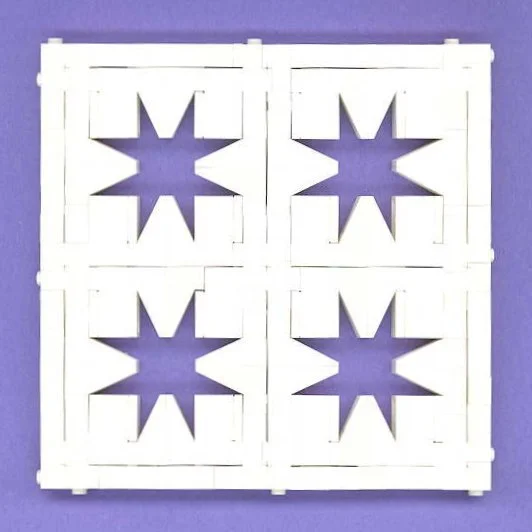
Image 5.13: Eight-Pointed Star Frame
The star-shaped gaps can be filled in with cheese slopes. With careful color planning, the frame becomes an integral part of the mosaic (as shown in Image 5.14).
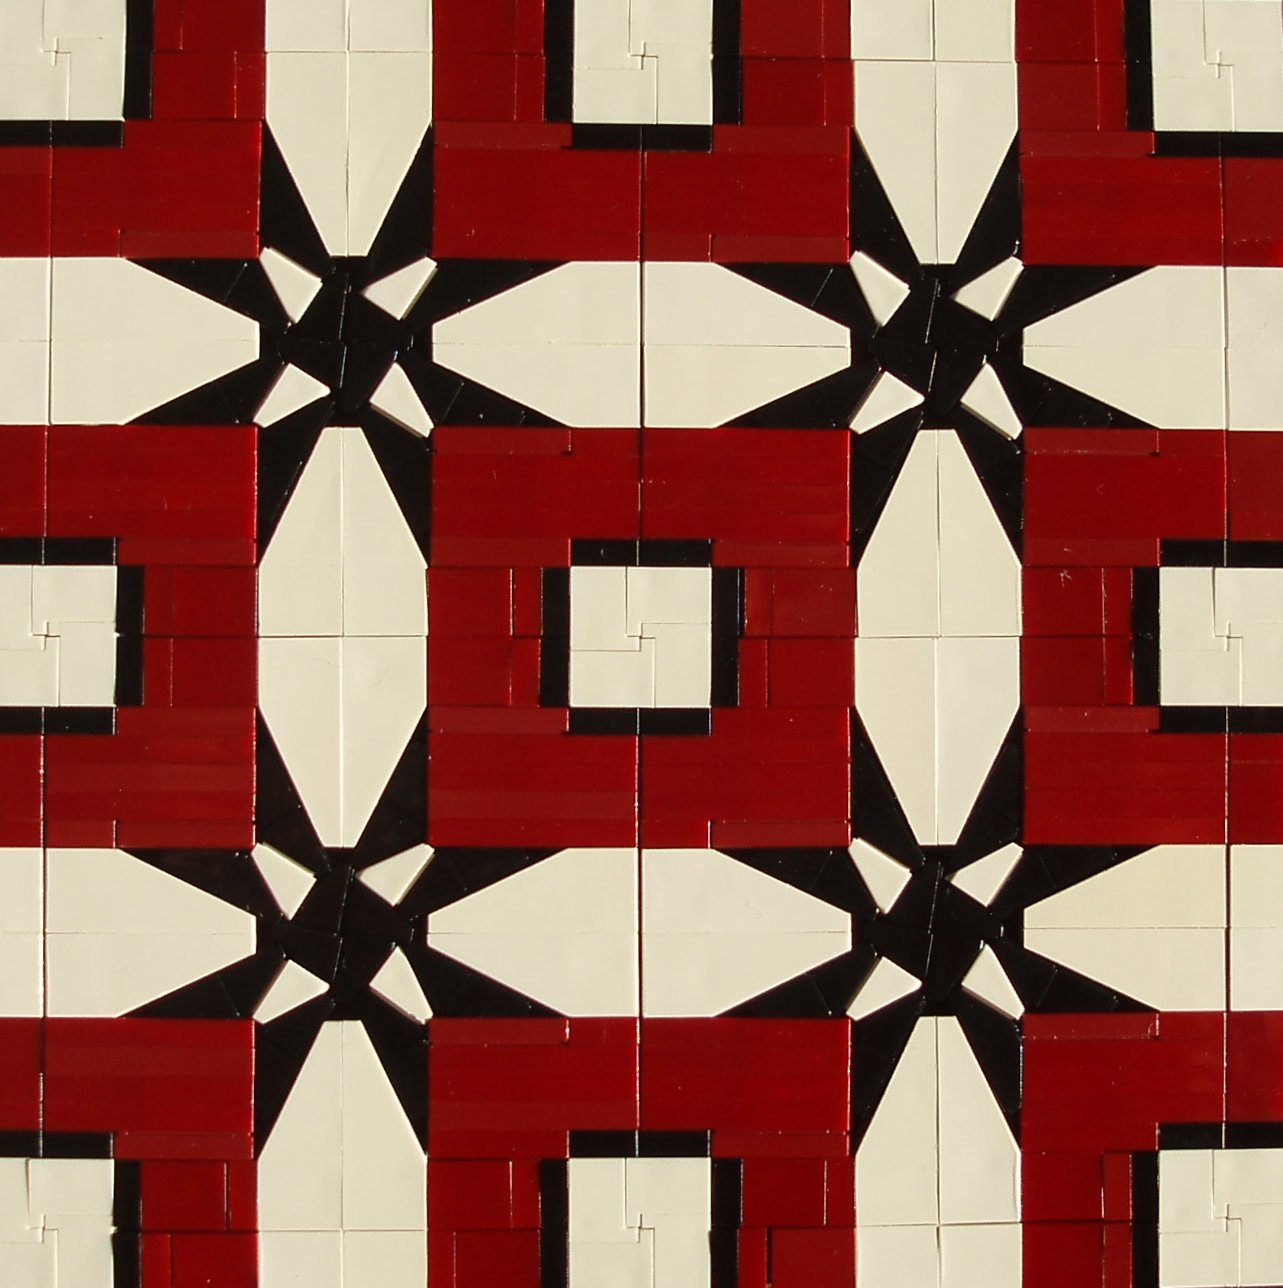
Image 5.14: Eight-Pointed Star Mosaic
Which comes first, the mosaic or the frame?
Frame First. Sometimes a cheese slope mosaic needs to be an exact size. Perhaps you have built a church and need a stained glass window to fit in a specific space. In that case, you would build the frame first, and try to create a mosaic to match it. This often turns into a puzzle, as you try to fill in the entire space without leaving any gaps. With the Christmas Window (Image 1.1), I found a frame size I liked for one pane of the window. Then I knew that all of the other panes needed to be the same size. It took a lot of trial and error to get designs that would fit into the established frame size. Lots of ideas I had were scrapped, but eventually, I found ways to fill up all the panes.
Mosaic First. Other times, you might have an idea for a mosaic, but not know how large it will end up. Or perhaps you’re just experimenting with designs, and find one you like. You would then need to measure your mosaic so you can make a frame big enough to fit the whole thing inside. After you transfer the mosaic into the frame, there will usually be a bit of extra space, which will need to be filled in. The “Mosaic First” method has the disadvantage of having to make your mosaic twice, once in the designing stages and once again to fit it into the frame. This can potentially be avoided with a bit of planning.
One way would be to make the frame first, but make it extra-large so that you know that whatever mosaic you come up with will fit into it. This method will usually cause you to end up with a lot of extra space, which will need to be filled in. Another possibility would be to carefully adjust the size of the frame while the mosaic is still in it. This is tricky, and will often result in the partial destruction of the mosaic, but it can still be quicker than re-doing the whole thing in a brand-new (and correctly sized) frame. Or, if you’re particularly brave, you can surround your mosaic with an outside frame, built to fit, but not include a supporting back wall. If you get the mosaic into the frame tightly enough, you can lift the whole mosaic up, and the pieces (hopefully) won’t fall out. Image 2.3 shows one mosaic that was done that way.
Part 6: Eliminating Gaps
No matter how well a mosaic is planned, if it is at all complex, there will be gaps between the pieces that will need to be filled in. Otherwise, the mosaic will be too loose. From a purely aesthetic standpoint, a mosaic filled with cracks and gaps is not nearly as attractive. Sometimes filling in gaps will be as easy as sliding in an extra tile or two. Other times, you can substitute shapes in the mosaic with similar shapes of a slightly different size. This needs to be done with consideration for the colors you are using. Depending on the design, some substitutions might not work, because they would change the image too much.
Here are a few suggestions for substitutions. These shapes are shown in Image 3.5.
Trapezoids
Add or remove some of the plates or tiles between the cheese slopes. (See Image 3.5, top row.)
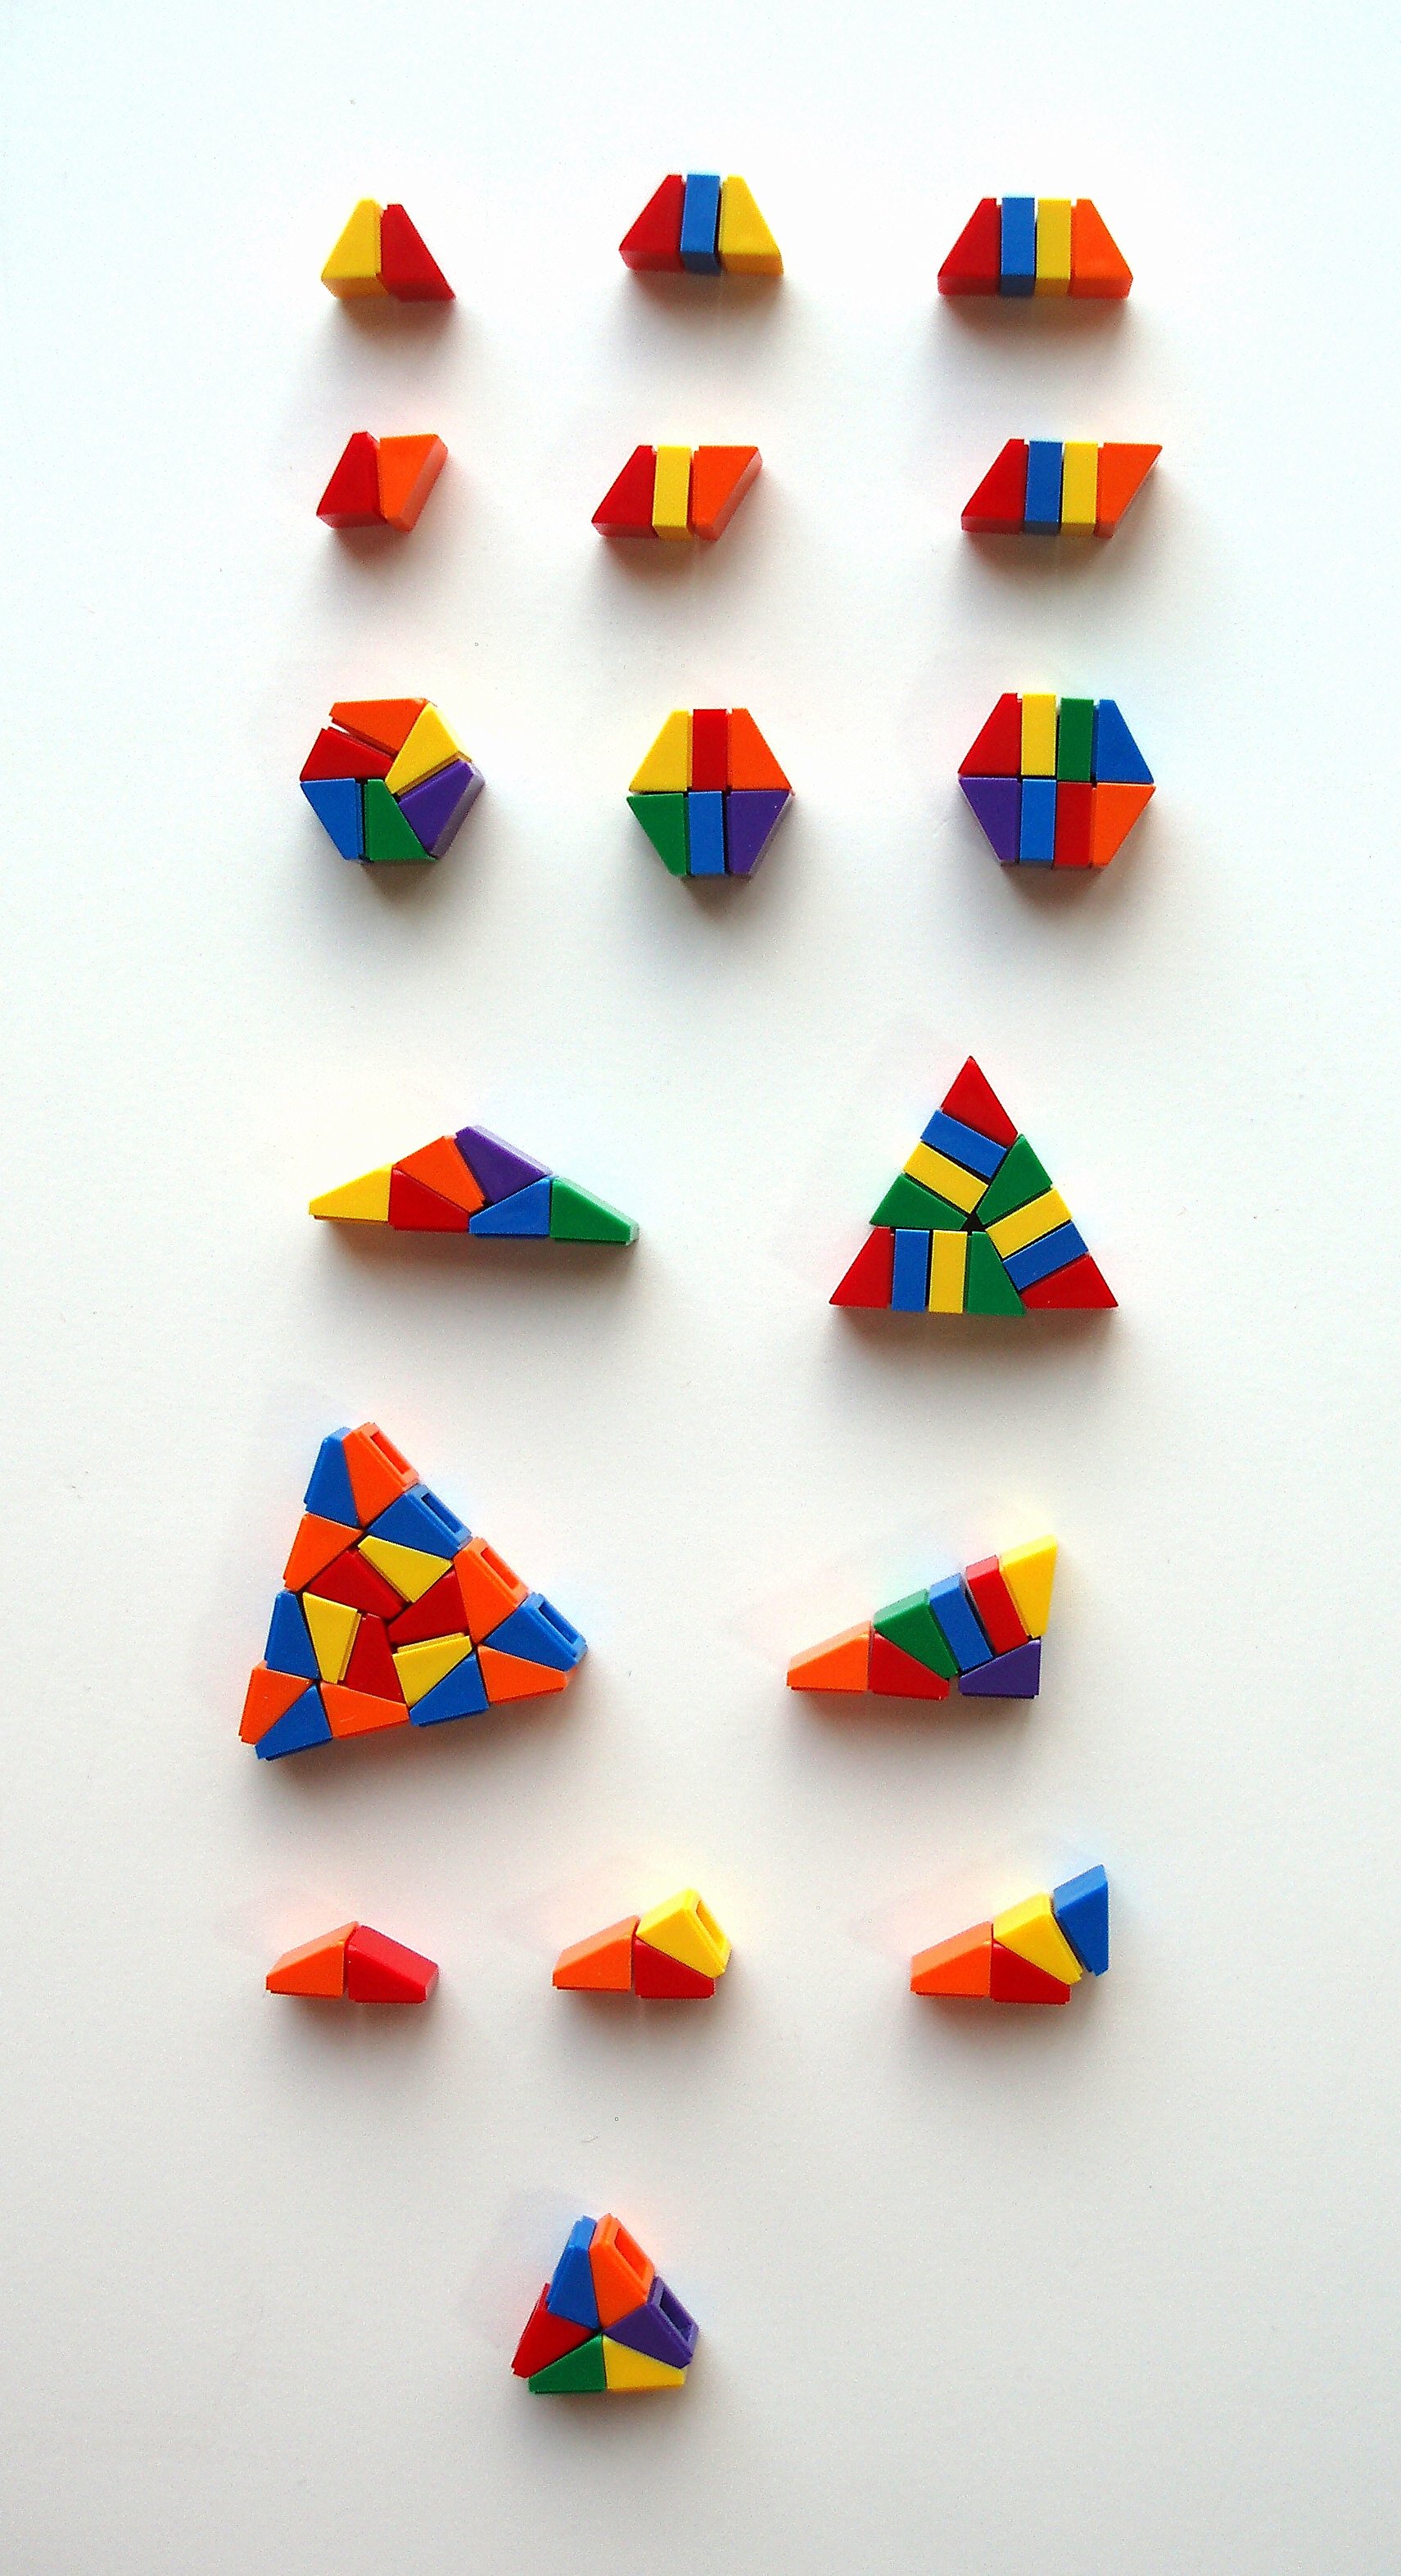
IMage 3.5 included again for your convinience
Parallelograms
Add in extra tiles or plates between the two cheese slopes. (See Image 3.5, second row.)
Hexagons
Hexagons can be made several ways, with slightly different dimensions. If it is made up of 2 trapezoids, you might adjust the number of plates/tiles in the trapezoids to make them bigger or smaller. Sometimes hexagons are made up of 3 rhombuses. Those are harder to adjust, but often switching to a hexagon made up of two trapezoids will help (as long as it doesn’t mess up the colors of your design). (See Image 3.5, third row.)
Rectangles
Rectangles come in many different lengths. You can see various lengths of rectangles in Image 6.1. All measurements are done in half-plates. If just bricks, plates, and tiles are used, the rectangles would all have lengths in multiples of two. But with the addition of a cheese slope "square", you can approximate odd-numbered lengths as well.

Image 6.1: Approximate Rectangle Dimensions
If you have a section of a mosaic with rectangles that are either too tight or too loose, try using a rectangle either slightly larger or slightly shorter. This usually means pulling out or adding in a cheese slope "square" so that the change in area will be as small as possible.
Sometimes during the process of filling in the gaps, a section might get filled in a bit too much. The tension in the mosaic will be too high, and the frame will start bowing and bending. If the mosaic is too tight, the frame might eventually snap. This can be puzzling because this will often happen while there are still obvious gaps in the mosaic. As you tighten some places, others might start getting pressed out of alignment, which can actually start creating more gaps. It helps to take a moment to examine the mosaic carefully, to see which pieces are pushing the others out of alignment. Then try removing some pieces to see if the problem is solved. Use your best judgment and be careful.
Filling in gaps usually isn’t easy. Try… and try again… and if nothing works, you might need to re-do a part of the mosaic.
Part 7: Helpful Hints
Here are some helpful hints that will hopefully make the construction of a cheese slope mosaic a bit easier:
Use tweezers and/or toothpicks to nudge cheese slopes and tiles into place. These little pieces can be tricky to move, and they tend to fall over. It’s helpful to have something to pull them out with.
Don’t be afraid to experiment! Don’t be afraid to try things that seem impossible – it might not be impossible, and even if it is, you might get other good ideas during the attempt.
It’s helpful to buy cheese slopes in bulk, either from a Pick-a-Brick wall or BrickLink. It’s hard to get enough cheese slopes in a single color just from buying sets… unless you buy a lot of sets.
It is okay to use printed tiles in a mosaic as the printing won’t show. For some sizes and colors, printed tiles might be the only kind readily available.
Not all cheese slopes are created equal. Some kinds, especially transparent ones and occasionally ones found in a Pick-a-Brick, are slightly larger than others. This can cause a problem, especially since the measurements for mosaics tend to be so precise. This is why it is important to be adaptable and to readjust your mosaic as problems come up.
And finally... don't give up! Working with cheese slope mosaics isn't easy, but it does get easier with practice.
Have you made a cheese slope mosaic before? Let us know in the comments below!
Do you want to help BrickNerd continue publishing articles like this one? Become a top patron like Charlie Stephens, Marc & Liz Puleo, Paige Mueller, Rob Klingberg from Brickstuff, John & Joshua Hanlon from Beyond the Brick, Megan Lum, Andy Price, and John A. to show your support, get early access, exclusive swag and more.