Oopsy Loop: The Joy and Frustration of a LEGO Train
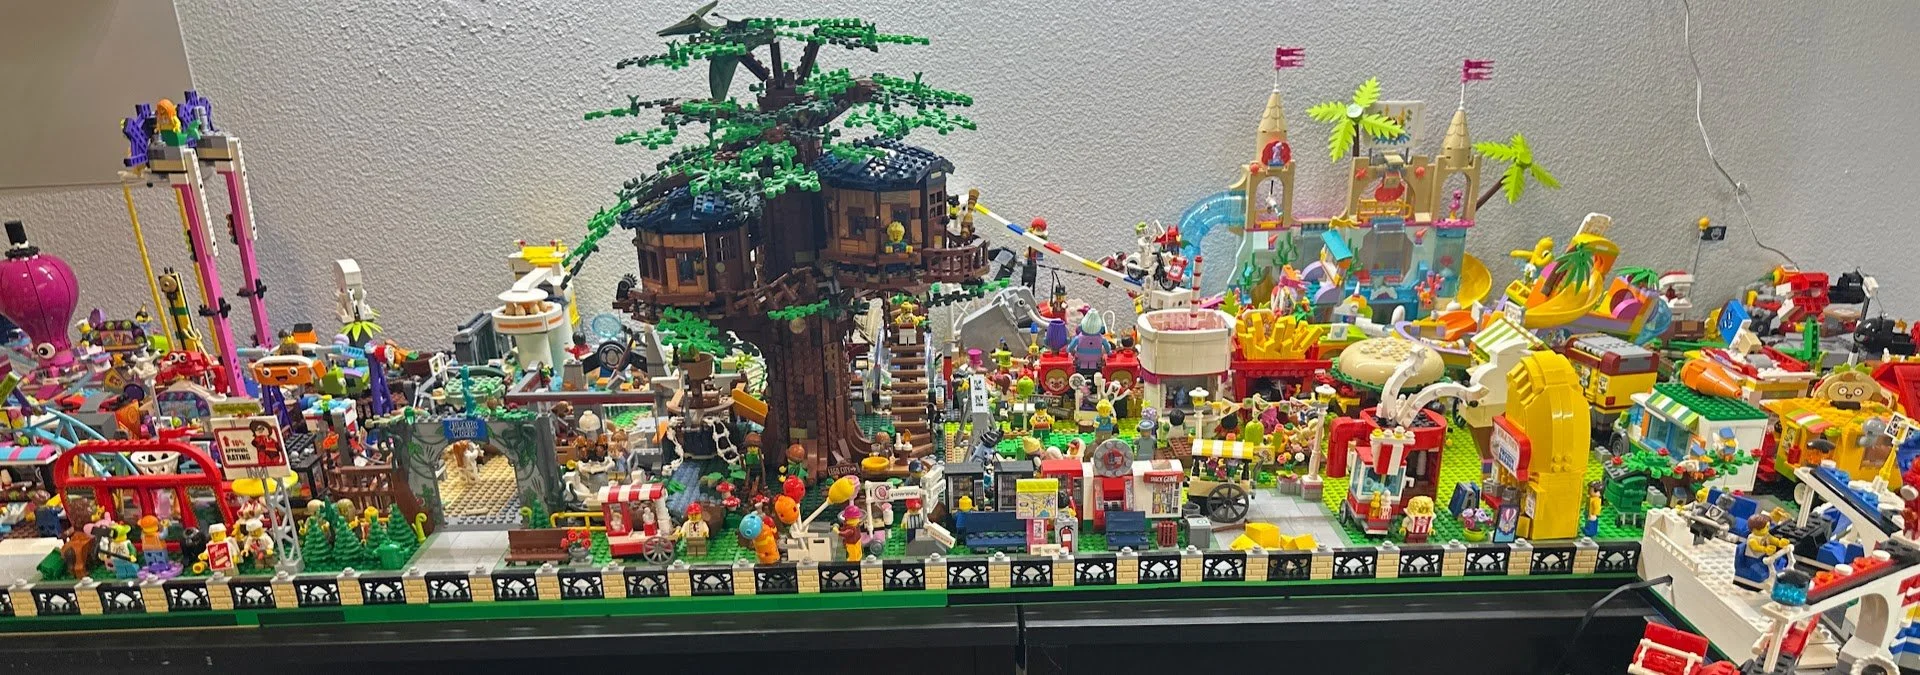
/Outside of enjoying LEGO with my kids, my main area of focus is my amusement park. For the most part, I buy existing LEGO sets and install them in the park instead of making MOCs. I feel blocked when I try to envision a MOC, I’m not sure if it’s a lack of vision or confidence but it’s not where I put my attention. Over the last six years, I’ve built up a decent-sized park that takes up about half of my limited office space.
Occasionally, I have to modify a set to make it work. I’m not a total stranger to using BrickLink Stud.io and my imagination. For example, set 10244 Fairground Mixer was designed as a ride that could be packed up and driven away, whereas the rest of my rides are obviously permanent structures. I modified it to the below so it makes more sense as a permanent ride.

I share all of this with you to give you context for one man’s journey to make a LEGO train work in his amusement park layout. I’ve never done anything like this, it’s my biggest project to date, and I made a ton of mistakes—most of which were avoidable. My hope is that if you, too, someday get the crazy idea to try and fit an inherently round-ish thing like a train loop into an inherently square-ish thing like a LEGO layout, you won’t make the same mistakes.
Table Troubles

Here was the core issue: I had one Ikea TÄRENDÖ table (sadly discontinued) with roughly 7.5 square feet of space and several large LEGO sets to fit onto it. The sets were 10261 Roller Coaster, 10303 Loop Coaster, 10257 Carousel, and 71044 Disney Train and Station. I bought the train set with the goal of getting the train to loop around the table and be able to run at the same time as the other rides are functioning.
After putting the table together and putting the completed sets on it, it was immediately apparent that they wouldn’t all fit. The first issue is that LEGO tracks take up a considerable amount of real estate! The basic track piece is 8x16 studs. A whole circle of track would take up a lot of space, but it also leaves small pockets of dead space in your corners—valuable real estate that is not being used efficiently.


Knowing I would have to get creative, I worked through a few ideas for the layout. Here’s my thought process, for better or for worse.
Idea #1: Elevate the Train Track
This solution would have involved buying a large number of custom 3D-printed brackets, track risers, and other bits to raise the train track high above the park so it’s not in the way. I quickly ran into two significant issues: traction and power. The train simply doesn’t have enough of either to get up the steep elevation required by my small space.

You could buy better rubber bands for the tires, and you could lose bricks to lower the weight, but it wasn’t going to be enough. If I completely maximized my train out for this purpose and bought all the right equipment, I could only get about six to eight inches of elevation. That’s not nearly out of the way enough to make any difference. This was not going to work.
Idea #2: The Underground
Instead of going up, what if I went down instead? In this scenario, I would cut holes in the table and use some of the above-mentioned custom parts as well as some woodworking to create a way for the train to go under half of the table.

Image via Bob Vila
Now, we may not know each other very well, but I can assure you this is a fantasy. I have little to no woodworking ability. I didn’t want to cut holes in my table, and it just all around would never work. Still, I must admit that I had a jigsaw in my Home Depot shopping cart for an uncomfortably long time.
Idea #3: Give Up

MOC by Angus Maclane
I could give up and free up the space for the track either by nixing the train altogether or putting one of my other beloved rides in storage and then move on with my life.
But, you know I couldn’t do that! I wouldn’t be writing this article and you wouldn’t be reading it if this was a ‘just give up’ situation. Giving up was not going to work.
Idea #4: Tunneling to Victory
But what if I could put the Disney Castle and the Disney Train Station above the train track, allowing those sets to go all the way into the corners, fitting next to each other above the track? My napkin drawing of inspiration looked like this:

This had to work—it was the only option left. I still had a number of issues to overcome. First, I’ve never built anything like this before. Second, mountains are tall and big and that means lots of pieces—pieces I don’t have—pieces I know aren’t cheap. But, standing on the other side, with the project done mostly according to plan, and mostly working, fully a year later, I think it was worth it.
Lots of Plates and a Small Confession
With a plan in place, it was time to get to work. The first step was getting plates. Lots and lots of plates. An important piece of context is that my entire amusement park is on MILS plates. Why? We moved two years ago and at the time, nothing was on MILS—taking the park apart and putting it back together was not fun. This way I can pull out different ‘lands’ as needed to update or switch out. They’re sturdy too, which is nice when having to move things around.

The only downside is obviously the cost. A typical MILS plate is 130ish pieces. You can cut corners, sure, skip rows of 2x2 bricks here, use a 16x16 plate instead of four 4x4 plates there, but even if you did all that you’d be hard pressed to get it below 70ish pieces. And here, I’m afraid, is where I’m going to lose some of you, but I have to be honest with you.
I broke down and purchased some off-brand bricks and plates. (I know, I know, don’t look at me like that.) Here’s the thing, I got 50% the way through the project and I couldn’t stomach the cost anymore. I took a three month break from building because I didn’t know what to do. Then, fate intervened with a well-timed ad for lower cost parts in bulk. I wont’ say from where. I closed my eyes and completed the purchase. The heretical bricks are mostly hidden, out of sight, but the keen eyed reader might spot the offending plastic. Some may disagree but I’m just glad I was able to push through through and finish this project. (Here are a few other ways to get bulk filler bricks for cheap.)
With all the parts in hand, I built the MILs bases and got them in place to solidify the width of my tunnel. The width between Space Land my office wall is 112 studs. This basically made a number of choices for me. Standard LEGO tracks are what’s called R40, meaning the radius of a full circle of track is 40 studs with a diameter of 80 studs. But that’s not actually true—it’s 40 studs to the center of the track. So an R40 track, C shaped curve is actually 88 studs at its widest. I wanted to widen the overall loop so I planned to put one straight track piece between the curves, giving my C shape on each end an overall width of 104 studs, leaving 4 studs on each side for the mountain tunnel. That’s… not a lot of clearance, but you work with what you have.
Building a Mountain
After measuring the height of the train and testing how much clearance it needed, I settled on a tunnel entrance with a height of 18 bricks, and a width of 18 studs. Given the height I needed to climb and the space I had, I settled on using BURPs and LURPs. They’re not my favorite pieces but they do the job, leave room for detailing, and cut down on the overall number of pieces I needed. I even lucked out on Facebook Marketplace and found someone a few towns over who sold me 12 of them for a decent price. One of the longer phases of this project was sourcing these pieces, stalking my local Bricks and Minifigs. I needed 20 BURPs, and I was trying to avoid paying international shipping on BrickLink. I made the side that was going up against the wall plain bricks to save on costs as well.

The support structures inside the mountain are mostly Duplo bricks on ‘loan’ from my children. The stacks are topped by 2x4 bricks to connect with the baseplate roof. Duplo bricks, by nature, are quite large, and I ran into a few issues with that. Support columns couldn’t be too close to the track or the portion of the train that hangs over the track hits it. I solved this with a few strategically placed LEGO brick columns and then running Technic support beams between them over the track. I didn’t have enough beams in the correct lengths so I had to make longer beams by connecting two shorter Technic beams with pins.

With all the columns in place and the top plates on, it was time to start detailing. I didn’t want to order too many pieces here, as it was something I could always go back and do later fairly easily. I did a basic job with a waterfall and some rockwork. I plan to go back and add some animals and greenery, as well as more texture.

For the tunnel entrances themselves, I took inspiration from tunnel MOCs I’ve seen online as well as the Disney train station itself for some additional cohesion. You’d never know the rainbow of colors that tunnel hides!

It’s not until I got the Disney Castle and Train Station placed that I start to relax and smile. It’s big, sturdy, and perfect for now. Improvements can come later. I sat back and admired my handiwork, then turned on my train for the inaugural run through the cave.

Except the train immediately crashed into the tunnel wall! When I was testing if the train would fit, i concentrated more on the height than the width. It turns out whatever you call this part of the train was too wide:

Losing that detailing on the train was a bummer, but it was simple fix to take that part off of both sides and replace it with 2x2 tiles. That was easier than rebuilding my entire tunnel, though I also had to slightly adjust some column locations. Now the train just glides right through!

Replacing the Coasters and Carousel
The next phase was a very frustrating game of Tetris. I’m not good at planning things out—it’s just not how my brain works. My brain wants to just dive in and figure it out later. I had done some basic measurements, but these sets are not square boxes—they stick out over their footprint. No matter how I place the sets, I could not get them all to fit with enough space. I thought about extending over the edge of the table and building some wood supports, but we already covered my woodworking skills. I needed 8 studs… or I had to take one of these wonderful sets away from the layout and I really didn’t want to do that.

To give myself a few more studs, I tried using LEGO flex track to extend the loop. This slightly bendy track can be used to gently push my train track wider where I needed it to be. Using flex track on both sides, I could take the train track to the very edge of the baseplates on both sides.

I very happily confirmed that the sets fit and turned on the train to test it out. Whereupon the train glided through the tunnel and immediately hit my office wall. When I moved the track to the end of the baseplate, I forgot about overhang again! The track may have enough space but the train didn’t. All it needed was one lousy stud of clearance. One stud!

I spent two full hours maneuvering my sets forward stud by stud, and finally, I saw a light at the end of the tunnel. I was able to get that one stud of clearance while also fitting all the sets. I plumbed the motor wires, closed up the MILS plates and moved on, hoping to not have to revisit the placement again.
While brushing my teeth later, I was going over the evening in my mind and had an epiphany that some of you may have already noticed. I had messed with the System®! I had crossed the streams, divided by zero, a butterfly flapped its wings on the other side of the world and I now needed an odd numbered stud length train track piece. I flew back downstairs to check my error. Sure enough, by bringing in the track by one stud on the long side, I shortened the length of the short side by one stud. I now was in need of a track piece that was 3 studs long. Despite pretty much knowing the answer if this part existed, I checked BrickLink anyway and confirmed the truth.

Recovery and the End (For Now)
It took me about a week to come back from that error, to be honest. I was just so close to perfection that it felt like a gut punch to have a gap. I was back to playing Tetris, and there was just no way out. I had spent a year of my life on this, thinking about it, mulling it over, and waiting for pieces to arrive. In desperation in the twilight of 2023, I Googled ‘short LEGO train track’. I scrolled through the results and bolted upright when I saw this listing from OKBrickworks:

Before I could blink, I handed over my credit card info. In early January, I was able to run out to the mailbox and collect my prize! I ran home and connected all of my new pieces, turned on the train and park rides and breathed a deep sigh of relief as my amusement park came to life with no issues. Mickey and his train went around a few dozen times before I finally gave him a rest. The rest of the detail work, like walking paths, food stands, minifigs, etc. would all have to wait for a later date, more time, and more energy.
For one last hiccup, I was about to turn off the light and go to bed when I noticed something. The track where I placed my new pieces was hovering slightly off off the ground. I pushed it down and sprang right back up like a jack-in-the-box. I took the pieces out, examined them and discovered one last oopsy. The one-stud wide track piece was actually wider than one stud and can’t actually adhere to a plate. Even FxBrick’s powered track small piece was wider than one stud.

I’m was about to tear up the whole display in frustration when I realized that this is good enough. It’s not perfect, but it works—and that’s fine for now. If I could do this all over again, there’s a few things I would do differently, sure. (A lot more measuring for one!) I know it isn’t the fanciest or perfectly aesthetic like some of my fellow contributors here at BrickNerd can build, but it’s the biggest LEGO project I’ve ever worked on and I’m kind of proud of it. I made it work through sheer will. I pushed through and didn’t give up. And there is a beauty in that as I look over at my working amusement park.
Would you fix the problem of the slightly raised track? Or could you just let it ride? Let us know in the comments below.
Do you want to help BrickNerd continue publishing articles like this one? Become a top patron like Charlie Stephens, Marc & Liz Puleo, Paige Mueller, Rob Klingberg from Brickstuff, John & Joshua Hanlon from Beyond the Brick, Megan Lum, Andy Price, Lukas Kurth from StoneWars, Wayne Tyler, Monica Innis, Dan Church, and Roxanne Baxter to show your support, get early access, exclusive swag and more.