This Old Track: Maintaining and Restoring Metal 9V Track
/Best of BrickNerd: Weekend Highlight — Article originally published November 2, 2021.
Although the sunset of the 9V train era has long passed by in 2006, it is encouraging to see many LEGO train fans still using the superb and much-missed metal rail track from this era. Also encouraging is the potential renaissance of metal rail track with both DIY modifications and 3rd party commercial products keeping the dream alive.
One of the benefits of metal rail track is its durability and long life. However, metal rails also perform one other critical function; delivering electrical power to a train motor. Thus, the rail forms a vital part of an electrical circuit and is therefore vulnerable to the effects of dirt, contamination, oxidization (“rust”), and other environmental threats which affect the electrical performance of the rails.
Fortunately, LEGO (and incidentally Fx Bricks) have adopted the use of Nickel-plated Copper Beryllium (Ni-BeCu) alloys in the construction of its metal rails. This alloy is both durable and corrosion resistant and has excellent electrical conductivity. However, as with many metal alloys, it is not invulnerable to the effects of wear and tear and sadly, despite its corrosion resistance, it is still vulnerable to oxidization in some environmental conditions. This oxidization manifests itself as tarnish (a yellowish-brown hazing) and in extreme cases, it appears as “rust” (brownish-black discolouration possibly with textured pitting).
In this article, I will describe some simple steps you can take to clean and maintain your 9V metal rails as well as describe some more involved processes to restore and revitalize old and tarnished 9V rails up to full restoration of 9V track in extremely poor condition.
Why Must We Clean Track?
As mentioned, the role of the metal rails is to deliver electrical power to a train via contact with its metal wheels. In the LEGO 9V train system, this critical contact point occurs at the inside leading edges at the top-corner of the rail section. The diagram below illustrates this contact profile:

This configuration is somewhat unique to the LEGO 9V system as compared to other model train scales and systems. In most model train systems, electrical contact occurs between the top rail head surface and the wheel tread (i.e. mostly in the horizontal plane). Whereas in the LEGO 9V train system, contact is is in the vertical plane between the rail inside edge and the metal wheel flange. This method of contact is somewhat of a double-edged sword. On the one hand, this method achieves an almost magical feat of “self-cleaning” the track with use. The rotational abrasion of the wheel flange against the rail “polishes” the rail edge and removes contamination and dirt—not spectacularly, but adequately enough.
Yet, this method has two disadvantages:
It hides the dirt - LEGO 9V train fans are probably not as used to cleaning track simply because the train motors have been doing such a good job of masking the true state of filth. However, we should not be relying on our train wheel flanges to do the job!
Smaller contact patch - the contact area between the rail and wheel is confined to the thin knife-edge inside corner of the rail rather than the more generous patch of the top rail head. Top side contact has the benefit of gravity acting in the direction of contact and thereby enhancing the contact efficiency. Notice in the photo above how LEGO 9V train motors have “bow-legged” wheels tilted inwards. This is because they have an intentionally designed slack and elastic (non-rigid) wheel back to back gauge. This is to ensure outward elastic tension is applied against the rail inside edge for electrical contact.
Safety First
This article is going to describe processes which use potentially harmful chemicals and the use of tools and techniques which require the use proper safety precautions. This includes:
Working in a well ventilated area
Use of latex or nitrile gloves is recommended when handling abrasive chemicals
WARNING: Do NOT use any acetone/ketone based cleaning products with LEGO track elements. Acetone is both toxic and highly volatile. Most importantly, acetone will dissolve ABS plastic and completely ruin not only track, but any LEGO ABS element.
Tools and Materials
For cleaning and simple maintenance, the following items are required:
Lint-free wipes (Kimwipes brand is highly recommended)—these can be purchased from scientific and/or industrial supply sources (e.g. U-Line, Acklands Grainger, etc.) and can also be found on Amazon
Paper Towels - if you can’t find lint-free wipes, paper towels are an ok alternative. Paper towels are also useful for drying track sections after washing or wet-sanding.
Cotton Buds - any brand (e.g. Q-Tips) will suffice and are widely available from any pharmacy

For more involved restoration tasks, you will also require:
Wet-and-dry sanding papers or sticks - recommended grit range 800 to 1500. These can be found in most hardware and/or hobby stores
Toothbrush for scrubbing
Soft bristled paint brush for scrubbing

Chemicals
For most cleaning and maintenance tasks, 99% isopropyl alcohol (IPA) performs extremely well. It can be easily found in any pharmacy; however make sure it is 99% (not 70%) concentration. Alcohol evaporates quickly and leaves little to no residue.
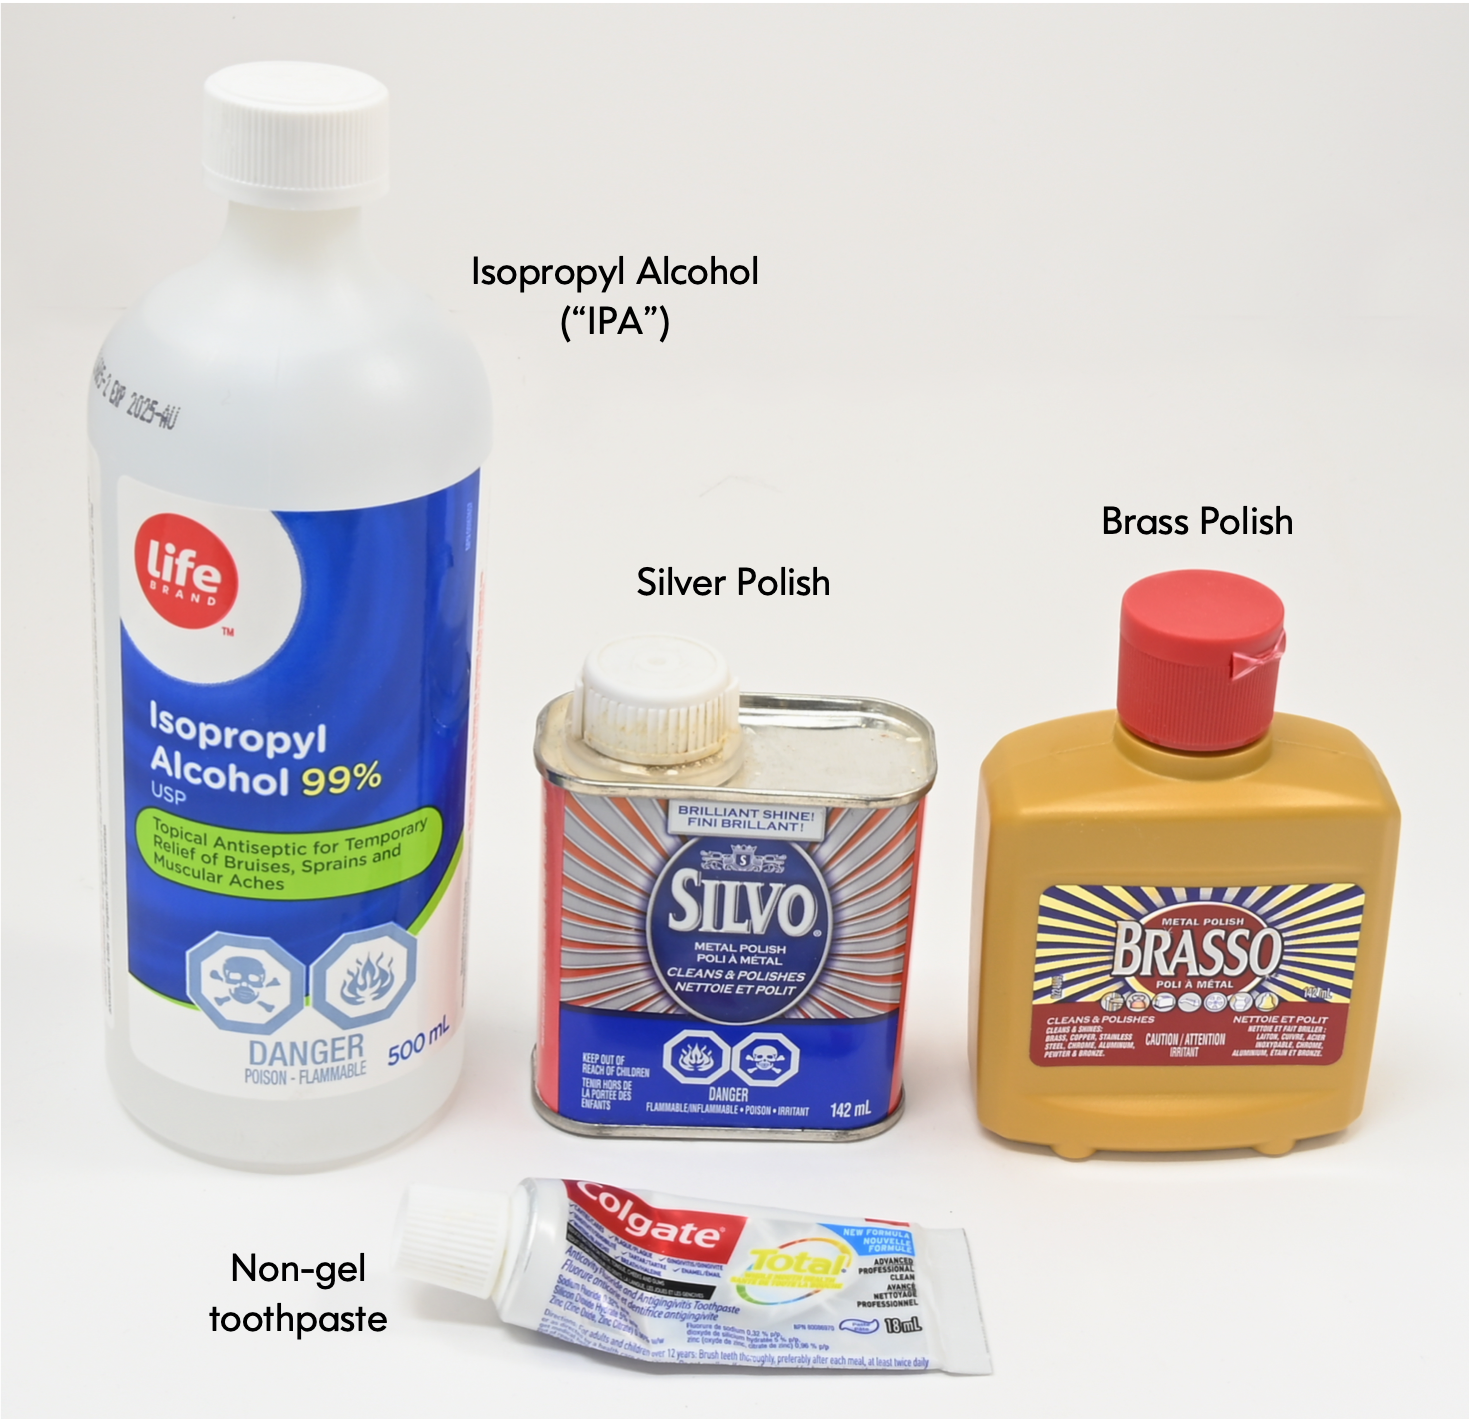
For more involved cleaning which requires polishing, you can use brass metal polishers such as Brasso; however, as I have discovered, silver polishers such as Silvo do not perform as well. Lastly, if you do not want to use a chemical polisher, ordinary toothpaste performs surprisingly well! Make sure to use a non-gel toothpaste, i.e. a white paste-like consistency toothpaste. The secret to toothpaste’s success is the fact that it contains microscopic abrasives usefully suspended in the paste. These abrasives polish materials without leaving any scoring or hazing marks.
Let’s Get Started!
We’re going to explore the care and maintenance of metal 9V track in three different levels corresponding to severity of maintenance and cleaning required. These are:
Cleaning and Preventative Maintenance - removal of mostly dirt and contamination
Polishing and Cleaning - for dirt and tarnish removal
Restoration - for revival and restoration of extremely dirty, tarnished and poor condition track
Level 1 - Cleaning and Preventative Maintenance
Any model railroader is well familiar with the nuisance effects of dirty and contaminated track resulting in poor running of trains, either chattering over a dirty section or stalling altogether. The same model railroader will also be familiar with the chore of regularly cleaning track to ensure fuss-free operation. The interval required between cleaning sessions varies depending on usage and environment but is almost always required after long periods of storage or out of use.
To clean metal track, the use of lint-free wipes lightly soaked in isopropyl alcohol works very well. The process is as follows:
Lightly soak a lint-free wipe in alcohol and rub along the metal rail surface. You will notice dirt and contaminants will begin to stain the wipe as they dissolve into it.
Follow up by wiping the rail with a dry lint-free wipe to remove any dissolved residue.
Repeat the above steps as required until the rail is clean and dirt no longer stains the wipe.
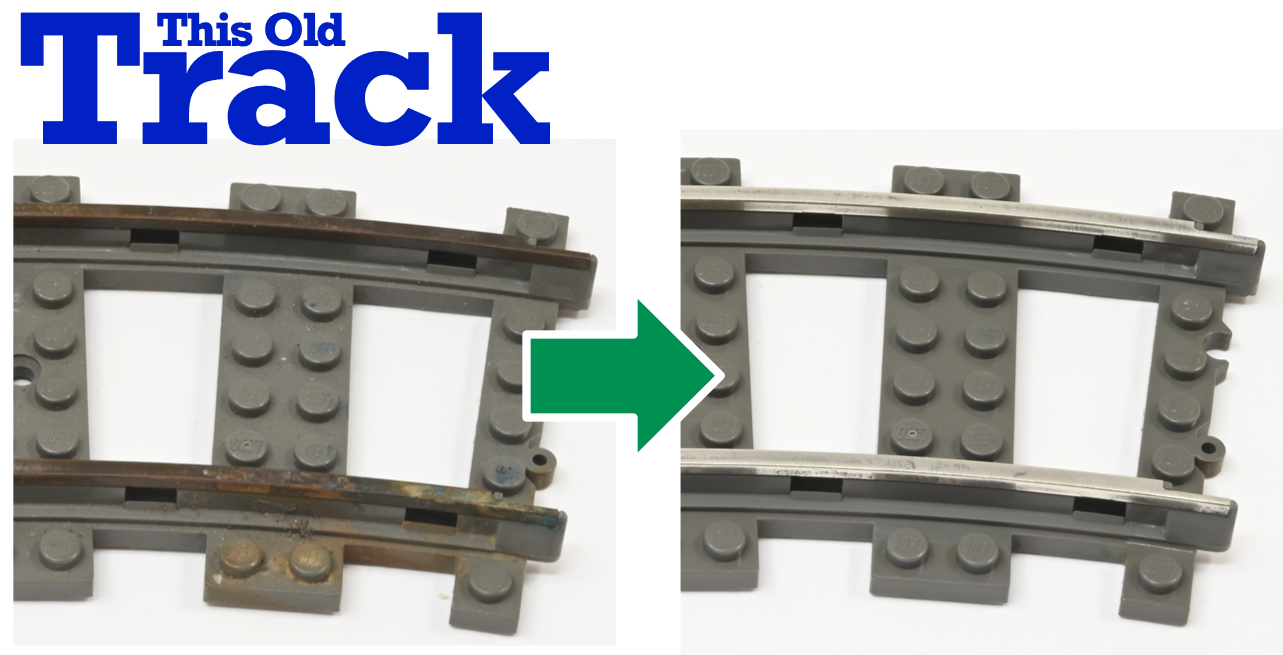
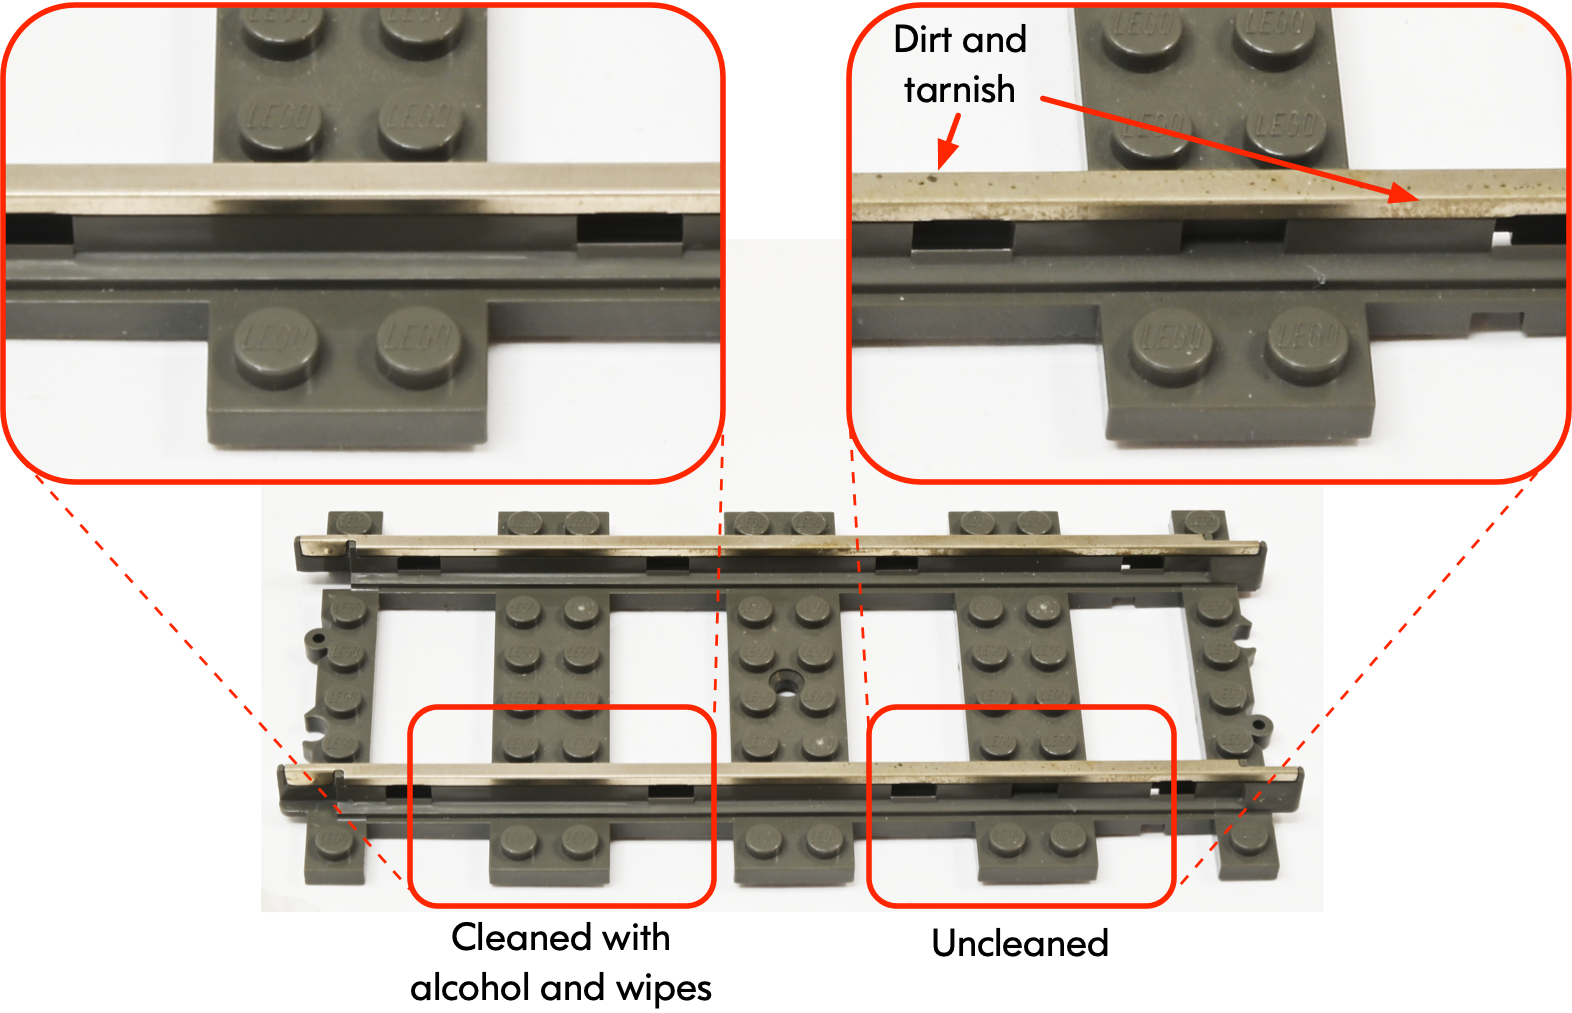
The photo below shows a lightly tarnished and dirty rail section before and after cleaning with alcohol and wipes:
Level 2 - Polishing and Cleaning
Metal rails that exhibit more severe tarnishing and contamination may require polishing with a mild liquid abrasive prior to cleaning. Tarnish is the physical manifestation of oxidization of a metal alloy. Oxidization is a chemical reaction between metal and oxygen. The resulting oxidized metal on the outer surface of the rail acts as an electrical insulator and affects its performance. Also, the oxidized layer is chemically bonded to the metal rail and is not something that can simply be wiped away. It requires physical removal with an abrasive.
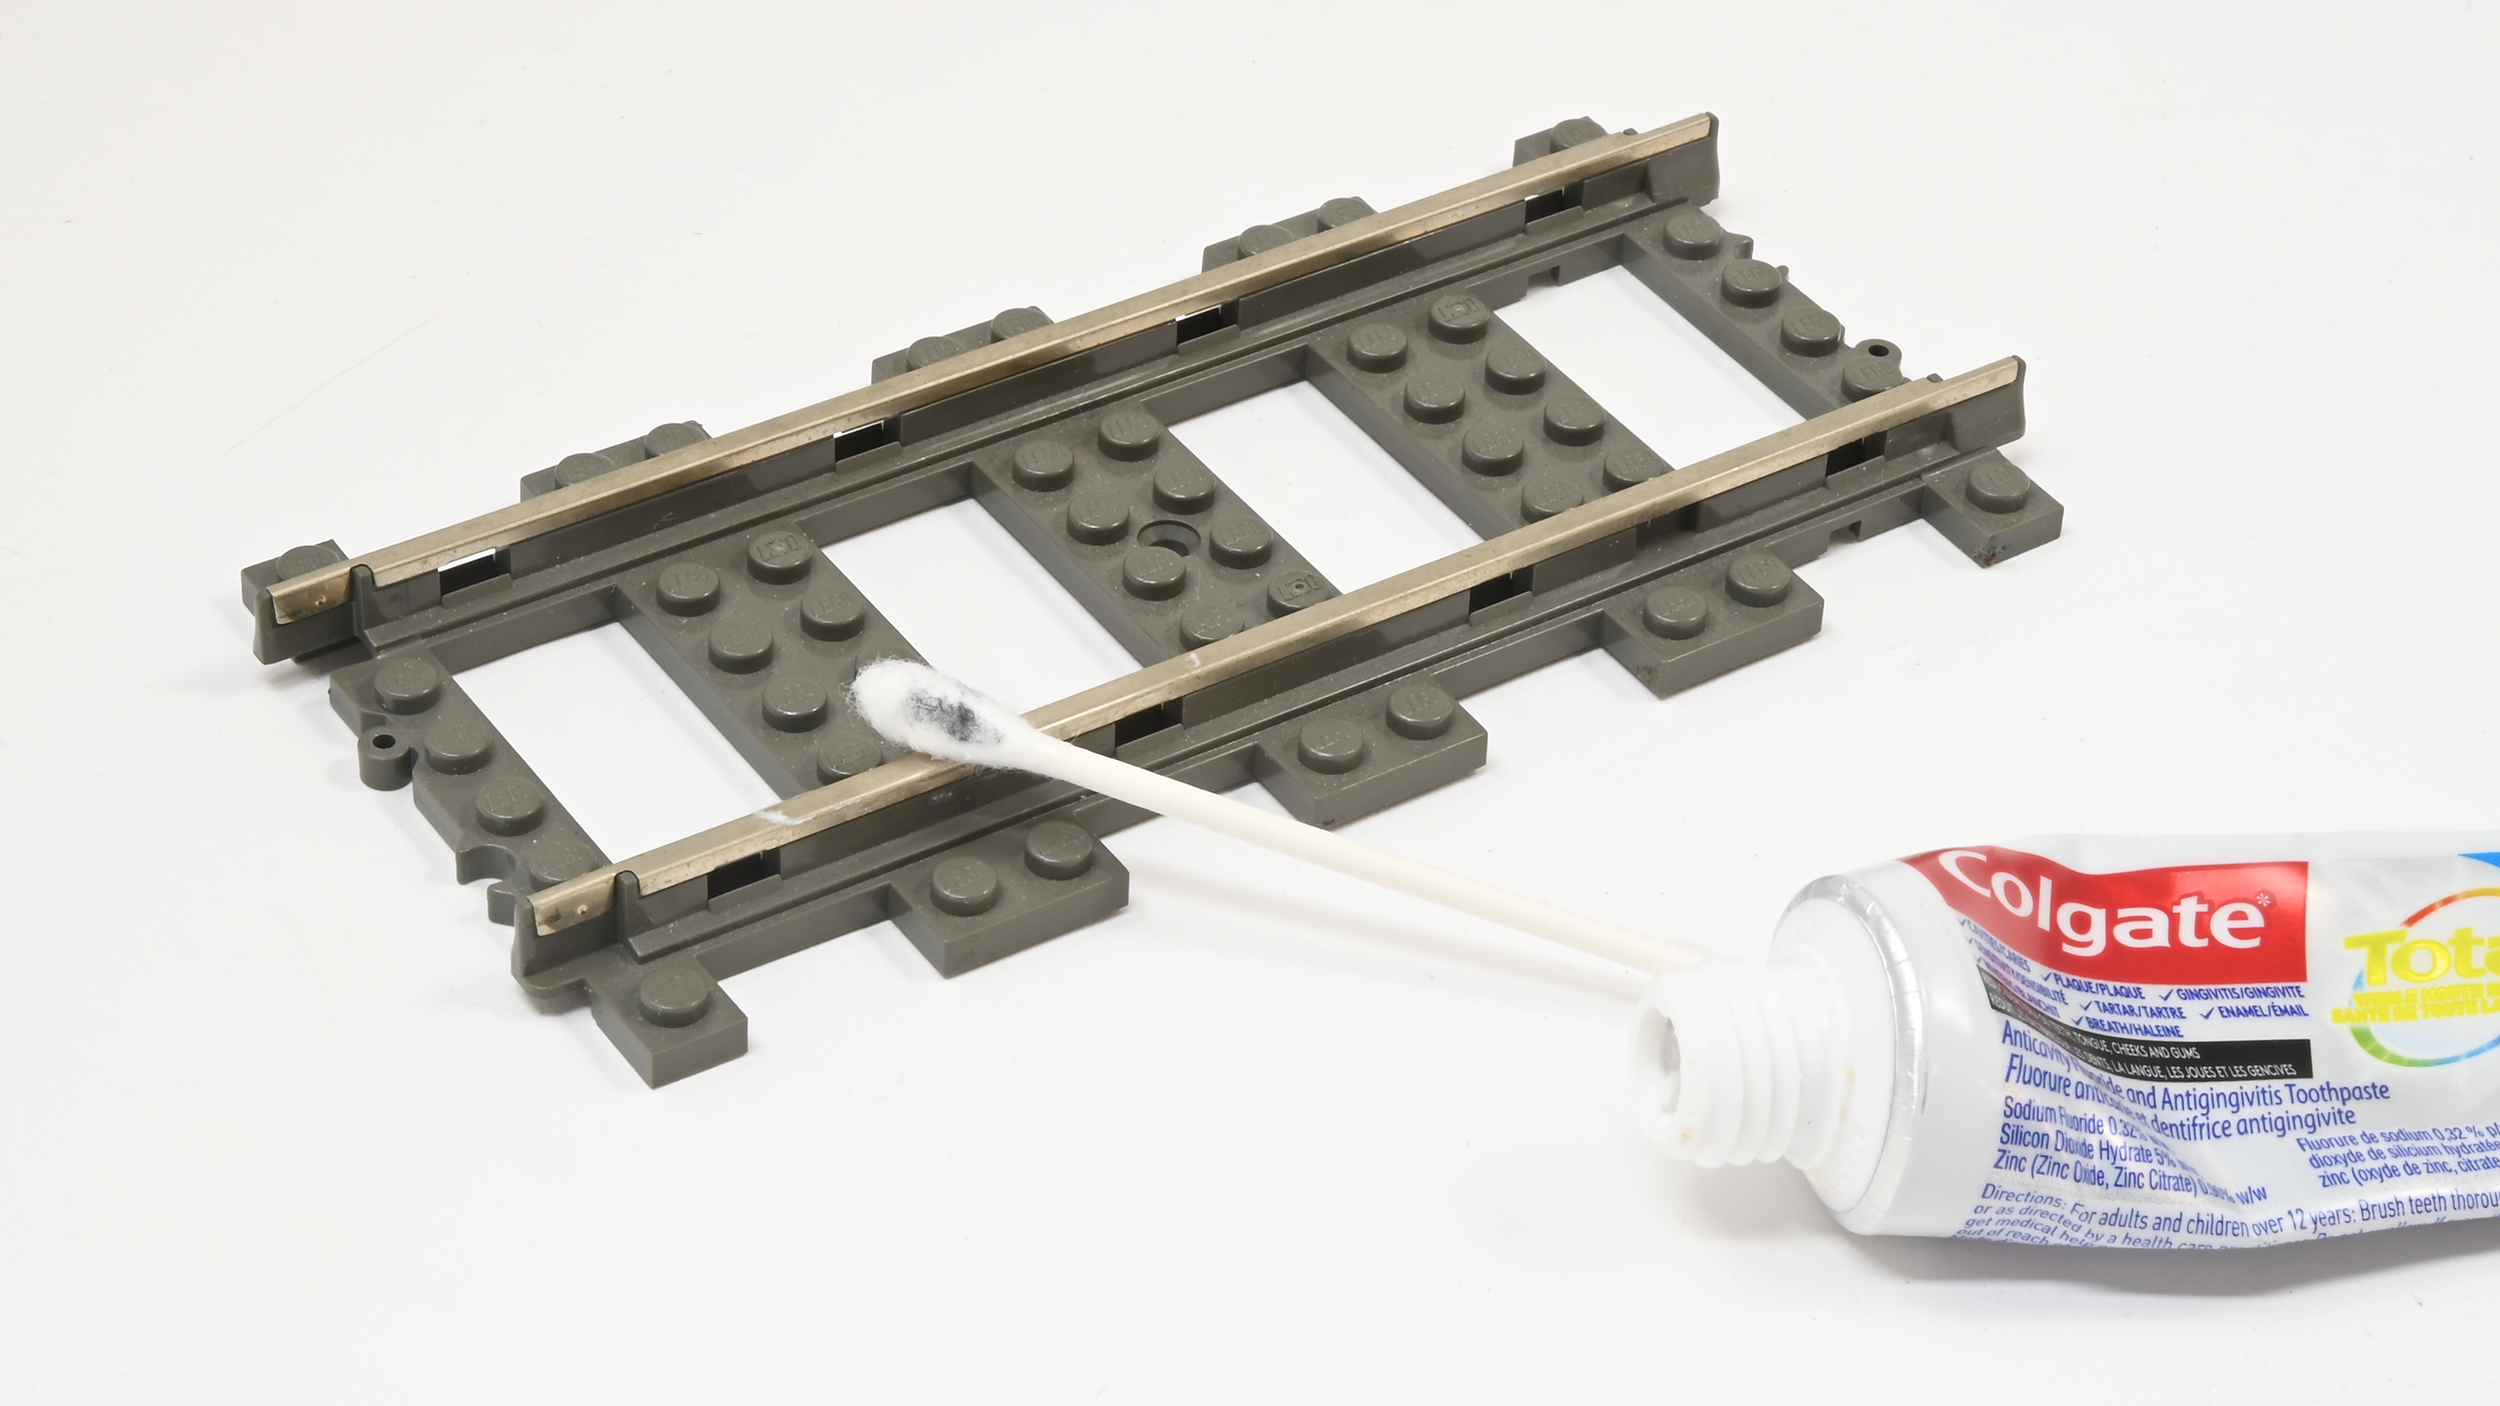
The abrasives I recommend for this purpose both work the same way. Microscopic particles suspended in a gel/paste polish and remove the top layer of oxidized metal from the rail. The paste/gel acts both as a lubricant to help move the abrasives and as a carrier to absorb and remove the oxidized metal particles away from the rail surface. You can use a dedicated metal polisher such as Brasso or equally well, you can use toothpaste. The method is as follows:
Apply a small blob of polish/toothpaste to the end of a cotton bud.
Rub the cotton bud repeatedly along the metal surface.
As the cotton bud tip begins to stain with removed contaminants, flip to the opposite clean cotton bud tip and dry-rub the rail to pick up polish residue.
Repeat this process as required to achieve a clean rail surface with the tarnish removed.
Dry rub the rail surface with lint-free wipes to remove any remaining polish residue.
Finally, clean the rails with isopropyl alcohol and wipes as shown in Level 1 above. This will remove any remaining residues and contamination and leave a clean shiny finish.
The illustration below shows the results of polishing and cleaning using both Brasso and toothpaste. As can be seen, there is little to no difference between either polisher and both achieve successful removal of tarnish.

Level 3 - Restoration
For 9V track elements which are severely corroded and contaminated, polishing alone cannot remove enough layers of oxidized metal. This requires a more aggressive process: wet sanding with high grit sand paper.
Wet sanding is a common technique for preparation of materials prior to painting or as intermediate steps in polishing or top finishing. Effectively it is no different than using sandpaper on wood, except we are attempting to remove microscopically thin layers of material without leaving visible “gouges” or hazing marks in the metal. The abrasives in the sandpaper are assisted by the lubrication of water during the sanding process.
In order to illustrate the process of restoration, I luckily(?) have some horrifically poor 9V track sections as obvious candidates for restoration. Incidentally, these track sections were literally a “barn find”—recovered from a garden shed many years ago from some relatives in England!
Before Restoration
As can be seen in the photo below, this 9V track element is in extremely poor condition! It has just about every attribute of deterioration:
Severely corroded metal rails with deep tarnishing, pitting, and surface rust.
Staining of the plastic from dissolved rust/corrosion.
Accumulated debris and contamination all over the rail.

Step 1 - Pre-cleaning
Before any restorative measures can be taken, the track element requires a thorough cleaning in soapy water to remove all of the loose debris and surface contamination.

Using a soft bristled paint brush, scrub the track element with soapy water over every surface and accessible cavity. Rinse with clean water and repeat the process. Dry the track element with a paper towel and let it sit and dry.
Step 2 - Wet sanding
Starting with a coarse grit (800) gently scrub the metal rail surface under constant running water. Repeat this process with a finer grit (1000, 1200) and finish with a final polishing with 1500 grit. It is important to sand under running water so that the water acts both as a lubricant for the sandpaper and continuously removes particles of oxidized metal as it is removed by the sandpaper.
In the photo below, I used wet standing on the outer metal rail and for comparison, used Brasso metal polish on the inner metal rail (no wet-sanding). As can be seen, the metal polisher does not achieve the same level of oxidation removal as wet sanding. Lastly, as an experiment, I used Silvo on the other half of the inner rail. It had little effectiveness compared to Brasso, and it is likely that Brasso is more effective with brass/copper alloys and Silvo is more compatible with silver-type alloys.

Step 3 - Polishing
Wet sanding achieves removal of most of the oxidation and corrosion but leaves behind a somewhat hazy finish. Therefore, polishing the metal with toothpaste will give the metal a smooth shiny finish before final cleaning.

Step 4 - Final Cleaning
The final cleaning phase with alcohol and lint-free wipes will remove any remaining residues and contaminants.

The photo above shows the comparison between metal rail polished with wet-sanding vs. Brasso metal polish. As can be seen, wet-sanding is necessary with deeply corroded track in order to penetrate the many layers of oxidization.
Worst Case
The photo below shows another before and after restoration process with another dramatic barn-rescue!

The restoration process did yield excellent results! However, with detailed examination under a microscope, evidence of deep pitting can be observed. This shows the severity and extent of the corrosion—penetrating deeply into the metal alloy. It is possible that additional passes of wet-sanding may remove more layers of metal to the depth of the pitting; however, it is likely not necessary and risks too much removal of good metal.
Conclusions
LEGO 9V metal track is much adored by LEGO train fans for its durability and the obvious benefits of electrically powering trains from the track. With regular care and maintenance, your 9V track elements can continue offer excellent performance both electrically and mechanically for many years. Even seemingly hopeless track elements severely corroded and left for dead can be restored to nearly new condition!
In my next article, I’m going to turn my attention to the maintenance and restoration of 9V train motor/motor bogies. I recently discovered a poorly performing and troublesome bogie in my fleet and thought it would be a good candidate for a strip down and restoration and hopefully bring it back to top performance.
Footnote
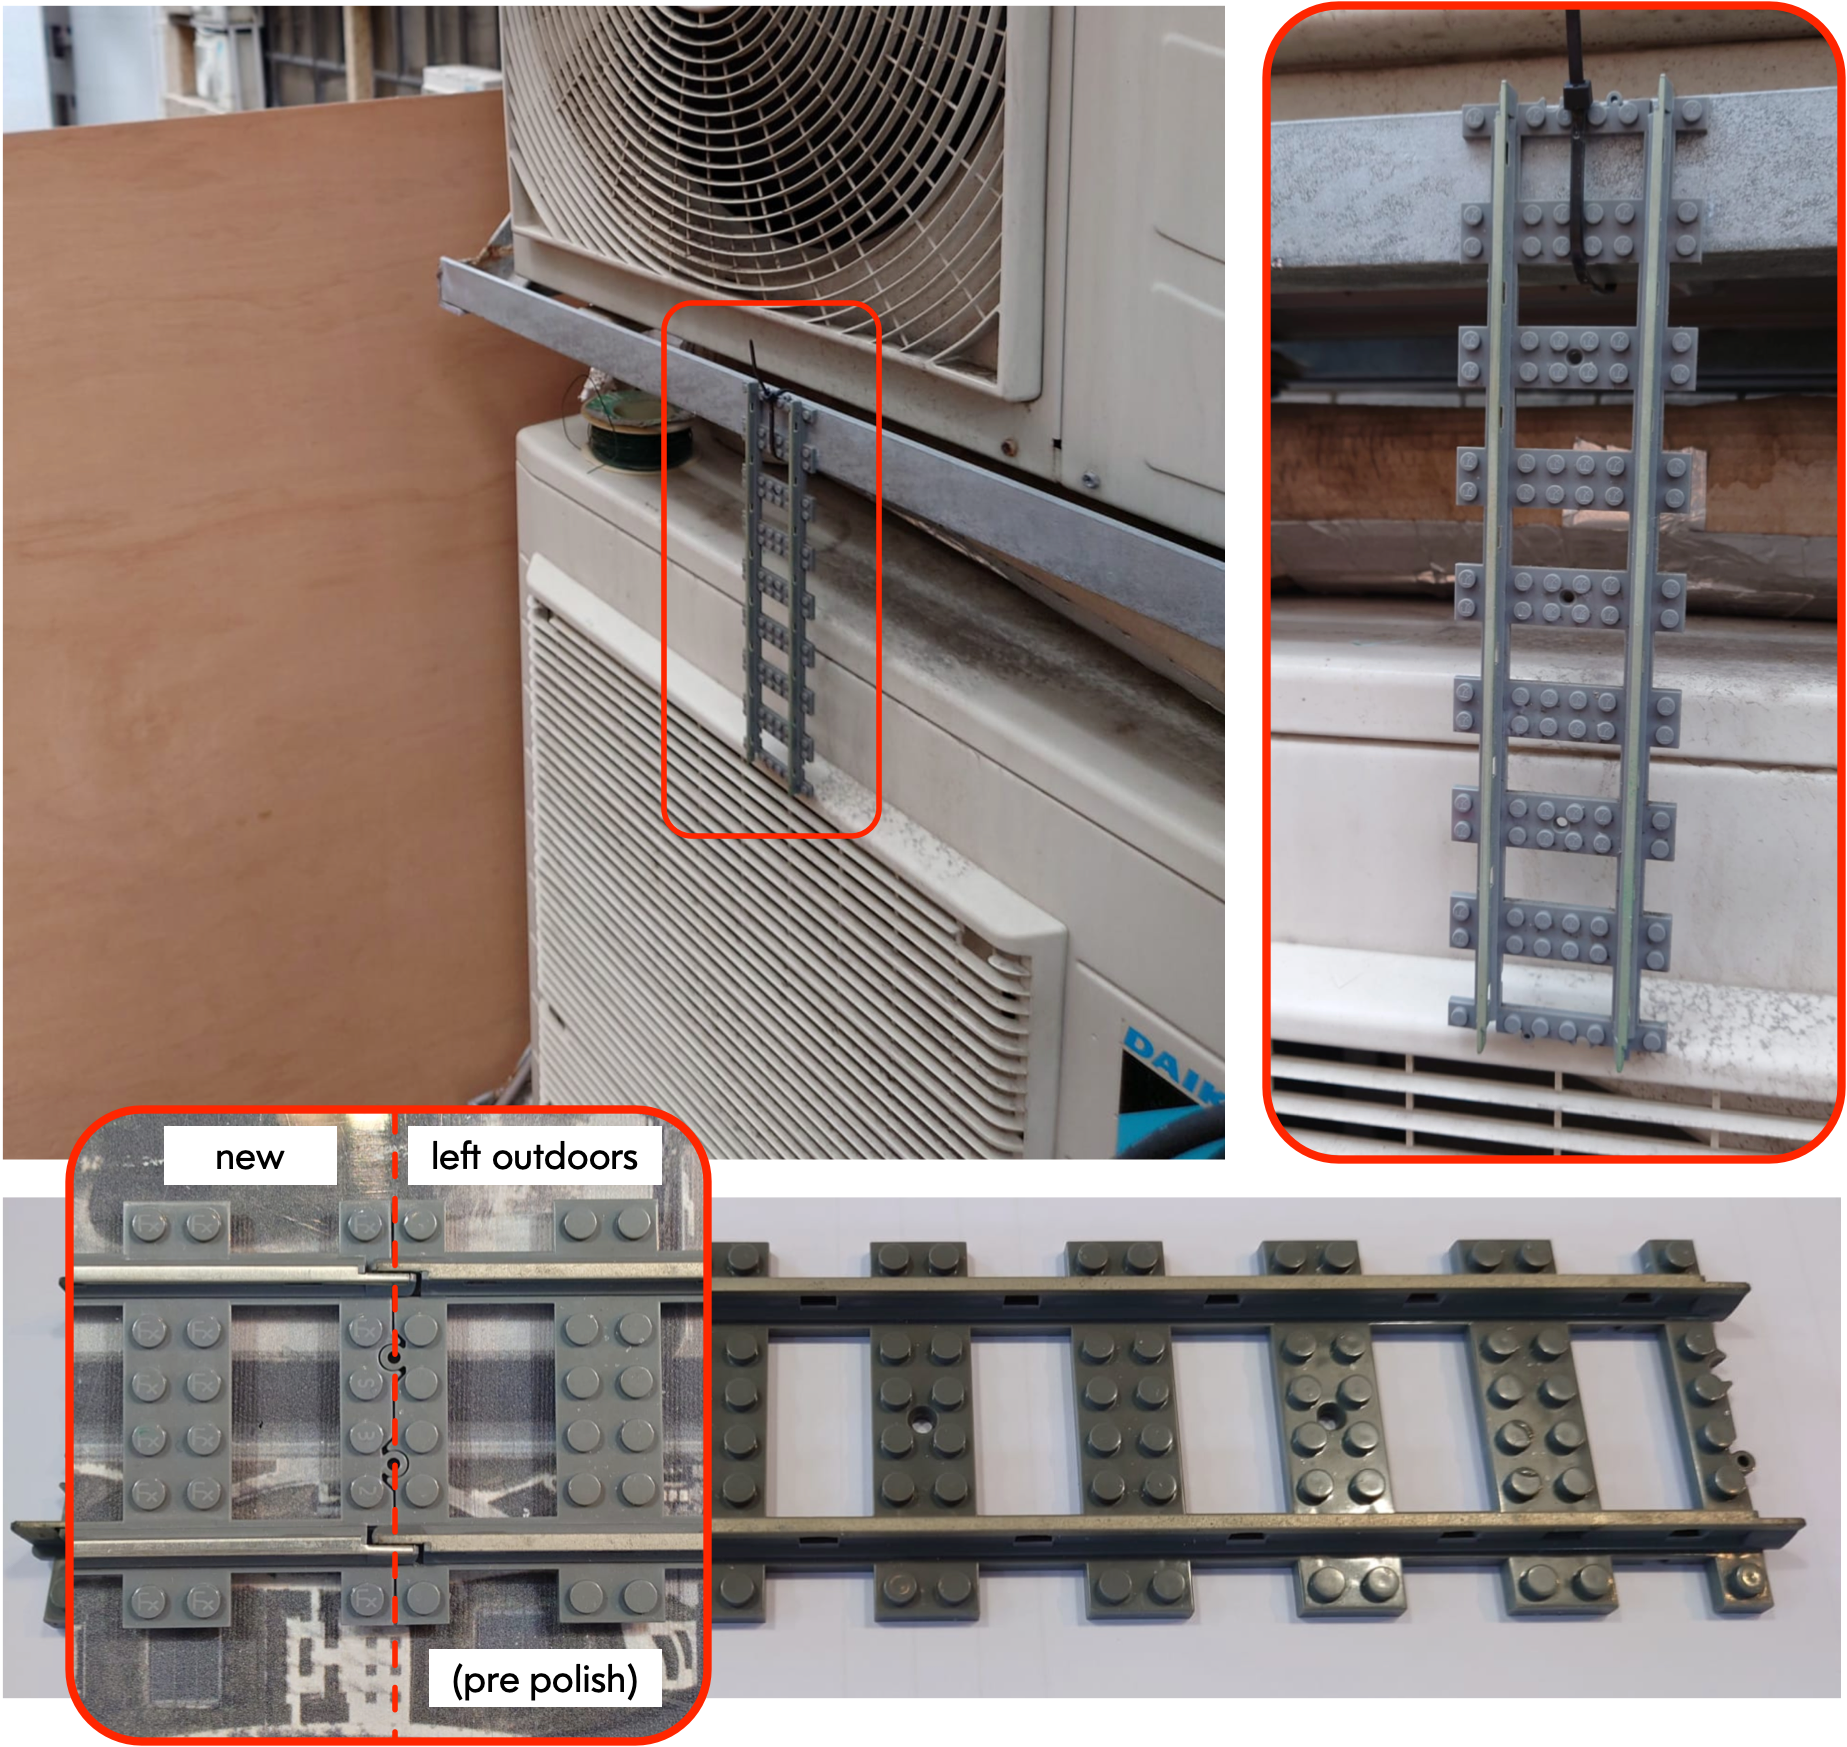
Disclaimer: As some of you know, in addition to writing for BrickNerd, I am the CEO of Fx Bricks, the manufacturer of 9V compatible L-Gauge metal track elements. As a footnote to this article, I wanted to share one aspect of our commitment to quality and robust testing of our products. One test we applied to our pre-production track was leaving them for several months outdoors in the hot, humid, and wet conditions typical of Hong Kong. Track elements were both suspended and laid flat and left outdoors. They were recovered after several months and thoroughly inspected. We were happy to discover that they survived in two key areas:
The ABS plastic did not discolour or distort with UV and heat exposure.
The metal rails did not corrode or pit. They tarnished slightly as can be expected, but they were easily restored with cleaning and mild polishing.
What methods do you use to clean 9V track? Or do you clean it at all? Leave your thoughts in the comments below.
Do you want to help BrickNerd continue publishing articles like this one? Become a top patron like Charlie Stephens, Marc & Liz Puleo, Paige Mueller, Rob Klingberg from Brickstuff, John & Joshua Hanlon from Beyond the Brick, Megan Lum, Andy Price, Kate Harvey and John A. to show your support, get early access, exclusive swag and more.