Inside the The Ark: Adding Movement and Stability to a LEGO Spaceship
/In today’s guest article, LEGO builder Ben Smith shares an inside view of his rotating Ark spaceship, how it is constructed, how it moves, and some of the hard lessons he learned along the way.
Overview & Video
When Dave asked me to write a piece on The Ark for BrickNerd, I didn’t know what else I could possibly say about it, having done a presentation on it for Bricks at Home and BrickCon, written an article for BrickJournal and made a 10-minute video for at Comic-Con.
Then I realised BrickNerd is for more of a hardcore AFOL audience and the idea of a piece digging deeper into the construction techniques of the model might be of interest, so… here it is! I won’t repeat what’s been said before, so just go and watch the Comic-Con video below to find out all about the model before I wade in.
3D Modelling
The Ark was intended to be a really big, impressive model that would use loads of lights and motors for maximum effect. But before I did any actual building, I roughed out the overall shape I was imagining in some 3D modelling software. This is a great way to figure out the scale of the model (the checkerboard shows the scale of studs) and get an overall shape that looks pleasing before you commit to anything.


My initial idea was kind of short and dumpy, but was also minifig scale; but it turned out if the ring was any kind of sensible size it looked really toy-like and claustrophobic for minifigs; so after a bit of mucking around, I arrived at the idea of a longer, more elegant thing at microscale.

My personal technique is to design everything on the computer first in LEGO’s LDD software before building it for real in the brick. Because the Ark was such a monstrous project I tackled it in sections – so I designed the centrifuge first, then ordered all the parts on BrickLink and built it whilst simultaneously designing the next section.
Lord of the Rings
Because I had a 3D model I knew the overall design would work when the sections were joined together. However, it’s frequently necessary to test whether digital designs will actually work for real, hence I produced many study models reproducing connections and small sections to check they work, such as these above.

The main centrifuge ring is based on a technic frame with 18 sides, connected with liftarms that generate the 20-degree angles needed to give it 18 sides. The hub in the middle uses six of the Nexo Knights shield pieces arranged in a circle and the three spokes of technic bricks connect to that with jumpers.
Everywhere this internal structure is clamped together with plates on brackets or with Technic liftarms sandwiching the bricks together so the connections can’t fall apart easily and hence it’s really strong. The wheel in this picture above could be rolled around on the floor like a bicycle tyre without breaking!
Adding a Backbone

From the get-go, I decided the model wouldn’t be 100% LEGO but would be supported by a steel frame inside. I’d learned that the large models made for the LEGOLAND parks are supported by 16mm square steel, which exactly matches 2 studs and is therefore easy to build around. So I planned to use a frame that would rise up through a convenient fin on the model and would then go sideways to support the centrifuge.
I am really, really pleased I did this because it’s very sturdy and makes disassembling the model for transport pretty easy. In this picture above, you can see an early version of the centrifuge connected to the frame, and I have begun to dress the technic frame with pieces to add the sci-fi panelling and connect the big transparent panels for the biomes inside.
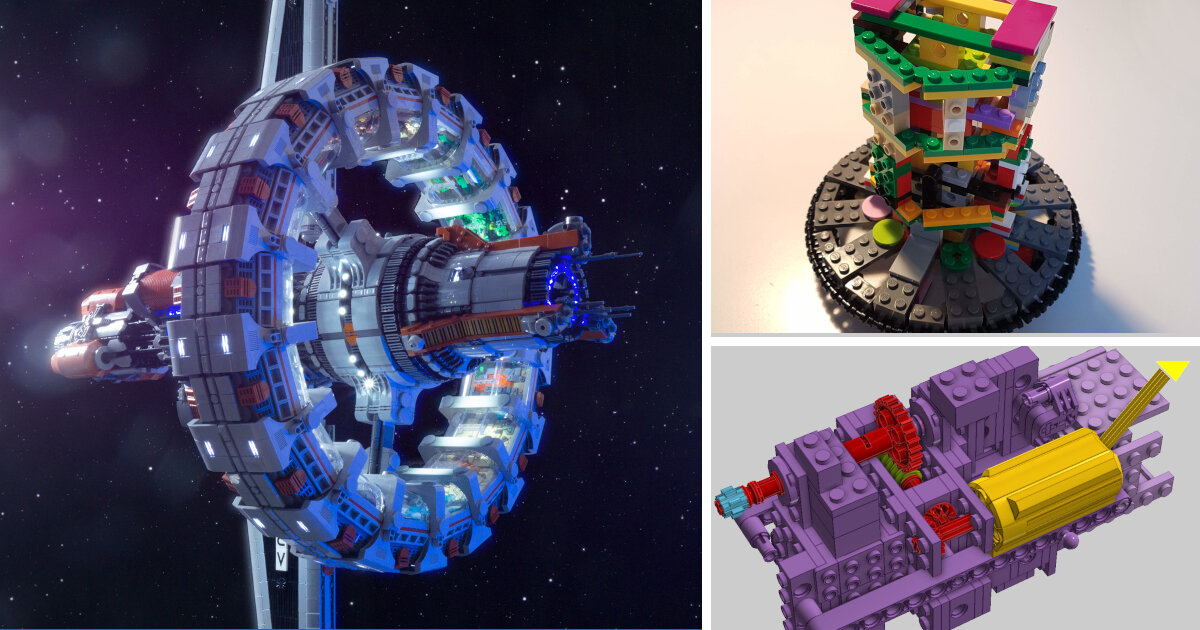
Making it Move

As I mentioned in the video, the biggest challenge of this model was getting the centrifuge to actually turn smoothly. I had naively thought this would be easy, and the picture above shows the little gearbox inside the middle of the model with the motor in yellow, the worm gear in green, and the drive gear (that turns the centrifuge) in blue.

But at first, the centrifuge just stayed stuck in place and wouldn’t move at all. Even after I added more motors and changed the technic turntables it just jerked around like this video on Flickr.
Eventually, I realised the problem wasn’t too little power but too much friction, so I radically redesigned the centre of the model so the centrifuge had six sets of little wheels that spin around 2x4 round panels fitted over the steel section – bearings, basically, like in the video below.
This made the wheel really easy to turn so the motors have enough power to turn it smoothly on the steel frame.

But using a steel frame did generate some unexpected problems. To give the model a circular appearance I had assumed I would use a central axle and rotate sections at different angles, but of course you can’t pass things THROUGH the steel, so I had to work out structures that had radial symmetry whilst having a 2x2 stud hole all the way through the middle.

This picture above shows the internal structure of the nose section, which uses hinge plates to get six sides all held rigidly together with various studs facing out to connect the exterior. The bit at the bottom has 23 sides (everything has to be a multiple of 3) also via hinge plates held rigid with various connections and fixed to the 4x4 technic brick with 2x2 hole in the middle, as you can see in this photo.
Collaboration

As I mentioned in the video, I also decided to collaborate with builders Tim Goddard (AKA Rogue Bantha) and Tom Loftus (AKA Inthert) to build the biome models that would fill the big centrifuge wheel with greenery. Having worked out the design of the centrifuge and built a study model to prove it would work; I sent them an LDD file so they could reproduce it themselves and make sure their work would fit under the glass roof. This worked really well, and when I had received them they fit perfectly.

Then, just as the model was starting to finally come together, I decided to then build a super-complicated reactor section on the back with a glorious 21 sides. The picture above shows some of the internal structures here, which are predominantly black because you can see them peeking out in places. At top right the main reactor structure has a square hole for the steel, which is then connected to a ring of 6 3-armed rotors to get a six-sided structure. This in turn is connected to 21 hinge plates to create all the sides, but those sides aren’t held rigidly and flop around.
Only when the ring of 1x3 plates lower right) is attached to the outside does it become rigid. This picture below shows some of the connections involved and you can see it in situ on the model here.

Lessons Learned
The Ark was, quite deliberately, the biggest and most complicated thing I’d ever built. It took about 18 months all in and, because I have three small children and consequently very little time for LEGO, it was quite a slow, painstaking process that wasn’t very rewarding a lot of the time.

However, enough time has passed now for me to look back on the project affectionately and to appreciate the finished thing. I can also be entirely sure of the following points of advice that I gleaned from the process which I will share with you:
Have a plan
If I hadn’t had the rough 3D model to guide the overall process, it would have come out looking like a bit of a Frankenstein’s monster of mismatched parts. If you’re building something small you can wing it, but if it’s something big and complicated have a sketch or a diagram or a 3D model or something.
Technic first
If the model involves any sort of Technic mechanism or moving parts, you have to design that FIRST—build it and test that it works BEFORE you design the visible parts of the model AROUND the mechanism. You cannot build something that looks cool and then shove some technic into it to make it move.
Use steel
OK, it’s not a purist technique, but every time you move the model and it DOESN’T break, you will offer up a little prayer of thanks that you built it around a 16mm steel frame rather than LEGO.
Collaborate
Big models are hard going, so add a few collaborators to lighten the load and share the experience; particularly for areas that are outside your realm of experience.
Best of BrickNerd — Article originally published August 6, 2021
What is your opinion on creating LEGO models with a metal armature? Have you ever done something similar? Let us know in the comment section below.
Do you want to help BrickNerd continue publishing articles like this one? Become a top patron like Charlie Stephens, Marc & Liz Puleo, Paige Mueller, Rob Klingberg from Brickstuff, John & Joshua Hanlon from Beyond the Brick, Megan Lum, and Andy Price to show your support, get early access, exclusive swag and more.