
Tricky Triangles, Sneaky SNOT and Stardew Valley
/Best of BrickNerd: Weekend Highlight — Article originally published May 19, 2021.
The other day my pal Kyle Keller shared his new Stardew Valley build in a virtual hangout. It immediately struck me how clean the triangle shape of the bottle was, and that he’d pulled off something pretty cool.

So I decided it was time for a MOC spotlight—let’s get nerdy about geometry!
Doug: Hey Kyle, before we get into the techniques, can you explain what the heck is Stardew Valley, what is this bottle thing, and what inspired you to build it?
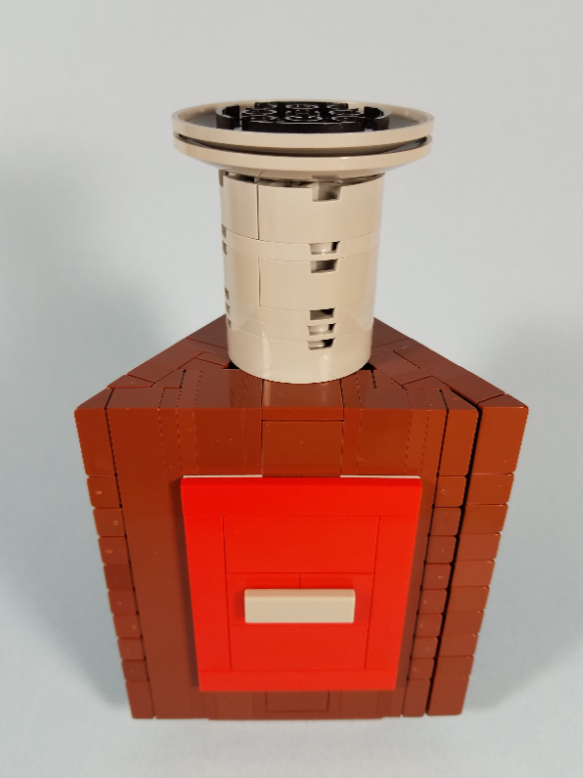
Kyle Keller: This is a Seed Maker from the video game Stardew Valley (image from the game below). For those not in the know, the game is all about starting a farm from nothing and building it into a fully functional, profit-making estate. (And for those of you in the know, I’m midway through Summer of Year 4 and saving up for a Return Scepter.)

One of the helpful tools you can make on your farm is the Seed Maker, which converts a crop you have in excess into seeds for your next round of planting. In the case of my MOC, I had some extra peppers to toss in and didn’t want to spend money on seeds at the General Store (it may have also been closed on that particular Wednesday).
As for why I built my own Seed Maker, I was enjoying the April Tools theme being promoted back in April by Iron Builder. After two real-world tools, I wanted my final build to be of something less based in reality.


(Kyle’s other April Tools builds!)
Doug: Ok thanks for catching us up on the background, and love those other tool builds—especially the level, that’s completely spot on! Now let's get into the techniques for the Seed Maker. First question, how did you get the triangle shape to fit so well—did you measure angles and determine your parts selection accordingly or trial and error?
Kyle: The initial design was all done in Studio. I started with the Axle Connector Hub with 3 Axles (Element ID: 4502595, BL# 57585) knowing this would give me the connections needed to build out the equilateral triangle as well as a central connection for the spout on the top. From there, I worked out how I could best make the corners flush, leaning heavily on the 30° angle and studless tech of the revered cheese slope.
Doug: You surely leaned on the cheese wedge! I think this is a good time to take a trip down memory lane to our high school geometry class. Let’s look at the beauty and simplicity of the triangles behind your awesome shaping.
First in our geometry lesson, we remind ourselves of the really obvious things that triangles are made of three sides with three points—and maybe the less easy to remember fact that the three interior angles add up to 180 degrees.
As you can see below and as Kyle mentioned above, the Stardew Seed Maker shape is a special kind of triangle. It is an equilateral triangle which is special in that each side is an equal length, and that results in the interior angle at each point being the same at 60 degrees: 60 + 60 + 60 = 180 so it all checks out. Woohoo!

Triangle goodness
Doug: So to geek out even further… I have to hand it to LEGO for their design of the cheese wedge (slope), which makes Kyle’s job here much easier. Cheese wedges use another really common triangle which I like to think of as the cousin of the equilateral triangle: the 30/60/90 triangle. As you can see below a 30/60/90 triangle is basically what you get if you chop an equilateral triangle in half. This results in a set of standard and easy-to-use angles with cheese wedges that really open up a lot of possibilities in LEGO building! It’s no wonder that cheese wedges became such a ubiquitous element for design in sets and MOCs.
It’s really cool to me that with the power of the cheese wedge, Kyle managed to have perfectly straight sides and everything matches up. The cheese wedge 60-degree vertex provides the outer corners of the equilateral triangle we discussed above. Kyle also smartly uses that same angle to allow the three brick-built faces to match up nearly seamlessly.

CHEEEEEEESE!
Doug: Ok that’s enough geometry for today. Onto the rest of the build! Did you have any challenges with the build?
Kyle: I find myself more and more doing my “calculations” for builds in half-plate units, and this was no exception. It allowed me to determine how best to fill in the top of the canister while eliminating as many gaps as possible. With a wide enough spout on top, I was confident I wouldn’t need to go more than two studs deep.
Real-world application did present some challenges, however. I’m still not happy with the seam running down the sides near the corners. But using the parts I had on hand, I was unable to find a way to offset the half-plate gap while still maintaining the smooth exterior on all the panels. I might try to remedy this before displaying it at my next LEGO convention.
Doug: Smart move to let the spout cover up any unsightly gaps in the middle. I also noticed there was some neat SNOT work with just the right offsets to get the panels right where you want them. How'd you arrive at the SNOT solution?
Kyle: This is the magic of building around the triple axle Technic part! I have some play on the axle with where and how I place the bridging piece between Technic and stud-and-tube. Ergo, I no longer have to play by the rules of the LEGO grid. This does, however, mean I need to rig up a connection to the axles with enough clutch to get everything to hold together. The bit of SNOT on the interior was some guessing and checking after designing the exterior shell. I started with the inward-facing brackets and the spacing of a little more than 1.5 plates ended up working well.

The Technic Axle hub, Axle bricks, and brackets make for a versatle and sturdy core.
Doug: I love the versatility the Technic axles give in being able to slide your inner core elements up and down where they need to go, and then slide the 1x2 Technic axle brick in or out along the axle connector axles as needed to align the walls. Thanks so much, Kyle for sharing your techniques and a super cool build!
Kyle: Thank you for the opportunity! Always happy to get a little nerdy.
Have you ever thought about High School geometry class while building LEGO? What geometry puzzles have you had to conquer? Let us know in the comments!
Do you want to help BrickNerd continue publishing articles like this one? Become a top patron like Charlie Stephens, Marc & Liz Puleo, Paige Mueller, Rob Klingberg from Brickstuff, John & Joshua Hanlon from Beyond the Brick, Megan Lum, and Andy Price to show your support, get early access, exclusive swag and more.


