A Study In Perspective: A Snowy Journey to the North Pole
/Today’s guest article comes from Josh Parkinson, a LEGO builder specializing in forced perspective. He shares with us the build progression behind his charming North Pole MOC.
Sometimes things don’t go as planned.
I’m Josh Parkinson, and my first year of MOC building was a productive one. So much so that I got featured here in BrickNerd a little less than one year after starting to create my own creations. A year later, my look back at my progress was bittersweet. It included my biggest build, my first con, but also a huge gap in my MOC building where life was completely disrupted.
No matter what we achieve, there’s the part of us that longs for what we didn’t accomplish, the cons we didn’t get to attend, the numbers we didn’t garner, or the work that we couldn’t complete (or complete to our satisfaction). Especially when life gets in the way. And it certainly did. But this journey to bring The North Pole to life at BrickCon, and my challenging second year as a MOC builder, starts before all of that…
The Festive Arctic Journey Begins with Muppets and Monsters
October 2022 came with two Instagram challenges spurring me on: Jen’s Halloween habitat challenge and Kate Hunter’s “let’s build spooky” challenge. By this point, I’d done quite a few minifigure habitats (8x8 stud builds that can typically stack together). They’re quick, small and easy to try a lot of different things when I was still just getting started my first year.
But I was craving doing something different. I wanted to do something that did more with how the habitats stack together into what they call a “habitat stack.” Something that would reignite my motivation and spark. So this time, I did something very different.
I combined habitats with a more traditional MOC while smashing together my love of the Muppets with the spooky season. It became my Muppets Monster Mashup Mansion. I mashed up classic movie monsters with the new Muppets collectible minifigures. Five rooms were created as individual habitats, along with a full exterior of the mansion and grounds, spooky tree and graveyard.

The Muppet Monster Mashup Mansion exterior, spooky tree, and graveyard. The groundskeeper and his dog are a nod to the Disneyland Haunted Mansion.
It had a full 360-degree effect and integrated lighting, and they were all still standalone habitats. The biggest challenge was incorporating a power source hidden in the center. I had one space that barely fit the battery box on the second floor, along with an access panel on the exterior that came right out.

Interior side of the Muppet Monster Mashup Mansion.
There were some fun details inside. I integrated some nice parts including wands on sprues in multiple ways in the Miss Piggy Witch habitat. I used batarangs in the ironwork on top of the tower, with ray guns, wheel rims, and other fun parts inside the Frankenstein habitat, complete with lots of fun parts usage and lighting effects.


This one really got me going with challenging what a habitat stack could do and look like and opened the doors for what was to come.
Stage 1: Ambition Calls With The Ring of Jingle Bells
The holiday season brought with it a new combined challenge between Jen and Kate for a holiday habitat challenge. And I was looking to do something different once again. As is a little common for me… I spent about half the month just coming up with a vision for the project (and procrastinating, sorting, and everything but actually building…) and then rushing to build the habitats just in time for the daily posting schedule! (Yes, I may have been the student who did an all-nighter to get that research paper done after weeks of “thinking” about it.) Luckily, I get in the flow much easier in intensive sessions like that.
In my Muppet Monster Mashup Mansion, the habitats were rooms that fit inside the mansion. The habitats themselves didn’t have an exterior. Except for one: the top tower room. That one had an interior, exterior, and a roof. It fit right on top of the mansion, fully complete. I ran with that idea: what if my habitats combined to have the exterior built into the habitat? And what if they combined in a way that created larger rooms by having two habitats face each other?
Then I thought, what if they had a forced perspective landscape they fit onto? I had a solid concept for going forward. I usually start with a quick sketch layout, some brainstorming of what could go in it, and some technique ideas, as you can see below.

Preliminary sketch and brainstorming ideas.
I was excited by the idea, but as I sat in my cramped corner in the attic to build, I hit my first sticking point. I needed to figure out how I was going to a few things:
Standardize the bases of the lower-level habitats.
Integrate a foundation and removable exterior porch.
Connect two habitats together as a single room, and do it securely with pins.
I waffled a bit on that, wanting to be 100% sure I had the proper foundation. I wasn’t going to have time to tear them apart later. Was it procrastination or smart pre-planning? You decide. It ended up not being your typical habitat base.

A very SNOT-ty habitat base, including pin holes on one side for connecting together two to form a bigger room.
Before I knew it, I was tirelessly building a habitat each night, just in time to post the next day.


After several long nights, I had six habitats that combined to create two elf workshops for the North Pole (the link is a video on Instagram showing how they stack). And I had just enough time to create the roofs to put on top.
The roof, the porch, and a small 2-stud spacer between the lower floor habitats were all removable from the habitats. The porches and snow were built out sideways to create a cracked stone effect.
Completed elf workshops/habitat stacks.
But there was something I didn’t have… the whole rest of the scene. But I love the holidays, and it got stuck in my mind that I was going to complete my vision.
Stage 2: Off to See Santa (The Forced Perspective Study)
Christmas passed, and I was already diving back in. I believed, in my imaginary world, that it surely wouldn’t take too long and I’d have it done in January. Of course! The more I got into it, the more I realized this was a bigger project than I realized. I’d have to break it down into stages.
For those unfamiliar, many artists start with studies that help them test and refine what they’ll do for the larger creation. They’re quicker tests to explore critical elements of the final work. That way they figure out important parts before putting all the time, effort, and expense into the final work. These kinds of studies are just as useful when creating in LEGO.
I started by trying a forced perspective study with a microscale building for the mid-ground—Santa’s cottage on a hill. It’s a key element and a microcosm of what would be needed to make the background work. That was a fun challenge and required a lot of SNOT and finding just the right pieces.
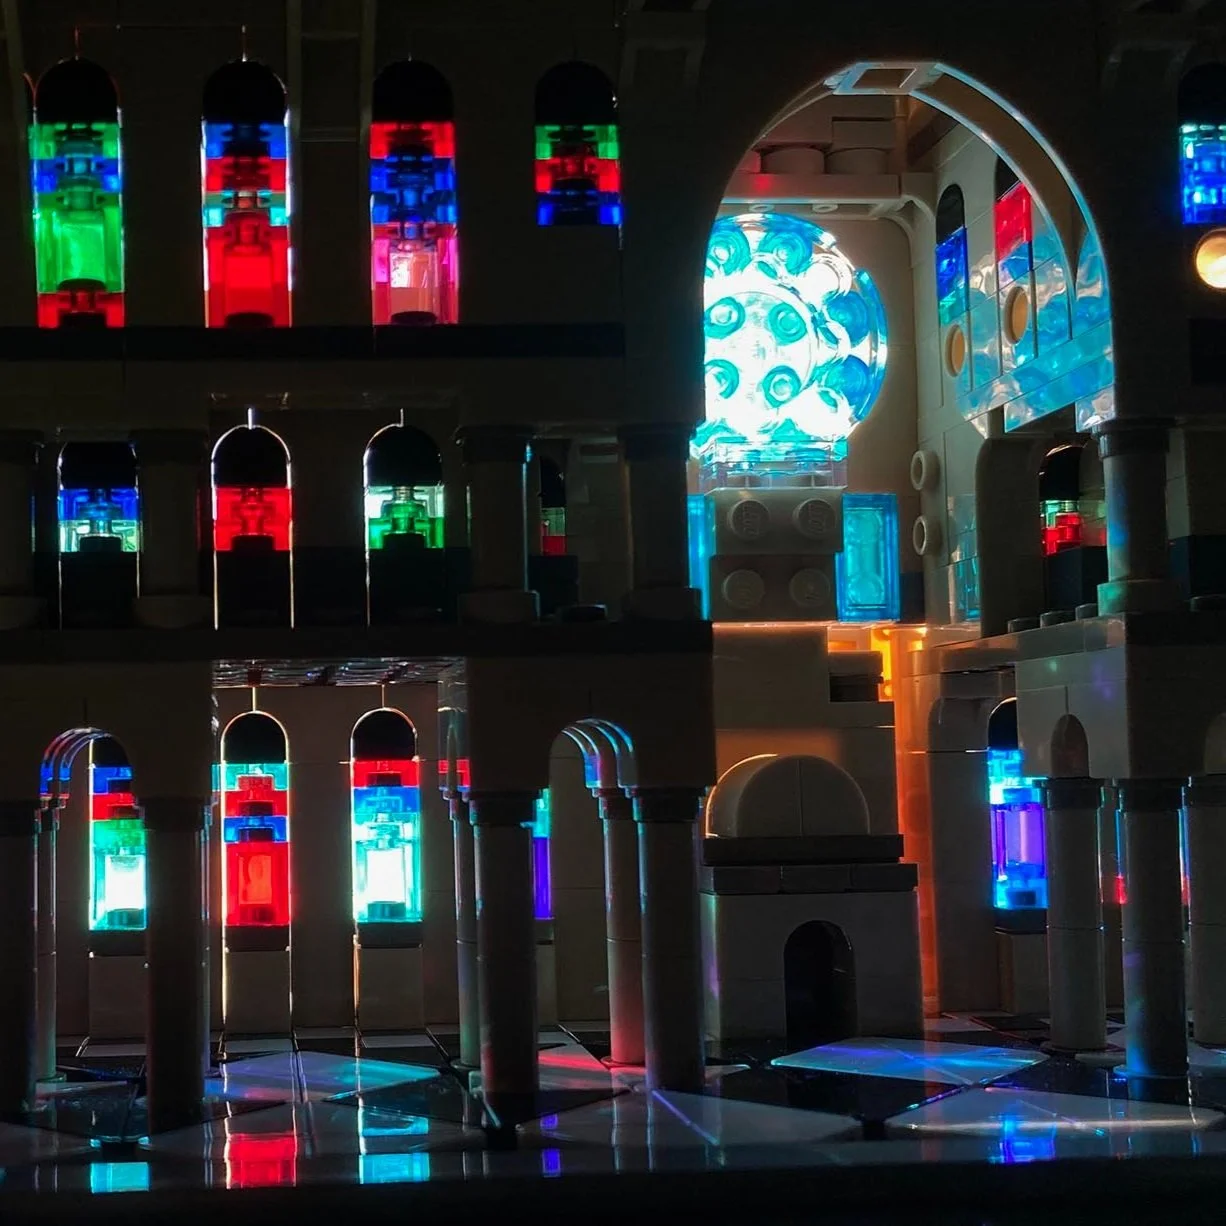
I wanted to use the pearlescent blue for the windows to add a little frosty magic to it, but it was available only in 1x4 tiles. So they’d have to run the full depth of the house, making it challenging to have two stacked up inside the build. I needed the ends of the tiles to represent the windows. The problem was that they didn’t have studs on top, so they had to be stacked with one of them being only held in place by friction somehow.


Building progress for Santa’s cottage.
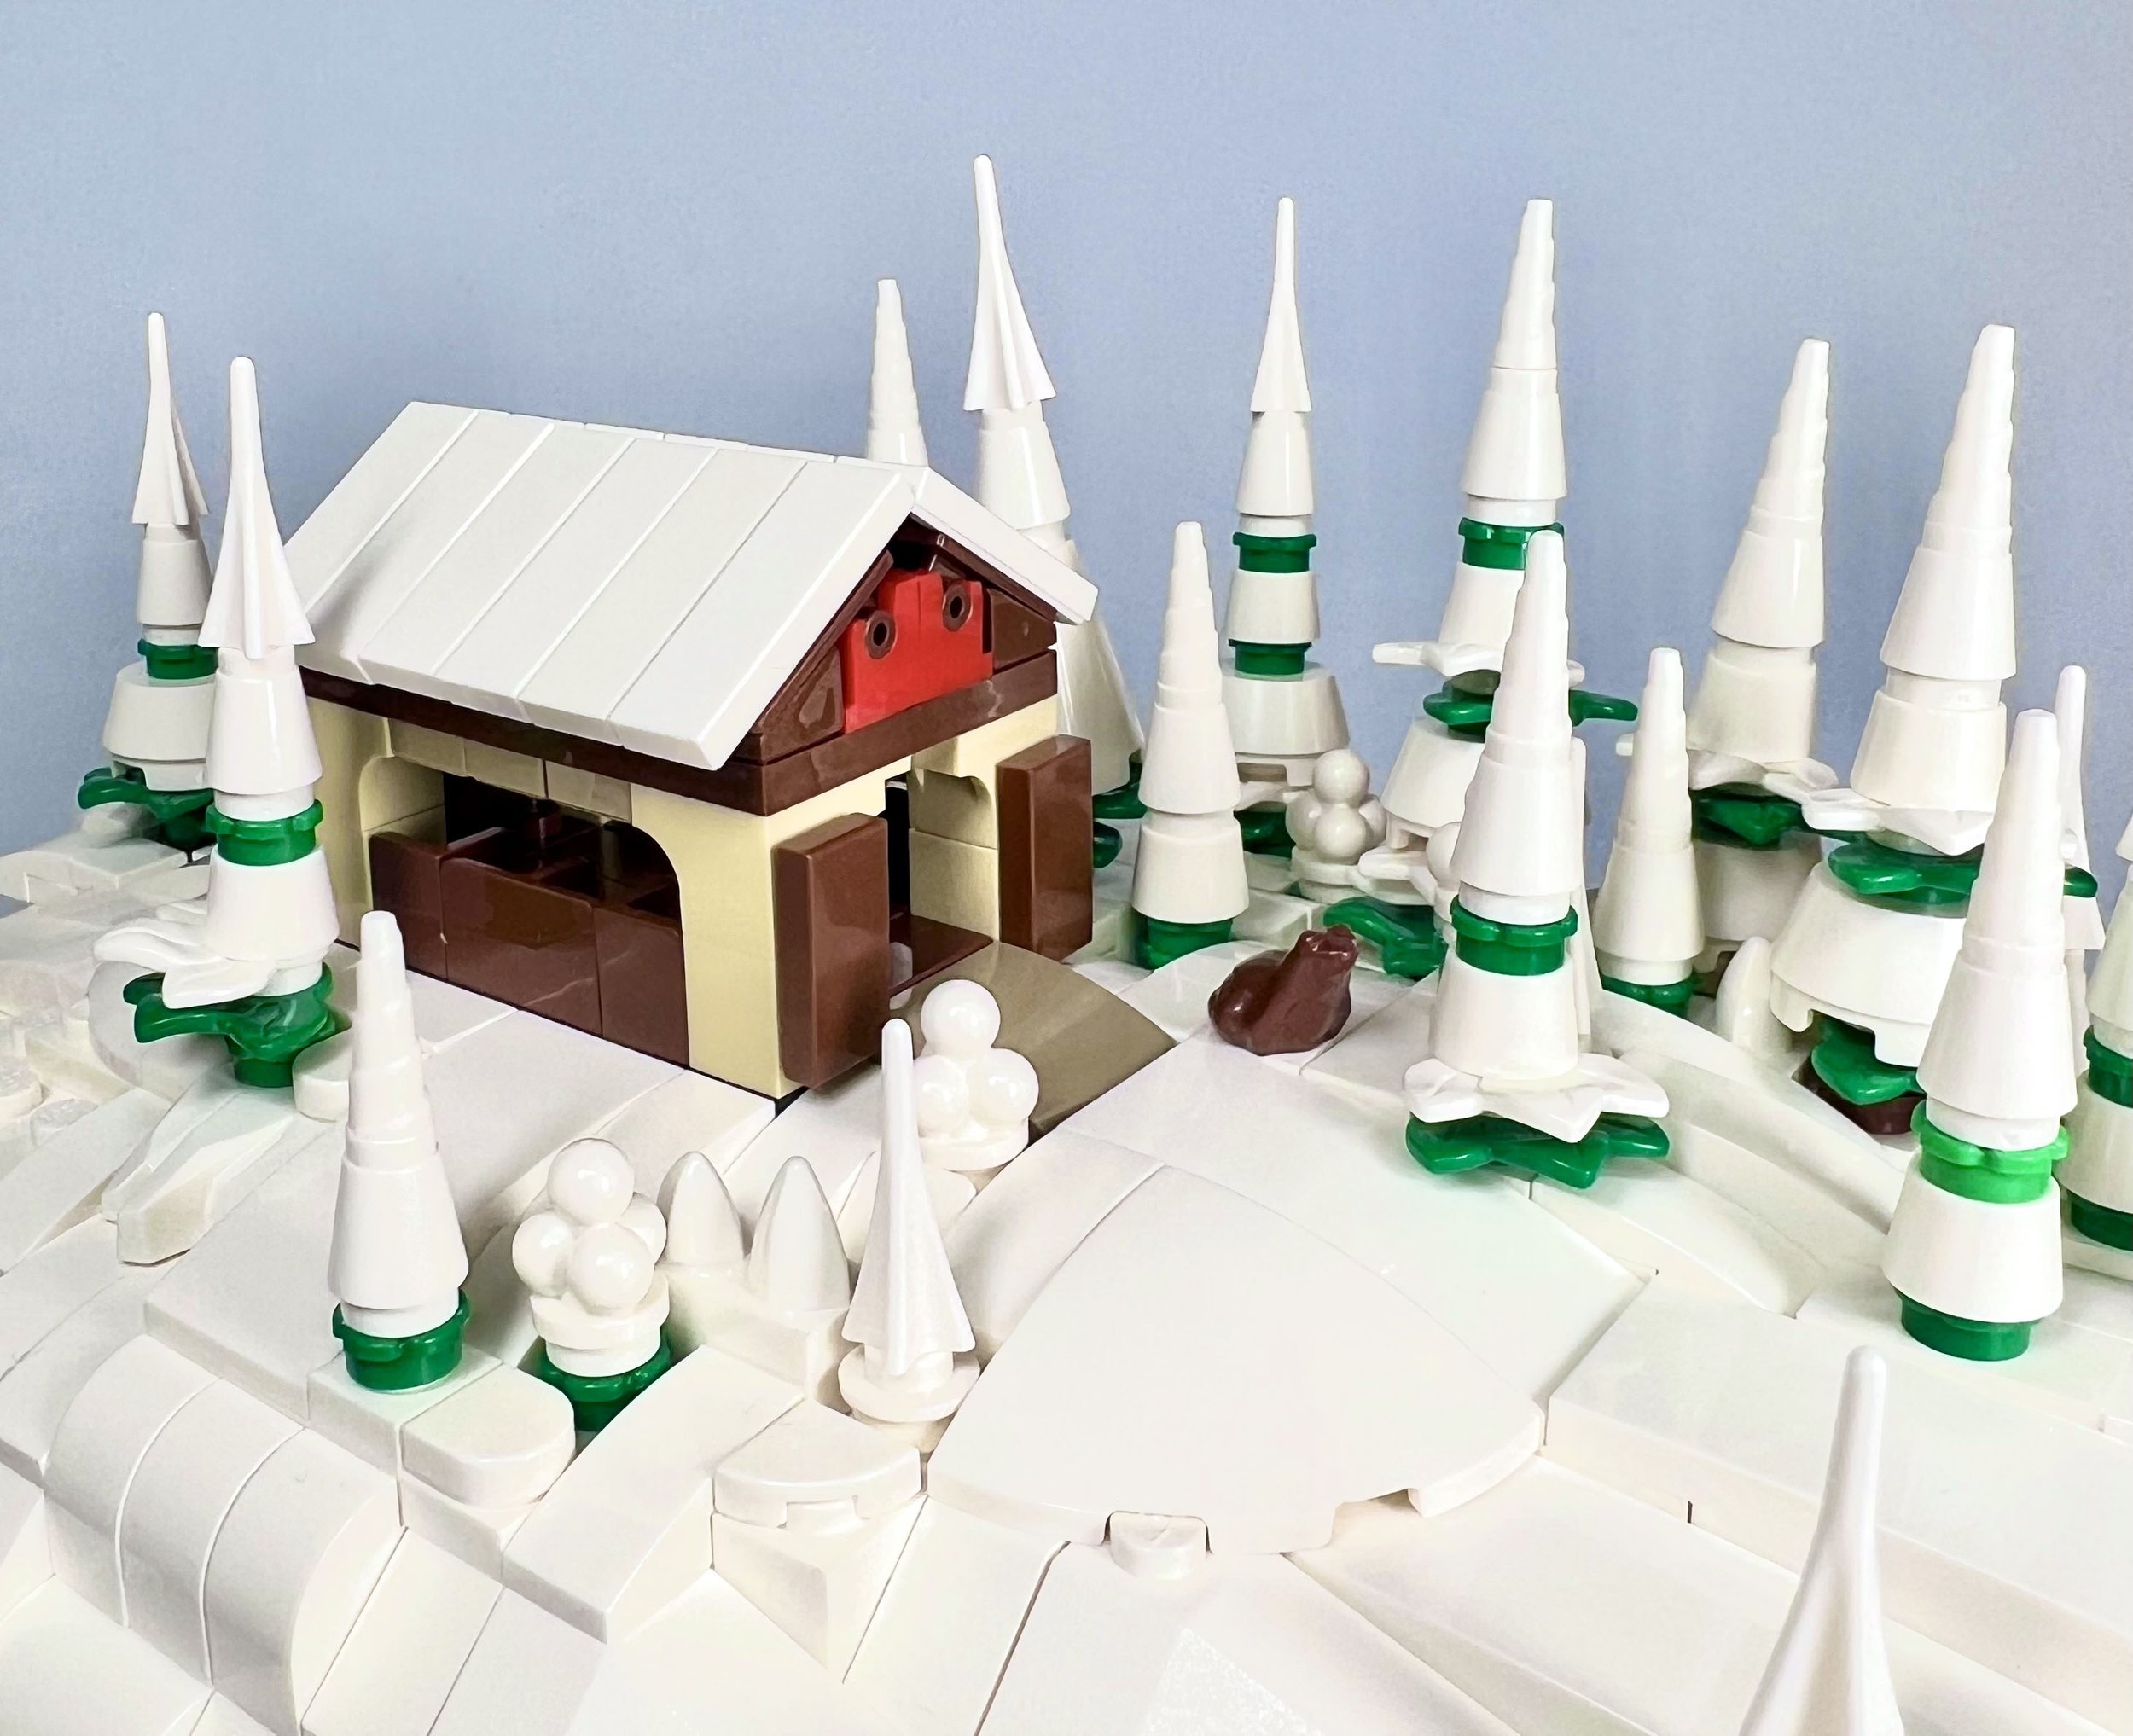
It seemed like each little part was a puzzle. Sometimes I’d be reworking the entire thing just to get a stud in the right place and direction so that another piece was in just the right spot and direction. When building in microscale, every little piece counts, placed in just the right position. It took a while, but I finally had it together. I built out a base with snow and trees on a hill.

Completed microscale Santa’s cottage and trees.
I was going to use “forced perspective” to create the illusion of receding distance all the way out to mountains rising in the back. The key is to trick the eye by playing with scale and by compressing the visual distance. Some things help with that, like building things smaller as you go back, like smaller trees and buildings.
Another thing that helps is creating visual breaks like hills or tree lines that make it easier to create the illusion of layers of depth in a smaller space. I tried to use both. That’s why I put these micro-builds on hills.

Examples of some of the mid-ground microscale trees. Some include a white Fez (29175) or a 2x2 truncated cone (98100). Sadly, the white 2x2 crowned leaf part (15469) is getting pretty rare. I’m hoping LEGO brings it back into production with the other colors!
Then I went about crafting the reindeer stables so the scale was smaller than the house. I even put a reindeer lounging out front using a brown frog. And I used corner panels to create small stalls inside the stables. Then I put it all on a hill with slightly smaller trees.
Completed reindeer stables and reindeer lounging out front.
With these studies in hand, I started placing them behind the workshops, seeing how the scale was looking and how they’d work together, how I’d place them, etc. With the holidays coming to LEGO’s Pick-a-Brick service and knowing some things I’d be needing, I started collecting parts.

…Including lots of white brick from the wall, lots of unicorn horns from BrickLink (I used around 400 of them!), and other useful parts. Plus, the recent collectible minifigure line gave me exactly what I needed for the most distant buildings with the gingerbread house 1x1 printed plate. Things were moving.
Stage 3: The Foreground Comes into Focus
With the forced perspective studies helping crystallize the vision into reality, it was time to figure out the base so I could figure out exactly how things would be laid out.

Starting to figure out placement and layout before finalizing the base.
It was getting clear that there was no way I could have completed this in December, even if I had started earlier. But I was on a roll and building furiously. I realized I was going to need to split this MOC up into sections and was considering the biggest bin I had for transporting each section. That defined the maximum width and depth I could go with each section. I’ve never had to build a landscape in sections before.
The workshops, despite being seemingly smaller builds made out of innocent little habitats, were actually taking up a lot of space. Plus I wanted enough space in between to feature the forced perspective background and space on the outsides for some trees. Before I knew it, the build was 70 studs wide.
And of course, me being me, I had to throw in a challenge and didn’t keep the base rectangular. I decided to angle the workshops a little outward for better display as you walk past the MOC at a show. So you’d view it from different angles as you move past it. That meant the base had to have angles to match the workshops.
Trying to keep things from going mathematically crazy or having to secure the angle in complicated ways, I kept the angle to a simple Pythagorean triple so it would be “on stud” for all three sides of the triangle. I used simple hinges to secure the angle of the base’s walls.

The structure of the foreground base getting started.
With the shape decided, I built up the base for the front half with a network of long plates, filler brick, and large plates to cover the top and help stabilize it. I created workshop foundations and snow. And I had a few studs on the foundations to secure the workshops on top (keeping them removable as habitat stacks).

Building up the foreground base and testing putting on the workshops.
I was laying down snow, adding in holly shrubs, rocks, places for animals and minifigs, building in places to secure the tree trunks… Things were moving along! But I had another challenge.

Further building, and seeing how the foundations are made to keep the workshops removable.
Crisis Point: The Quest for Magical Snow-Laden Trees
The background trees in my studies had smooth boughs of snow. I was trying to get that Rankin/Bass look and feel from those classic claymation Rudolph-type movies. But now I needed to figure out something for the foreground trees that also looked like the smooth, snow-laden boughs those background trees would be close up. I had assumed in the past that I’d use the white plate branches and had a bunch of them.
That idea went out the window when I tried putting them together to see the effect. They were too bumpy and scattered-looking. It wasn’t the look I wanted. I tried using some slopes and tiles on green branch pieces, but it still wasn’t right. In every build, there are certain cornerstone elements I feel need to be figured out in order to make the full MOC work. This was one of the big ones for this MOC. And it wasn’t happening!
It took me a while to try things out, but I finally came to the curved wedge slope piece. It definitely had the smooth curving shape I was looking for. So I placed green branch pieces underneath and the combination was looking good. It brought the splash of green color it needed, especially in this white winter wonderland. But… it was just a little too much green sticking out. So I started adding bits of tile—rounds, “D” shaped, quarter rounds—onto the studs extending out. Personally, I loved the effect.

Studies of the trees, figuring out the technique for building the boughs and connecting them to the trunk.
Crisis averted! I had my tree technique. And it would blend well with the background microscale trees. But aside from getting a few trunks and a few lower boughs in to determine the layout and finish the foreground landscaping, I hit a standstill on the trees because I just didn’t have all the parts I needed yet. So I moved on to the next big section.
Now, my LEGO studio area is currently a corner of an attic filled with storage with one desk and barely enough space to get into my chair. I do not have a “LEGO room.” So building bigger presented a challenge. And this next section of the MOC would be even deeper than the foreground! Things got tight, to say the least, but I couldn’t pack the foreground section away in a bin since I had to keep it out for reference when building the back section. I had to make it work.
Stage 4: Forcing Some Perspective
January turned into February, and I was working on the back half. This would all be forced perspective with microscale that got smaller and smaller as you went back, simulating increasing distance. I laid out where the two initial studies would go (Santa’s cottage and the reindeer stables), angling them to create more dynamism in the composition.

Testing out the forced perspective placement of the two microbuilds so far.
Then I started working out what I was going to do with the rest of the scene just in time for another Instagram challenge, Kate’s “Let’s Build Microscale” challenge. It worked out perfectly. February hit, the challenge was on, and I was determined to get this landscape done by the end of the month before I went on vacation for my birthday. It was surprisingly time-intensive. Everything was tiny, and there was a lot of undulating landscape to build up.
I kept referencing the foreground by placing it in front, helping me determine where to place things as people would look between the elf workshops. I wanted it so that as people walked past or looked from different angles, they’d see different things. (The downside is that it’s tough with photos to see everything in one shot!) At each step, I had to keep re-evaluating how it looked. Did it keep the illusion of distance? Did it work with the elf workshops in front? Was it an interesting composition? Did it draw the eye through?

Building out the background section and integrating the two studies, each at an angle for more dynamic composition.
The further I went into the distance, the more tedious it became placing each individual 1x1 tree with cones, unicorn horns, spear tips… then teeth, lipsticks, and other little parts to give the effect of smaller and smaller trees going off into the distance. Even burying some of the unicorn horns a bit to make them even smaller above the snow.

Build examples for the more distant trees further into the distance as you go left to right.
The further I went, the more conscious I also had to be of how much of which parts I had left, especially for the limited parts.

Several of the types of parts used in the microscale landscape.
Thankfully, there were a few interesting areas along the way to break it up. This is where those printed gingerbread house plates came in handy to create the elf villages on the hills. They were perfect for the furthest buildings possible.
Another interesting break (keeping my sanity from crumbling) was figuring out the deciduous trees I wanted in the elf village. I needed to bury brown bars into the hills to have only a small portion showing above the ground as tree trunks. Then I placed ice cream scoops on top.


The building of the microscale deciduous trees and elf village.
The most distant mountains finally rose up at the very back—I had to flip the MOC around to continue working on it from the back as it was so deep. I was almost done but quickly running out of time. (Instagram challenges can be great motivators.)

So deep I had to flip it around to continue building back. Shown from the rear as I work to build up the hills and mountains.
I’ve been wanting to use sand blue for rockwork and have collected a good selection of sand blue parts. So I used it on the mountains rising out of the snow. I like the added bit of color, and it really worked with the Rankin/Bass kind of look. Funny enough, I got the idea a while back when the discoloration on a MOC photo I saw made it look like he used sand blue for the rock work instead of gray. And I loved it! So I knew I wanted to use that color one day and have been collecting parts for a while now.
I had to get creative with SNOT to build in different directions and utilize the limited part palette in sand blue (unlike if I built it in gray). And surprisingly enough, there were basically no 1x1 plates available in that color, only round studs. Thankfully, the full background landscape finally came together just in time to post it for the challenge. It ended up being a great MOC on its own for a snowy North Pole landscape.

Completed microscale background with forced perspective.
But it was time to put it away. I was ready to head out on a warm Southern California road trip and a short stop at Disneyland (coincidentally, where I got hooked back into LEGO if you read my backstory in last year’s feature). I did not realize I would not be able to get back to it (or much of any LEGO) for another three or four months with what was about to happen…
What other scenes would you like to see in a forced perspective-style? Let us know in the comments below.
Do you want to help BrickNerd continue publishing articles like this one? Become a top patron like Charlie Stephens, Marc & Liz Puleo, Paige Mueller, Rob Klingberg from Brickstuff, John & Joshua Hanlon from Beyond the Brick, Megan Lum, Andy Price, Lukas Kurth from StoneWars, Wayne Tyler, Monica Innis, Dan Church, and Roxanne Baxter to show your support, get early access, exclusive swag and more.