Choo Choo Choosing the Right Scale for a LEGO Model
/Although I identify as a LEGO train fan, I also identify as a model train hobbyist. In addition to building LEGO trains and layouts, I also have built model train layouts in N, HO, and OO scales. Therefore, when I consider building a LEGO train model, I use the same discipline and techniques as I would in other traditional model train scales. Despite the differences between building a model in the different mediums of LEGO and modeling with kits, tools, glue, paint, etc.; the key aspects of research, planning, and compromise remain the same. This preparation before building a model helps establish the scale of the model and the inevitable compromises we have to make to the scale of the model.

When we talk about scale, we refer to the relationship of size between our model and the prototype “real thing” it represents. The choice of scale impacts the size of the model, the time required to design and build it, the amount of detail it has and ultimately, the number of parts required. Before we dive into the topic of scale, it is helpful to consider some preliminary thoughts about choosing our models and preparation.
Preliminaries
Although this article is focussed on model train MOCs, it is relevant to building other creations in different themes such as aircraft, boats, buildings, vehicles, etc. Furthermore, a model train need not be a locomotive—it could be a coach, wagon, building or some other railway-related infrastructure.
When considering an exciting new MOC to build, there are several factors I like to consider before starting a project:
Interest factor: Is it something you love?
Hassle factor: Is it too complicated, is there enough research/reference material on the subject?
Relative dimensions: Width, length, height — which is the smallest?
Colour palette: Are the model’s colour features compatible with LEGO colours? If its sand red, it could be a problem!
Preparation
Before building a model, it is important to prepare. This involves doing some background research on the chosen prototype in order to get familiar with its history, physical characteristics, and distinctive features. This research involves:
Photographs from different angles, different times of day/year/era
Line drawings/engineering drawings
Books, magazines, ephemera
The internet is our friend! So much can be gathered from Wikipedia, Google image search, etc.
Scale
The focus of this article is scale. I can’t emphasize enough how crucial the choice of scale is when building a model. The obvious consequence of scale is the overall size of the model. What is not obvious is just how much scale influences the number of bricks you’ll end up buying from BrickLink! The brick count is very roughly related to the volume of the model or a factor of the cube of its linear dimensions (N^3). For example, if we wanted to build a model of a Rubik’s Cube, we could use as few as 27 bricks, but if we simply double the scale (i.e. double the length, width, height), then we would require 216 bricks!
Another other important consequence of scale is the effective “resolution” of the model. That is, how much detail can we represent using the discrete and “blocky” nature of LEGO building elements. Fortunately, the LEGO system consists not just of simple rectangular brick elements, but also a rich selection of “shape” elements such as slopes, curves, wedges, etc.
What Scales Can We Use?
We indeed have the freedom to choose any scale we want when building a LEGO model. However, there are several common and popular scales that LEGO builders use based on factors such as practicality, compatibility with minifigures and compatibility with other builders. Here are some common scales used by LEGO model builders:

1 mini-figure = 6 feet
1 stud = 1 foot (12 inches, 30 cm)
3 studs = 1 metre
micro-scale
mini-land
I typically build to a scale that is approximately 1:40 scale. This is very nearly 1 stud = 1 foot and is somewhat agreeable with using mini-figures as the inhabitants of our model worlds! This scale also relates to the equivalent scale of the LEGO train track gauge (37.5 mm, the distance between the rails) and its relation to the actual dimension of standard gauge track at 4 ft 8.5 inches. The diagram below shows how this scale fits relative to other popular model train scales.

Using Scale to Find Dimensions
Often, when we have a reference source for a model, we want to figure out as many key dimensions as possible. Let’s consider an example.

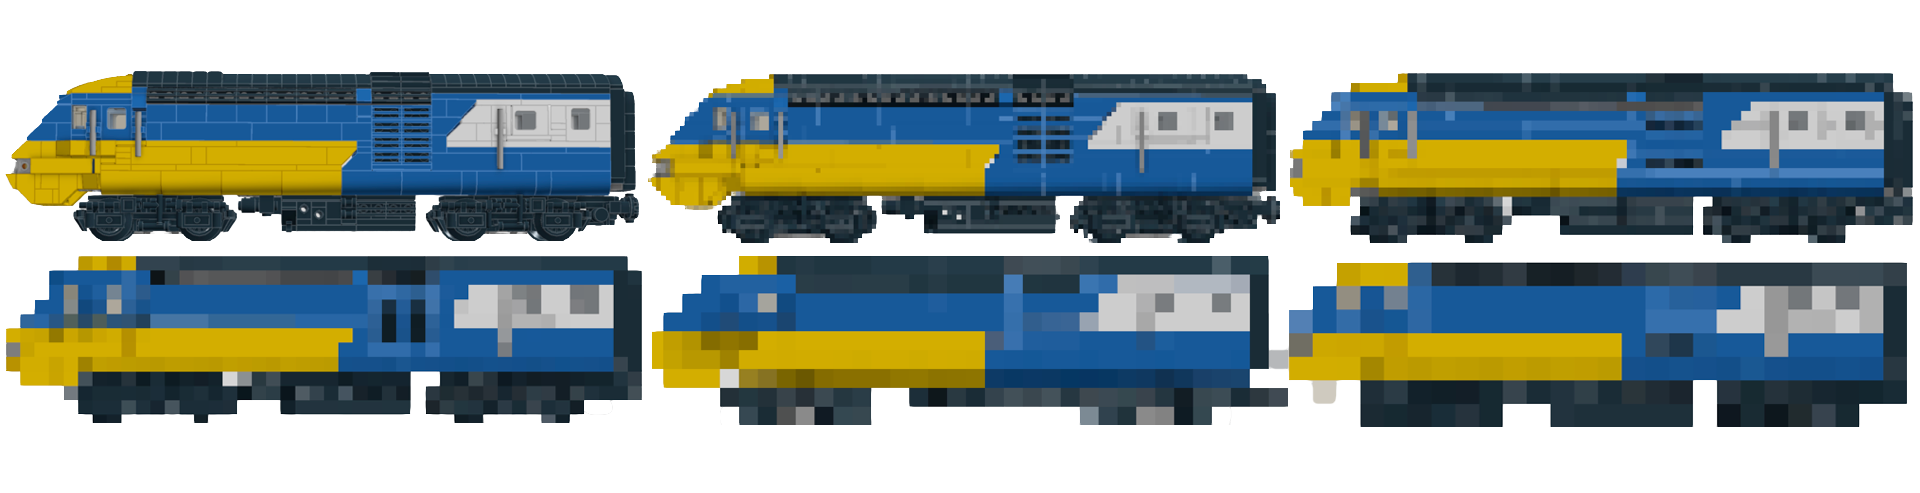
Let’s say I’m building a model of a British Rail HST power car (shown above) and I’m aiming to build to a scale of 1:40. Let’s also consider that I have a useful reference drawing of the prototype that is bitmap picture. Finally, let’s see how we can use this bitmap reference image to estimate the wheelbase of the HST power car.
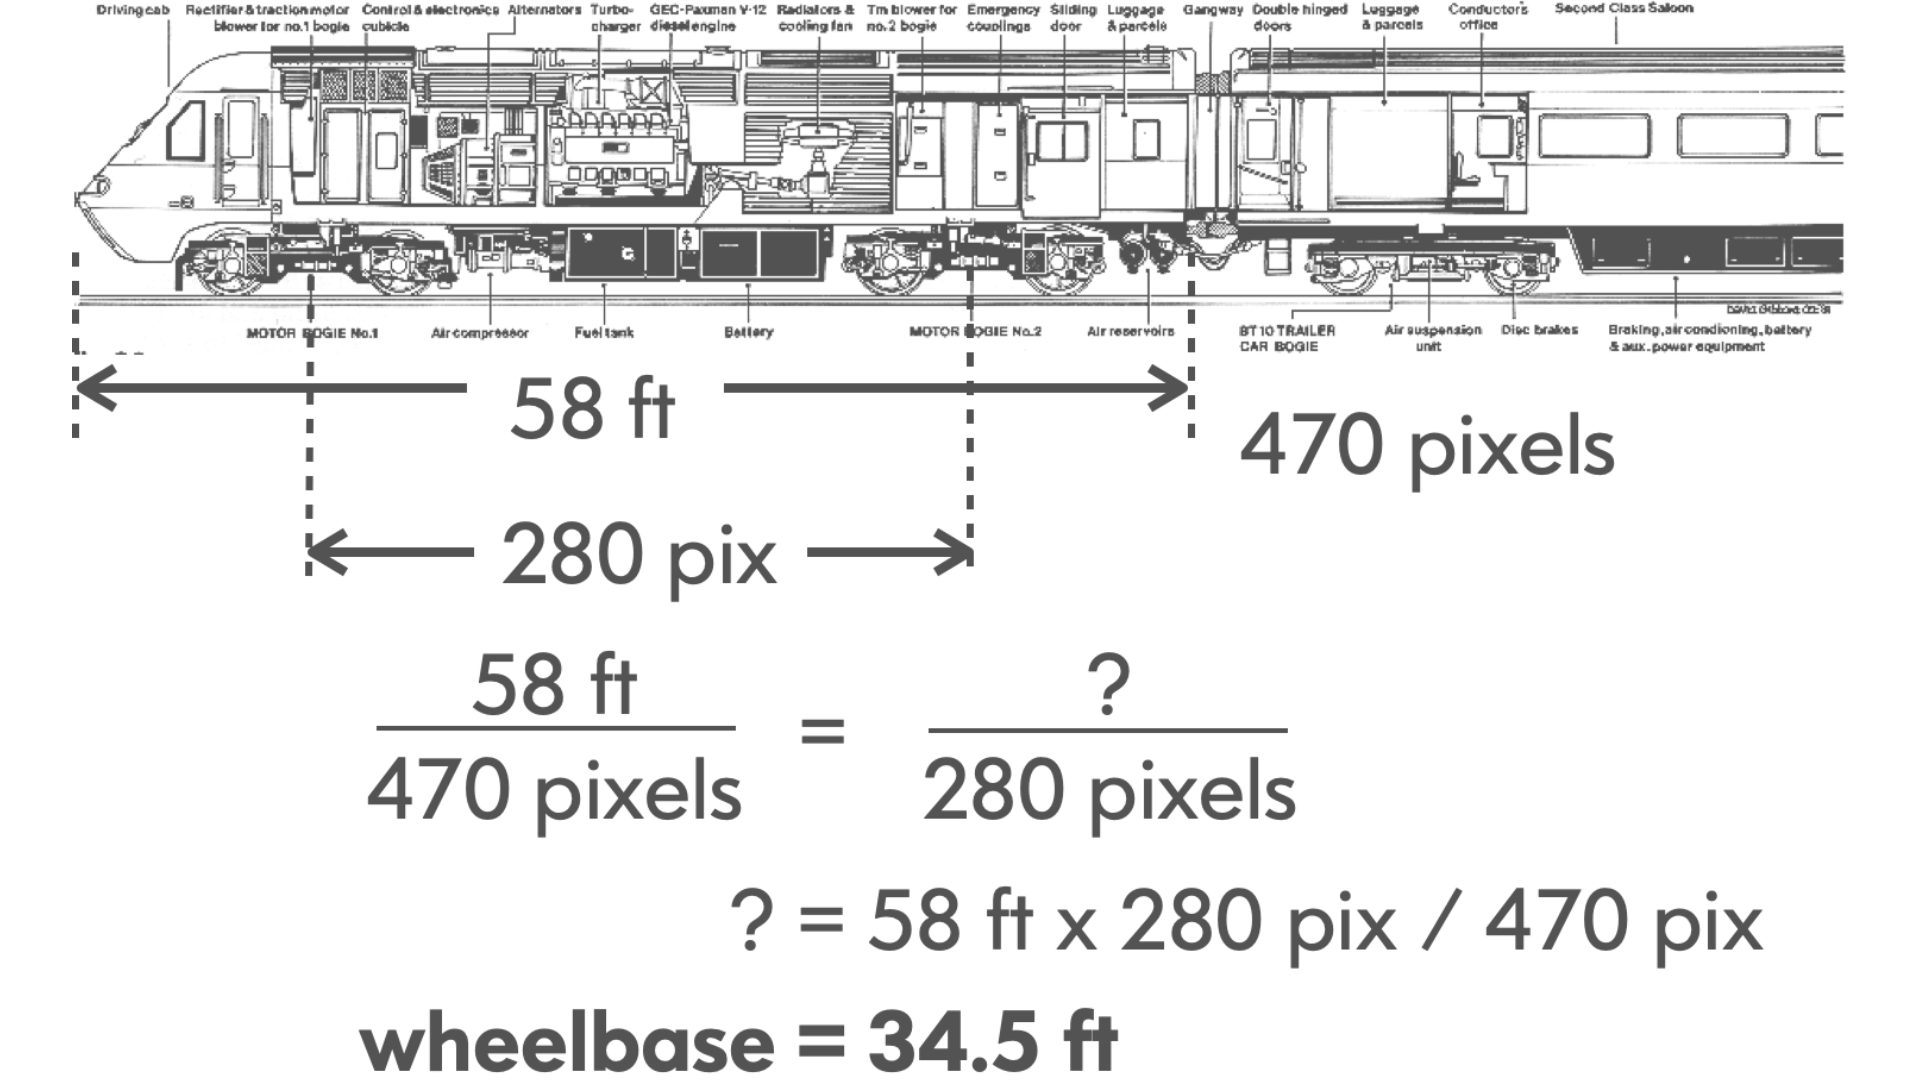
In this example, let’s assume we know the HST power car is 58 ft long in reality. Then, we measure how long the model is in units of pixels from our reference image, in this case, 470 pixels. Since we want to estimate the wheelbase, we measure the wheelbase to be 280 pixels long. We now have enough information to compute the wheelbase dimension to approximately 34.5 ft.

Since we’re building a LEGO model, we want to know what our 34.5 ft wheelbase corresponds to in LEGO studs. This can be computed as follows:
Our scale is 1:40, therefore 34.5 ft : 40 = 0.8625 ft or 10.35 inches
A LEGO stud interval is 8 mm, so 10.35 inches x 25.4 mm / inch = 263 mm
Finally, 263 mm / 8 mm/stud = 32.875 or 33 studs
When performing these estimates of dimensions using our desired scale, it is useful to think about these dimensions in terms of LEGO system elements. Thus it is useful to keep in mind these key LEGO element dimensions:

Scale Compromise
No matter what scale or medium you build models, inevitably, we end up making compromises on our model’s dimensional fidelity or accuracy. This compromise is sometimes called “modeller’s license” or just another manifestation of “artistic judgement”.
These compromises are often the result of determining our desired model size is too big, or that its awkward in one or more dimensions (e.g. too narrow in width, but ok in length), or simply not feasible to represent using LEGO elements due to a complex shape.
Let’s consider the above example again of the HST power car. Using our desired scale of 1:40, the resulting model would be 58 ft (55 studs) long and 9 ft (8.5 studs) wide. This is an awkward size (in particular the width) and would result in an uncomfortably big and heavy model. Therefore, I compromise by setting the width to 7 studs wide. This then results in a LEGO model which is proportionally (and manageably) 42 studs long.

This is an example of making a compromise based on size. However, there are other compromises that result from the choice of available LEGO elements to render our model. Let’s use another example to illustrate this point. Let’s say I wanted to build some British Rail Mk 1 coaches. These coaches come in a variety of types and configurations.

When I see a candidate prototype to model, I often look for distinctive features which characterize the model and how these potentially relate to LEGO elements. In the case of the coaches above, I consider these key LEGO elements to be important to capturing the essence of the Mk 1 coach:

The rounded the train windows of the prototype are perfectly represented by the LEGO rounded train window elements (1x4x3 and 1x2x3). Another distinctive feature of the Mk 1 coach (not obvious from the side view above) are the curved “tumblehome” lower body sides which curve inwards slightly below the windows. This feature is very effectively represented using bow slope elements (1x2, 2x2, and 2x4).
Therefore, the scale of the model is more or less established by the size of the window elements, and how many are required to effectively represent the window arrangements in the prototype. Using this, I prepared a drawing representing several window arrangements in terms of LEGO elements and stud intervals as shown below:
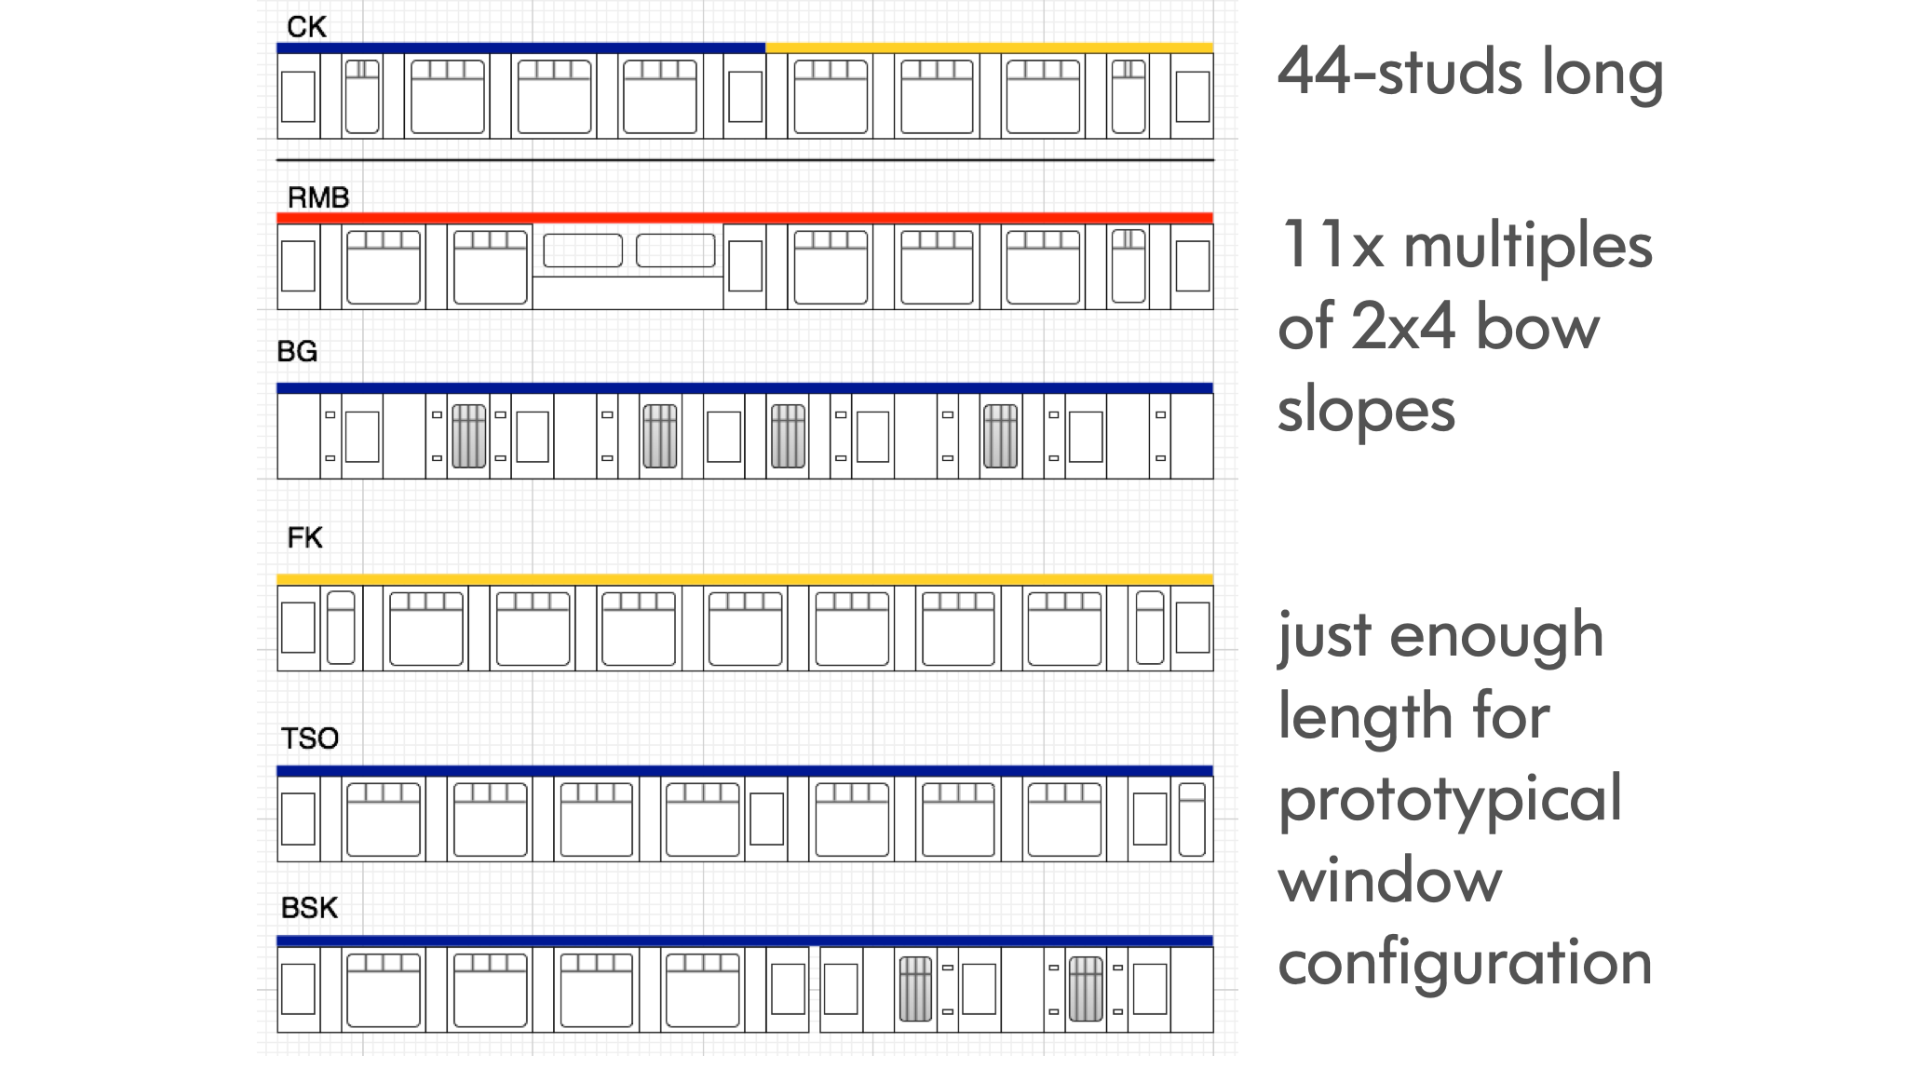
The LEGO approximation shown above is a compromise of capturing enough detail, yet compressing the length of the coach to a more manageable 44 stud length. Examples of the resulting models are shown below:


Conclusions
It always amazes me that LEGO has become a medium suitable enough to build stunning scale models. It is not uncommon to hear the question “is that really LEGO?” due to the level of detail and fidelity demonstrated by many talented LEGO builders.
I think part of the reason this is possible, is the introduction of several key element types in the last 10-20 years such as curved slopes, special shaped tiles (e.g. curved, angled, etc.), and bar/clip elements. These elements help us “sculpt” the distinctive shapes found in our prototypes with greater fidelity. As a result, we have more scope for choosing an appropriate scale.
The choices we make about our model scale inevitably result in compromise. In many cases, we cannot afford to make a perfectly scaled replica of a prototype either due to unmanageable size constraints or limitations of available LEGO elements. However, as we gain more experience building LEGO models, we refine our ability to make these compromises without sacrificing the quality of the final model.
How do you go about creating a scale model? Does it involve maths, or do you just wing it? Let us know in the comments below!
Do you want to help BrickNerd continue publishing articles like this one? Become a top patron like Charlie Stephens, Marc & Liz Puleo, Paige Mueller, Rob Klingberg from Brickstuff, John & Joshua Hanlon from Beyond the Brick, Megan Lum, and Andy Price to show your support, get early access, exclusive swag and more.