Making Trains Move: The History of LEGO Trains, Track, Motors and More
/
Introduction
One of the best attributes of LEGO trains is the fact that they move! The laws of physics tell us that in order to move, we need energy; in particular, electrical energy. However, before we get into the obvious use of electrical energy to move our trains, it should be mentioned that many of us likely started our LEGO train journey with “push-along” energy from our arms. I remember receiving my first LEGO train set at age three. It was not battery-powered, but self-powered! For most children, this is how we start our play experiences. We are not burdened with having to know how electrical circuits work, how things like motors and switches, etc. need to be connected, or the basics of operation. We simply put our trains on the track and pushed them along (also making sound effects of course!)

Eventually, we recognize that having our trains move themselves is actually very cool too! And so begins the journey of playing with electrically powered LEGO trains. Since the introduction of LEGO trains in the late 1960s, LEGO has offered us a variety of convenient and kid-friendly options to motorize and power our trains. These solutions have been based on both battery and track-powered systems and have been adapted over time to work with changes in both the underlying track system and the LEGO system of elements themselves.
When diving into this topic, it became very apparent that both its long history and technical depth merited more than just one article. Therefore, this article will be the first in a three-part series about powering LEGO trains. The series will include these topics:
History and Review of Motors, Batteries and Controllers
Building, Operation, and Maintenance Tips and Advice
Motor and Control Technology; Future Possibilities of LEGO Trains
The history and review in this article will be focused on analyzing the products and systems that have been released by LEGO for powering trains. These systems have evolved over time and can be grouped into distinct “eras” or themes. These eras can more or less be characterized by a distinct combination of track and electrical system architecture. Each of which have very different operational and performance characteristics and also reflects the influences of the evolving LEGO system itself. Factors such as new elements and adjacent themes such as Technic, Mindstorms, etc. all have influenced the elements and architecture of each LEGO train era.
Lastly, due to the vast number of products and elements that could potentially be considered relevant to this review, I have confined the product focus to those elements which are mostly or exclusively aimed at the train theme. For example, there are many general-purpose 9V, Technic, Power Functions motors that could be used for motorizing a train; however, this article will focus strictly on train motor products. The idea is to discover the distinct character of LEGO elements that were specifically designed with the needs and requirements of the train theme. This is different from an element which is designed to be general-purpose across many themes.

When you take a long view over the entire history of the LEGO train theme (spanning more than five decades), the contours of six distinct eras can be distinguished. These eras are mostly characterized by the combination of track system and power/control source. Unofficially, train fans often refer to spans in LEGO train history as the "blue era", "12V era", "9V era", etc. The eras identified in this review somewhat correspond, but use a stricter grouping based on distinct technical features and attributes.
From a very top-level perspective, one can split the entire LEGO train theme into two distinct categories: track-powered and battery-powered.

This partitioning is independent of track system or time period. Battery and track-powered trains have coexisted throughout nearly the entire theme's history.
From another perspective, one can slice the train theme along lines of the underlying track system. In this case, we effectively have three categories: the Blue/Gray Era, 9V Metal, and RC Plastic.

With these partitions in mind, we can see the outlines of six distinct eras or themes as shown in the timeline diagram below.

I have identified the six main eras of LEGO trains (from a power system perspective) as follows:
4.5V Battery Powered
12V Track Powered
9V Track Powered
RC Battery Powered
Power Functions
Powered UP
A summary of each era's key attributes is shown in the table below.
With this frame of reference, we can now dive into the details of the essential components of each power system era. I have grouped this analysis into three functional categories of elements: motors, battery systems, and power controllers.


Motors are at the very heart of any powered LEGO train, whether battery or track-powered. LEGO has developed many motorized brick elements over its history for not only trains but other themes such as Technic and Mindstorms. Many of these motor elements were designed to be general purpose, that is, suitable for integration into any type of model such as a car, crane, bulldozer, robot, etc.
However, the LEGO system has developed motor elements specifically aimed at the train theme. These motors have had to address either a form factor or performance requirement unique to powering a train. Furthermore, we must remember that LEGO products are aimed specifically at children and their needs. In particular, motor products must be easily and safely used by children of all ages and abilities. There has to be a "turn-key" or "plug-and-play" simplicity to the train motor element so that the play experience is relatively quick and with minimal challenges.
A timeline of motorized elements related to each power system era is shown in the diagram below.
At first glance, it appears that each theme has a unique motorization solution. If we zoom out over the entire range of train motor elements, there are effectively only two distinct form factors:
Brick Box (12 x 4 studs x 10 plates tall) - 2 axles with 6 stud wheelbase
Motor Bogie (10 x 4 studs x 7 plates tall) - 2 axles with 6 stud wheelbase
The so-called "Brick Box" is in fact one of LEGO's first motorization products and was a general-purpose element used across many themes. In my opinion, its form factor appears to be more influenced by the requirements of being built into a train. The 4-stud width and 6-stud wheelbase are fundamental attributes that are still with us today.
The "Motor Bogie" form factor is really the core essence of LEGO train motorization. This form factor is discussed in greater detail at the end of this section after a detailed analysis of each era of motor elements.

The 4.5V motor element has the classic brick box form factor. Wheels are friction fit into four axle hole locations aligned on a 6-stud wheelbase. Flanged wheels were used for trains; however, un-flanged wheels fitted with rubber tires could be used with the same motor, thereby making it general purpose beyond trains. The motor is connected to a battery power source using one of the many electrical connector terminals placed along the body, both facing up vertically or horizontally at each end.
One of the notable features of this motor was its internal construction built around a two-part die-cast metal chassis. This gives the motor both mechanical durability and more importantly weight. The 150+ grams of weight increases the traction adhesion with increased force on the wheel tread contact with the rail.


The underside of each end of the motor has a 4x2 brick space which can be used to mount functional accessories. These include:

The 12V power system spanned the transition from the classic “blue rail” era to the “gray rail” era starting in 1980. As such, motors of both the brick-box and motor bogie form factors were available for the 12V 4-rail system.
The brick-box motor (x550a, x550b) element was visually identical to a 4.5V or 12V motor. Internally, they were fitted with different motors rated for each corresponding voltage. They could be identified by a small open hole on the top surface which revealed a colour strip printed on the motor casing: either a red strip with a printed “4V” marking or a yellow strip with a printed “12V” marking.


Mechanical Features: 12V Motor Bogie (bb0012)

The 12V motor bogie was an exquisite example of product engineering. A powerful brushed DC motor was encased in a two-part die-cast metal chassis. The motor shaft extends symmetrically out of each end of the motor casing with a mounted brass worm gear. The worm gear drive was a very high torque drive and gave the motor tremendous pulling adhesion. Another nice feature was the exposed motor brushes not being enclosed in the motor casing. This made the brushes and commutator easily serviceable for both cleaning and replacement if required. The die-cast metal chassis gave the motor weighted adhesion, rigid mechanical tolerances for the drive mechanism, and could act as a thermal heat sink improving the runtime endurance of the motor.

The 9V motor bogie was introduced with the transition to the 9V metal track system. It maintained the same motor bogie form factor from the 12V motor bogie, yet it retains the distinction of being the first and only LEGO motor product fitted with metal wheels.

Mechanical Features: 9V Bogie (590)
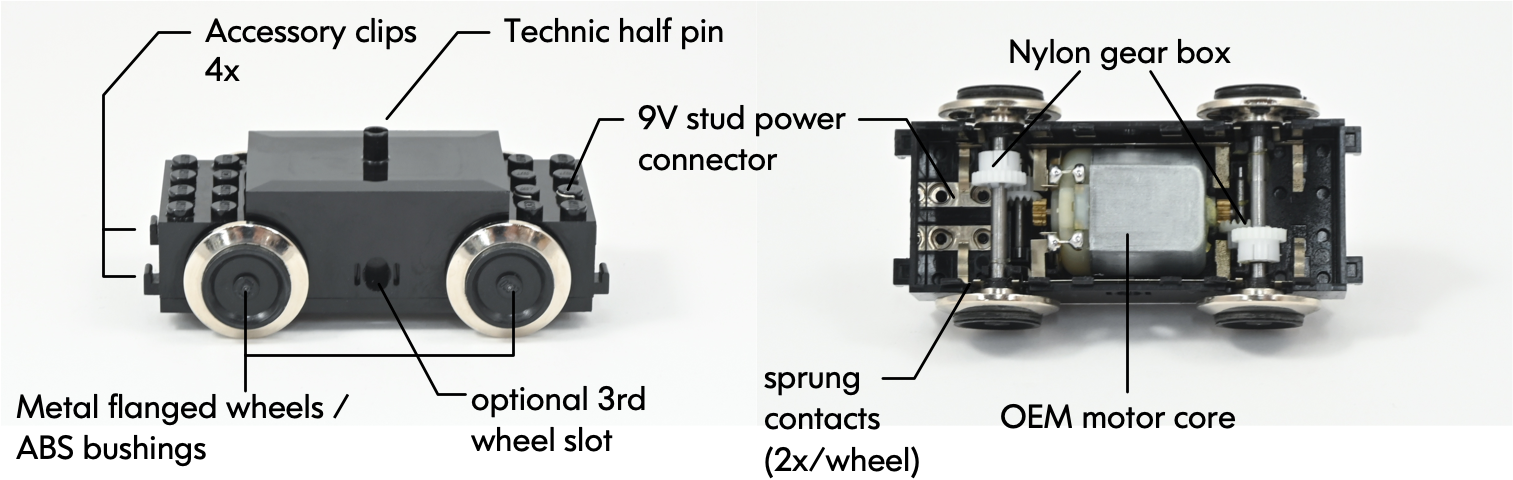
The 9V motor bogie is a compromised design. Unlike the motor elements that preceded it, it does not have an internal die-cast metal chassis. As is clear from the weight specification, it weighs half of the 12V motor bogie in the same volume. Lower cost construction is evident with the use of Asian rather than German Buhler motors, nylon plastic gears, and molded plastic axle bearings. This is an understandable compromise and effort at cost reduction given the target market of toy trains for children. The LEGO train sets which incorporated the 9V motor bogie consisted of no more than four to five relatively lightweight vehicles—well within the performance envelope of this motor.

The discussion of the motor bogie element for each of the RC, Power Functions and Powered Up eras is combined since there is very little difference between these motors from a form factor perspective. Differences exist in the motor performance (the RC motor being the worst and the PF and PU motors being satisfactory) and each motor is connected with a different connector termination corresponding to its System identity.

Mechanical Features: RC Motor (x1688)
The RC motor was introduced in what appears (in hindsight) to be a stop-gap between the retirement of the 9V metal track system and replacement with battery-powered trains on plastic track. It retains the beloved 9V 2x2 metal stud connector as its electrical termination and introduces a few key updates to the motor bogie form factor. These include:
Technic cross axle barrels for axle + wheel mounting
Shallower height overall (increased clearance above the rail)
Screwed two-part enclosure (rather than plastic clips)

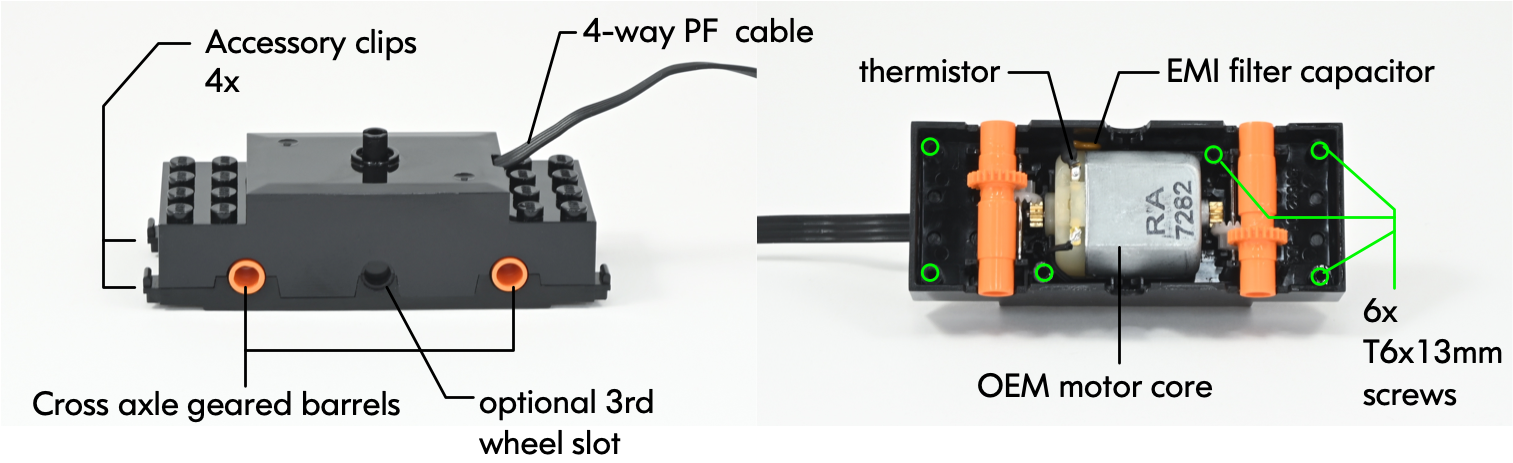
Mechanical Features: Power Functions Motor Bogie (87574c01)
The introduction of the Power Functions system superseded the short-lived RC power system era. With it, a revised motor bogie was introduced. Externally, the case form factor is identical with the exception being the retirement of the 9V connector replaced with a hard-wired 4-way Power Functions cable assembly terminated with the new Power Functions 2x2 stud stackable plug. Internally, the OEM motor was replaced with a high-performance motor.
Mechanical Features: Powered-Up Motor Bogie (bb0896c01)
LEGO train fans were understandably apprehensive with the introduction of the Powered Up system as a replacement for Power Functions. The Powered Up motor bogie replacement is essentially identical to its Power Functions predecessor. The obvious differences are the 6-way hard-wired PU cable assembly terminated with the new PU modular plug. Internally, the mechanical arrangement is the same with the only difference being a new PCB installed on top of the motor casing to terminate the PU cable and form a substrate for component mounting and electrical interconnect to the motor terminals.

Train Bogie Form Factor
As mentioned earlier, the motor bogie form factor introduced in 1980 with the 12V motor bogie is essentially the same today. Its key features include:
6-stud (48 mm) wheelbase
Technic half-pin centre swivel mount
2x4 stud “shelf” at each end for mounting bogie sideframes and/or buffer/coupler elements
Despite the same overall form factor of the motor bogie from 1980 to the present day, a few subtle differences exist between each era—the key differences being the bottom ground clearances and axle vertical centrelines. These differences do not affect the key dimensions of ride height and buffer height. Variations in axle centrelines have been compensated with changes in wheel diameter to retain the correct ride height.

Battery-powered trains have to carry their battery payloads either integrated into the locomotive or inconspicuously as a disguised wagon. Initially, batteries were carried in a “classic” box element with a simple off-centre bi-directional switch. The awkward dimensions of this box (11 x 6 studs x 10 plates—in reality 11 x 7 studs due to overhang) make this difficult for disguising in a train—often being dressed as a tender for a steam locomotive or as a generic tanker wagon.
In 1972, a dedicated wagon element was introduced to mount 3x C-size battery cells vertically within a 6-stud wide profile. This wagon survived well into the late 1980s prior to the introduction of the 9V power accessory system.
Battery boxes had a brief hiatus from a train theme perspective until the transition away from the 9V system—starting first with the interim RC system and then into the popular Power Functions system era.

Mechanical Features: Classic Battery Box (bb0045)
The classic battery box is big but is a product of its time. Smaller battery sizes (e.g. AA, AAA) were less common in the 1960s/70s as were the number of small portable battery-operated products. Furthermore, the larger C-size battery cells simply have greater energy capacity and will offer longer runtime endurance.
The awkward outside dimensions of the classic battery box do impact its ability to be disguised when used in a train. Often, it would be disguised as a tender for a steam locomotive.

Mechanical Features: Battery Wagon (3443)
To avoid the limitations imposed by the classic battery box, LEGO made a bold choice to produce a purpose-built battery wagon for trains. This would have been a significant investment in molding and manufacturing since this item would only benefit the train theme exclusively. In any case, this battery wagon served the train theme well—being released in no fewer than 10 variants in different body colours, wheels and couplers.
The use of a dedicated wagon also allowed for two functionally clever features to be integrated into the design:
The off-centre bi-directional switch was side mounted at wheel level. At this height, it could interact with track-side accessories which could stop and/or reverse the direction of the train.
An under-mounted power interrupter button could be used for stopping/starting with a track-mounted ramp accessory.

Mechanical Features: RC Train Chassis (w/Battery Box + Controller) (55455)
After the battery wagon was effectively retired in 1985, almost two decades would elapse before the introduction of another train-specific battery container. In the early/mid-2000s, it was clear that the 9V electrical accessory system was nearing the end of its life and a replacement was on the horizon. For train fans, this meant the disappointing retirement of the 9V metal track system and a transition to battery-powered trains on plastic track.
At this time, what would become the Power Functions system had not been fully developed. As an interim solution for trains, the RC system based on infrared (IR) remote control was introduced for a brief time from 2007 to 2009. To incorporate the batteries and IR controller, a significant investment must have been undertaken to develop a bespoke 6 x 30 stud chassis with an integrated battery cradle and electronics (55455). This element was only used in two sets each molded in its own colour (black and white).
What this element lacked in flexibility, it did make up for in compact integration. The decision to use 6x AA batteries did offer greater energy capacity than Power Functions AAA battery boxes with longer running and greater peak current output. Infrared receiver sensors were fitted to both sides of the chassis which helped with maximizing IR signal detection. Lastly, this element was likely the last to incorporate the 9V 2x2 stud connector feature. This being incorporated into a recess on the top to connect to the motor bogie using a standard 9V cable assembly.

Mechanical Features: Power Functions Battery Boxes
The Power Functions era offered what I think is the most flexible range of power products for LEGO train fans. No fewer than 3x battery boxes were available for Power Functions: a AA aimed at Technic models (59510), a AAA 8x4 stud battery box (87513), and a Li-Ion 8x4 rechargeable battery box (84599). I am confining my review to the 8x4 form factor boxes since they were the most relevant from a train builders perspective.
The ubiquitous 8x4 AAA battery box was offered with every Power Functions train set. It was a compact form factor, efficiently housing 6x AAA batteries loaded into a cradle carrier. The top lid offered a status LED, an on/off push button, and a direction selection switch for standalone operation of a motor without a remote control. This made the battery box very versatile for not only train builders but also for those building other LEGO models and MOCs which used motors or lighting.
The versatility of this form factor was taken another step further with the introduction of the superb 84599 rechargeable battery box. This had the advantages of greater energy density of Li-Ion battery cells (although at a slightly lower peak voltage of around 7.6 V) and the eco-friendly ability to recharge without consuming large quantities of disposable alkaline batteries. Furthermore, the versatility of this unit was further expanded by introducing a control knob to set both the speed and direction of the PF C1/C2 pins when connecting a motor in a fixed (non-remote controlled) application.

This description would not be complete without mentioning the 58123c01 IR receiver. In almost all train applications, the battery box would be used to power the IR receiver module which would then control one or more attached PF motors. In a typical train set locomotive, this would be a single PF motor bogie. However, a simple upgrade to two motor bogies could easily be achieved by connecting to the same IR receiver. Furthermore, trains could be built without motor bogies and use a Technic drive mechanism from either an M, L or XL PF motor. This was typical when building a steam locomotive since the motor bogie is of little relevance.

The two eras of track-powered trains were definitely the most exciting and interesting from my perspective. The so-called “golden age” of LEGO trains during the 1980s 12V “gray” train era was both inspiring and unique. The unimaginably broad range of products indicates to me that LEGO was guided by a product “system” mindset. The system was designed as a cohesive family of elements, supporting train fan layout ambitions small and large. You could grow your layout progressively over time with the comfort of knowing the elements will all work together.
With the sunset of the 12V train era, a new era based on the then-new 9V power accessory system emerged. For train fans, the biggest change was the change to an entirely new track system architecture. Rather than the brick-built track elements of the “blue” and “gray” track eras, track elements were molded as monolithic components with crimped metal rails made from stamped nickel-plated copper-beryllium. For the first time, LEGO trains could be operated in much the same way as traditional scale model trains. Trains could be both powered and controlled by drawing energy directly from the track with metal wheels.
Alas, in the history of LEGO trains, we were only rewarded with two distinct eras of track-powered trains as shown in the timeline below. Each era had its own core power and control element. Admittedly, the 12V era had three power transformers; however, it was the gray 2864 controller which has the most notable and meaningful impact.

12V Power Controller (2864)
As mentioned, the 12V train system era was magical and inspiring. At its heart was the 2864 power controller. This element has several notable features:
“Power Station Aesthetic” - The light gray molded box was designed in such a way that it would not look out of place adjacent to a train layout since it looked somewhat like a typical lineside power transformer you would see on a real railway. Its minimalist aesthetic was just right and timeless
Exposed Studs - Two rows of exposed studs on the top surface allowed builders to both decorate their transformer for labelling or identification or to build around and on top to blend into a surrounding layout. Furthermore, the speed control knob was actually just a cross-axle receptacle into which a larger knob could be inserted. This allowed builders to make all kinds of custom speed control levers, actuators, knobs, etc. as shown below.
3. Docking Accessory Modules - In my opinion, one of the most inspired aspects of the entire history of LEGO trains was the concept of dockable accessory modules which could attach directly to the 2864 transformer. These include:

Mechanical Features: 12V Transformer (2864)

9V Speed Regulator (2868b)
The 9V train era was the last of the track-powered train systems. Although the new track architecture of 2-rail metal track was far superior, it was no match for the amazing range of accessories and products of the 12V system that preceded it. However, the 9V electrical accessory system overall was actually LEGO’s most ingenious and inspired industrial/product design solution.
It combined the best aspects of the LEGO system of clutch-connected elements with electrical connections. This was achieved with the fundamental and ingenious 2x2 conductive stud array. This 2x2 conductive stud pattern was the fundamental electrical terminal used to make cable assemblies, motor terminals, lighting bricks, power output terminals, and much more. You could build these elements into existing LEGO creations since they were completely compatible with the LEGO system and attached with the same clutch characteristics with any other element.

From the point of view of the train fan, the 9V system offered a simple speed regulator unit and a cable accessory (5306c01 shown above right) which connected and applied power to the track. I must say, that despite the magic of the 9V connector scheme, the 9V speed regulator was a tremendously disappointing product. Its design ignored all of the best attributes of the 12V transformer unit that preceded it. Specifically:
Non-LEGO System Aesthetic/Geometry - The body mold for the 2868b controller was not designed to fit or blend into the LEGO system aesthetic nor make functional connections beyond its output power connector and two rows of stud decoration on the front panel.
Low Power Capacity - The output power capacity of the 2868 unit is very low. Internally, it uses a linear voltage regulator (LM317) to regulate and control the output voltage. This regulator is rated up to 1.5 A of output current, but more fundamentally, this limit will likely not be achieved without aggressive thermal heat sinking/management which the LEGO unit does not have. Therefore, its output current is typically < 1.0 A.
Not Continuously Variable - You cannot imagine the disappointment I personally experienced when I realized that this unit’s speed control was not continuously variable (as the rotating control knob would suggest)! Rather, it selects between seven fixed discrete levels of output voltage in each direction. This is entirely unsatisfactory for precise and smooth operation of model trains. The ability to adjust train speed in a continuously smooth and controlled way is essential and impossible to achieve with this unit.

Conclusions
I’ll conclude this long (but incomplete) story here. When I started this investigation, I did not realize how broad and interesting this topic would be. I am fascinated by the evolution of LEGO’s product design with respect to the train theme. It is especially challenging for LEGO since they must balance many competing factors such as system compatibility, suitability for children, performance, cost, reliability, and much more.
Admittedly, we LEGO train fans are a thankless crowd who are impossible to please! Joking aside, no matter what “raw materials” are available from LEGO for building and operating trains, we seem to make the most of these elements and still derive immense joy, pride, and satisfaction from this hobby.
In the next article in this series, we’ll dig deeper into the practical aspects of powering and operating trains. Topics such as motors, wheels, weight, electrical capacity, etc. will be examined and how they impact our choices for building a train. Tips for maximizing performance and maintenance will also be discussed.
Until then, happy building and please let me know in the comments below of any (inevitable) errors I’ve made or have any clarifications/insights to offer us.
Best of BrickNerd - Article originally published February 17, 2023.
What would you like to learn about LEGO trains for the next two parts of this series? Let us know in the comments below.
Do you want to help BrickNerd continue publishing articles like this one? Become a top patron like Charlie Stephens, Marc & Liz Puleo, Paige Mueller, Rob Klingberg from Brickstuff, John & Joshua Hanlon from Beyond the Brick, Megan Lum, Andy Price, Lukas Kurth from StoneWars, Wayne Tyler, LeAnna Taylor, Monica Innis, Dan Church, and Roxanne Baxter to show your support, get early access, exclusive swag and more.