Molds Over Time, Part 2: How Part Updates Change Build Techniques
/We last took a look at individual LEGO parts’ mold variations and the different techniques that were unlocked by using one specific variation or another. Well, our amazing readers had all kinds of great feedback, including a few elements that I hadn’t even considered the first time around! I’ll be highlighting some of those, plus a few more that I’ve thought of or discovered in the interim as we dive once more into… molds over time!

Stacking Up
Let’s start with a brief summary of the last article: many LEGO elements have been changed over time for various reasons, such as to make them more “in system” to match the design ideology of more modern pieces, or simply to enhance their functionality. Whether deliberately or by circumstance, this has created situations where different variations of the same element can be used for totally different connections and build techniques. Not only is this a great view into LEGO’s ever-changing design language, but more importantly for us MOC builders, learning about these sorts of things can open up new opportunities for our own models.
Last time, we grouped these into elements that were either upgraded, downgraded, or side-graded when they were changed. This time, we’re going to really switch it up… by doing exactly the same thing.
Upgrades: Parts That Gained Functionality
These are elements that were upgraded to add specific functionality and succeeded. These parts are success stories that are either straight upgrades with no drawbacks or ones whose drawbacks are minimal enough that the piece is still definitely better for its changes.
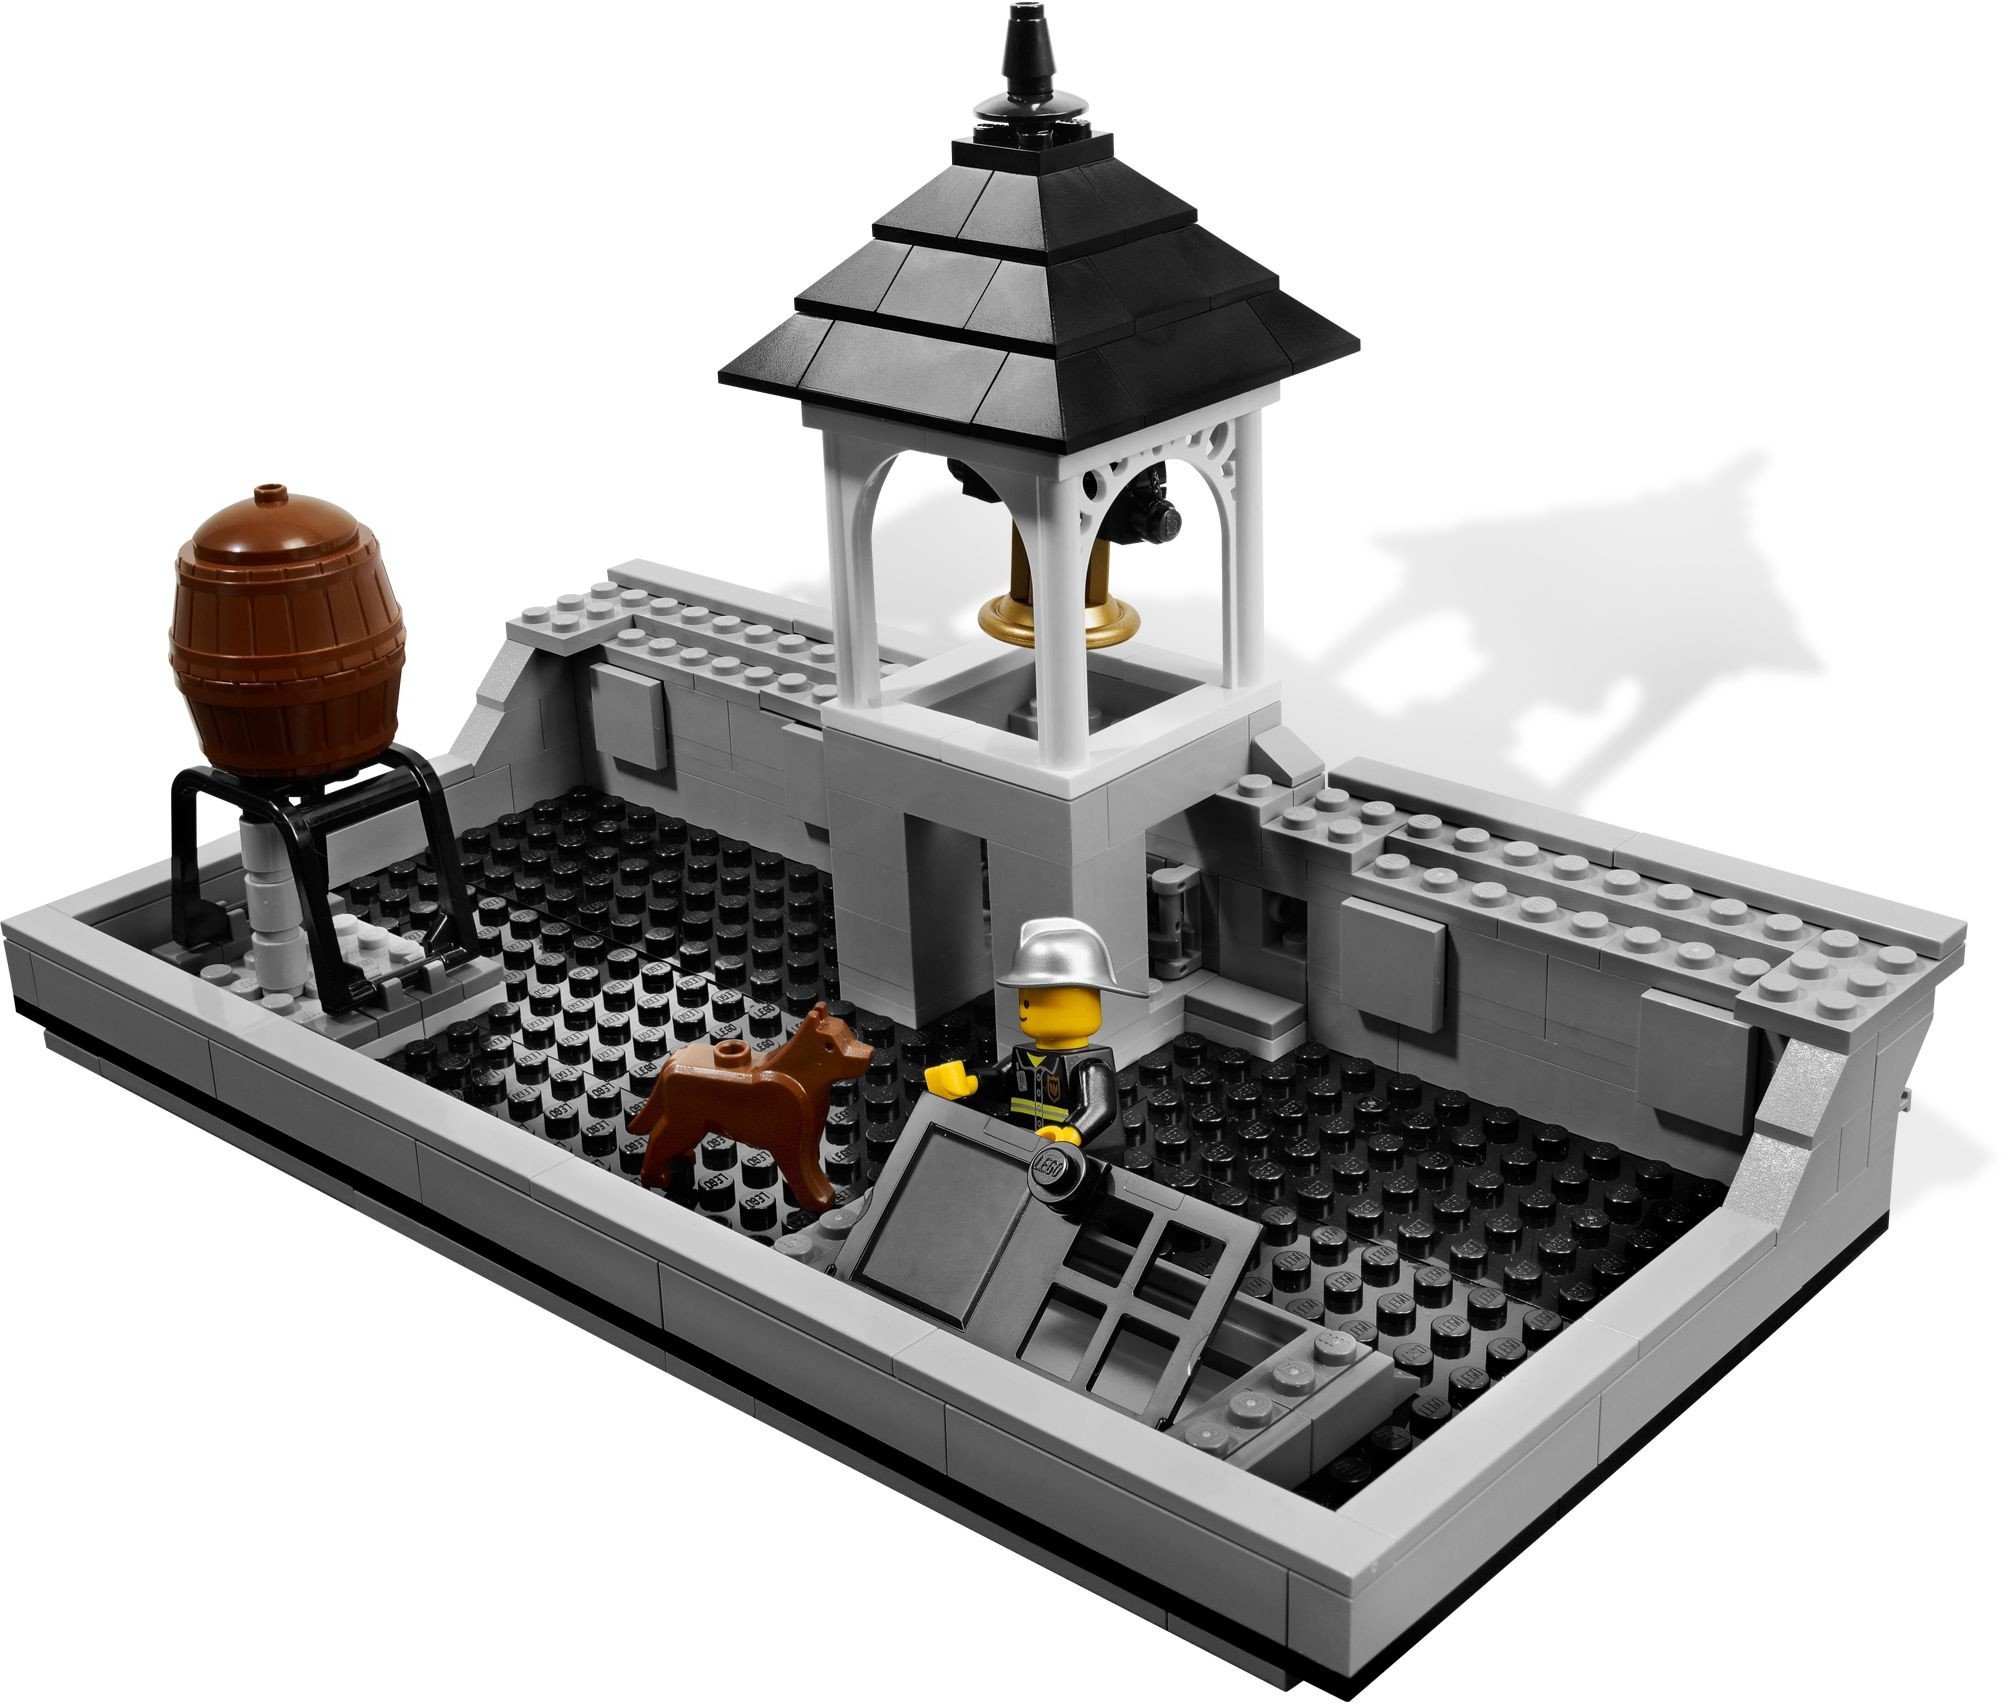
64951: Container, Barrel Half Large with Axle Hole
This suggestion comes from our very own editor-in-chief! The original version of this mold for the half barrel 4424, a part beloved by LEGO pirate fans worldwide, was identical except it didn’t have an axle hole through the middle. The addition of said axle hole to the updated part is a lovely example of LEGO taking a perfectly functional part design and adding just a little something extra to make it massively more useful. There are actually quite a few pieces that were updated similarly by simply adding an axle hole where there wasn’t one before (the 2 x 2 x 1 dome, for instance), but the usefulness of the upgrade is particularly impactful here.

Left: 64951 with an axle. Right: 4424.
One of its first uses after the redesign was for the water barrel on the roof of the 10197 Fire Brigade. An axle with stud passes through the axle hole of the inverted half barrel in order to finish the top of it with a 3 x 3 dish—a technique that would not have been possible without the addition of the axle hole. This connection point also allows this piece to be inverted and attached to the bottom of something much more easily, such as the rocket booster nozzles on the recent 60351 Rocket Launch Center.

Left: 10197’s water barrel. Right: 60351’s thrusters.
25214: Brick, Round Elbow Macaroni - Type 2
This one’s interesting to consider because of the multiple ways the round elbow macaroni brick’s functionality was expanded. The original version of this part, 71076, strikingly only ever came in chrome silver. It was used largely as exhaust or chrome trim on vehicles and was designed to interact with a similarly chromed 71075 1 x 1 x 1 ⅔ round brick. They were attached to one another with a simple stud/antistud connection.
The updated round brick still retains the antistud connection points on each end, but the piece's geometry was changed to make enough space for axle holes too. In fact, since its accompanying 1 x 1 x ⅔ round brick is no longer around, it now predominantly interacts with Technic elements, frequently pairing with 1 x 1 liftarms and 2L pin connectors. This enhanced usage and its added Technic connection points really make this element feel more like a Technic connector now, but BrickLink still classifies it as a “round brick,” likely due to its heritage and the retained antistud connections.

Left: 71076 with a round plate. Right: 25214 with a round plate and axle.
Anyone who has seen a somewhat notorious PDF called Stressing the Elements might be familiar with a specific use case that was attempted with the original version of this part but is only actually possible with the updated one, and that’s joining two of this piece side-by-side with a Technic element.

Source: “Stressing the Elements” by Jamie Berard.
Beyond the limitless options added from purely Technic connections, the axle hole also enables this piece to accept bars, allowing for low-profile connections such as these:

41740: Plate, Modified 1 x 4 with 2 Studs with Groove
The big difference between this plate and its predecessor, 92593, is the addition of a groove on the bottom of the 1x4 plate with 2 studs. Adding a groove to a studless or semi-studded element has some precedent, like with the 1 x 2 jumper plate, and is typically just a means to make a part easier to remove. In this case, that easier removability is a helpful addition considering the part of this element the designers were actually most interested in changing: the clutch.

Front: 41740. Back: 92593.
The original, grooveless version of this piece simply didn’t have a ton of clutch on the underside, which was a problem considering how this element was intended to be used. On modular buildings, it’s frequently used to hold a removable story in place, but a lot of folks found that when they went to lift off a floor, these 1 x 4 modified plates would come with it, detaching from the walls beneath. They stuck to things attached to the top of them better than underneath.
The redesigned version of this part, in addition to the added groove which made the part less noticeable when used with other tiles, featured much more grip on the underside of the piece. Reinforcing ridges were added to each side and the outermost antistud connection points now had 4 walls around each stud, maximizing the contact and friction. This means that, when an assembly is lifted off the top of this piece, it’s much more likely to stay in place, as it should.

Front: 41740. Back: 92593.
Downgrades: Parts That Lost (Some) Functionality
I’ll repeat the usual disclaimer here: this is not a condemnation! The parts featured in this section are not bad or unusable in any way. This category simply exists to highlight techniques available to you with older variations of certain pieces.
28618: Castle Dragon Flame / Seaweed / Water
Without a doubt, this dragon flame element was requested the most to be featured when the first article was published, and for good reason! The original 6126 flame element was first introduced in 1993 in the Castle theme, and it was specifically designed alongside another complementary element: the 6129 dragon.
The dragon was designed to be able to fit the flame piece in its mouth and even featured a bar-sized hole through the front of the mouth that would allow the flame to remain in place with the dragon’s mouth either opened or closed. In order to secure the flame piece, the dragon had a pin hole in its lower jaw, and the flame element had two pins on it, one placed 90 degrees from the other, allowing the flame to be placed in two different orientations.
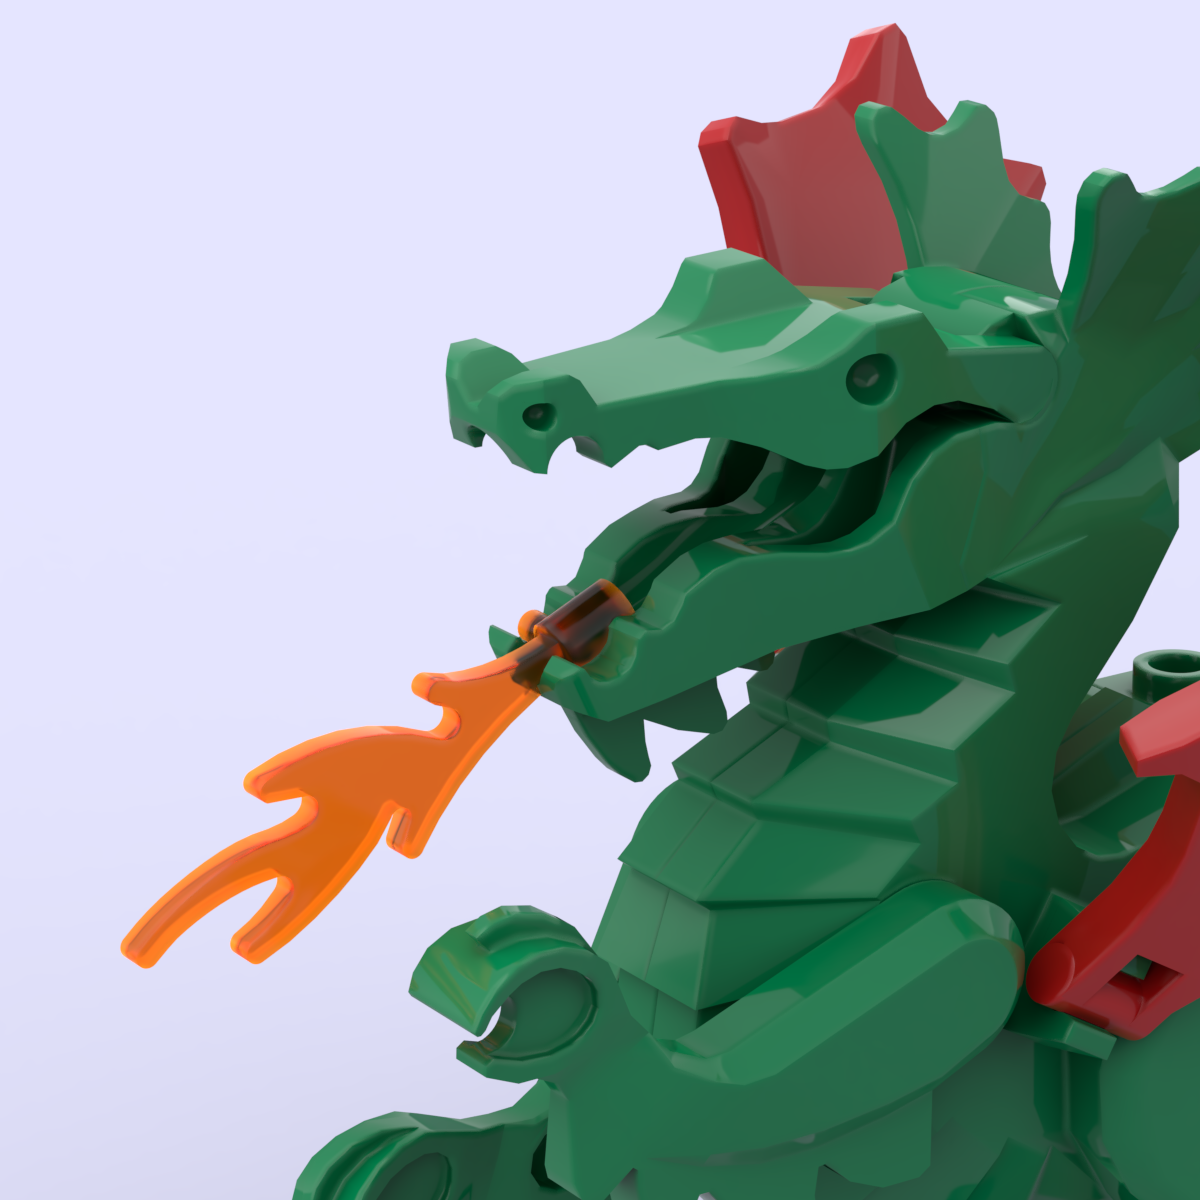
The 6126 flame in the mouth of a 6129 dragon.
Several years after the dragons went out of production, the flame mold was updated to no longer have the pin connectors at the base. Instead, with part 28618, a stop ring took its place to prevent over-insertion. This is a detriment to the part’s functionality because it simply removed two connection points and replaced them with essentially nothing functional.

Left: 6126. Right: 28618.
Now, pin hole connections aren’t used TERRIBLY often in LEGO—or, at least, they weren’t until a few years ago when we had a bit of a pin connector revolution. But, in the case of this specific element, it turns out there was a special trick you could do that required the use of that pin. It was just the perfect size to fit between two licks of flame on the fiery end of the element, allowing multiples of the piece to be chained together. This allows for dramatic, organic shaping of streams of flame, used to great effect on models such as Jonas Kramm’s Balrog and Matt Goldberg’s The Vanisher.


Left: “Bridge of Khazad-dûm” by Jonas Kramm. Right: “The Vanisher” by Matt Goldberg.
98262: Plant Flower 2 x 2 Rounded - Solid Stud
This one is pretty straightforward. The original mold for this flower piece, 4728, featured an open stud instead of a solid one. This allowed a bar to be pressed all the way through the element, which offered additional connection possibilities that the modern version of this piece doesn’t offer. The only benefit the solid stud offers is, arguably, aesthetic.

Left: 4728. Right: 98262.
Now, there are plenty of pieces that have changed from having solid to open or hollow studs, or vice versa—door frames, cones, hinges, all sorts of pieces. I could have highlighted any of those, but I wanted to showcase this flower specifically due to an issue that was caused when the mold was updated.
The classic modular building set 10211 Grand Emporium was released during the phasing out of the old flower element. Some copies of the set shipped with the new flower design, which actually prevented it from being attached to the model since the instructions called for it to be attached via a bar through its open stud! LEGO ended up shipping out the necessary mold variation of this flower to people who purchased the set and were unable to finish putting it together.
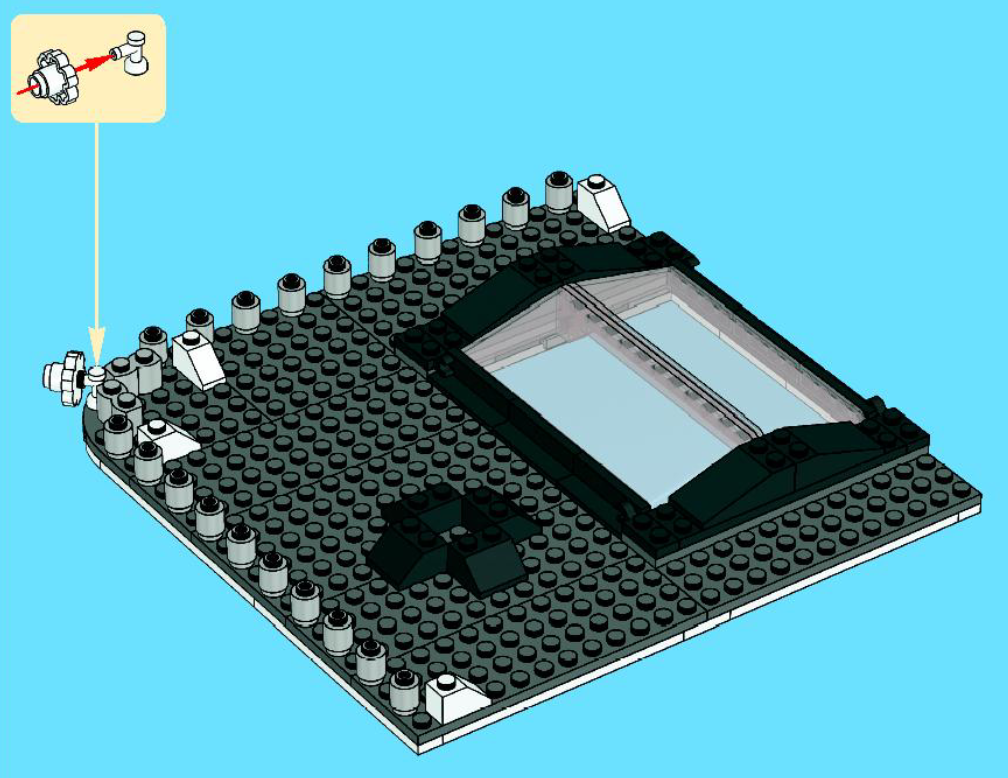
Step 9 of 10211: Grand Emporium’s roof.
4085b: Plate, Modified 1 x 1 with U Clip Thin (Vertical Grip)
In the last article, we discussed how the 4085c, or 3rd generation vertical clip plate, could be used for a special connection involving bar elements. This time, we’re going to look at a trick that was possible with the 4085b / 2nd generation clip plate.

From left to right: 4085’s A, B, C, and D variants.
The B variant of this part had the thinnest profile of clip to date, which allows the prongs of said clip to actually fit into the underside of a brick, allowing for a very sleek and low-profile SNOT connection. It’s quite comparable to a technique that is made possible by the 32828 “espresso” plate, which can hold an element that has an open stud in a similar manner, but the clip plate version has a couple of advantages.
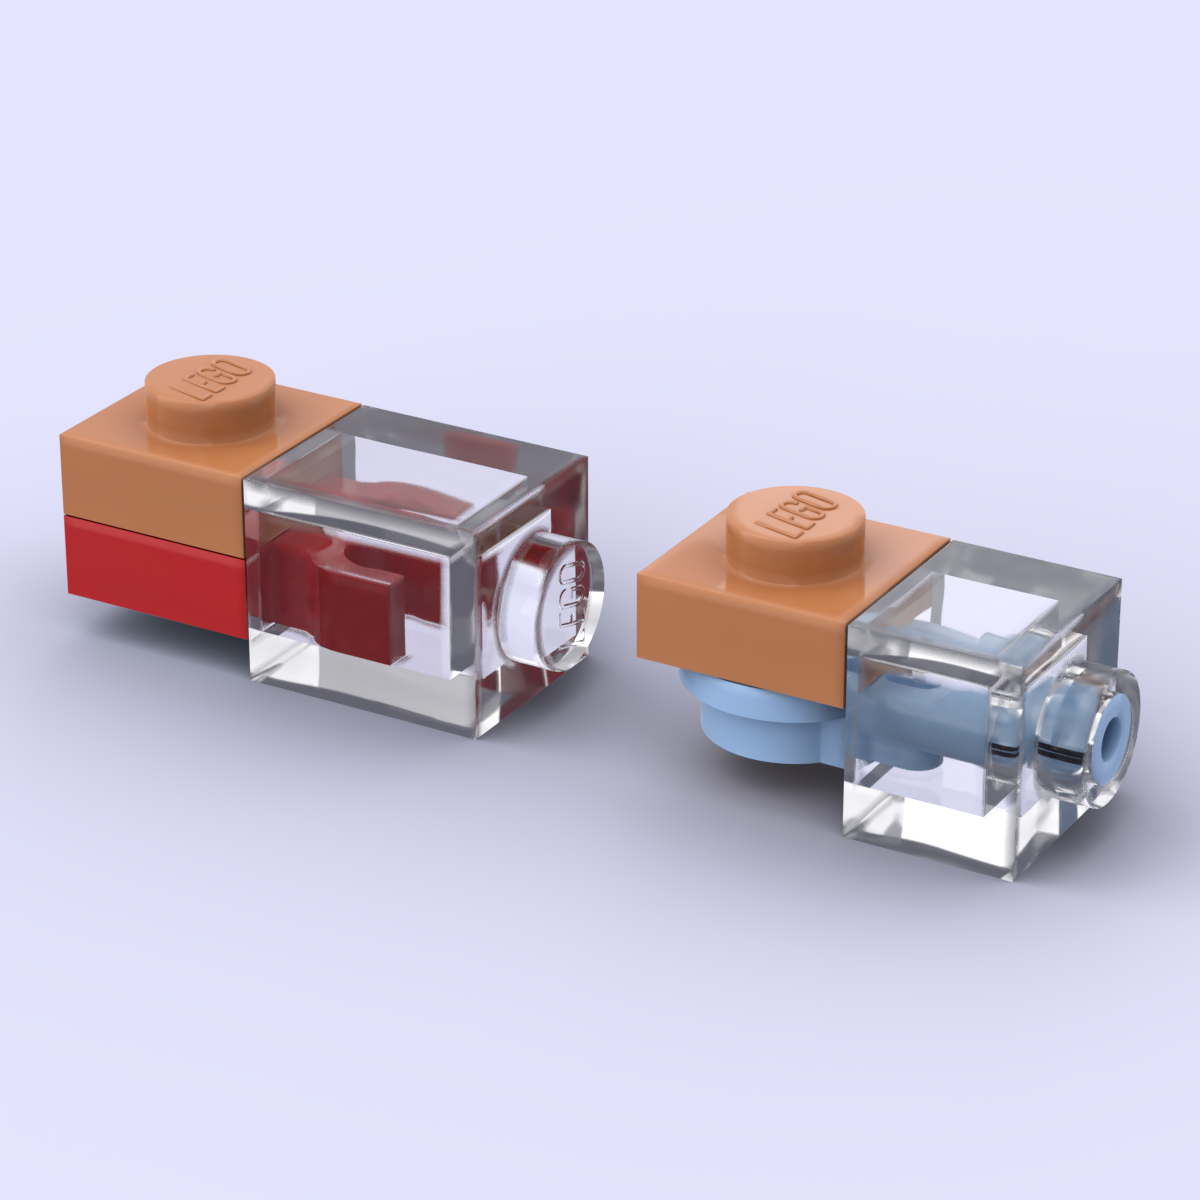
Left: a 4085b clip plate holding a 3005 1 x 1 brick. Right: a 32828 round plate with bar holding an 86996 1 x 1 x ⅔ brick.
First, since the clip plate doesn’t have a rounded profile, this technique can be more cleanly implemented in situations where the connection will be viewed from the side. Second, there is some vertical play to how the sideways brick can be aligned, meaning the brick can be aligned in different ways depending on the gap you’re trying to fill or the connection you’re trying to make. It can even be angled slightly, enabling builds with angled bracing or gentle slopes, for example.
Sidegrades: Parts That Changed In Functionality
The parts in this category didn’t necessarily get better or worse, they just changed in functionality. Different techniques are possible depending on which mold variation of these pieces that you choose to use.
76768: Arch 1 x 5 x 4 - Irregular Bow, Reinforced Underside
In all honesty, I came very close to putting this arch update in the “downgrade” section even though it is, on paper, clearly a sidegrade, since it trades a bit of form factor for an added connection point on the underside of the tip of the curve. The thing is, the extra functionality that was unlocked in its update is just not something that anybody was really asking for. I’ll explain!

Left: 2339 with a 1 x 1 plate. Right: 76768 with two 1 x 1 plates.
Whenever possible, LEGO likes to keep certain angles and radii consistent between pieces to maximize their possible interactions. This is largely referred to as keeping things “in system.” What it means in practice is that if there is a round brick with a radius of 1 stud, there should also exist a rounded tile with a radius of 1 stud. That way, those two elements will share the same profile of curve to ensure interactivity and consistency. Rambling Brick has a fantastic article about the interactions between rounded elements and arches specifically that you should check out.
The original version of the 1 x 5 x 4 arch, part number 2339, adhered to this design language. Despite being designed back in 1986, its 4-stud-radius cutout is exactly compatible with 4 x 4 macaroni tiles designed in 2017—it’s a lovely example of the future-proof nature of designing elements “in system.” However, in a brief detour in 2008, LEGO changed the design of this arch. They altered the profile of the curve to re-shape the underside of the tip of the arch to match the profile of a 1 x 1 plate. Hence, “irregular bow.”
So if this essentially ADDED a connection point, why is the update not considered the superior design? Well, that connection point just… isn’t all that useful. When this piece is used to form a full arch, the shape of the continuous curve is more valuable. When a round piece is set into this arch, there is now an unnecessary small gap, and the connection point isn’t usable anyway.
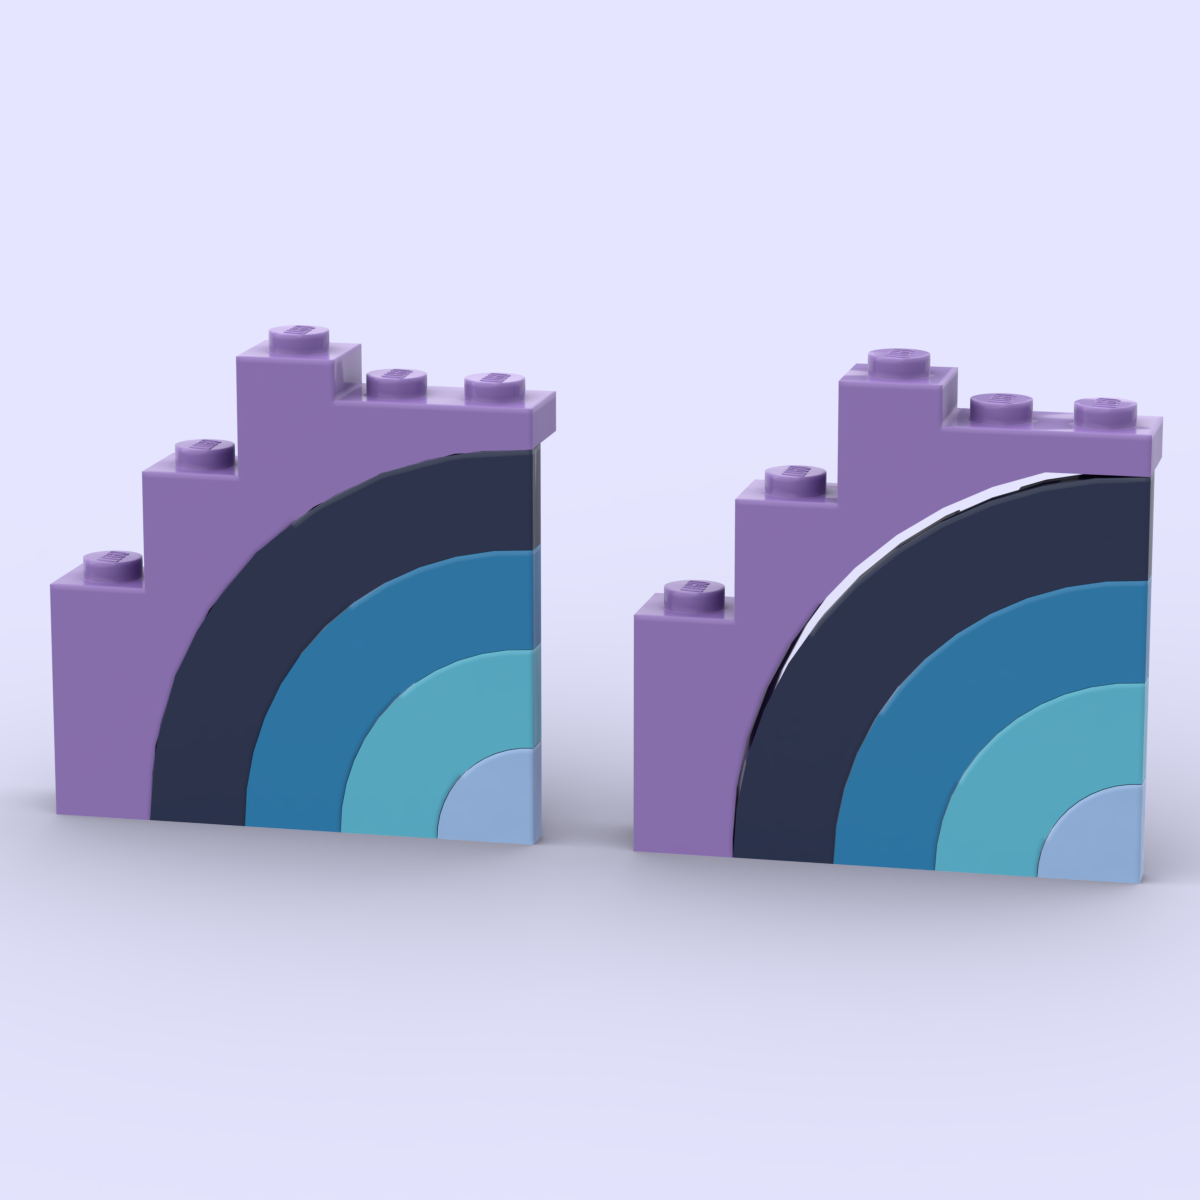
The 2339 arch, top left, perfectly aligns with macaroni tiles. The 76768 arch, bottom right, cannot say the same.
I briefly scanned through the various sets that were made when this arch was the style being produced, and I actually could not find a single example of this connection point being used for anything, though I’m sure I must have overlooked something. History proved this change unpopular (and, rumor has it, possibly a mistake in the first place), and the part was reverted to its original form several years later!
88930: Slope, Curved 2 x 4 x 2/3 with Bottom Tubes
Most of the time, a 2 x 4 element would not feel the need to specify “with bottom tubes.” You can probably guess where this is going. Indeed, the first version of the 2 x 4 x ⅔ curved slope, 61068, did not have bottom tubes! In fact, it didn’t have much of anything under there. This somewhat limited its connection opportunities: you couldn’t attach it to any single stud, for instance. It could only firmly be placed on sets of at least 2 studs at a time.
It would seem, then, that the addition of the bottom tubes in this piece’s update would be a straight upgrade, adding 11 individual antistud connection points to use, but as MOC builders have come to appreciate, there is definitely a time and a place for elements that don’t have on-grid stud holders, like the 1 x 2 tile or “cheese grater” 18 degree slope.

Front: 88930. Back: 61068.
If the original version of this part is placed over a single lengthwise row of studs, it can be slid along those outer studs, allowing it to be positioned off-grid.

Since 61068 can be slid along two studs, an off-grid assembly like this is easy and simple.
3387: Vehicle, Mudguard 4 x 2 1/2 x 2 with Arch Round
The original form of this element, part 18974, was the first mudguard developed specifically for the Speed Champions theme. It featured a tall, continuous fender that was tapered and slick, more appropriate for modern track cars than the chunkier truck fenders that had come before. However, this piece took up a lot of space inside a build. Specifically, to support the very thin fender, the top studded part of the piece sat higher than on comparable elements like 50745 or 98282.

Left: the older two mudguard elements, 98282 and 50745. Right: 18974, designed for Speed Champions.
In 2023, a new iteration of this mudguard part was introduced. This new version lowered that top studded section so that, if the fender is placed in a very low vehicle, that top surface can still be tiled over for a smooth, finished look.

Left: 18974, partially tiled over. Right: 3387, fully tiled over.
This new mold would be a straight upgrade if not for the fact that the “innermost” section of this element was thickened from 1 plate tall to 2 plate tall. And, if you needed any more evidence that this is a sidegrade and not a direct upgrade, the lead designer of the Speed Champions theme, Chris Stamp, even mentioned in an interview that this new element was explicitly not intended to replace its predecessor. In this case, then, the two may live in harmony for a while, situationally being applied whenever the unique characteristics of one or the other are called for!

Left: 18974, with a 1-plate thick internal support. Right: 3387, with a 2-plate thick internal support.
And, Still, Many More
This series has been a lot of fun. The first article in this series came pretty easily as I had all kinds of examples of part molds to talk about on my mind. This second one definitely took a lot more thinking, scouring, and asking around to find elements I had overlooked—but this community never disappoints. In fact, I once more ended up with a list of elements longer than would even fit in this follow-up article.
I hope you’ve found our coverage of this final selection of parts enlightening, interesting, and—in some way or another—helpful! We’d love to hear your experiences using the techniques enabled by these part mold variations (or others that I didn’t mention here). I’ve been inspired time and time again by the creativity and technique demonstrated by all of you, so please consider articles like these a huge thank-you from me to every one of you.
Best of BrickNerd - Article originally published October 19, 2023.
Have you noticed changes in molds over time not mentioned that we should include in a follow-up article? Let us know in the comments!
Do you want to help BrickNerd continue publishing articles like this one? Become a top patron like Marc & Liz Puleo, Paige Mueller, Rob Klingberg from Brickstuff, John & Joshua Hanlon from Beyond the Brick, Megan Lum, Andy Price, Lukas Kurth from StoneWars, Wayne Tyler, LeAnna Taylor, Monica Innis, Dan Church, Roxanne Baxter, and Steven Laughlin to show your support, get early access, exclusive swag and more.