Parkinson’s Particular Perspective: The Story of a Talented New AFOL
/Best of BrickNerd - Article originally published September 28, 2022.
What do Dr. Strange, Jurassic Park, Star Wars, and Disney characters all have in common? They’re subjects built into MOCs by the talented Josh Parkinson of course!

Last month I covered the holy grail of nerdiness, Emerald City Comicon (ECCC), and the group of AFOLs that I hung out with there called Brick Nation. As part of the story, we took a minute to talk to one of the builders who presented MOCs there, Josh Parkinson, to get his first-timer ECCC experience recap. It turns out that while we chatted, he was so fascinating that I got to asking him other questions that ranged far past ECCC… so I decided to split it out into a second article. So here we are!
It’s always exciting to get to learn about another builder—everyone has such a unique and fascinating story to tell and Josh is no exception. So without further ado, let’s hop right in and have a cozy fireside chat (if the fire is the magical spiral of Dr. Strange’s portal!).
Doug: Hey Josh, can you tell us about yourself as an AFOL? You’re relatively new to the serious MOC’cing community, yes?
Josh Parkinson: That’s right. I started MOC’ing in November, so I have not even reached my first MOC’iversary yet. And have only been building sets for a few years now. As a kid I had a massive love of LEGO and I don’t think I ever built what the set actually was. I just used the parts to MOC. I especially loved getting the functional parts like hinges. I remember building spaceships with interiors that opened up, robotic creatures, a gondola between our bunkbeds… But as a lifelong artist, I always had too many hobbies. They took over by my later teens. I did pick up some of the first wave of Star Wars sets, though, as I couldn’t resist.
But otherwise, it was pretty much hopping into all kinds of other creative pursuits, from drawing and painting to model trains to photography and other creative media. It probably helped that my dad has always been a woodworker and my mom has done various kinds of art my entire life. But all of this definitely contributed to what I now do with LEGO.
It was my first trip to Disneyland for the holidays of 2017 that changed things. I didn’t even think I was going to be too into it as I was never a theme park guy. But my fiancé wanted to go and I love Christmastime. I quickly found I was so wrong about that! I fell in love with the creativity, detail, and amazing world-building. And of course, some beloved fandoms. And there, in Downtown Disney, was the LEGO store. It was surrounded by majestic LEGO sculptures curling around the curved facade. I had to go in.

Josh Hulking out at the Disney LEGO Store!
It was then that I saw how far the parts and building detail had come. In fact, the massive UCS Millenium Falcon had just recently come out and was on display. I only bought one small set on sale to bring back with me in my carry-on— a Y-wing Microfighter. I was hooked on both: Disney Parks and LEGO.
However, it was slow-going from there even though my passion had been fully rekindled. I had considerable debt I was paying off, so it was a trickle of new LEGO sets for a few years while I chipped away at that mountain. It culminated in finally breaking open my big celebration set that had been taunting me for months (bought during the Black Friday sales). It was only to be opened when I finally paid all that debt off. That celebration set was the 71044 Disney Train and Station. I only now realize how perfect a choice that was.
From there I could finally dive in more fully into my growing LEGO passion. My collection grew, and I started thinking I would be MOC’ing one of these days. Well, that day was in November 2021 when I delved into my first real MOC. I had been collecting parts knowing I’d be very interested in building landscapes and scenes. And what captured my attention first was creating a life-like evergreen tree in a small woodland clearing, not unlike the mountain hikes I love here in the Pacific Northwest.

Beautiful nature scene and Jos’s first MOC
I wanted to capture the way the branches would droop more at the bottom and transition to upright new growth at the top. It meant every level had to be built differently, with different methods of angling the branches and different sizes of foliage. And the wedge of rocky field around the tree would be lush with wild growth where I could experiment with all kinds of different pieces. That included everything from green hair to mops to tan and green Wolverine claws. And using the new mini figure posing bar with stud to add angles to the foliage. Plus, the scene made for a great setting for the CMF Series 22 minifigures.

The bard having a grand ole time with his hermit crab pal!
I’ve gone all out since then. First for my local LUG (SEALUG) monthly challenges. And then getting into Instagram (@brickbuiltjosh) and discovering such a great interactive community there with lots of build challenges to keep me creating and challenging myself. Being new, there are so many directions I want to try. The Minifigure Habitat challenges have been great for that as I can pack in a ton of detail and experimentation into a small build and rapidly try a lot of different directions.
Ultimately, I love packing in as much detail as I can, challenging myself or the format itself (Minifigure Habitats, I’m talking to you!), and experimenting with parts. And more recently, incorporating lighting. Time will tell where I go in the future, but so far I do love to work with both existing fandoms (Marvel, Jurassic Park, Star Wars, Disney, classic LEGO themes) and creating my own medieval-like fantasy worlds (like my recent one which is a pilot project for a much larger plan).
I’m looking to keep going strong with LEGO as my artistic medium of choice and much-needed creative outlet. My fiancé is not always enthused by this explosion of LEGO in my life, but she’s been supportive of my passion and my passion to share it. As I grow my parts, I also plan to create larger creations. Whatever I go with it, I know I love creating scenes, landscapes, and worlds. So that will continue to be a huge part of what I do. And sharing my creations and the techniques I discover along the way!

Fantasy build incoming!
Doug: It’s really neat to hear that Disney specifically brought about your transition out of your dark age. I hadn’t personally thought of Disney as a gateway drug to LEGO as Disney sets have been a newer addition to the LEGO stable, but of course, the Mouse House now presides over so many beloved pop culture staples and LEGO has partnered with them to produce popular lines - so it makes total sense.
It’s also great to hear you’re methodically growing your empire, ahem I mean parts collection. It can take a while to build up a nice well rounded set of elements (both in part type and color) but with today’s options (sets through LEGO and other sellers, LEGO’s revamped Pick a Brick, the PAB walls, BrickLink, BrickOwl, eBay, etc.… I think it’s safe to say it’s a golden age of opportunity!
Back to your builds, what MOCs did you bring to Emerald City Comicon this year? I recall two for sure: the Dr. Strange build and the Jurassic Park build (I call it the “Grant and kids in the tree” build). Anything else?
Josh: I brought four MOCs to this past ECCC. Dr. Strange portal-ing to Darkhold Castle and the Jurassic Park build were there, as you mention. Plus a couple of others. The “Jurassic Park: Meeting the Brachiosaurus” was that classic scene from the movie in the treetops. I had planned originally to do the first scene where you see the Brachiosaurus in the field (my favorite scene), and still plan to. But building time constraints (less than two weeks) forced me to focus on a more manageable scene.

Immediately recognizable scene
The key was the Brachiosaurus neck. If I could get that, and then the head, I would do this entire scene. I plan to do the larger scene sometime soon. But having this part of the Brachiosaurus figured out gives me a good start.

Nailed it!
Unfortunately, I had a disaster strike not too long before ECCC: I tried to drive it to my local LUG for the first time, opened the lid, and found the upper canopy collapsed completely over. The Brachiosaurus was bent back struggling under the weight. Every attempt to pull back up the canopy and re-install the central branch only led to further crumbling. I left it there, a hopeless heap.

whoopsie
I realized the stability (for travel) hinged on the central branch as it helped support the entire upper canopy. This is especially important since all the branches are going out at different, odd angles—and the branches and foliage get heavy quick. One thing I had going for me is that all the foliage in the tree was interconnected to keep it all up more securely.
So I rebuilt the core of the build to have technic axles going up from the central trunk all the way up the central branch. It’s now been driven to two events and has stayed secure so far! In the process, I also rebuilt some of the base and repositioned the Brachiosaurus a little, just to improve the composition a little bit and better hide the base anchoring the neck. For me, it’s often a process like that: I end up in a time crunch getting something completed. But then I’ll go back later and fix and refine.
I also brought one of my first MOCs to ECCC, my Endor battle scene. It includes the official LEGO AT-ST set which was great already. I built the entire scene around it with lush foliage, Ewoks, Rebels, Stormtroopers, and a large tree towering over the AT-ST. I particularly liked the fallen, moss-covered log as well, which spans the ravine.
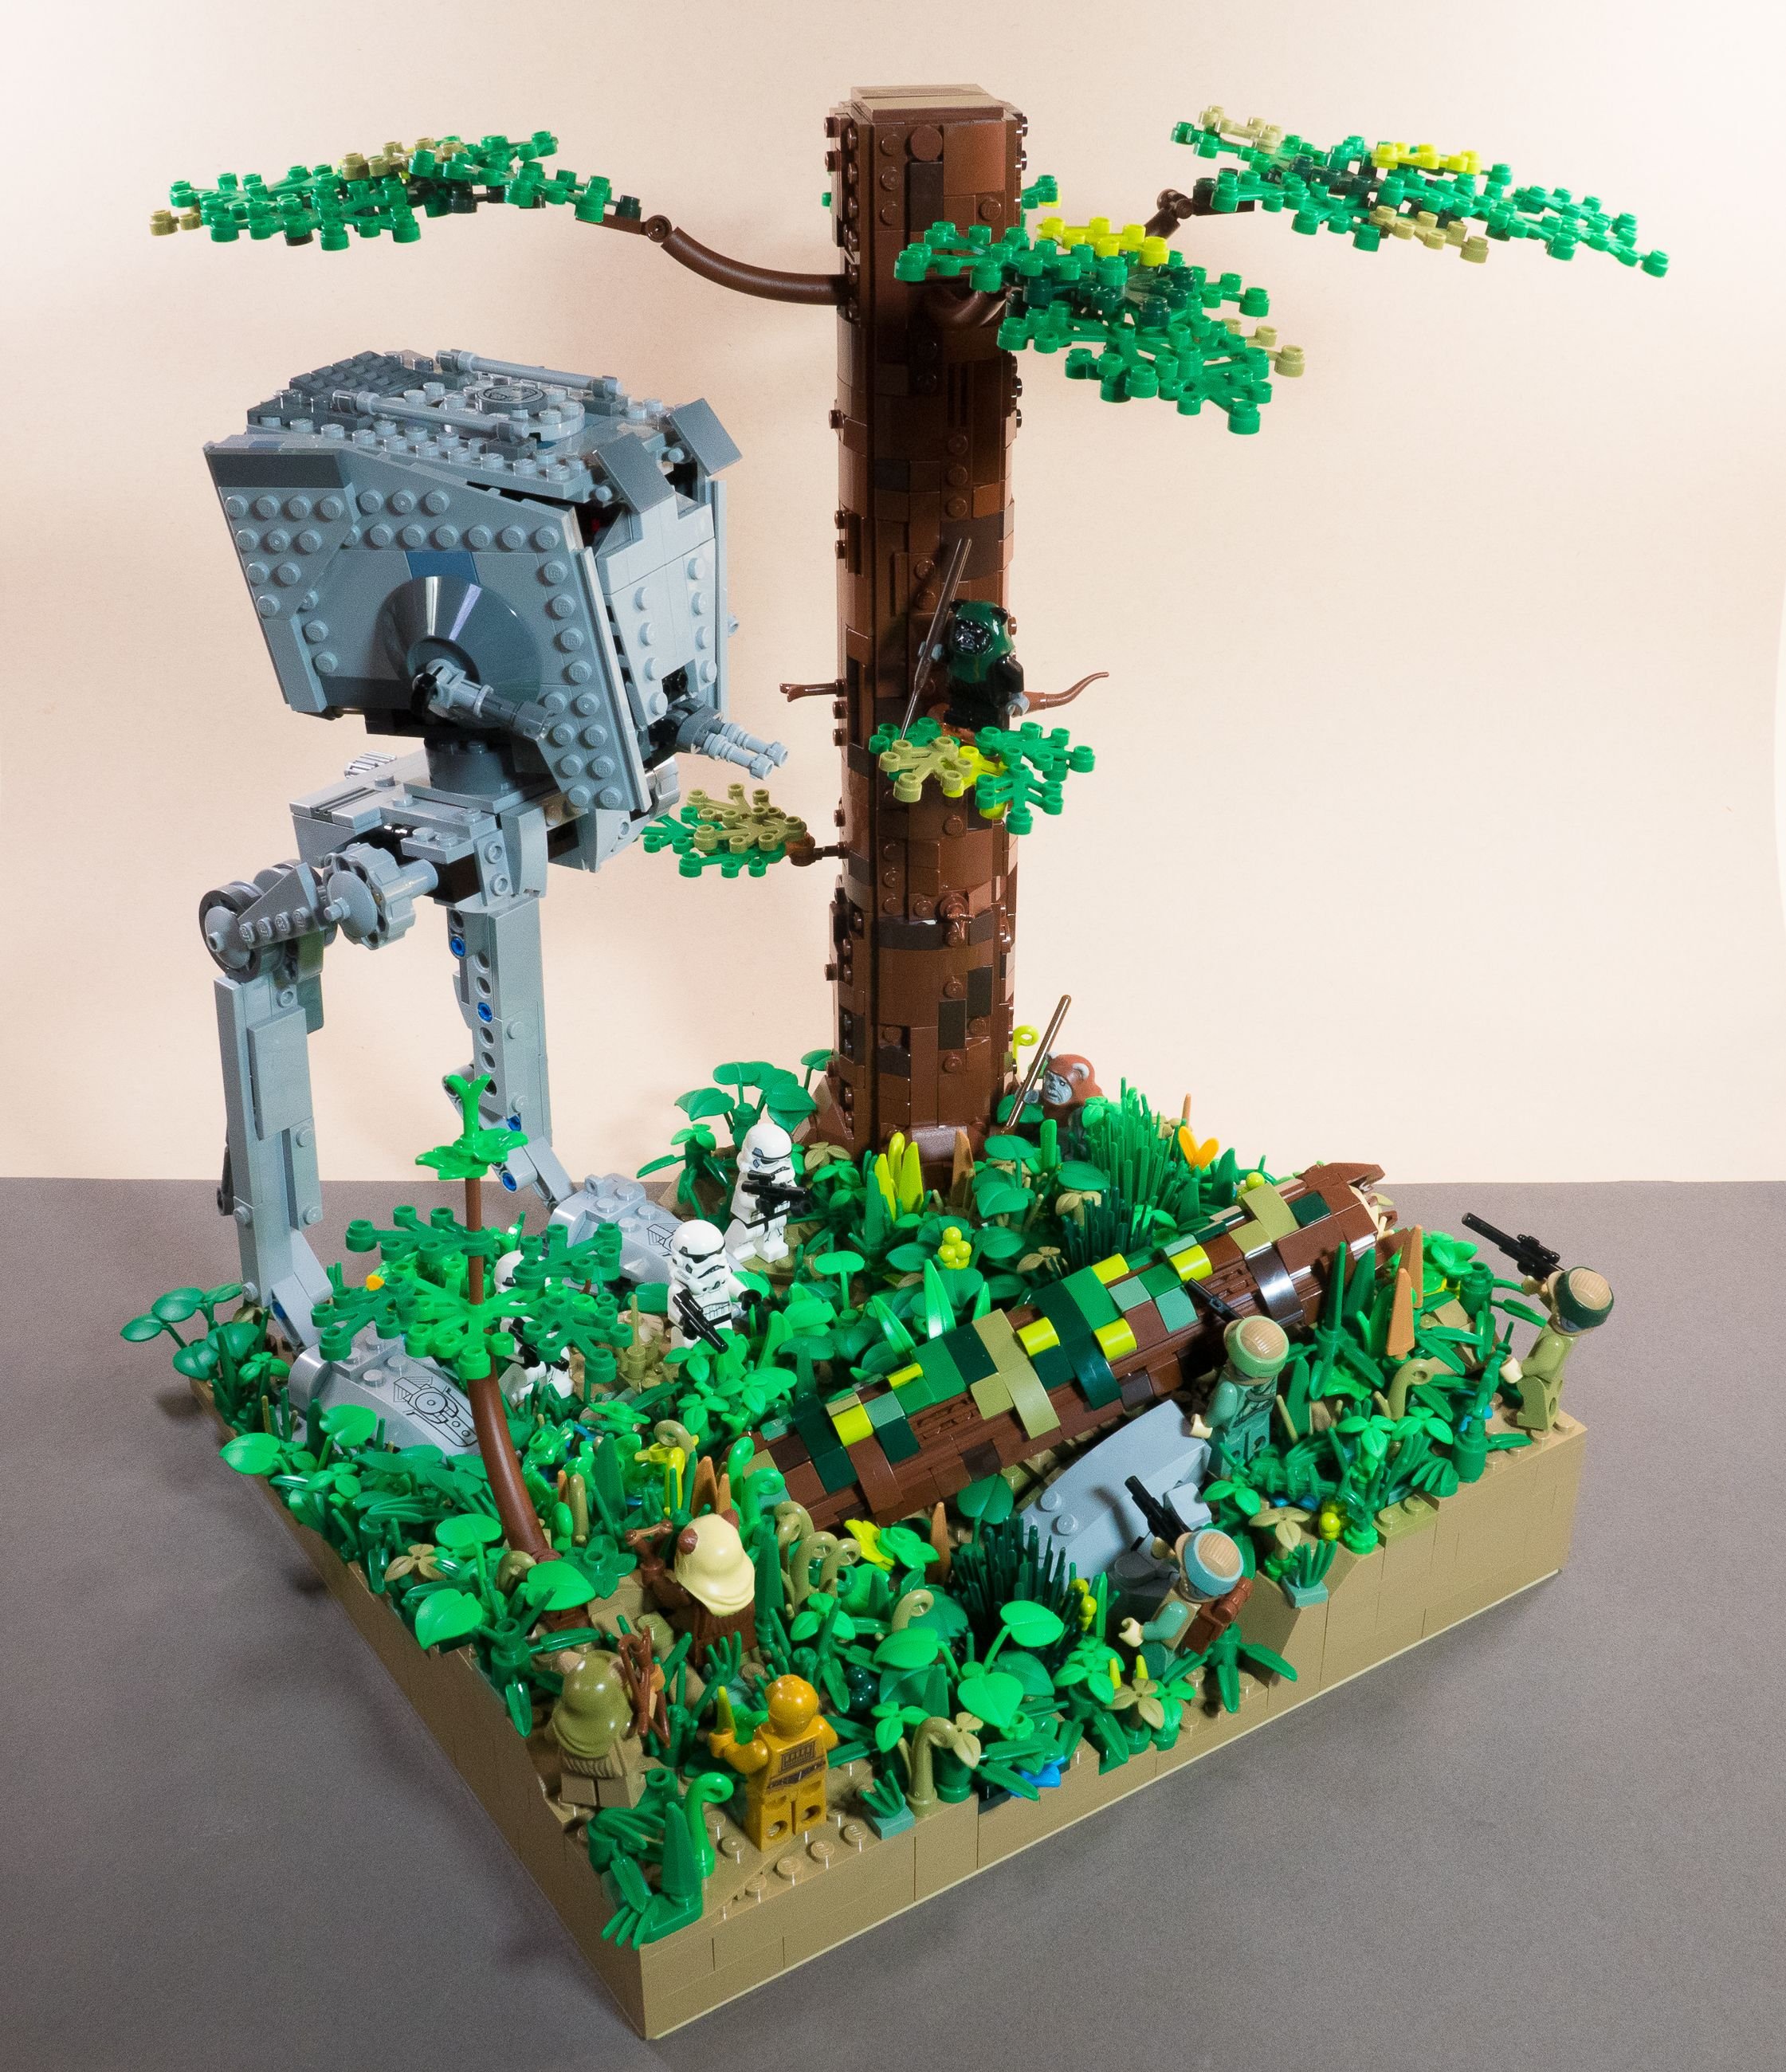
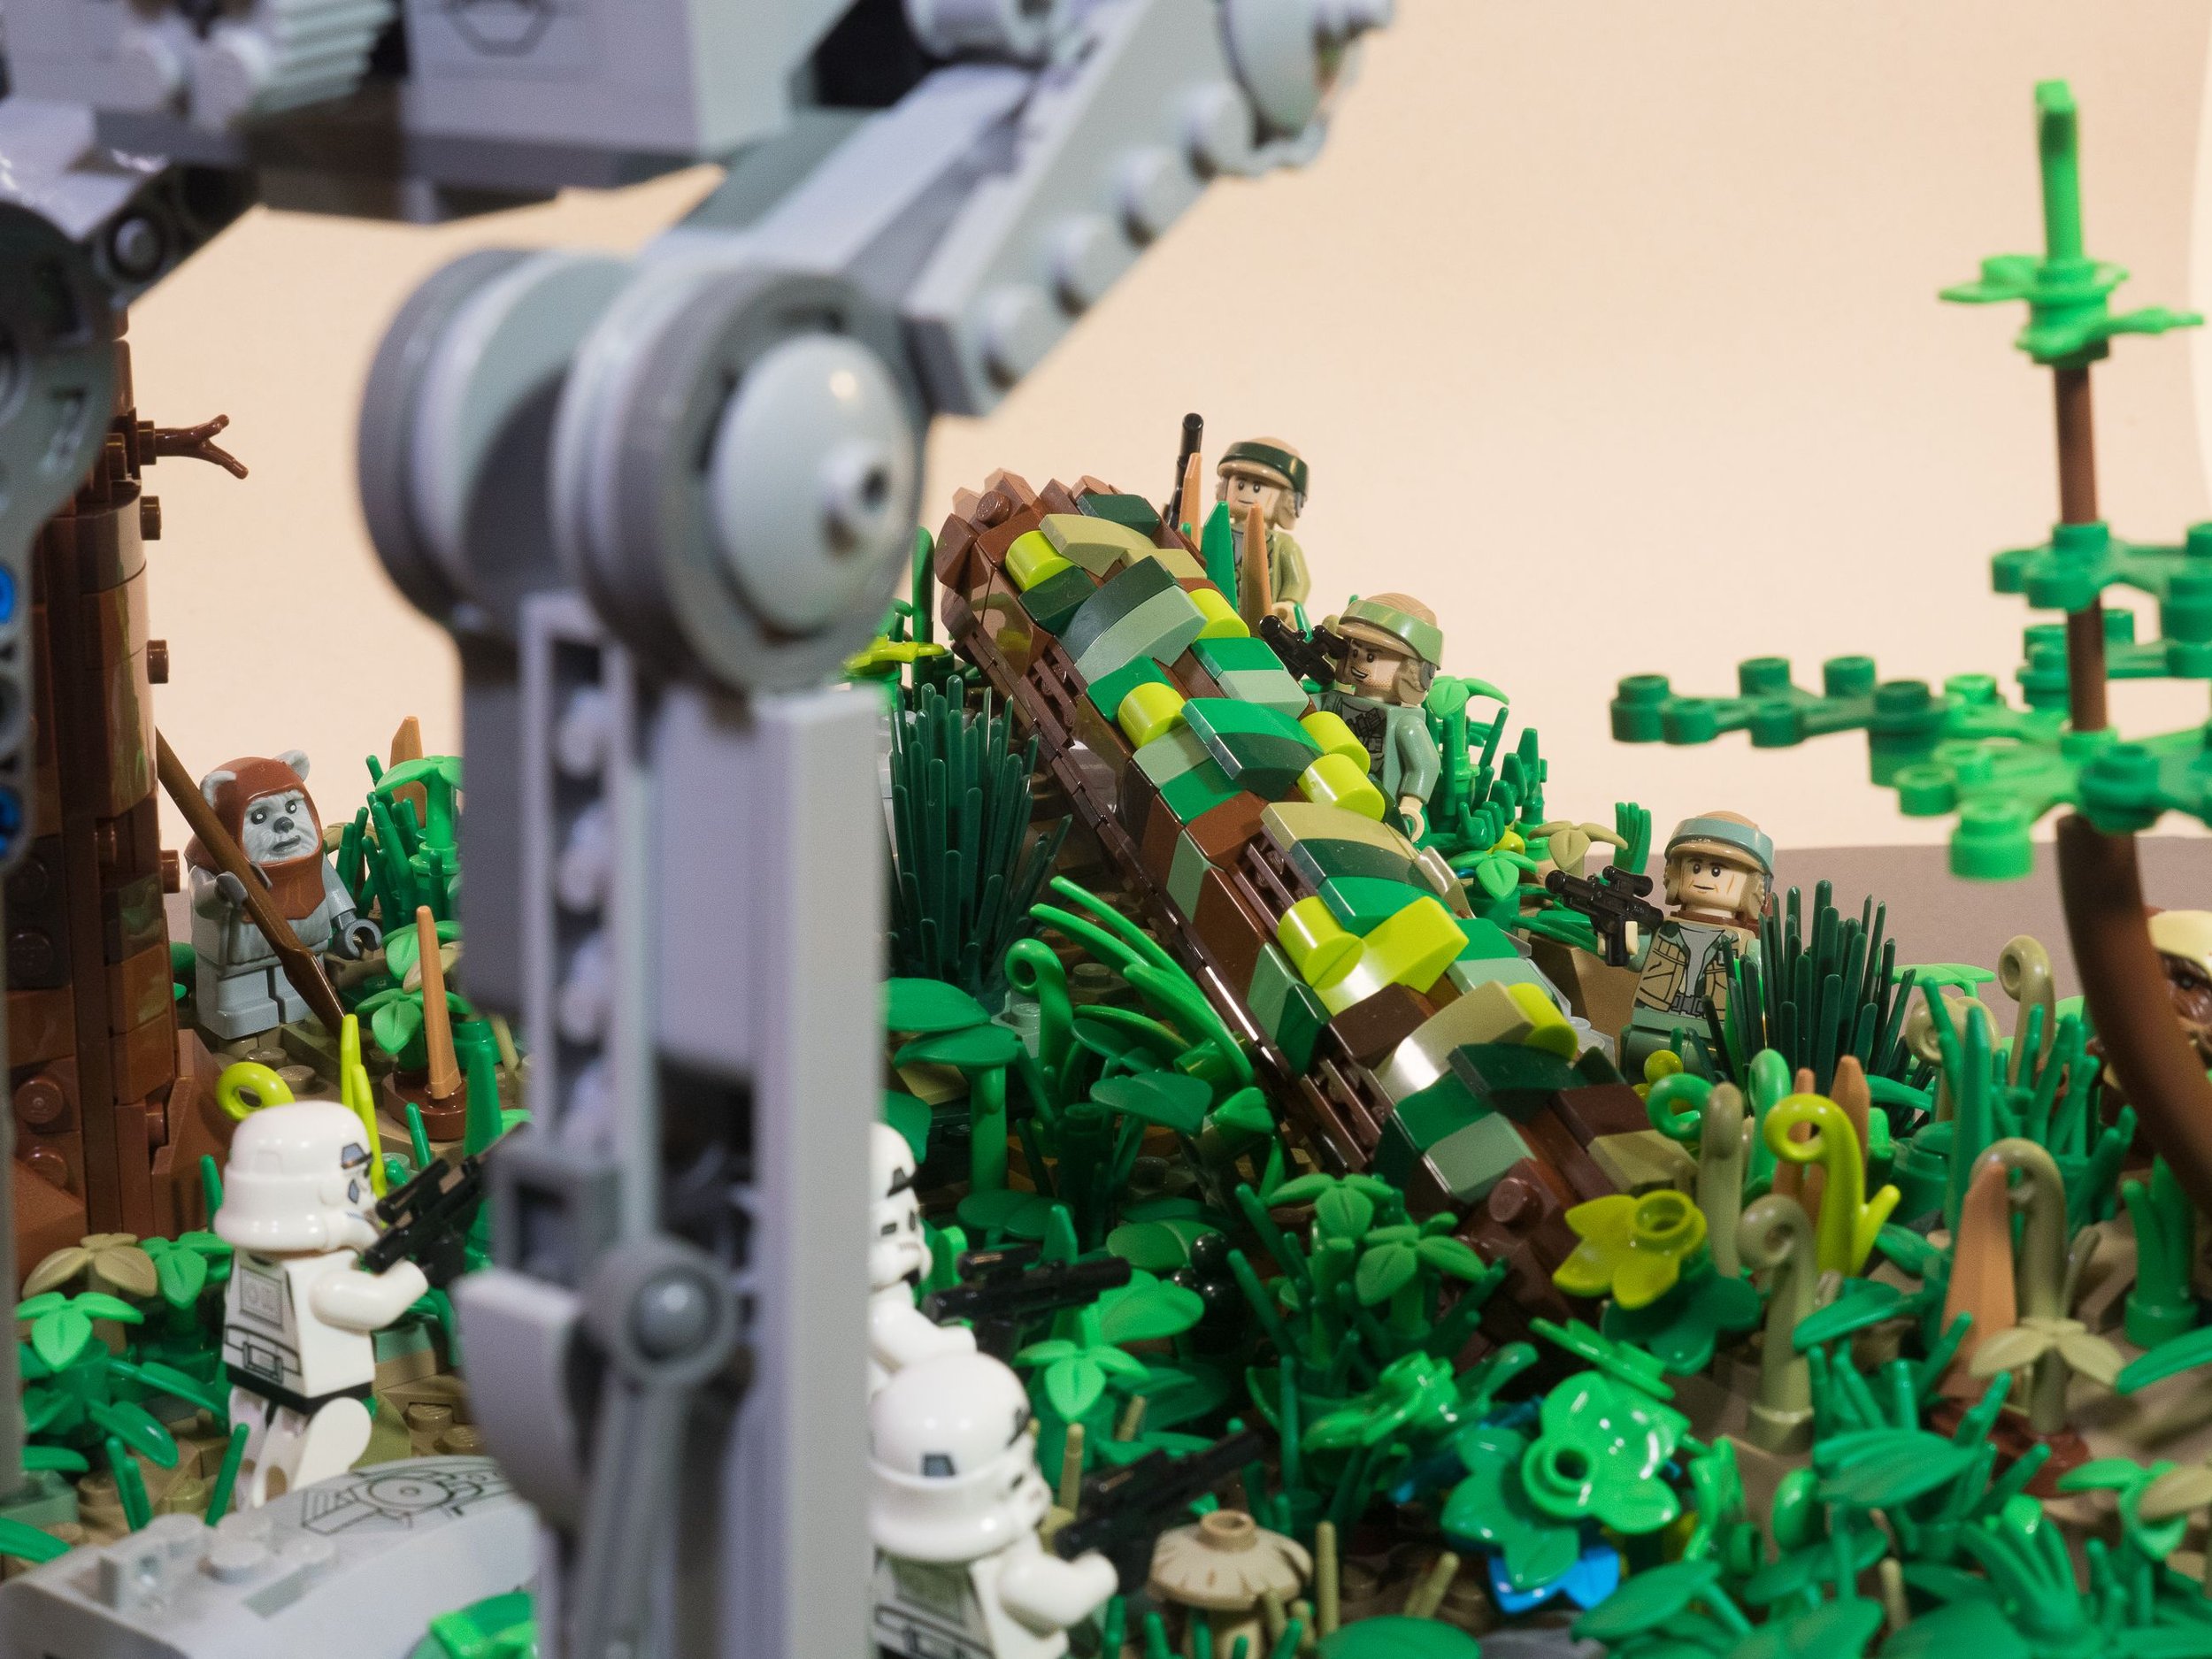
For the log, I even included the broken, lighter-colored inner wood, seen on the ends. I like having realistic details! The large tree has a core of SNOT, layered over in a wide array of plates, slopes, grills, curves, and more. The end result is very sturdy and very detailed.

Can you count the rings on this tree?
I turned it at the base to an off-angle, keeping things dynamic. And tapered it slightly from the base to the top, with a flared base where the roots dig into the ground. Again, always trying to replicate nature as much as I can.
There’s lots of details, including small twigs from old, broken-off lower branches to the sloping organic branches at the top using the brown tail pieces combined with spigots and clips to attach the leaves.

Yub yub!!!!
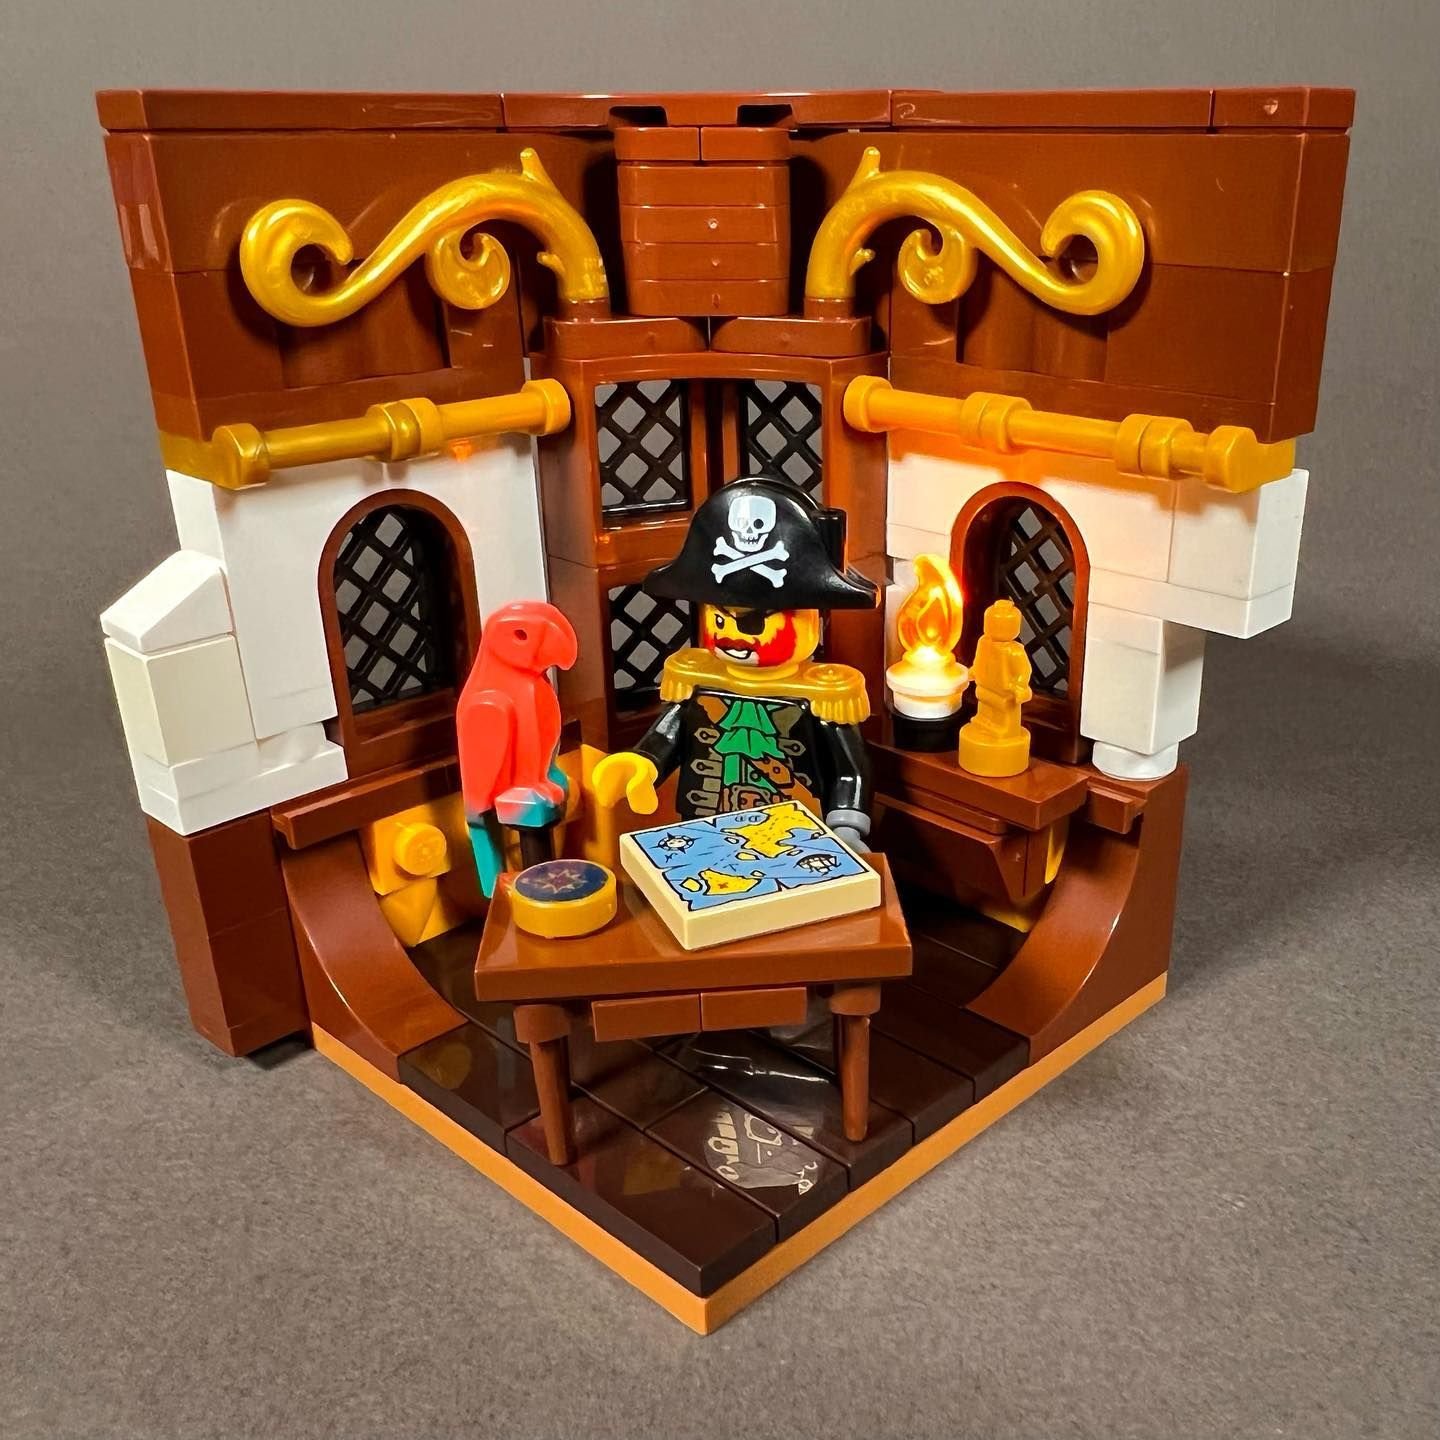
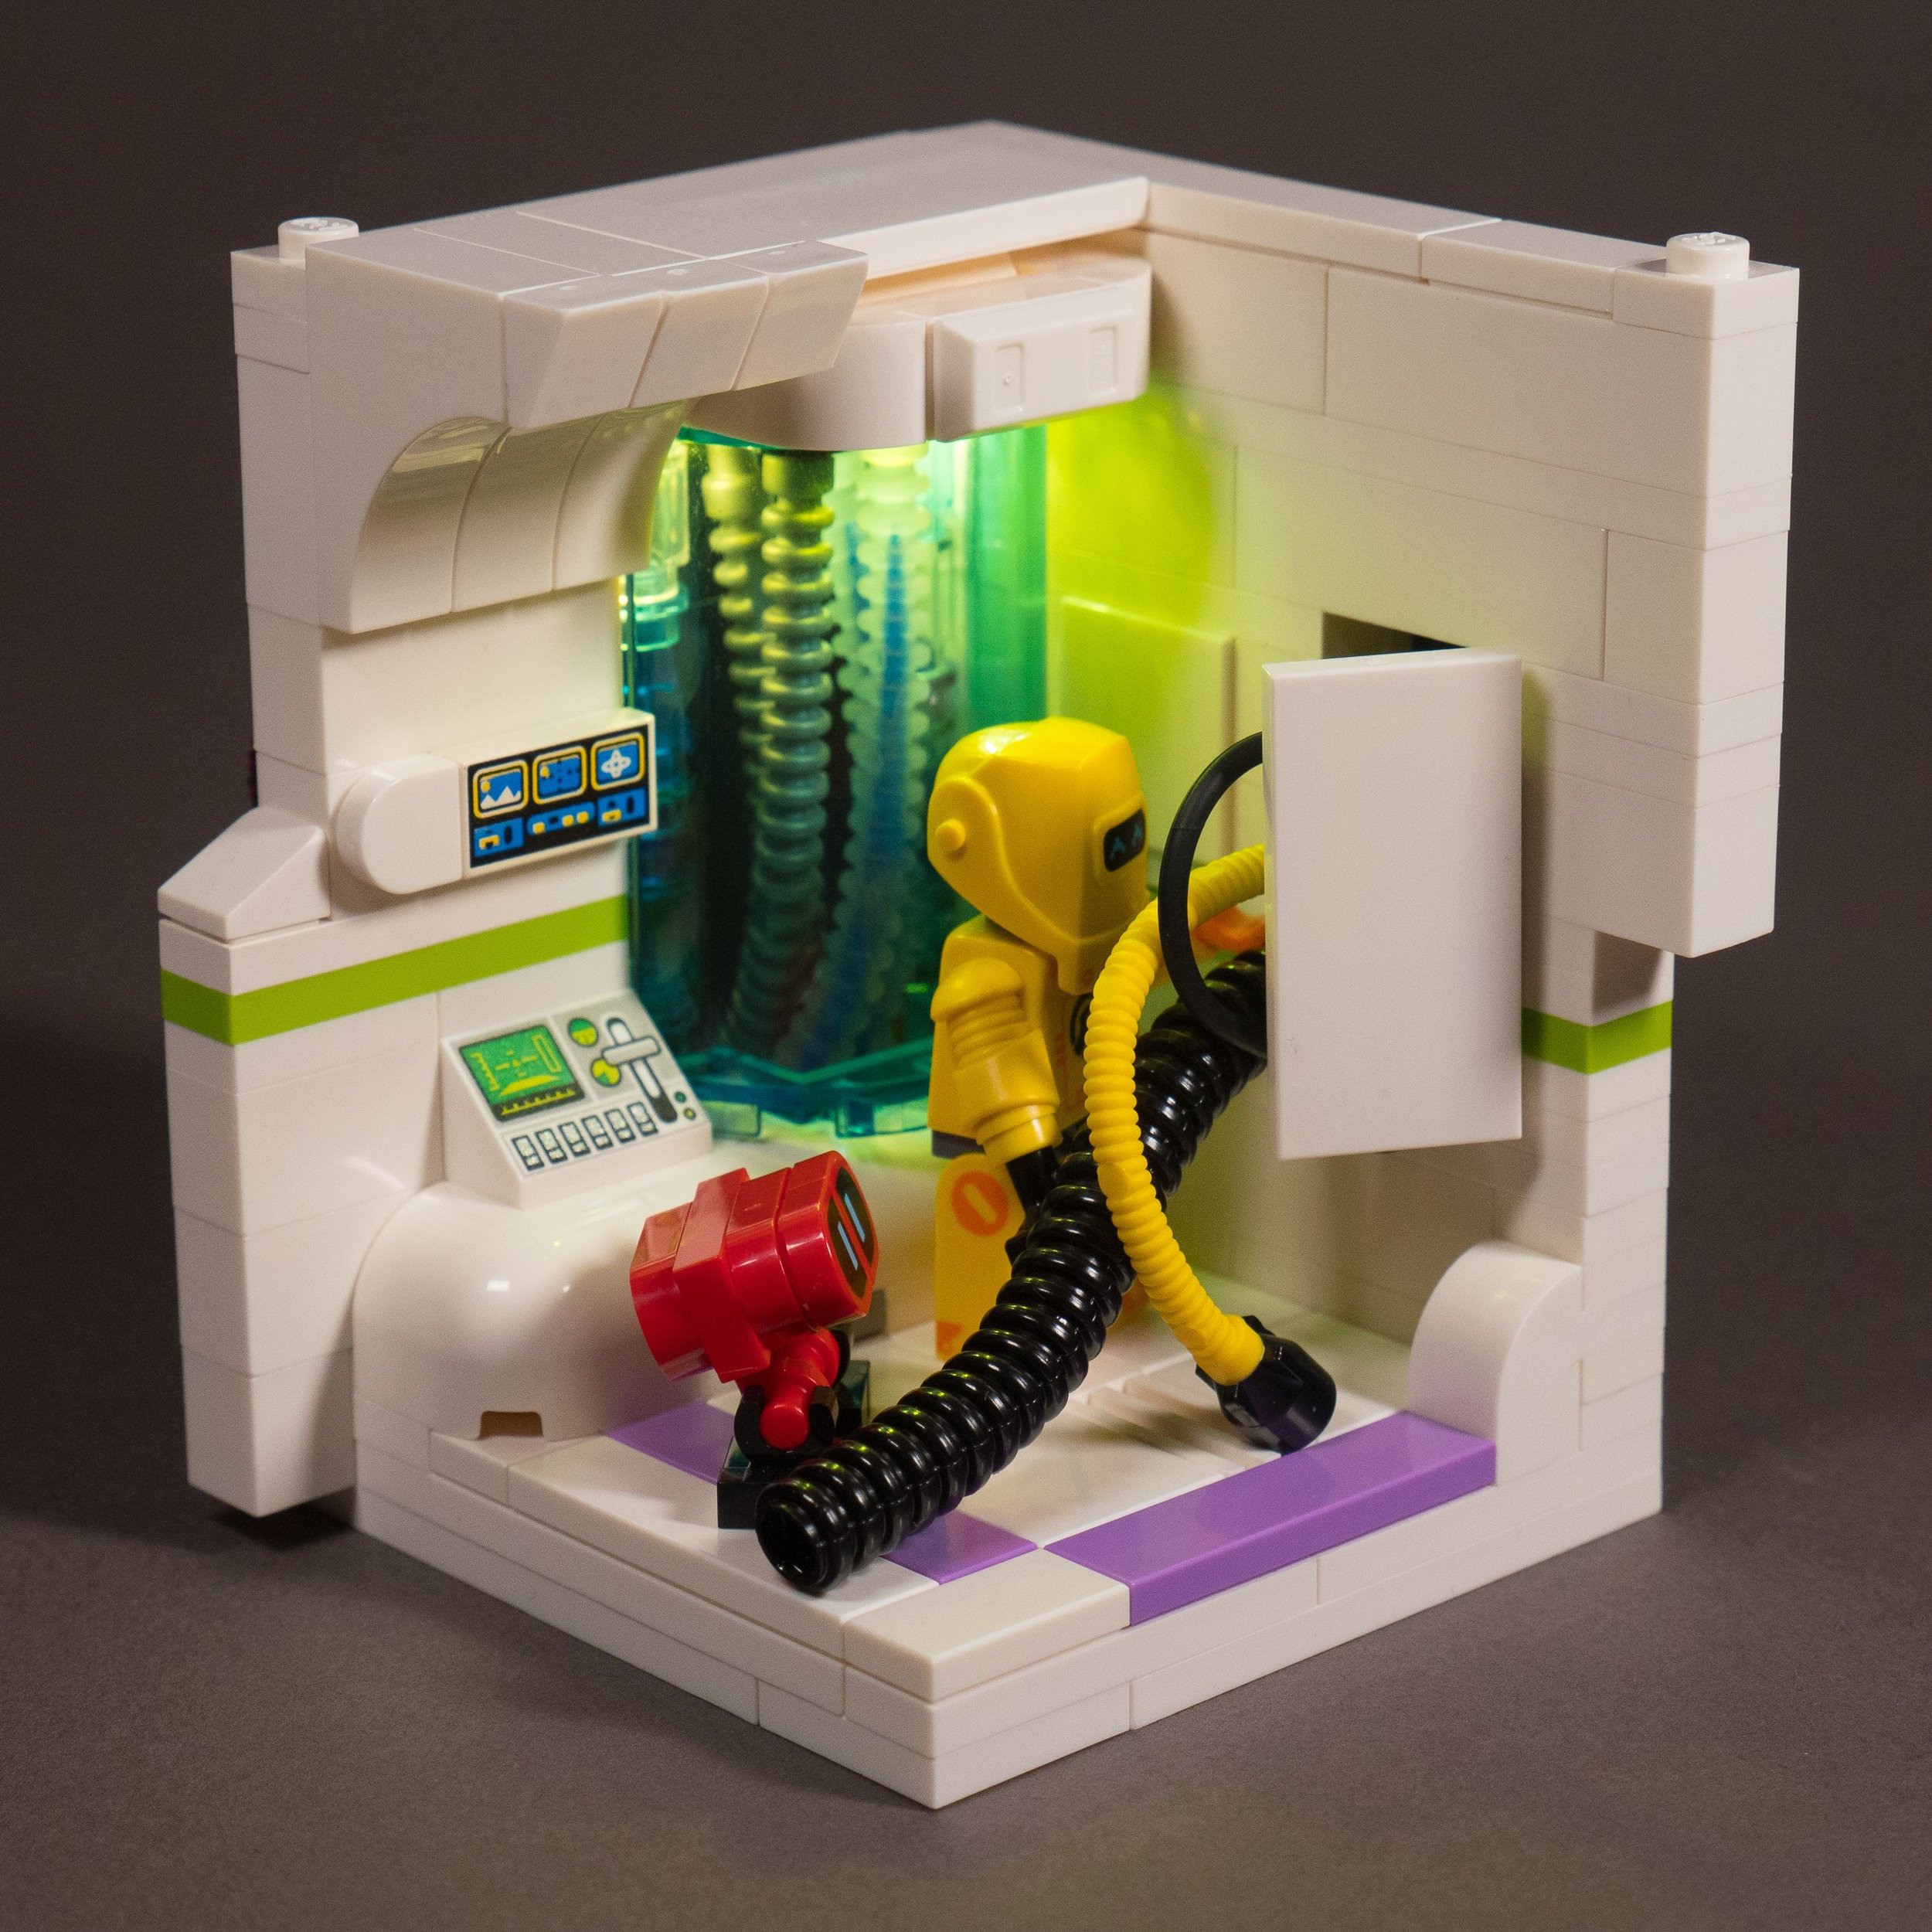
And lastly, I brought a stack of my first minifigure habitats—the Disney stack. It included Buzz Lightyear, the Toy Story aliens, Stitch, Hades, and the particularly popular Kermit habitat in his swamp on a log.

Ok the Kermit one really hit me—Josh really nailed the vibe of that scene I saw so many times as a kid!
Each habitat had its own unique thing I was playing with. Stitch had the sunset background curving around the corner, with palm trees strategically placed to hide the seam. Buzz had glow-in-the-dark stars outside the windows and references to classic LEGO space themes. Hades had lighting in the lava using 2 standard light bricks and using LEGO pieces to diffuse and reflect the light around. And Kermit had the floating log using the tree costume at its core and half underwater, with fish swimming under the surface.
I don’t like to leave out an opportunity to add more detail! Like my first MOC I mentioned earlier about the evergreen tree, it had a hidden rabbit burrow you could barely notice from the front, but from the back, you see into the burrow underground. It’s essentially utilizing what would have been empty space, even if most will never see the back. It adds little extra Easter eggs hidden away. I have a cool one planned for when I get back to completing my ocean reef MOC to use the space inside the hilly foundation.

Wabbits
Doug: That’s a really impressive collection of MOCs for any AFOL, let alone a newbie Josh, well done! I’ve found over the years that cheekily building in little Easter eggs is a popular tradition among builders and it is awesome you’ve joined in.
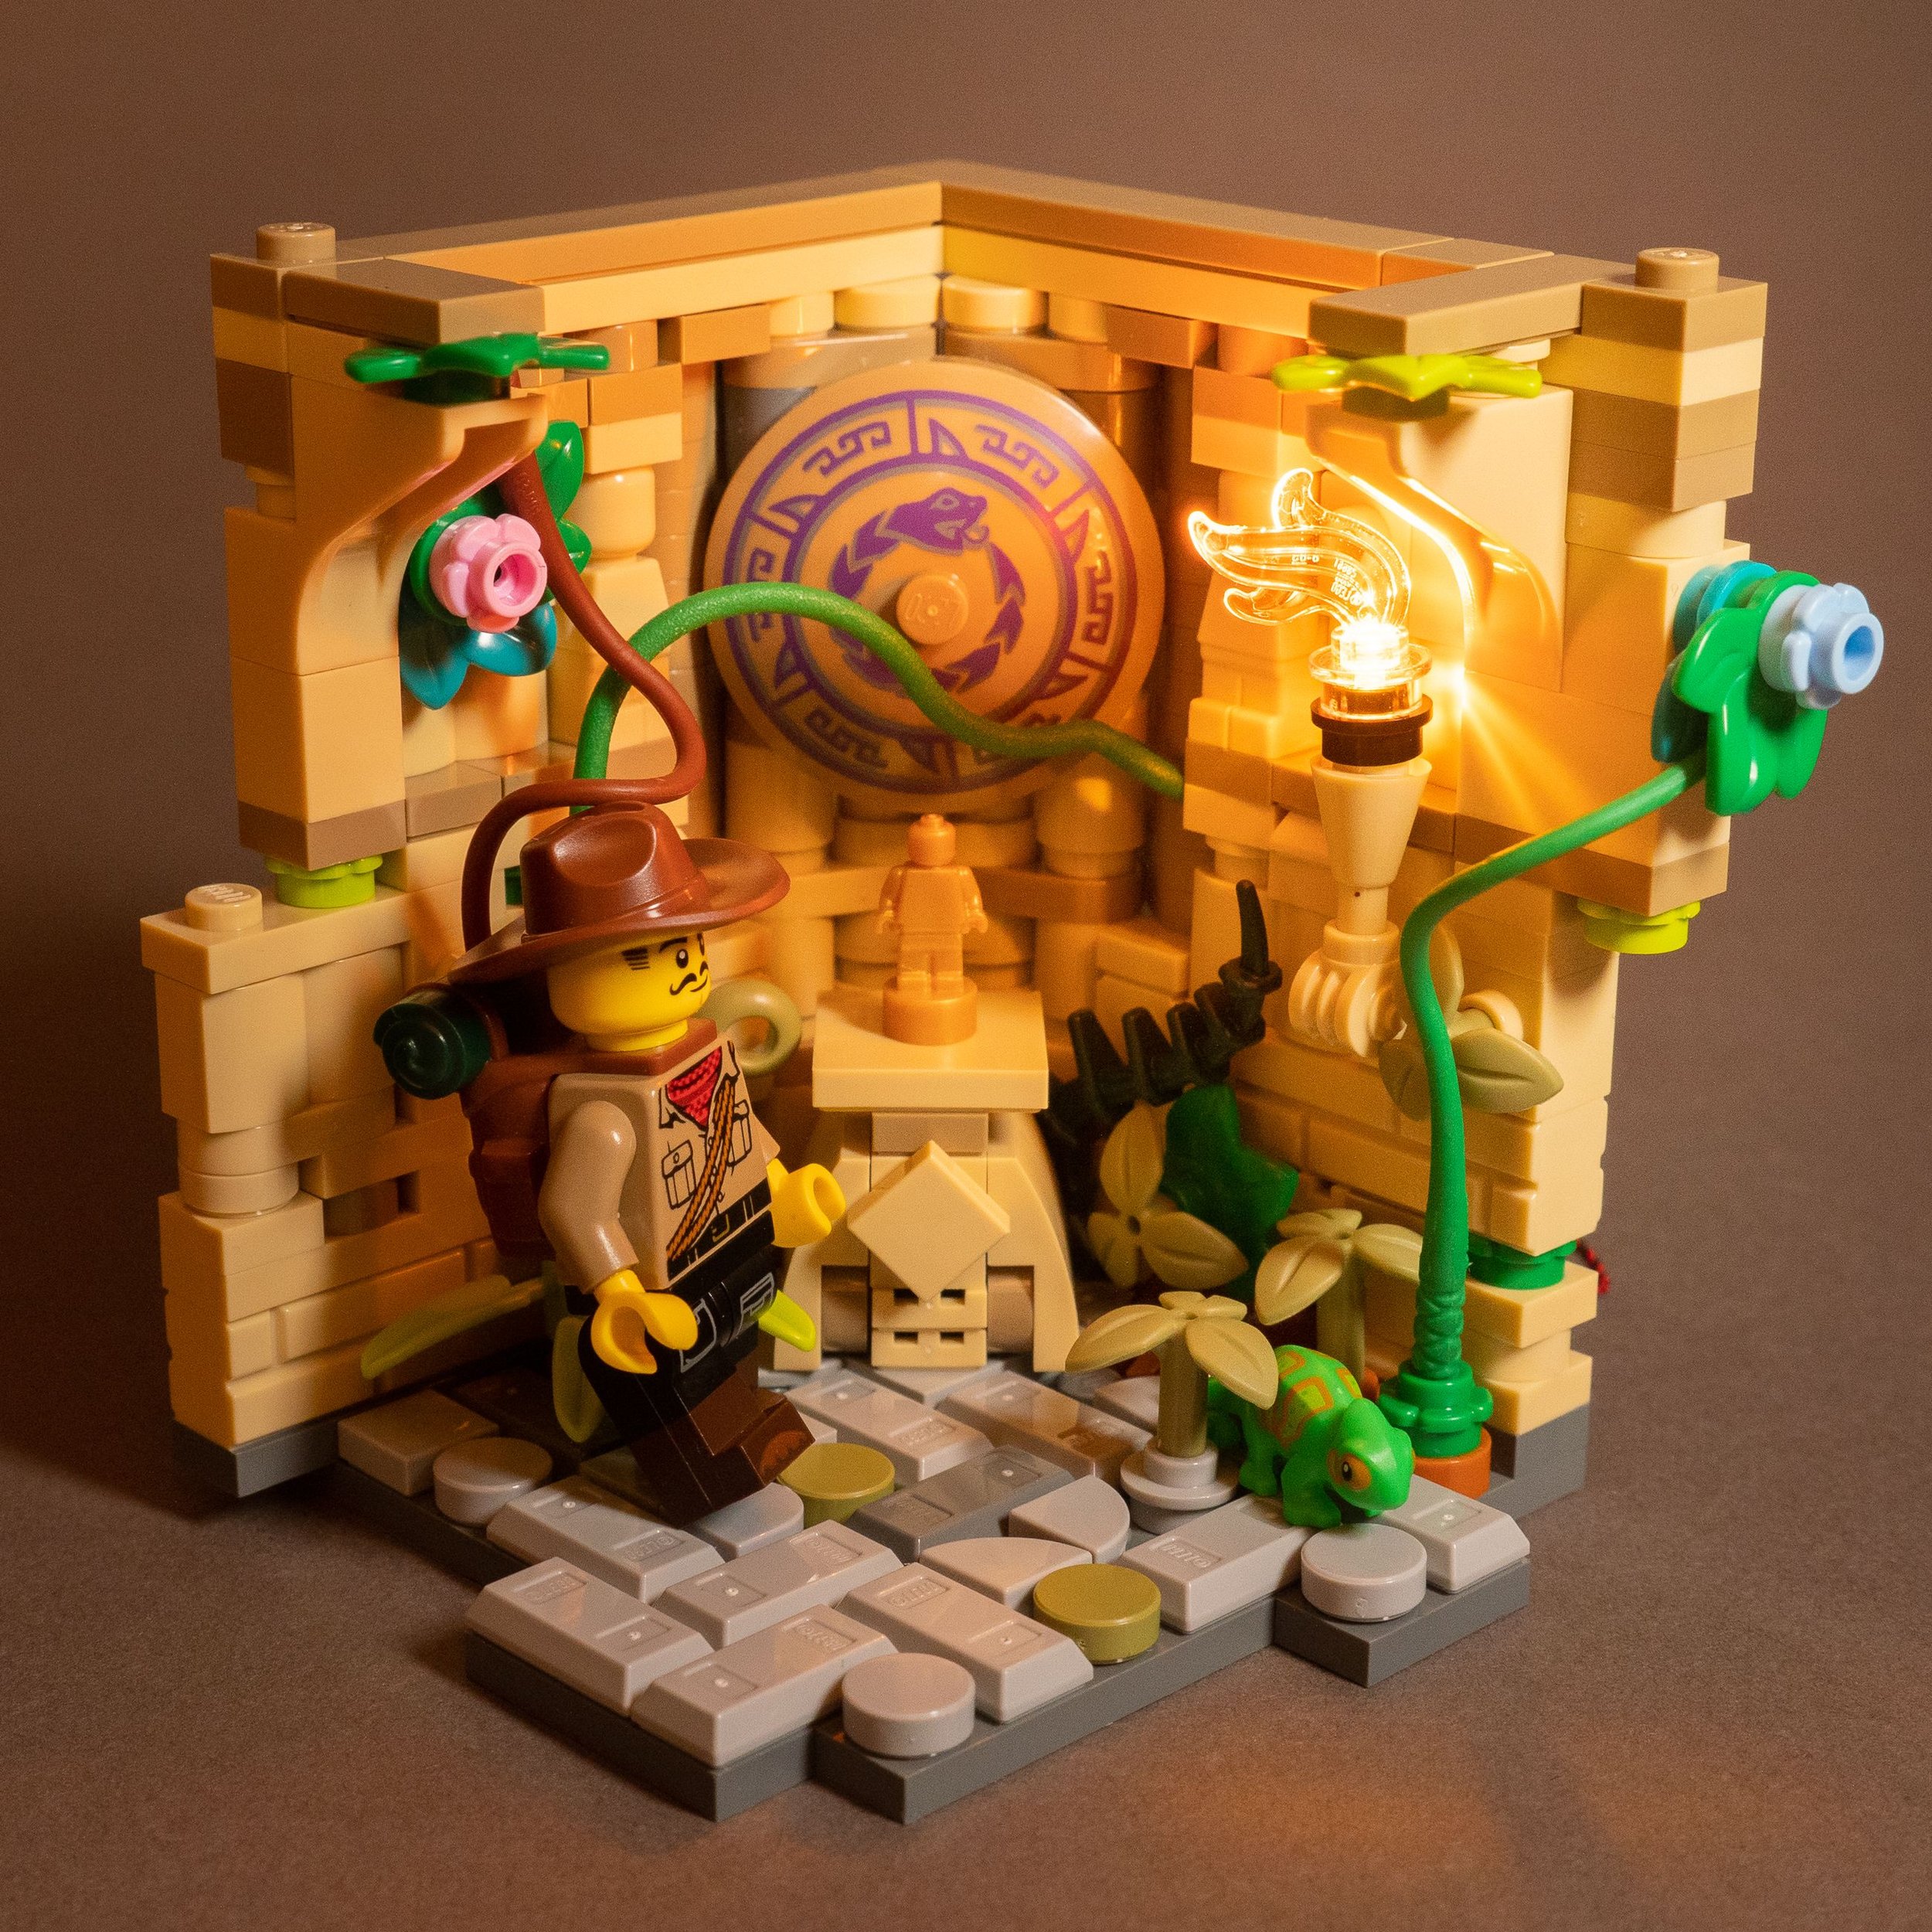
And of the builds you had at ECCC, I have to say the Dr. Strange build really stood out for me. It is such a crisp and well-designed scene. Can you tell us more about the build, what inspired you, and it sounds like there have been upgrades since the original version?
Josh: It all started with having an idea for the portal using transparent orange flame pieces spiraling out like the sparks you see on screen. Then combining that idea with those 1x2 rounded plates to get a nice circle and trans-orange chains going around to add a little more to the effect. With the 1x2 round plates, I knew I could get a gradual series of angles going around the circle if I could figure out a good way to attach the flames right. Everything else spiraled out from there (no pun intended!).

Mesmerizing isn’t it?
Next was deciding what the scene would be. The Sanctum Sanctorum seemed like the best location to start from. It enabled a convincing effect with the portal when viewed in real life from varying angles because it didn’t have to float in open space.
Next, I wanted to show what was on the other side. And for that to be expansive. I wanted a wide open landscape that would contrast with the indoor starting point. The Multiverse of Madness was coming, so I went with the Darkhold castle in the mountains, using the trailer as reference shots. The castle was key, so that was my prime focus there. I had to work out how I could give the effect of that castle in microscale only a few bricks high.

The subject castle: (Image via Marvel)

I love that creative use of the pistols!
The main structure came together with a few choice bricks, but the broken circular top structure was the trickier bit. The circular part was vertical and the top half had collapsed and was completely open. I settled on using pistols in clips to give the idea of that broken semi-circle.
I had very little time, as I was doing this in the final week or so of the #MarvelousMay challenge. So I had to work with what pieces I already had. That was another struggle, and why my original castle landscape was pretty simple the first time around. But I couldn’t skimp on the front part. So I had to work out how I wanted to create a slice of the interior that felt like it could be in the Sanctum Sanctorum, even through not specifically from the movie.
I also didn’t want to have a blocky, simple bookshelf. So I tried experimenting with ways to keep the shelves themselves only the thickness of a tile. What I ended up going with was essentially mimicking the shelf pins you see in a real-life adjustable bookshelf. I used the 4 pronged plate with flower edge piece turned slightly askew so the prongs would stick out beyond the edge. That acted like those shelf pins for the tiles to rest on.
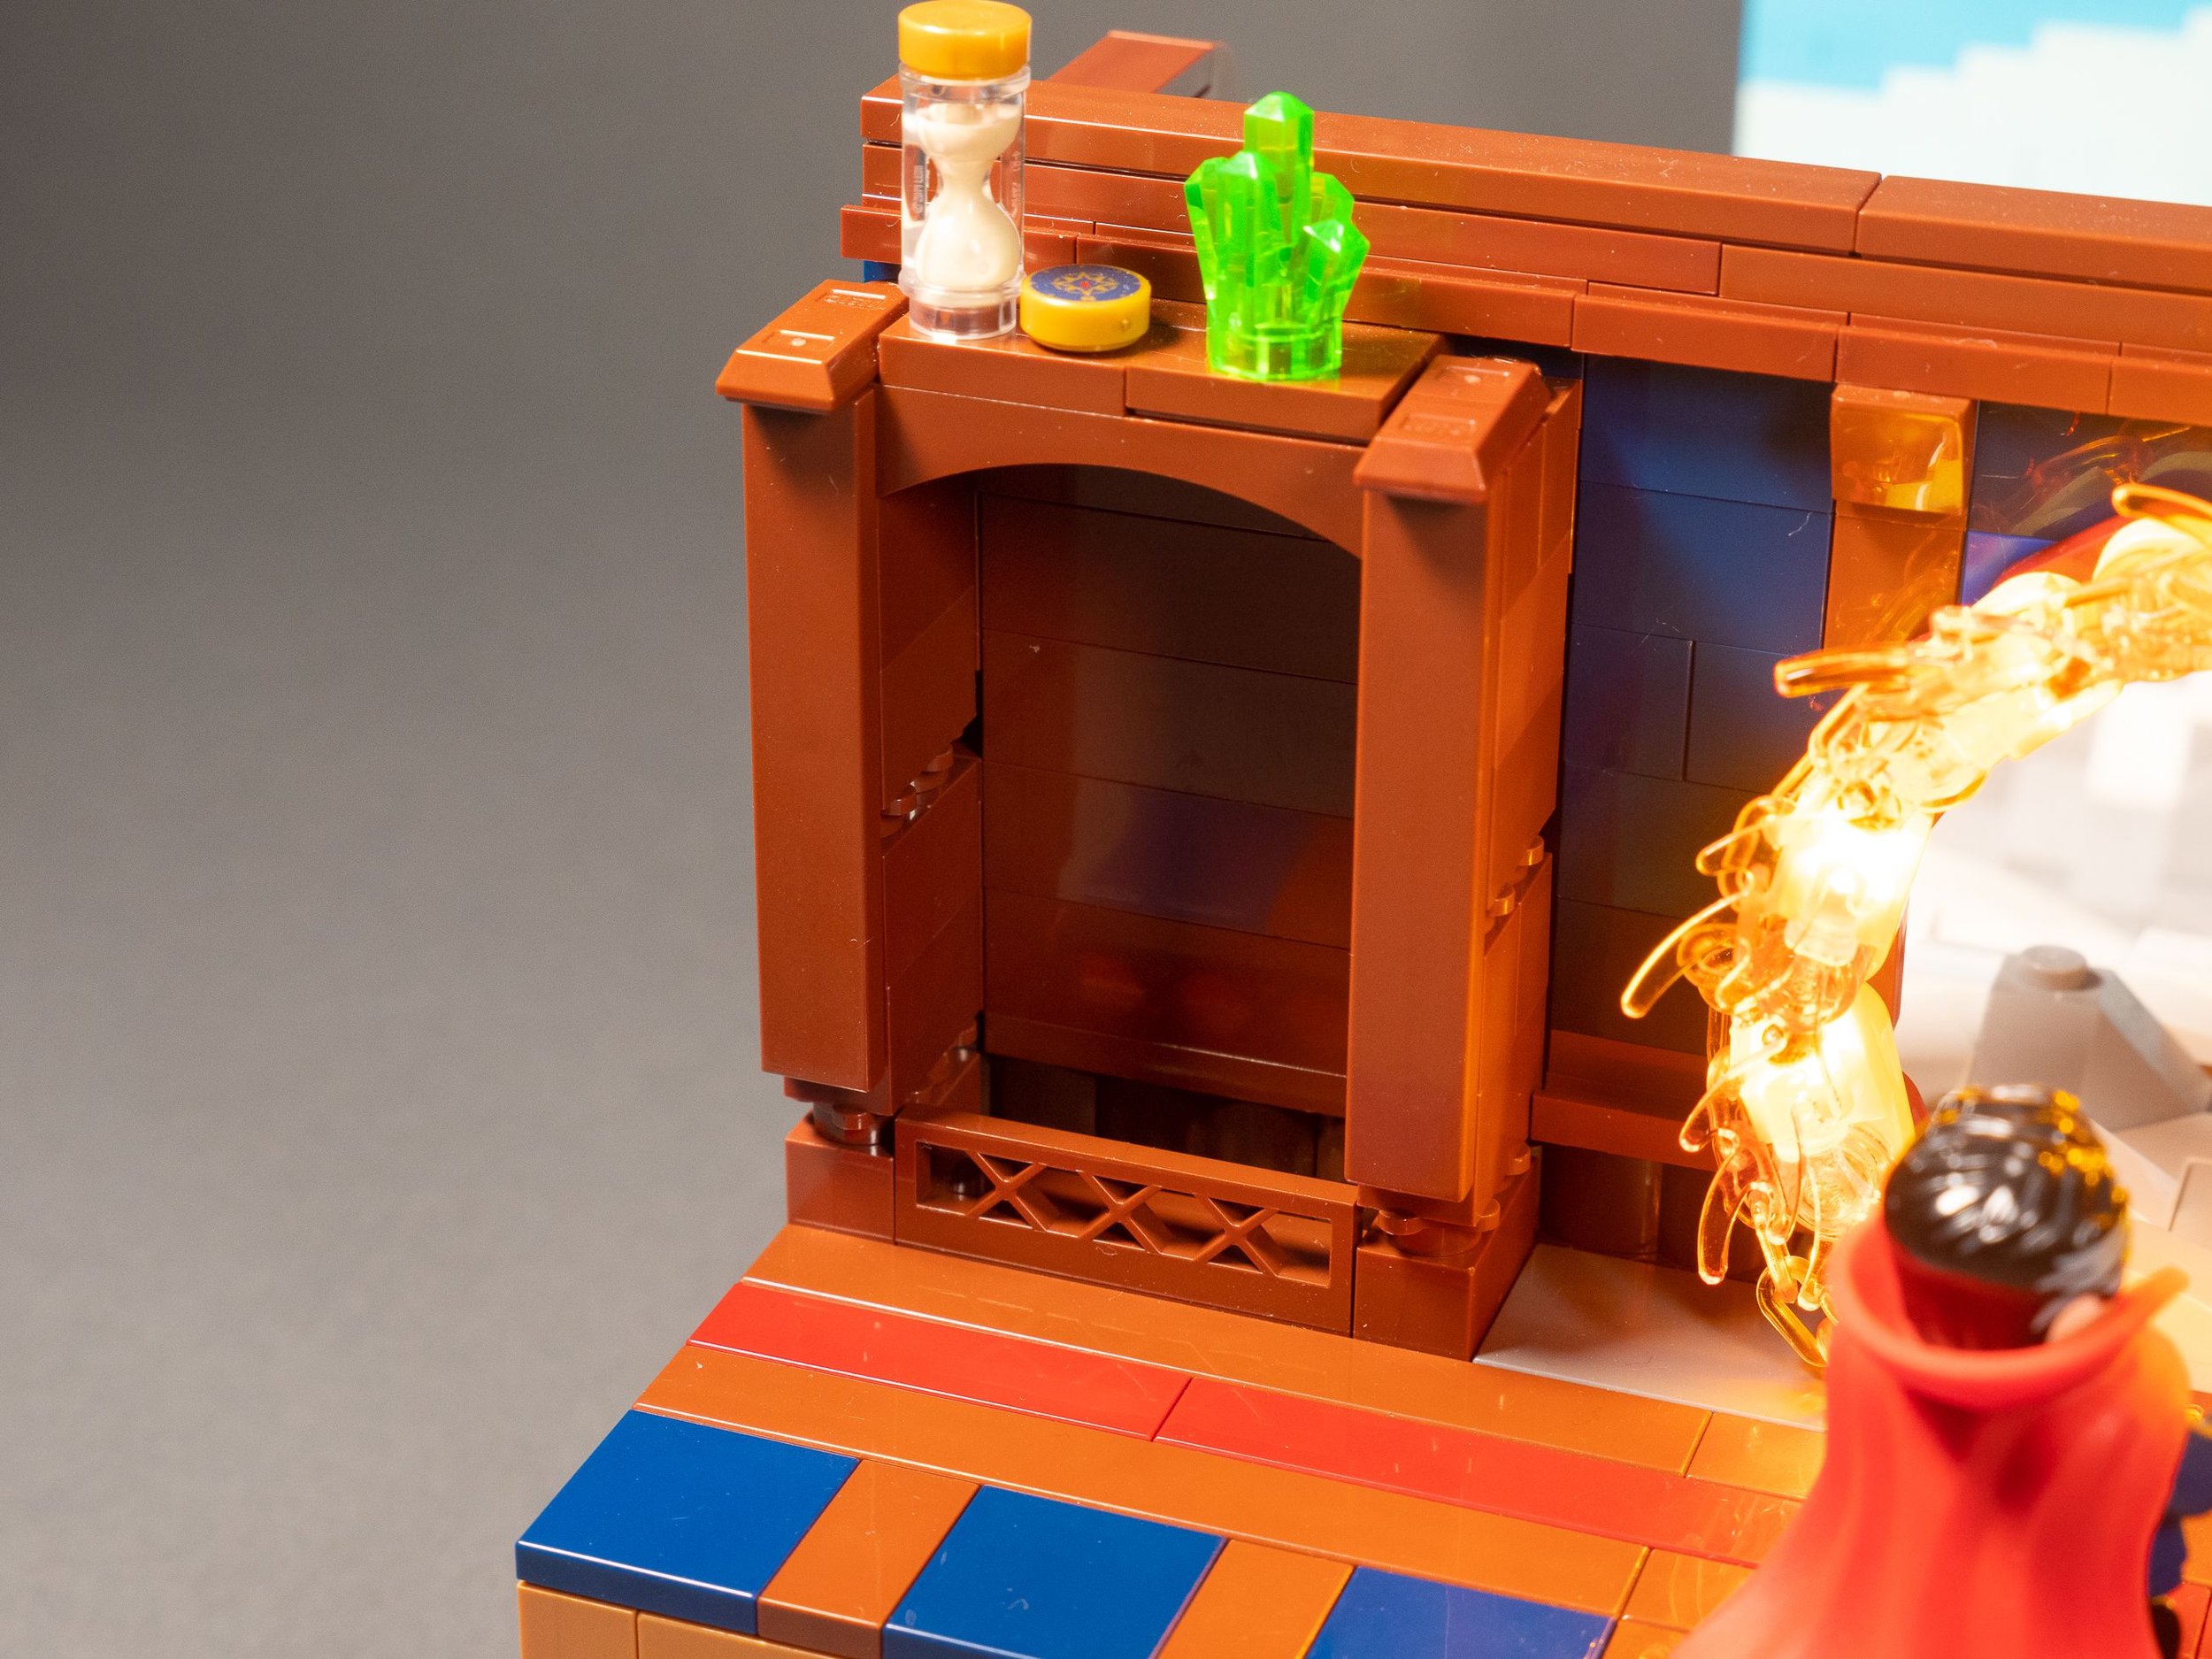

It did create one problem in that it meant there were now these prongs jutting out on every side. So I had to work around that, covering up the front with long tiles that wouldn’t have a problem with those little bits sticking out. And I had to work the back wall around the prongs as well. They protrude just a little bit you barely notice them. But it’s enough to interfere with a brick placed flush against it. And I added some other decorative flourishes to the bookcase including ingots, a fence piece, and stacking it up with books and curiosities.

The finished shelf
I finished everything out, creating a chair and table with lamp, and had it all ready to go. But then I wanted lighting. I had just started playing with lighting and had these Brickstuff flicker lights that would be perfect to give a little of the effect of the sparks going around the portal.
So I wired them in, one by one. I placed them just right so they were behind the trans-orange, and angled to face the direction of the “sparks”. I particularly wanted to make sure they were covered by the trans-orange because even a little bit out of place and you’d see this bright warm white light and it would stand out and ruin the effect.

Wiring up the lights
Doug: It’s the little things that catch our eye as viewers of a MOC, and your details of the interior of the Sanctorum definitely don’t disappoint. I thoroughly enjoyed hearing you walk through your decision-making and design process, thanks! So you mentioned that you weren’t happy with the backdrop at first due to a time crunch, so can you tell us about the upgraded version you just released?
Josh: I wasn’t happy with most of the back landscape. It was basically a gray plate, with the castle on the peak in the middle, and a backdrop of varying blue bricks (very blocky). I had a different vision but didn’t have the pieces in the colors I needed. I barely completed that blocky backdrop with what I had to give the rough impression of mountains and sky. I had planned to get the pieces and finish off the MOC nicely… at some point. I had a few main objectives:
Create a good forced perspective landscape of mountains receding into the distance.
Add a little extra height so I could have more of the lower part of the mountains and clouds the mountains were rising out of.
Finish the sides nicely for a more finished appearance.
Have a door to access the battery box.
It was the Brick Nation/SEALUG showing at ECCC that really prompted me to get it done. I wanted to not only do the forced perspective of it but also incorporate the bluish haze that happens as you look at peaks further and further into the distance.

The lovely backdrop
So the first layer of mountain peaks behind the castle went with a little bluer hue. The rockwork was sand blue instead of dark bluish gray. And the snow was light aqua instead of white. Then I needed another gradation of color for the next rows back and felt the best fit was the light royal blue. Not the cheapest parts for some of those slopes and curves, but I only needed a small supply. And then I rebuilt the backdrop to be more detailed, using light aqua for distant clouds rising to medium azure, and then darkening as you reach towards the top.

See how the after picture lighting is better too— Josh is such a cheater ;)
Then I worked on the finishing of the presentation. Using reddish brown to create the battery box door, the sides going back from the front portion, and having the back and front as two pieces that would pin together.

Secrets within
By having them separate, I could access each section more completely, and see the landscape on its own. It all came together shortly before ECCC. The only thing I didn’t end up doing was adding more height to the Sanctum Sanctorum, and maybe even fully enclosing the back landscape. But I decided I’d rather have the ability for people to look over the wall and see the full landscape and see what is happening with the forced perspective. I thought seeing how it worked would be more interesting.
And you may be wondering, “Why is the castle slightly off center?” No, that wasn’t just carelessness. That was for the benefit of people who would be viewing this. Dr. Strange is in front of the portal as he opens the portal with his sling ring. (Did you notice the gold ring in his minifigure hand?) So you have to look at a slight angle to get a fuller look through the portal. This creates a line of sight where you can look around Dr. Strange to see the background more fully, and the castle lines right up into your field of view.

Josh shows the MOCs at a local SEALUG event
Doug: I had noticed the smart placement of the tower! Your thought process was spot on and it had the desired effect, people really enjoyed looking through the portal and being rewarded with a well-crafted view! So that brings us to the conclusion of our chat, it was great to chat with you Josh, hope we’ll see you at BrickCon this year!
Josh: Great to chat with you as well! Unfortunately, I’ll be missing BrickCon but hope to attend Bricks Cascade and/or BrickCan in the coming Spring! And I’ll be showing in the Grit City Comic Show in Tacoma, WA later in October along with a new pop culture MOC to add to the mix!

Turtle power dude!
How many of you are busy picking your jaws up off the floor in shock at how great these MOCs are? Let alone from a relatively new builder!! I’m just glad Josh had the time to sit down and chat and tell us about himself and the builds, I enjoyed getting to know him more and I can stare at these MOCs all day. We will certainly follow him and are excited for whatever comes next!
What is your story of becoming an AFOL? Are you a seasoned veteran or a newly minted builder like Josh… or still waiting for the right time to take a whack at your first MOC? Let us know in the chat.
What was your first MOC like? Let us know in the comments below.
Do you want to help BrickNerd continue publishing articles like this one? Become a top patron like Charlie Stephens, Marc & Liz Puleo, Paige Mueller, Rob Klingberg from Brickstuff, John & Joshua Hanlon from Beyond the Brick, Megan Lum, and Andy Price to show your support, get early access, exclusive swag and more.