10 Things I Learned by Building LEGO Skyscrapers, Part 2
/Continuing our guest article on building LEGO skyscrapers from Deep Shen (read the first half here), today we learn the SNOT tricks, Pythagorean triples, and jumper techniques you need to know to build big architecture!

6. Isn’t that stud supposed to be on top? No, it’s SNOT!
A funny thing happened at the first LEGO convention where I displayed my skyscraper models. Someone from the general public came up to me and asked how I had built the green roof in my model of 40 Wall Street. “Oh, I just used SNOT...” I started saying without thinking twice, and before I had a chance to explain what I meant, the guy had moved away with a puzzled (and slightly disgusted) look on his face. Little did he know that SNOT (Studs Not On Top) is what we AFOLs call a technique where we turn LEGO bricks and plates on their sides and attach them to the faces of other bricks.
So what is wrong with just stacking LEGO bricks and plates the normal way (one on top of the other), you may ask? Nothing really, but using SNOT techniques allows us to add details and create shapes that would otherwise not be possible from just stacking. As the LEGO system has evolved over the years, more and more elements have been added to the parts catalog to facilitate SNOT—especially brackets, bricks and plates with studs on their sides. Here are examples of some SNOT elements that I have found to be very useful.
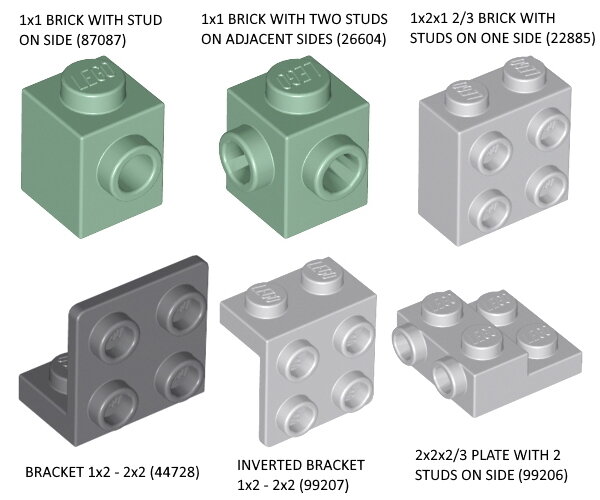
SNOT is not as straightforward as it sounds and the reason is the geometry of LEGO bricks—which happen to be taller than they are wide. A regular 1x1 brick is 3 plates tall but only 2.5 plates wide (and this 6:5 ratio comes into play for everything you build using SNOT).

This excellent BrickNerd article covers SNOT in more detail in many more configurations. I admit that I am not a particularly skilled practitioner of SNOT but I have used it in one form or the other on all of my skyscraper models.
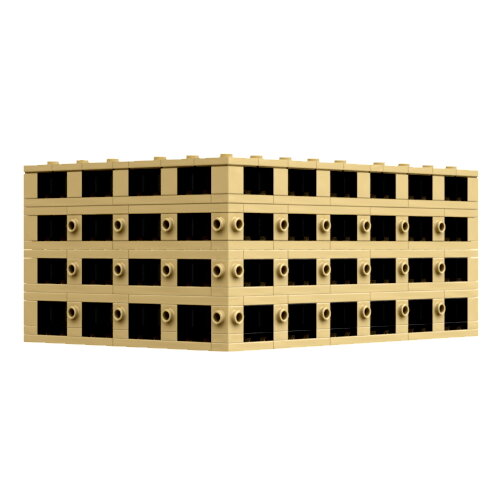
The first example I would like to share is some simple SNOT that I used for the base of my Empire State Building. Here, I wanted the windows to be slightly recessed compared to the walls. Instead of moving the windows in, I moved the walls out. An easy way to achieve that is by attaching tiles to the wall sections between the windows. With the 1/230 scale I was using, I needed each floor to be 5 plates high and this was perfect for SNOT. I had layers of bricks sandwiched between layers of plates. I used the 1 x 1 modified bricks with two adjacent studs in the corners and 1 x 1 modified bricks with single studs everywhere else. I then attached 1 x 6 tiles vertically to the wall sections between the windows to achieve the recessed-windows effect.

It was a little trickier to create the same effect on the base of my model of the Hearst Tower. Here the scale is bigger (1/156) and calls for 7 plates per floor. To be able to attach 1 x 8 tiles to the faces of the wall I needed to somehow get the studs on the faces of the walls to be 5 plates apart even if each floor was 7 plates high. I ended up having to mix bricks and plates within the same layer (so to speak) to achieve this.


Next, we look at a more complex example of SNOT. I couldn’t think of an easy way to recreate the curves of the crown of the Chrysler Building. Simply stacking bricks or plates would have created a very blocky structure. I knew I had to find a way to incorporate some curved slope pieces which have smooth curved surfaces. After quite a bit of experimentation using LEGO graph paper, I figured out a way to do each of the six arch panels (of varying sizes) using a combination of regular bricks and plates as well as their SNOT counterparts with studs on their sides, in addition to tiles, brackets, etc. I also found a way to join these panels together to create a sturdy structure for the crown that would hold together without any glue.

My last example is another tricky roof—this time it’s the roof of 40 Wall Street. Again, there was no easy way to build the green pyramidal roof of this building just by stacking bricks or plates. I figured I would need to build the green roof panels entirely out of plates and have them angled using hinges. Each roof panel was exactly 30 plates wide so that it could be attached to the base that was 12 studs wide. Also, each panel was built in two halves (with studs facing opposite directions) that were joined together using SNOT.

7. Don’t underestimate that jumper plate
When you are building with LEGO, you are always working with a grid of possible locations where you can place your bricks. For each layer of bricks you place, this grid is determined by the layer immediately below it. All the locations on this grid are separated by increments of a stud (which is the width of the basic LEGO unit—a 1 x 1 brick). For instance, if your first layer is a 32 x 32 baseplate, the bricks in your second layer have to be placed such that their studs line up vertically with one or more of the 32 x 32 studs in the baseplate.
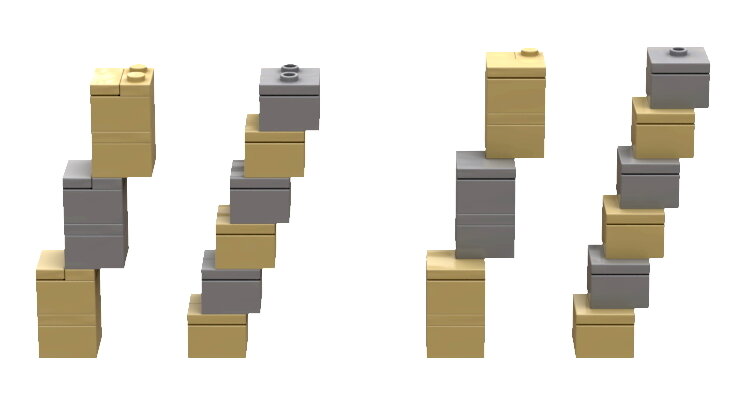
Say you are stacking bricks to build a tower that is supposed to taper as it rises. The smallest amount you can normally set back a layer of bricks relative to the layer below it is a single stud. Depending on the scale you are using for the tower, a full stud setback at each step may not give you as smooth of a taper as you would like. So, is there a way to set your bricks back by just half a stud instead of a full stud?
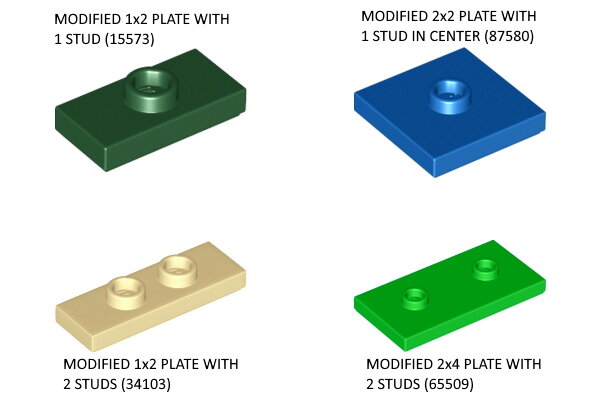
Fortunately, there is and the way is using jumper plates. These are plates that have studs located halfway between where the studs would normally be if they were on a regular plate. They allow bricks to be offset by half a stud in one or both dimensions.
Jumper plates can also be used to recess windows or wall sections back by half a stud to add more subtle detail. Here are examples from two of my skyscraper models. In the case of the Empire State Building, I used jumper plates to create recessed wall sections at the top of the building and also to taper the portion of the building that leads up to the spire.
I did something similar in my model of 70 Pine Street. Here, jumper plates were used to create recessed windows as well as for the taper at the top portion of the building that culminates in the spire.
Some of my skyscraper models (Transamerica Pyramid, John Hancock Center, etc.) use half-stud offsets extensively to create tapers that stretch the entire height of each building. One complication with half stud offsets is that the edges of your bricks are no longer in a straight line and so, if the portion of your wall that uses half stud offsets needs to meet a regular wall, you are left with ugly gaps. I had this issue on my model of the Transamerica Pyramid where the “wings” of the building intersect the main tower. I ended up using tiles attached to the wings to plug these gaps as best as I could.
In the case of the John Hancock Center, I had to deal with a different kind of issue. Based on the dimensions of the real building, I realized that the wide and the narrow side of the model needed to be tapered by different amounts in terms of studs. So I couldn’t simply use the 2 x 2 jumper plates as I did on the Transamerica Pyramid. I had to use a mix of 1 x 2 jumper plates (oriented lengthwise or widthwise) along with 2 x 2 jumper plates to taper the model by one stud (half-stud on each side) every six floors on the long side and every eight floors on the short side.

8. Take a different angle on LEGO walls
If you look at a LEGO baseplate, you will see that the studs on it are arranged in a regular grid with any two neighboring studs exactly 0.8 cm apart (measured center to center). However, this is true only if you are measuring the distance parallel to one of the sides of the baseplate. If you were to measure the distance between two studs that are next to each other diagonally, the distance would be slightly longer (√2 x 0.8 = 1.414 x 0.8 = 1.13 cm to be exact). Herein lies the problem—you can place bricks every which way on the baseplate as long as they are parallel to one of the sides of the baseplate. But as soon as you turn the bricks to an angle different from 0 or 90 degrees, the studs no longer line up.
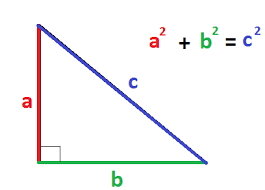
The trick to placing bricks at a different angle (with good stud connections at both ends) is making sure the triangle you form satisfies the Pythagorean Theorem. (Yes, here we go with some algebra! Don’t worry, it is pretty easy to understand.)
Most people haven’t encountered this since high school math, but it basically states that in a right-angled triangle, a2 + b2 = c2 where a and b are the adjacent sides that make up the right angle and c is the hypotenuse (or the longest side that is opposite to the right angle). The smallest Pythagorean triple (set of three numbers that satisfy the theorem) is 3, 4 and 5 (and that is because 32 + 42 = 9 + 16 = 25 which is equal to 52).
How does this Pythagorean triple (3, 4, 5) translate into LEGO? Basically, if you place your brick or plate at an angle such that it forms a triangle (3 studs long on one side and 4 studs long on the other), then the studs at the two ends of your brick or plate (but not the ones in the middle) will line up perfectly with the studs on the grid directly below it.
But wait! Does it make sense to use a 1 x 6 plate in the first picture below? Yes, when you consider the fact that the sides of our triangle actually intersect at the centers of the studs, the distance that matters is between the studs at the two ends of the 1 x 6 plate which is 5 studs. The same applies to the other two sides. However, when we use hinge plates to create our triangle, the longest side has 5 studs instead of 6 (because the sides of the triangle now intersect at the corners of our plates, not the center of the studs).

What are some other Pythagorean triples? 5, 12, 13 is the next one before we get into much bigger numbers that are not very useful. If we limit ourselves to Pythagorean triples, there are not many to pick from (especially with practical applications in LEGO builds). But if we use LEGO hinge plates to build our angled walls, the little bit of give that these have, allow us to use triples that are not Pythagorean triples (strictly speaking) but are close enough.
Most angled wall applications call for the walls to be at 45-degree angles which mean the two sides (a and b) of our triangle have to be of equal length. There are no Pythagorean triples where a and b are equal but there are many that are close enough. Consider for instance 5, 5, 7 and 7, 7, 10.
I happened to use 5, 5, 7 to create the angled corners in the base of my model of the Hearst Tower.

Pythagorean triples also work if you multiply all the numbers by 2 (or halve them). If you use 7, 7, 10 as an example of something close enough to a Pythagorean triple, then 14, 14, 20 and 3.5, 3.5, 5 should also work. But how do we create a triangle in LEGO with 3.5 studs on its side? Using jumper plates, of course!

I used angled walls extensively in my model of the Tribune Tower. Here the main tower used 5, 5, 7 for the angled corners. For the octagons in the crown, I used 7, 7, 10 (for the smaller one) and 8.5, 8.5, 12 (for the bigger one) to create the angled sides. The flying buttresses also needed to be attached at an angle (though not 45 degrees) so for that, I used another triple that was close enough—4, 7, 8.
9. There is illegal and then there is illegal…
Disclaimer: no LEGO pieces were cut, glued, or otherwise harmed in the making of my skyscraper models.
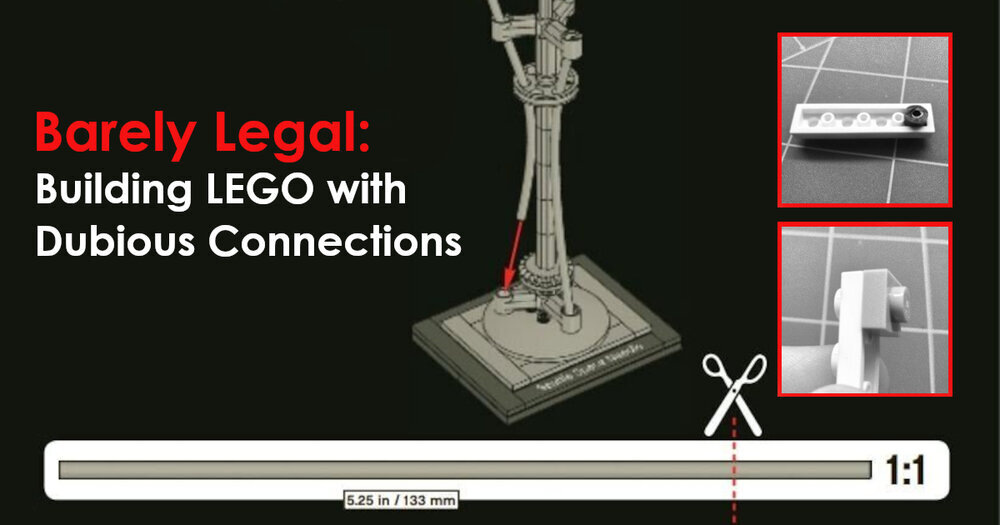
However, a few Technic bricks may have been inconvenienced and subjected to stress (in a manner that Jamie Berard likely wouldn’t approve of). You can read more about some barely legal building techniques in this other fantastic BrickNerd article.
Yes, I am talking about attaching Technic bricks with holes to studs (on the sides of regular SNOT bricks as it turns out). As I understand it, this is illegal because of the slight differences in the location of the Technic hole in comparison to the system stud. But apparently, LEGO has condoned the use of this technique when it is done for decorative purposes (which would minimize the stress on the elements—I would like to think that my usage of the technique falls into this category).
When I started working on my model of the Empire State Building, I realized that I would need tall stacks of tan 1 x 1 bricks at the corners. This would make the corners of the building very weak since the stacks of so many 1 x 1 bricks would not be anchored anywhere besides the bottom and top. There was simply no way to attach these 1 x 1 bricks to the main structure without resorting to techniques that are at least borderline illegal.
I came up with a pretty elegant solution (if I can say so myself). It involves attaching 1 x 1 bricks with studs on 2 adjacent sides to 1 x 1 Technic bricks with holes. This essentially creates a 2 x 2 corner brick that combines two different colors (in this case I am using Dark Bluish Gray for the window accents). Using this “corner” brick I can attach 1 x 1 x 5 or 1 x 1 x 3 bricks in the corners.

I also attached Technic bricks with holes to plates to create the roof panels in my model of 40 Wall Street. This allowed me to attach the panels (each made up of two halves that have studs facing opposite directions) to the base.
10. Keeping it real... or digital?
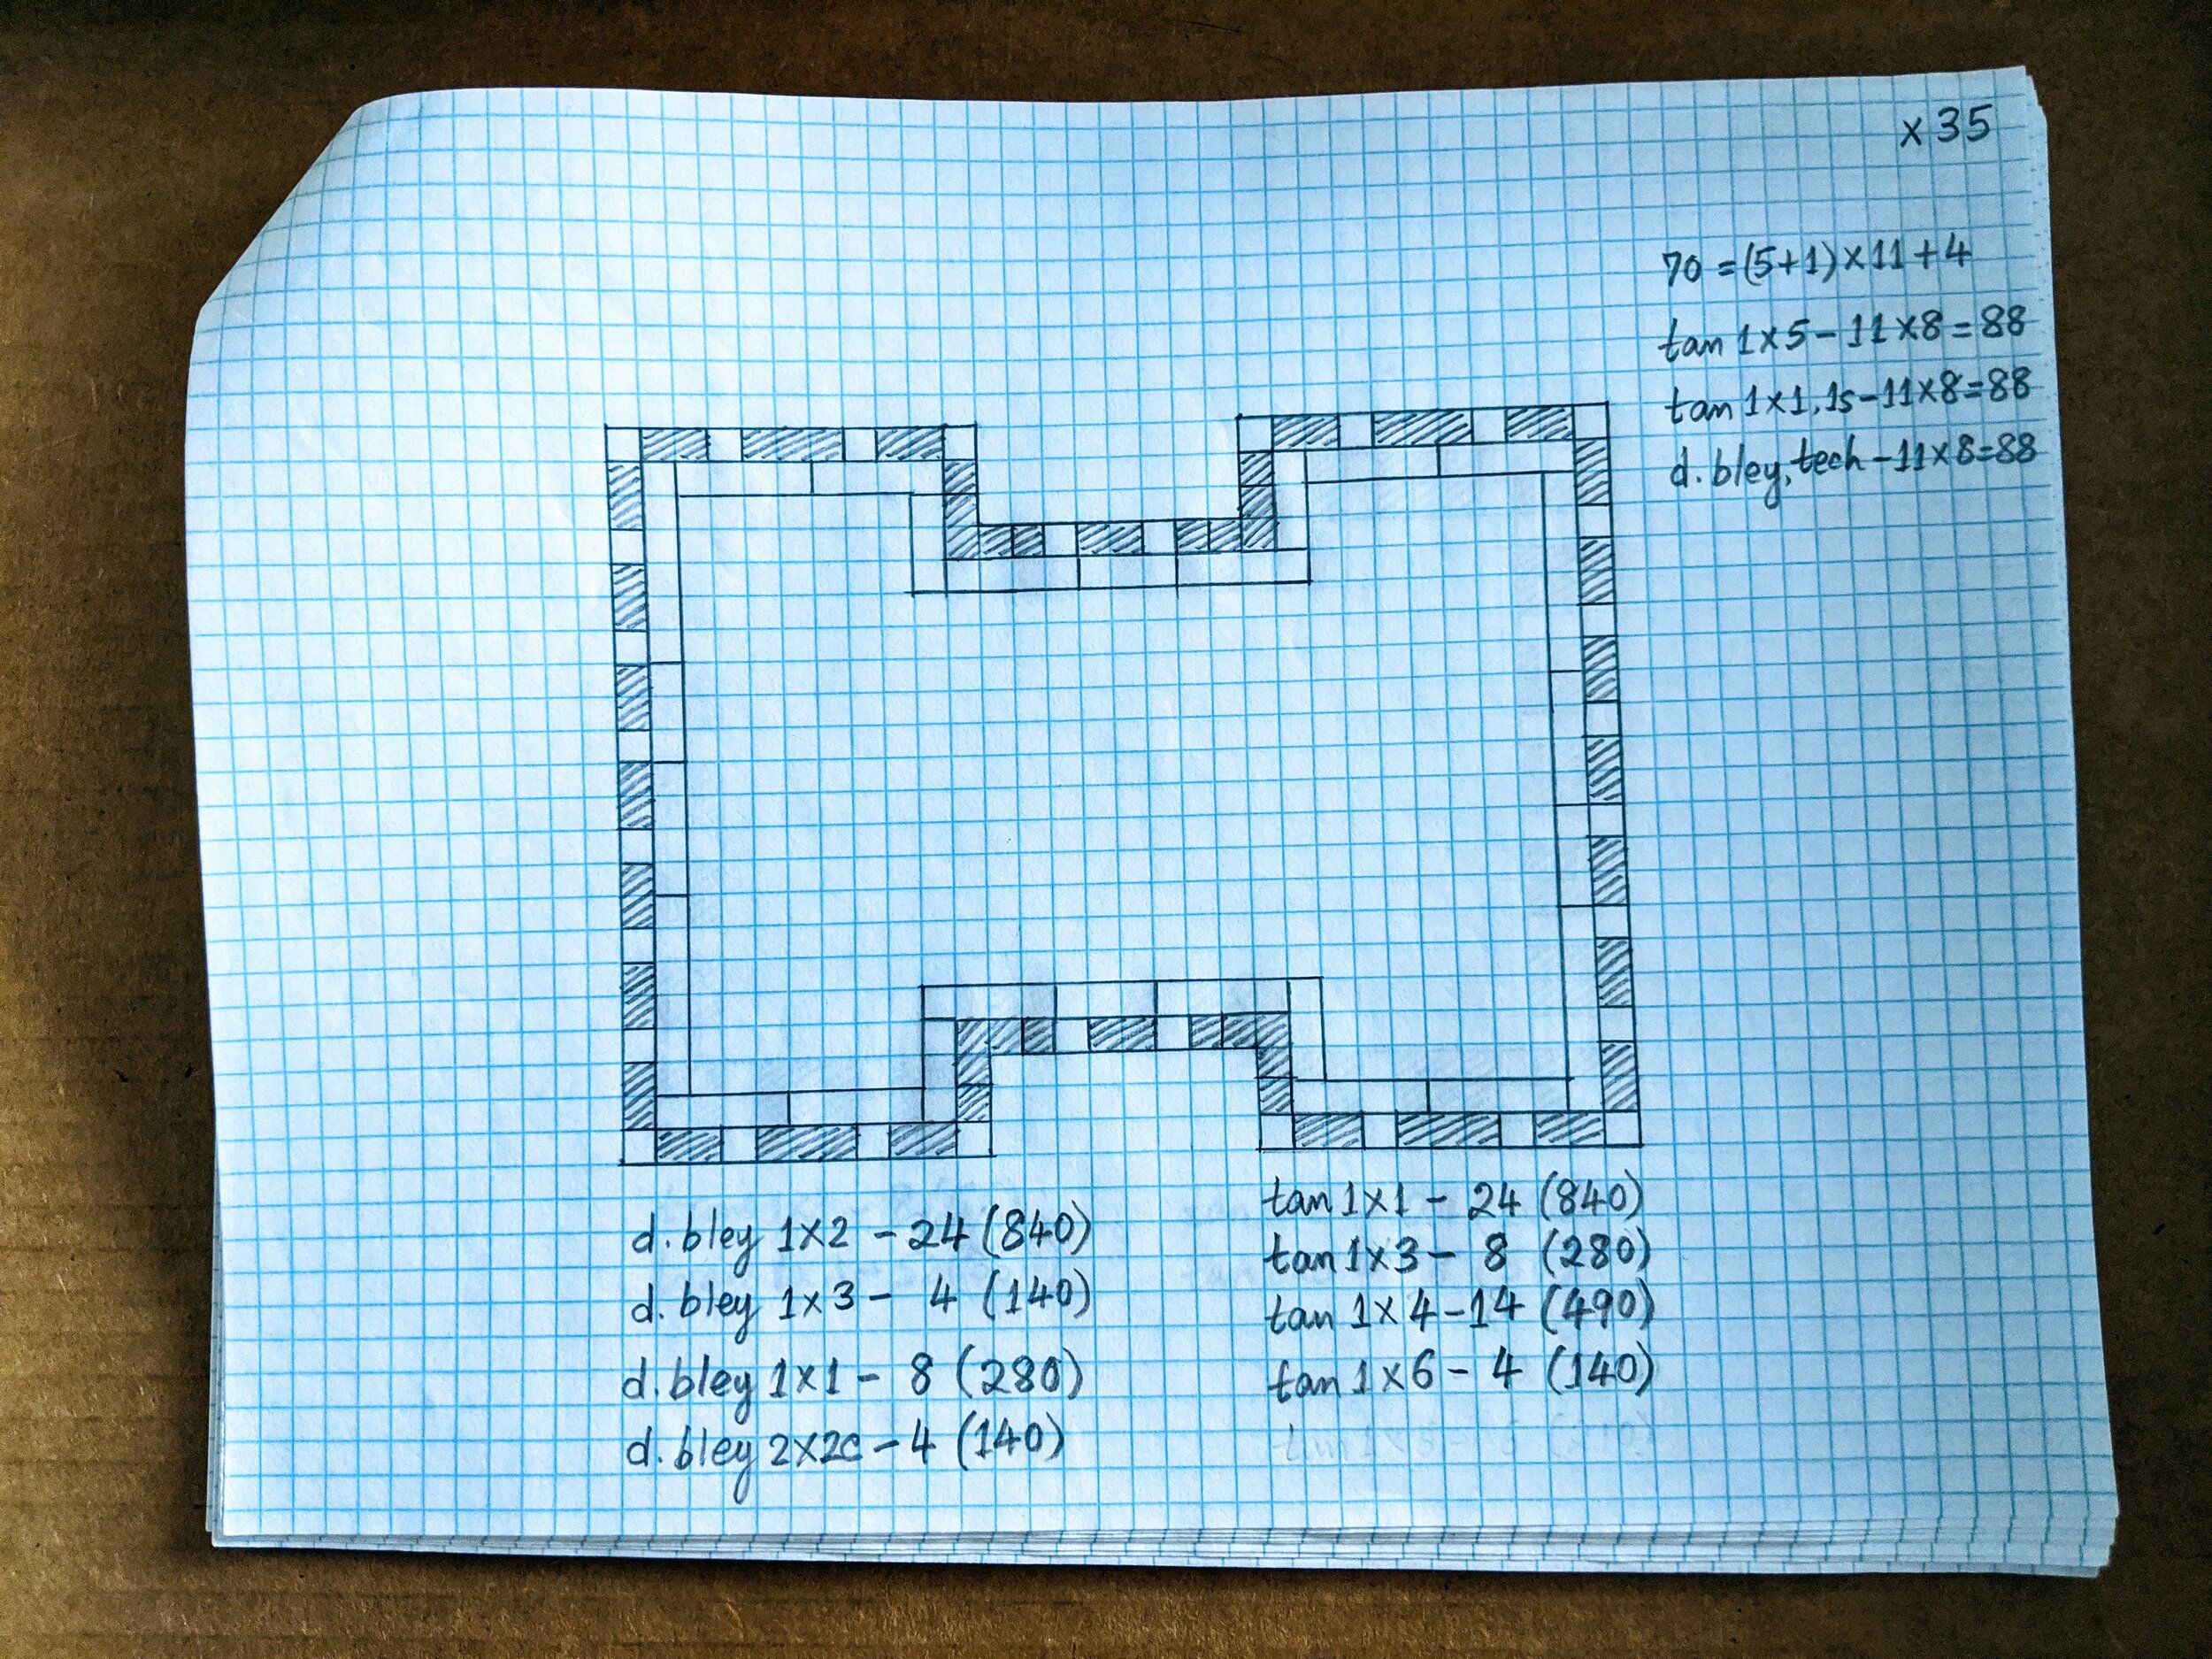
When I started designing LEGO skyscrapers I used the old-school approach of sketching everything out on graph paper (with each square on the grid representing a stud). This was pretty tedious for some of the more complex models like the model of 70 Pine Street that I did. This building has over 20 distinct sections, and I drew sketches showing the odd and even brick layers that made up a single floor for each of these sections (as you can imagine I had quite a thick stack of drawings when I was done!).
My day job involves using a computer all day and doing these sketches was an oddly relaxing (at least for me) diversion that did not involve using an electronic device. I used this approach on all the five real skyscraper models that I built.

But the thing about these large skyscraper models (the tallest ending up more than six feet tall) is that they don’t exactly come cheap. And of course, they take up space. I soon realized that I did not have the wherewithal to keep building more of these models or the space to display or store them. The only way to continue scratching my LEGO skyscraper itch was to start building digitally using BrickLink’s Studio program.
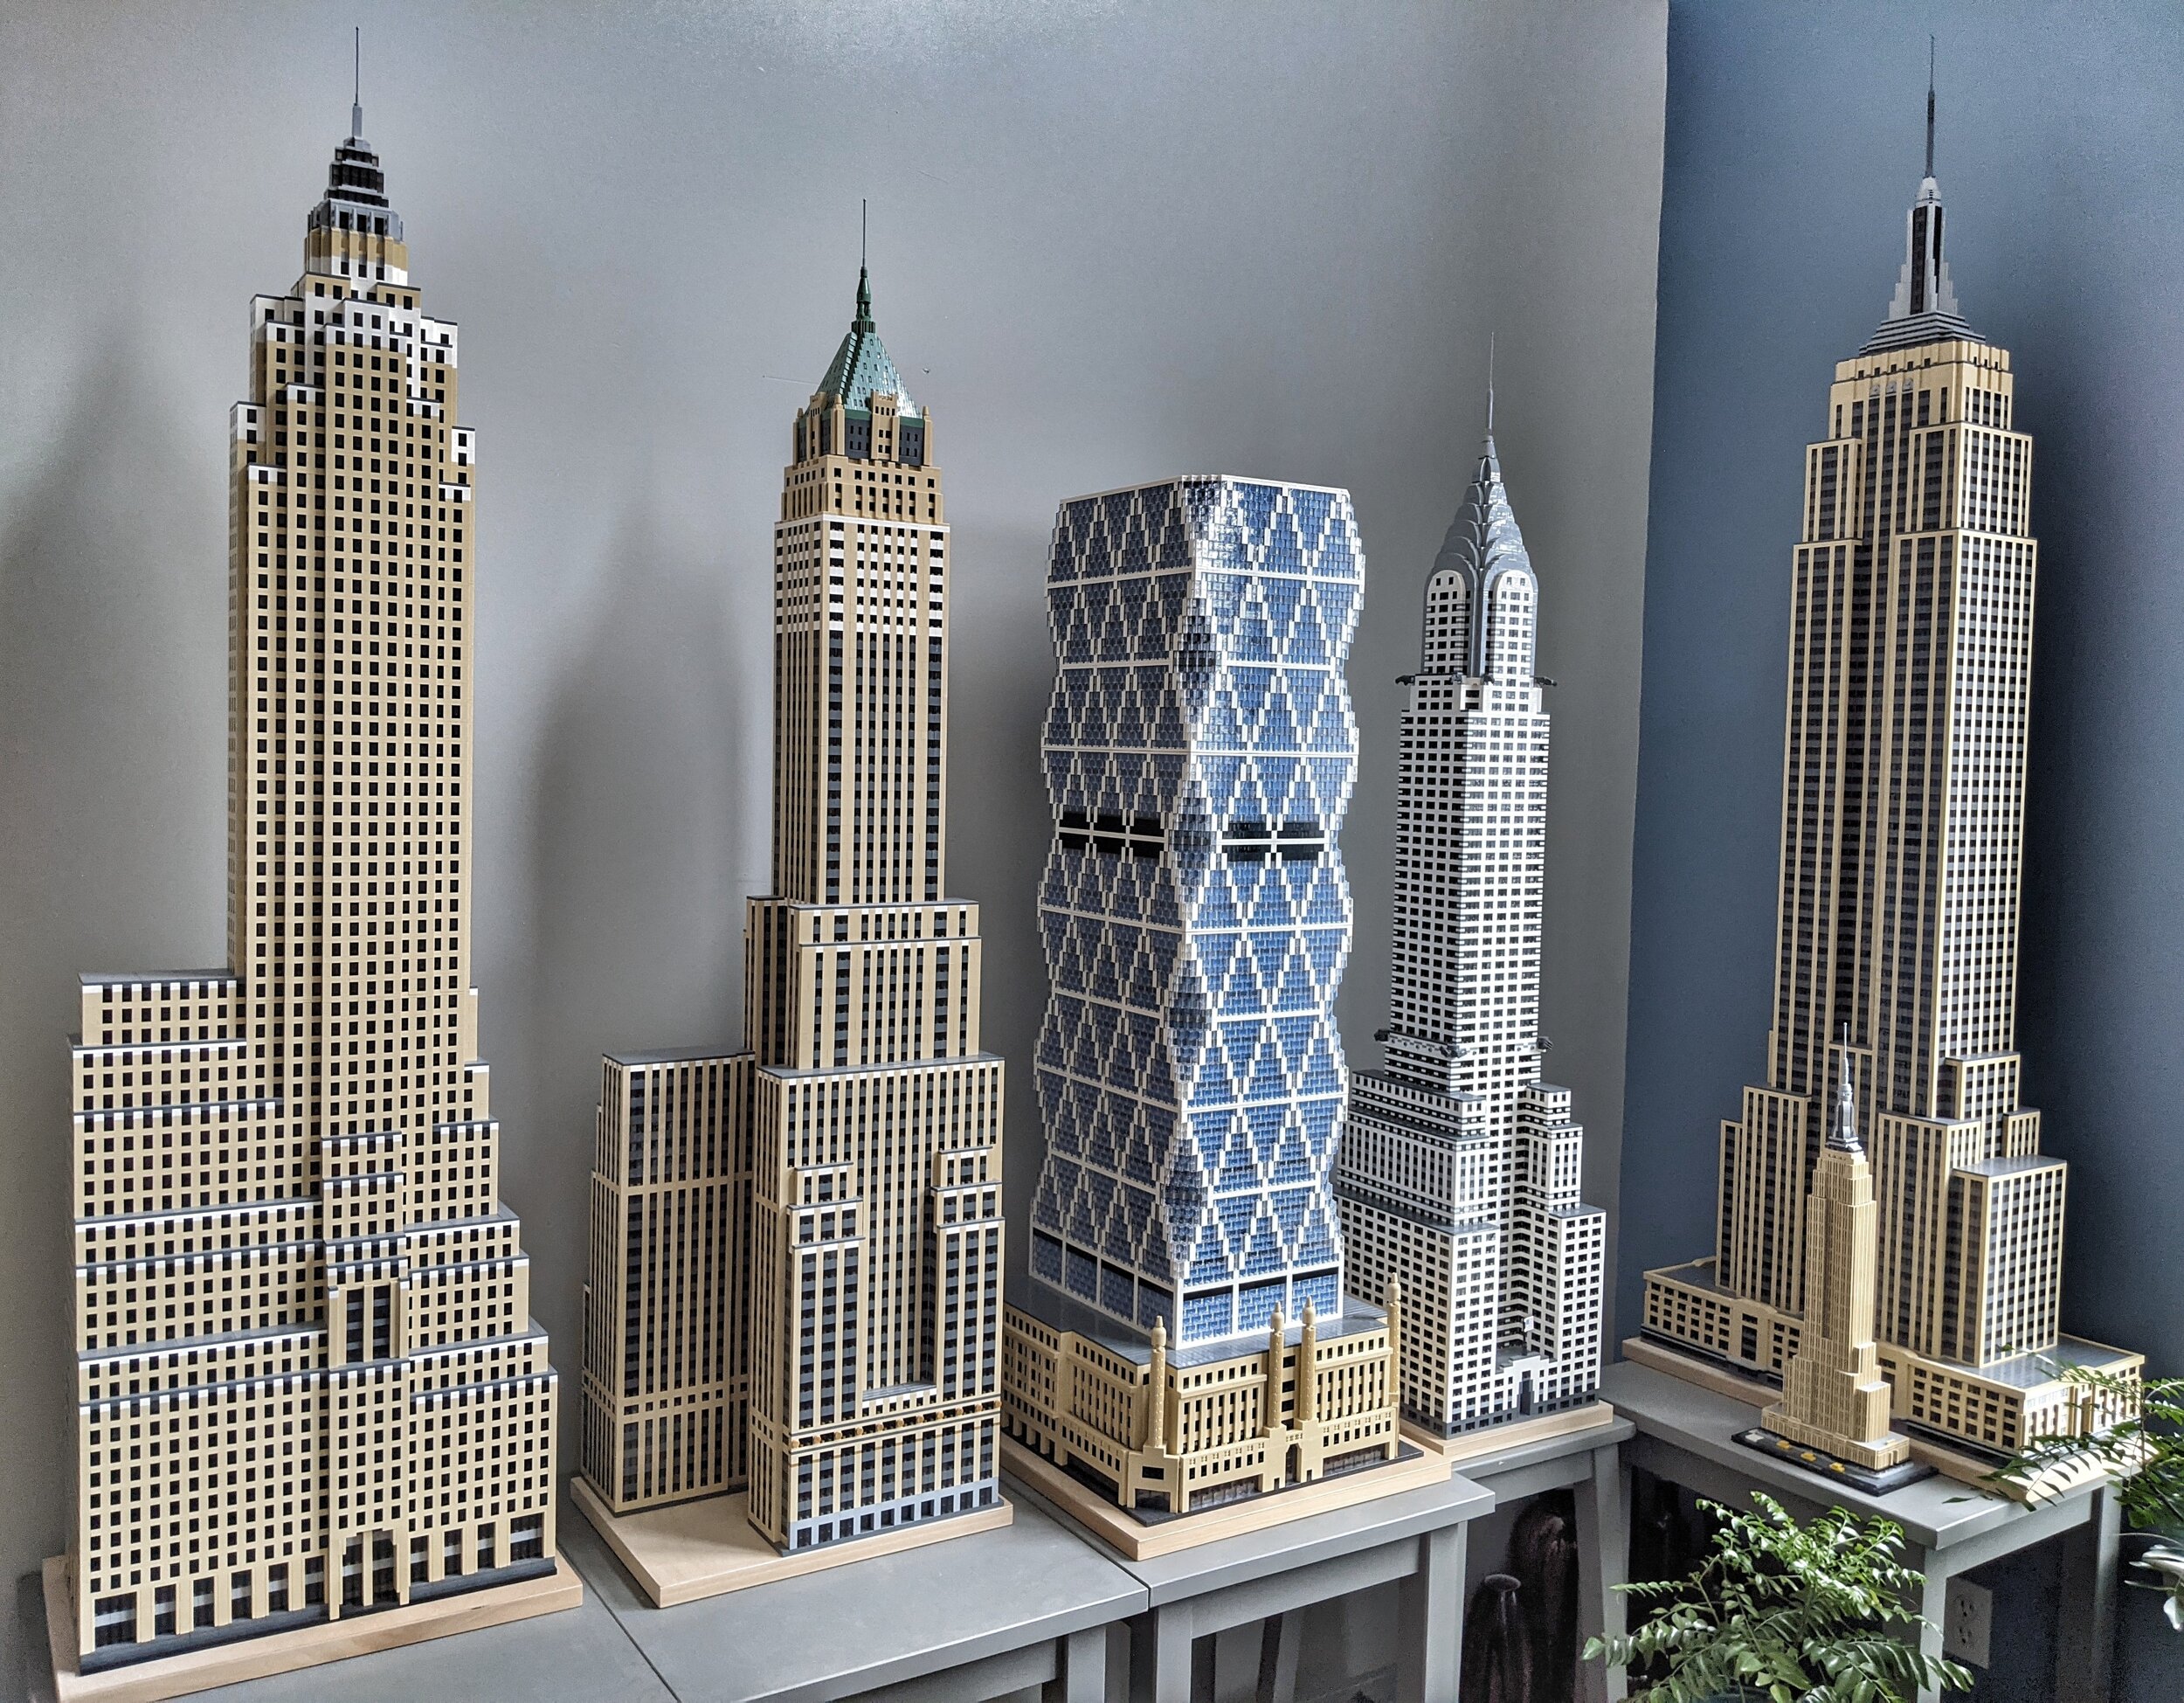
The software itself turned out to be easy to learn and very intuitive to use. It did not take me long to not only port all my real models into the digital realm but also to continue expanding my portfolio of skyscraper models… digitally. The built-in rendering options also assist in creating great visualizations and pictures of each building and section, as you have seen throughout these two articles.

Now that I have built LEGO models digitally as well as using real pieces, you may ask which I prefer more? Well, I love the fact that digital models don’t cost me anything, and the renders I can create are super-realistic without the hassles of lighting and photographing a real model. The build process is a lot less tedious too. I can create a submodel for a single floor and just replicate it as many times as I want with a few clicks (no such shortcuts are available with physical models, of course). However, when I am done building this great digital model, all I have to show for it is a render—not something I can proudly display in my living room or at a LEGO convention.

Also gone is the wonderful process of using my hands to sort pieces and watching my model slowly take shape as I put it together one brick at a time. But that is not to say that I can’t have my cake and eat it too. I can design and build a model digitally and then convert it to a physical one anytime that I want. (This would be my preferred approach going forward even for models that I intend to build for real—I just can’t get over the convenience of being able to build something in Studio and upload the parts list directly to BrickLink!)
Topping it off
I hope this article can provide the nudge you need to try building your own LEGO model of a real building (skyscraper or otherwise). And once you dive headlong into it as I did, you will find that there are a ton of resources out there (especially the super-friendly online AFOL community) that can help get you up to speed. It won’t take long for you to start seeing the world around you in terms of LEGO bricks.
In fact, it may become second nature for you to see a building and immediately start thinking about how you would represent it as a LEGO model. You may even find yourself thinking about specific building techniques that you want to use in your model, saying to yourself “Aha! I bet I can do that using SNOT!” (Just try not to say that too loudly or you may get some weird stares from the people around you.) Happy building!
Best of BrickNerd - Article originally published April 27, 2021.
What building would you want to see a LEGO version of? Leave your thoughts in the comments below.
Do you want to help BrickNerd continue publishing articles like this one? Become a top patron like Paige Mueller, Rob Klingberg from Brickstuff, John & Joshua Hanlon from Beyond the Brick, Megan Lum, Andy Price, Lukas Kurth from StoneWars, Wayne Tyler, Dan Church, and Roxanne Baxter to show your support, get early access, exclusive swag and more.