
Chibi Style, Part 2: Techniques to Build Cute
/
Katsushika Hokusai - by Mike Dung
Welcome back to our series on chibi figure building! Yesterday in Part 1, we provided an introduction to chibi building and got to know a bit more about prolific chibi builders Javier Soravilla and Mike Dung. In Part 2, we will continue our discussion with them both about how it all got started, the evolution of their chibi style, and the building techniques that you can apply to creating chibi figures of your own!
Continued Interview with Javier Soravilla and Mike Dung

Japan Brickfest 2019: Mike is second from left, and Javier is at bottom right.
Inspirations
Ted: We ended “Part 1” by talking about some of the builders who inspire you. When planning out what to build, if you see that one of those builders in the “chibi gang” has already built the character you want to make, what do you do?
Do you decide to build your own anyway?
Ask the builder for the instructions?…
Or maybe just decide to build a different character altogether, if you don't think you can improve upon it?
Javier: Seeing that someone else had built the character would rarely stop me from building them too, unless the build already matches the vision I had for the character. And, in that case, I would try to reverse-engineer it and improve upon it. I enjoy creating, but I also enjoy collecting MOCs, so I would not feel bad about copying it. Fortunately (or sadly), the chibi community is relatively small, so such coincidences happen quite rarely.
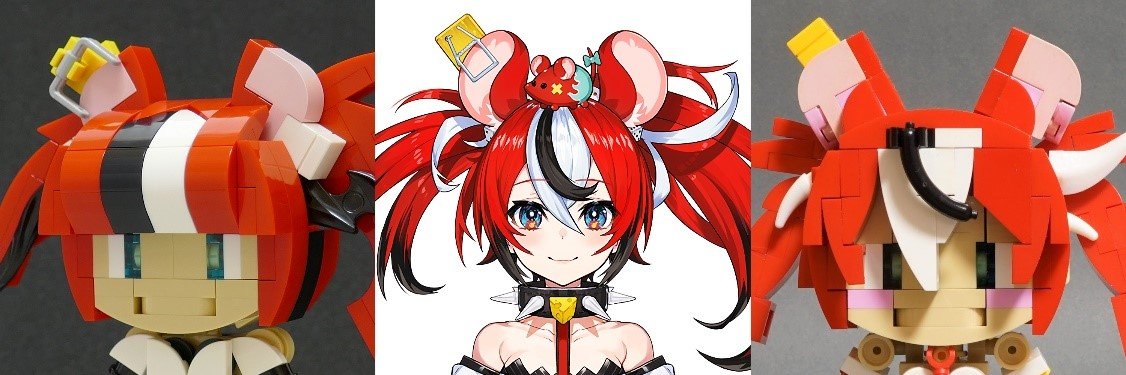
But there are always exceptions, and a remarkably interesting example is the HoloEN Virtual YouTubers (pictures below). I built this gang in collab with Mike, constantly exchanging ideas, techniques, and work-in-progress shots. It was a fulfilling and unique experience, and I sharpened my skills in this joint endeavor. And despite so much exchange of ideas and simultaneous building, the outcome from both of us resulted in radically different chibis! In the end, a testament that every builder is very particular about their building tastes.
(Mike’s up-top / Javier’s on-bottom)
Ted: Well-put. As I mentioned in the intro of “Part 1”, I unwittingly built the same characters that Mike had already done; Chisato and Takina from the anime “Lycoris Recoil”. I had even done a search on Flickr to see if either of you had built the LycoReco girls already, but it turned out that Mike just hadn’t posted them on Flickr yet. If I had known Mike had already built them, I would have likely chosen to build different characters… but like your collab, we resulted in different chibis anyway, and it shows that everyone brings a unique perspective to building the same characters (Ted on Left/Top; Mike on Right/Bottom).


Mike: I am glad that you built Chisato and Takina despite me having built them already. I build chibi because I like the characters, so seeing that someone else has built the character already would not affect me. I would like to build my own anyway. I believe that every chibi built of a character ends up being its own unique version… and of course, I could also learn some skills from other’s MOCs of them!
Chibi Building Techniques
Ted: As I mentioned earlier, Javier, I used your recently shared instructions for how to build “Rebecca” as the starting point for my chibi builds. I thought that that body frame using the 1x1 round plates with bar to connect arms/legs was an innovative approach. Is that something that you had come up with, or had you seen it used elsewhere?
Javier: [Thinks hard…] The use of 1x1 round plates with bar as limb connector is relatively old, used for the first time in Black Rock Shooter-chan as body-leg connector back in 2018:

However, you are keen in one aspect: Rebecca is the very first one to use this technique as “fake connector”. That is, the shoulder does not really connect the arm to the body. Nice examples of “fake connectors” are the ones used by Ollie and Lucy. The 1x1 round plate with bar is especially useful for this purpose, thanks to its ability to rotate in multiple angles.


Ted: Fascinating. That “fake” shoulder connection is one that I ended up using in all four of my recent chibi builds (most apparent are the black ones I used for the arms of my Drossel figure). It is a great refinement to the figure frame, as in enables quite a few different arm poses.
Mike, what was your first build that used your now ubiquitous head/face standard? Is it this one named Meido shown below? If not, then what was your first build to use it?
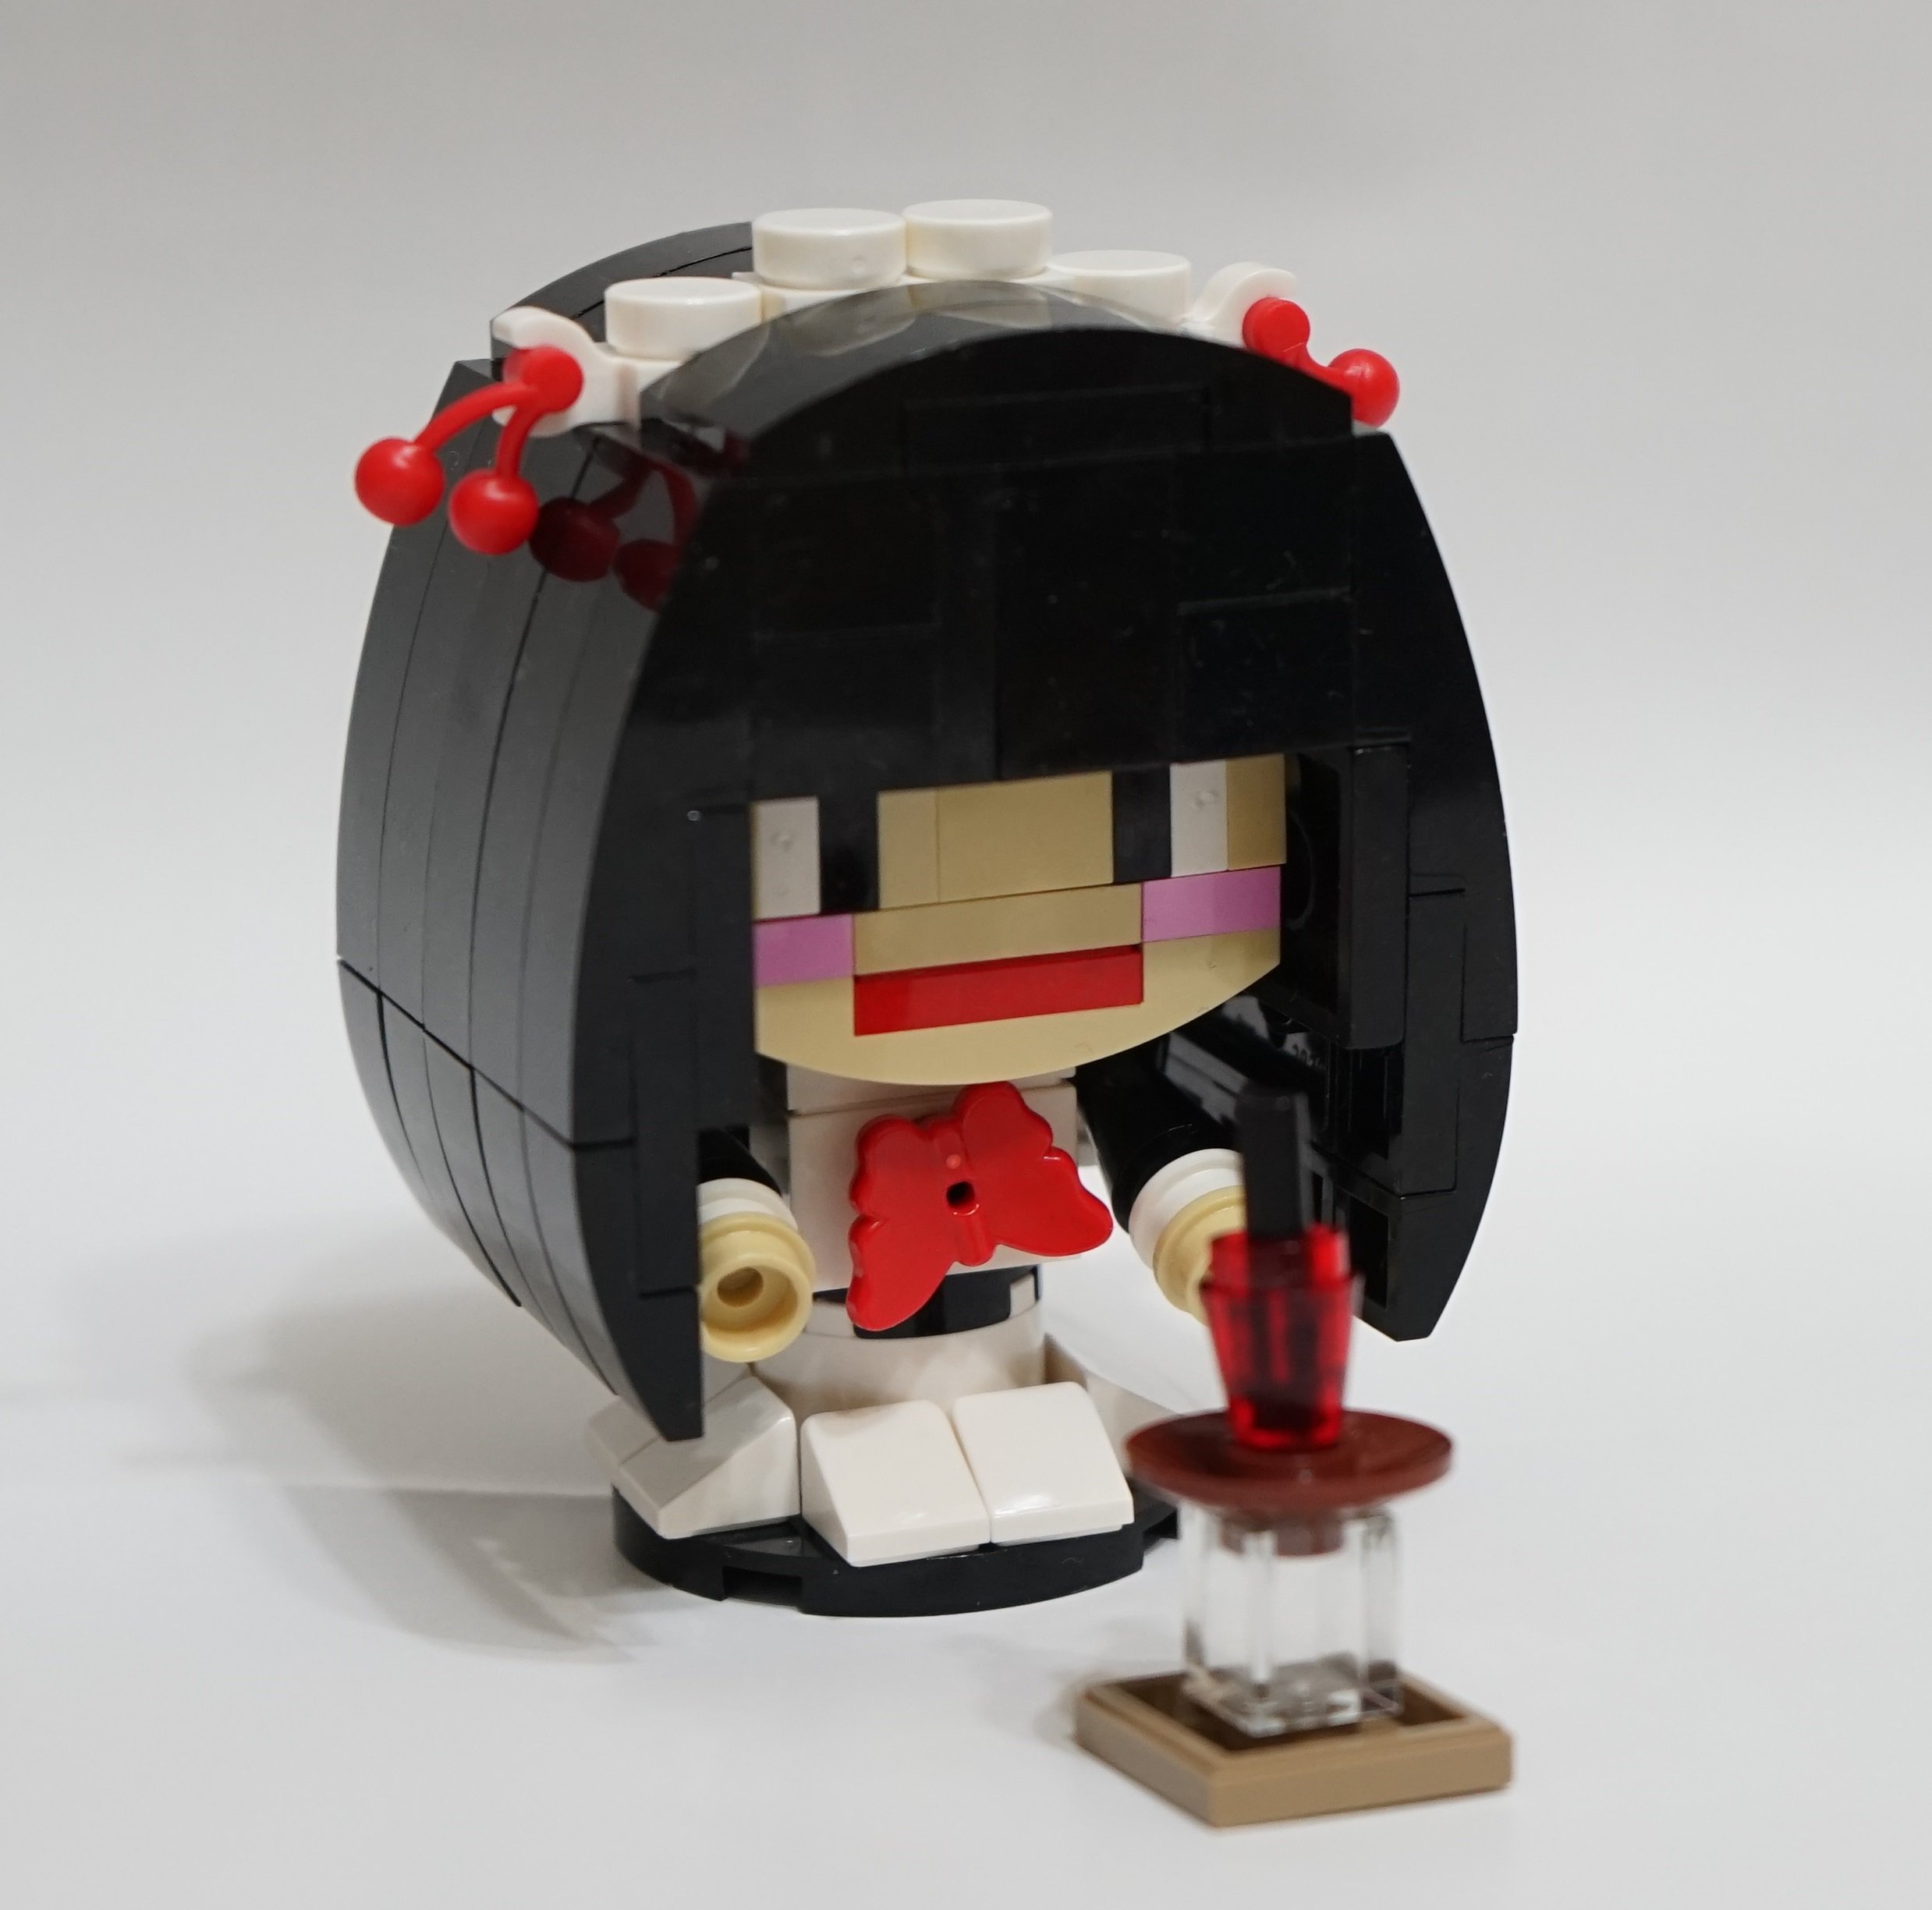
“Cute builds come in small packages.”
Mike: Yes, the photo is the first work using the face standard. At that time I was playing a mobile game named CQ, I was inspired by that game when I tried to build the figure.
Ted: I feel like with the advent of newer LEGO parts, your head/face standard has become even more versatile. Would you agree? I see that you have also done a remake of the RWBY figures that still use the same face structure (and even made them a bit taller in Javier’s style), so I am thinking the answer is yes.
Mike: Totally agree. With newer LEGO parts, there are lots of new building methods to compose a chibi’s face. Especially those parts that have more than one connection point, so there are even more options to connect other parts!

Comparison of Mike’s Remake vs Original
Ted: I have definitely seen that in some of Javier’s recent builds as well. Javier, what other changes have you made to the chibi figure standard Mike established to make it your own?
Javier: [Thinks even harder…] Hard to say. In the end, the only real standard to the chibi figures is the face configuration, but if I had to pinpoint some key differences:
LARGER BODIES: If you look at my first Mike's style Chibi, back in 2015, it is easy to notice that they have been observing a gradual “height creep”… and as you noticed, nowadays, they are notorious for being quite tall in comparison. Classic Mike’s chibi proportion is a 1:1 head-to-body ratio, while mine tends to use a larger one, around 1:1.8 ratio. Larger bodies allow for extra detail but at the expense of “chibiness”, which is a crucial cuteness factor

“If you can’t do it better, do it bigger!”
If you are familiar with GoodSmile’s popular brand of figurines, Mike would be building Nendoroids, and I would be building Nendoroid dolls:

“Two (and a half?) Mikus always better than one.” - (©Kahotan’s Blog)
POWER STANCE: Many of my chibis are standing in a characteristic “A-pose” power stance. I could write a complete essay about why I favor such a design choice but, in a nutshell, it is useful for body alignment and, well, I just like it X-D. If I am being honest, I feel that I fall back on that stance a lot and perhaps it is a little uninspired at this stage. Mike rarely uses the A-pose himself (mostly because of size restriction), and tends to use much more dynamic stances, like walking, jumping, or even flying!

Jinx, say “A”
STREAMLINED OVER FIDELITY: It is a little hard to explain, but I give a lot of importance to a clean, streamlined design. That is, I try to minimize bumps, protrusion, gaps, and grooves that break the “flowing” of lines, especially in the hair. For this reason, I am not afraid of altering relevant features from the character design in order to achieve this streamlining. As long as the character remains recognizable, I am good to go.
The picture below is a nice case study of “Streamline vs. Fidelity”, illustrated by the hair fringe design of Baelz Hakos, an English Virtual YouTuber. Mike’s design (right) closely follows Bae’s source design, faithfully matching the overall shape and characteristic black hairstreak (leaning towards the “fidelity” side of capturing all the details). However, this is done at the cost of a protruding clip connection that I feel disrupts hair flow. My design (left) is a more “streamlined” approach, but it gives Bae solid bangs and completely ignores her fringe haircut.
Regardless of what approach and style you prefer, it is not hard to see that chibi design relies heavily in compromises and sacrifices. It is impossible to keep all source detail within four studs, so you’ll have to find your own equilibrium between fidelity, shape and constructability.

An unforgivable sin?
PURIST: I build my chibis purist. Many times I have noticed Mike does not. (I am not really upset by this, but his tainted soul shall burn in the fiery flames of Hell…) That said, I do not shy away from customization, especially when talking about minifigs… so I guess even I have exceptions to this rule.
Mike: (no comment)
Ted: Oh boy. I think Mike-sensei is about to assign you to cleaning duty from here to eternity after that comment, Javier. You may have to find yourself a new sensei. Speaking of teachers, who was it that established the larger 6-wide chibi head standard? Was that Moko?
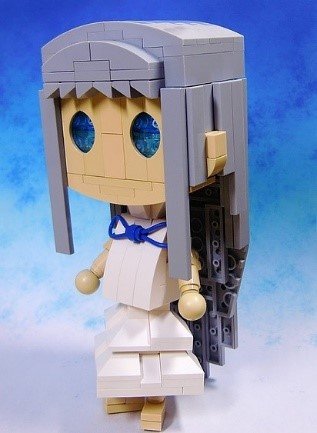
Mike: Yes, the chibi head standard is from Moko! He released his “girl” chibi around 2014, and it became popular very quickly [as per Javier, it managed to faithfully reproduce “anime eyes” while keeping an excellent facial aspect ratio]. Around that time some other people had started to build Moko-style chibis, and I also wanted to build one! In fact, I built a Hatsune Miku of Moko chibi style before. but I did not upload it to any social media since it was just to practice and learn skills from Moko.

Javier: As a curiosity, the ancestors of this style were the 8-studder (2011) and the 6-studder (2012). I respectively refer to them as the great-grandmother and grandmother of all the LEGO chibis. I believe that the 8-studder never got popular, as I can’t recall any builder using this frame apart from Moko. Despite their primitive look, do not be fooled. They were state-of-the-art LEGO techniques at the time they were built.
Javier: The 6-studder on the right enjoyed more popularity due to its more modern style, although nowadays it is mostly abandoned, at least on Flickr. I personally appreciate this style, as it hooked me to chibi building and my early chibis exclusively used this frame. Builder RPHNet continues to use it and, while I do not, I keep all these old chibis, refurbishing them with better techniques as time passes.

As yet another curiosity, Moko also explored an interesting, gigantic 12-stud chibi frame but, as far as I know, it never got past concept study:
Final Words
Ted: What final advice do you have for people looking to start building chibi figures?
Mike: My advice is that I always start with the HEAD using the face standard, and then consider hairstyle and critical decoration on hair (like ribbon, hat or other things). My concept of building chibi is to represent as many of the character’s features as possible, so I always focus on how to reproduce the hairstyle, significant decorations, the character’s costume, their equipment or weapons. Sometimes you need some imagination to use color blocks (tile or plate) to represent complicated parts. For example, if a character wears a red tie with some white patterns, I will choose a red clip bar or plate to present the tie part. Sometimes using special parts would help to present a better curve or decoration, I could use a minifig beard as a fur coat… But the most important thing is to make your chibi figure as cute as possible!
Ted: Great advice! Can never go wrong with too much cuteness. How about you, Javier?
Javier: Learn from copying! Do not shy away from taking inspiration from others. Replicate your favorite characters and try to add your own distinctive touch. As you gain experience, you will start defining your own style and, ultimately, become a full-fledged chibi builder!

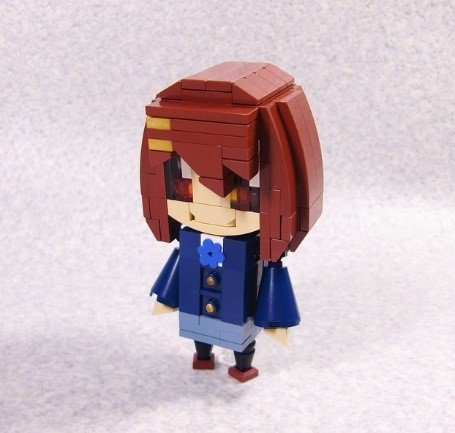
Javier’s first ever Chibi (left) was a literal copy of Moko’s Saber (right)
Ted: That sounds very familiar 😉. I’m still overdue on making copies of some of the figures that you have shared instructions and breakdown photos for, but they have certainly inspired the four that I have built already. So what projects are you both currently working on, or plan to build next?
Javier: Nothing really. I tend to build on impulse. However, I admit that I would love to build some cool mecha or SHIP, but the muses just do not want to cooperate with me. / In terms of chibi building, I have been thinking about building one of Adam Smasher, the boogieman cyborg from Cyberpunk: Edgerunners, and one of the most hated guys in anime history. You may know why. X-D
Ted: Woah there… Even if I did, as Simon would say, SPOILER ALERT! How about you, Mike?
Mike: At this moment I am revamping my old works. The head-to-body ratio is approximately 1:1 in my old works. When I was building Hololive characters, I extended the ratio to 1:1.5. That means I make more differences between each chibi figure. Of course if I watch some new anime and I find out that I like the characters, I would build them first when the inspiration strikes.
Ted: Well, obviously Javier thinks revamping your Puella Magika Madoka girls should be taking first priority, but I will let you negotiate that amongst yourselves ;). Oh, wait. It looks like you already did. Javier’s keen eye has found them in your chibi collection photos back in Part 1.

OrigiNal

Revamped
Ted: As we close, is there anything else either of you would like to share with BrickNerd readers?
Javier: BrickNerd-tan, where? :-)
Ted: Why, the annual Nerdvember contests of course! … And Mike?
Mike: Simply “Thank You!” again for featuring us both on BrickNerd! I hope we have inspired others to try building anime-inspired LEGO figures!
Ted: Thanks again to both of you for your time and for sharing all your knowledge!
End of Part 2

“Happy New Year!” - by Mike Dung
And thus concludes our deep-dive into the world of brick-built chibi figures. I hope you all enjoyed learning more about this “kawaii corner” of the AFOL building community as much as I did writing about it.
If you have ever considered building brick-built figures of your own and didn’t know where to start, I encourage you to go out to Javier’s Flickr page as he has some wonderful breakdown photos to get you started (in the comments, Pascal has also shared a link to the instructions for Mike’s chibi Miku)… and as I am sure Javier would say, there’s always room for one more in the “chibi gang” 😉.
Best of BrickNerd - Article originally published December 14, 2022.
What characters would you like to see made into chibi versions? Let us know in the comments below.
Do you want to help BrickNerd continue publishing articles like this one? Become a top patron like Charlie Stephens, Marc & Liz Puleo, Paige Mueller, Rob Klingberg from Brickstuff, John & Joshua Hanlon from Beyond the Brick, Megan Lum, Andy Price, John A. and Lukas Kurth from StoneWars to show your support, get early access, exclusive swag and more.


