
Illegal SNOT: Stressful Techniques For Sideways Building
/SNOT Week continues as we evade the LEGO police and analyze some illegal building techniques to achieve sideways building.
Illegal SNOT
In my quest for SNOT building techniques, I have come across some ways of building that might be considered somewhat controversial. You might have heard of so-called “illegal LEGO techniques” that cause stress on elements. Well, in this article I will highlight illegal techniques that have the best potential when it comes to SNOT. Don’t worry… we won’t be breaking any laws here (but we might break some LEGO elements!).

This is the sixth article in our LEGO SNOT series. I suggest reading the previous articles about SNOT (Studs Not on Top) and sideways building first to get the most out of this article.

So let’s take a look at some illegal techniques with the SNOT-iest potential…
What Are Illegal Techniques?
The term “illegal” was first used by LEGO designer Jamie Berard in a presentation about LEGO building techniques in 2006. The presentation was actually about the limitations of the LEGO elements and how The LEGO Group has implemented standards, or guidelines if you will, for how elements can be used by employees when designing sets. We LEGO nerds highly valued this information because it gave us insight into the official design process. The community has since adopted the term “illegal” when we mean that we can use LEGO elements in ways they may not have been designed for. In most of these cases, it causes stress on the elements which can lead to permanent deformation or broken parts.
However, Jamie has recently said that the term “illegal” was never meant to be official, and it has become outdated. It should probably be called “non-standard” or something similar instead. I think it’s hard to change it now, though. It has become too well established, and “illegal” is much more fun to say than “non-standard.” Because of this I will still keep calling these "non-standard” techniques “illegal“ at least in this article. 😊
Examples of Illegal Techniques
LEGO elements are designed to handle stress from certain directions and for a specific time period. In both these cases, the elements aren’t allowed to return to their original state, like the clip and pin illustrated below. This might cause them to break or at least be permanently deformed.

Illegal techniques can be very useful for SNOT applications, though… and we who build for fun are not under supervision like professional LEGO designers. So buckle up while we explore the dark underworld of LEGO building.
Illegal SNOT: Clips
A clip can hold any element with 1 plate thickness. As long as the clip can return to its initial state, everything is fine. If the clip is forced into an expanded state, however, it is used in a way it wasn’t designed for.

Above is a classic example of how a clip can be used/abused. It is also a great example of where new versions of elements can make previously illegal techniques legal. The tile in the clip on the left is actually considered legal nowadays because the new clip design has more flex.
There is a slightly more tricky way of using the clip though:

The wall on a LEGO brick is approximately ½ plate thick. (Check out our LDU article.) Therefore, the walls of two bricks will give you around a 1-plate thickness. This can be used in some tricky SNOT situations.
Why is it illegal? The clip is not allowed to flex back into its initial state. This might cause permanent deformation over time.
Below is an intricate example of how you can use this SNOT technique. This is from a MOC built by Barthezz Brick.

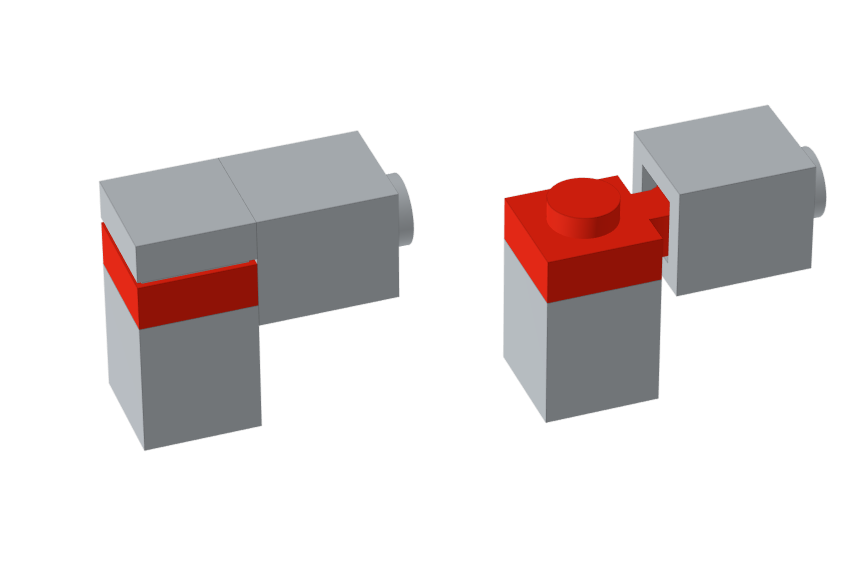
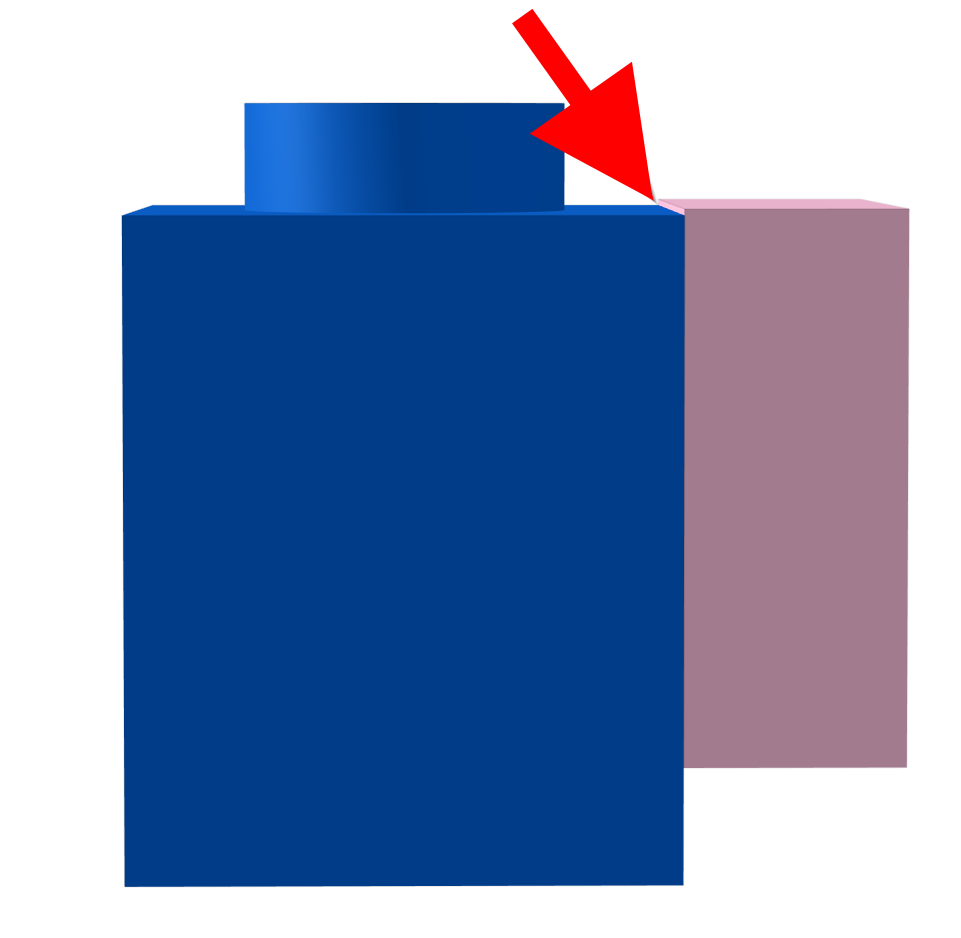
Illegal SNOT: Between Studs

The space between two studs is one plate wide which makes it possible to attach elements. As you can see in the two examples in the middle above, it also works with two panels because the wall of a panel is ½ plate wide. But as with all things, the illegality depends…
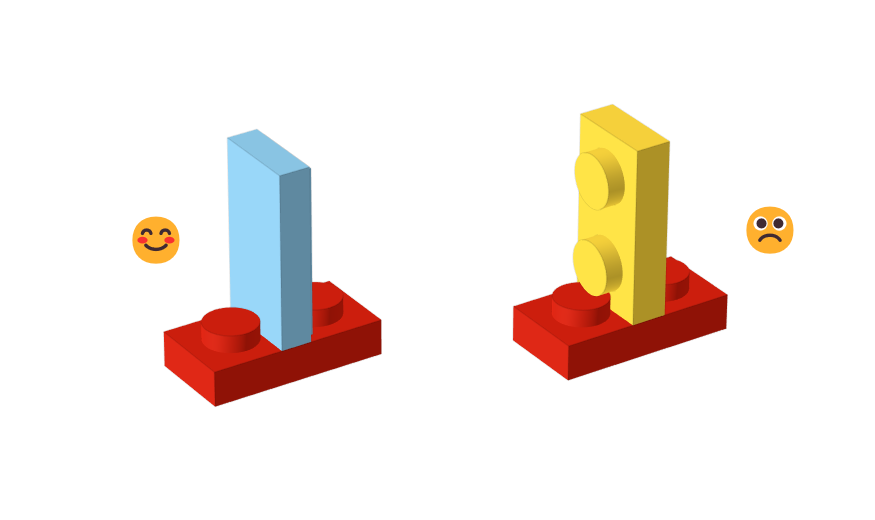
Attaching tiles in between studs like in the above image is not considered illegal, but other elements cause too much stress on the studs like plates and studs. The tile works because it is a tiny bit thinner than a plate, but the plate-to-plate connection can be used for some illegal SNOT.
Why is it illegal? The space between the studs is a bit smaller than the thickness of 1 plate. The studs can’t flex, which might cause them to deform and lose clutch power.
Here is a masterful puzzle built with this technique by Rylie Howerter.

Illegal SNOT: Roller Skates

The minifigure rollerskate element has some very interesting properties. It has one stud on top, a half stud on one side, and a small lip with the same width as a stud on the other end. As you can see in the images above, it gives us some great possibilities in a small space.
Why is it illegal? Probably the fact that the lip and the half stud are actually a little bit wider than a stud, causing unwanted outward stress on the elements they are attached to.
Here is an example of how Lifelitesrob used this technique.

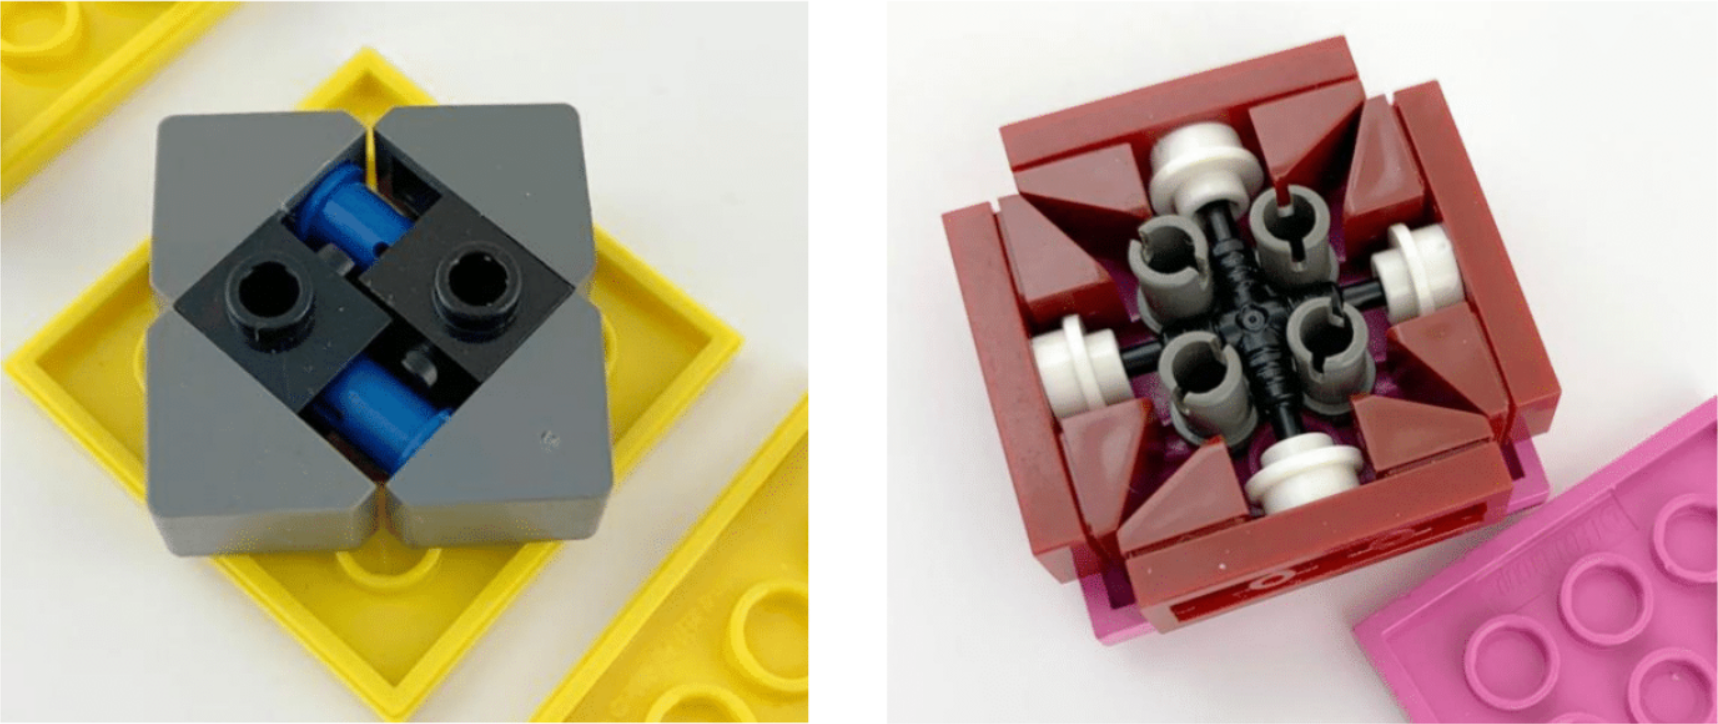
Illegal SNOT: Technic Pins
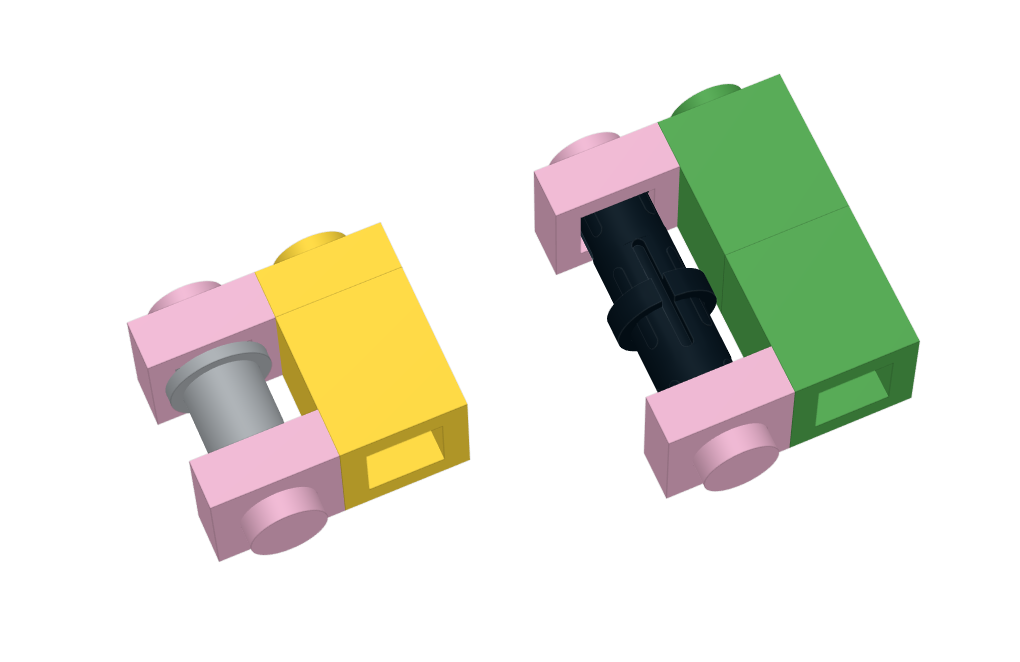
The ends of a Technic pin have the same dimensions as a LEGO stud. That makes it possible to attach other elements than just LEGO Technic to them, opening up a whole realm of SNOT possibilities because of the range of Technic pins available
Why is it illegal? The end of the pin is not allowed to flex out into its initial state. It is forced into a compressed state, eventually leading to permanent deformation.
Here, you can see some examples of how this technique can be used, again by Rylie Howerter.
Illegal SNOT: Old Clips
Sometimes when it’s time to make a new mould for an element, LEGO element designers also add small adjustments, usually for mostly unknown reasons. Maybe the old element broke too easily or was too pointy. Maybe it was slightly out of system or new manufacturing techniques had been invented. This is evident by looking at the evolution of clips over time.

The 1x1 modified plate with clip has been made in several iterations, and one of them (called 4085b on BrickLink) has a very useful property. The clip is so thin that it actually fits in a 1x1 anti-stud, like in the underside of a 1x1 brick (with a bit of force, however). This gives us some interesting SNOT capabilities at a unique interval as shown below. (I’ve been told the 4085a clip might also work, but I have not been able to test it myself.)
Why is it illegal? The clip is forced into a compressed state and cannot flex back, which can lead to permanent deformation.
Illegal SNOT: Log Brick
OK, this technique is probably not the most useful, but it is still possible! I find it so fascinating that a Technic axle fits on the underside of the log bricks, also known as palisade bricks. As far as I know, the 1x2 and the 1x4 log brick are the only elements with this property, meaning you can technically switch stud directions.

Why is it illegal? It does seem to cause a little bit of outward deformation on the log brick. Also, it is not how the element was designed to be used, meaning it has no appropriate deformation zones.
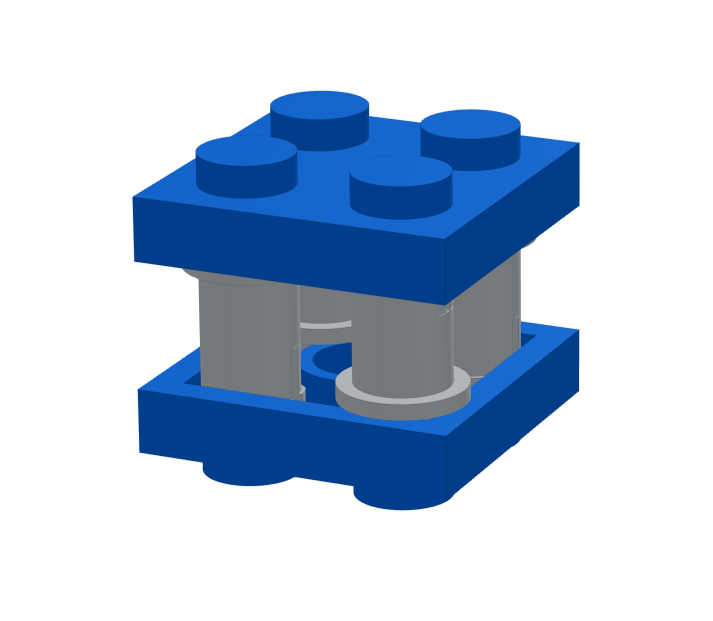
Illegal SNOT: Plate in Open Brick

The side profile of a plate has almost the same dimensions as a stud. Therefore, a plate can be forced sideways into any 1*X element ( if it does not have any internal supports). These bricks include the old 1x2 and 1x4 brick, or a 1x3x5 brick. If you can use a plate with open studs (i.e. no raised LEGO logo) the fit is even better and won’t cause as much stress.

Why is it illegal? There is an outward stress on the element walls. This can cause permanent deformation over time.
Illegal SNOT: Stud In Technic Hole
Here we go. This illegal technique of putting studs in Technic holes has a lot of history and might take some time to unpack.

The stud in Technic hole is a technique frequently used by many LEGO builders. It is perfect for SNOT applications. The current state of this technique seems to be that it is ok to attach only single studs into a Technic hole, but only for decoration and not in the main structure. It becomes an illegal technique if you add anything across the top or any additional connections.

Why is it illegal? There are several reasons. First, the Technic hole is not designed to flex. In the LEGO Technic system, it’s the Technic pins that are designed to flex and deform, not the hole. So, when you put a stud into that hole, there is no room for deformation, and there is much more clutch than a regular connection. This is acceptable for one stud decorations, but when you start to attach more studs, it becomes increasingly difficult to take the elements apart. At this point, there is even a risk of breaking the element.
The other reason is the placement of the Technic hole. We have covered the basics of this before in another SNOT article. But it’s a fascinating story, so let’s dive into it a bit more. Because the walls of the Technic hole need to be of a certain thickness, in combination with the fact that studs have protruding text on them for the LEGO logo, the designers needed to place the Technic hole 0,1 mm higher to accommodate for stud connections on the underside of the brick.

My guess is this caused a lot of cursing and hair-pulling at the engineering department in the 70s when LEGO Technic was born because it created this slight inconsistency in the overall geometry system. This design choice is still present to this day in every LEGO Technic brick, and it has some annoying consequences: A plate attached to a Technic hole like in the example above will mean the plate is 0,1 mm too high to be flush with the top of the Technic brick.
The “stud in technic hole” technique has a long history with The LEGO group, and despite its obvious drawbacks, it has still found its way into some official sets:
10222 Winter Village Post Office - 2011

In step 34 in the instructions for the Winter Village Post Office, a SNOT roof is attached with a stud into a Technic hole. This adds additional stress on the stud and can be avoided with several modern elements and techniques.
71040 Disney Castle - 2016


In steps 166-168 in the instructions for the original Disney Castle, decorations are attached on the side of the castle with the help of Technic bricks. Protruding plates are then attached on top of the connection, pushing down on the 0,1 mm protruding above the top of the brick.
21311 Voltron - 2018

In the very first step of the LEGO Ideas Voltron, a stud on the end of an axel is connected to a Technic hole. The build then continues, and this connection becomes an integral part of the structure. Any additional weight on the axel causes the “stud to Technic hole” connection to become stressed.
These three examples show us that even The LEGO Group breaks the rules every now and then… since they made the rules, they can make exceptions from time to time. That’s expected since design quality guidelines are under constant revision as time passes and both moulds and materials change.
Break The Rules
I would suspect that the majority of BrickNerd readers are not official LEGO set designers. The reality is that there are no illegal techniques for AFOLs. If an “illegal” SNOT technique works for you in your creative project, go for it! With new elements and ever-changing techniques that might cause stress on bricks, there is really no way for us LEGO nerds to keep up. Luckily, we don’t have to because we can just build whatever we want and enjoy ourselves in the process, illegal or not.
Best of BrickNerd - Article originally published September 7, 2023.
What do you think about these “illegal” connections? Do you find them useful or maybe just plain wrong? Should LEGO elements only be used for what they were designed for? Have you ever thought about the risk of breaking elements when you use them? Please let us know in the comments below.
Do you want to help BrickNerd continue publishing articles like this one? Become a top patron like Charlie Stephens, Marc & Liz Puleo, Paige Mueller, Rob Klingberg from Brickstuff, John & Joshua Hanlon from Beyond the Brick, Megan Lum, Andy Price, Lukas Kurth from StoneWars, Wayne Tyler, Monica Innis, Dan Church, and Roxanne Baxter to show your support, get early access, exclusive swag and more.


