
LEGO SNOT: Hinge Techniques and Element Design
/SNOT Week continues, even better and booger than ever, as we explore using hinges in sideways LEGO building. We’re SNOT even kidding, these techniques are a LEGO superpower!
Have you ever wondered why most of the hinges in LEGO elements aren’t vertically centered? Have you ever considered using hinges when SNOTting? If not, then this is the article for you! Let me take you down a road of element design and geometry that will hopefully gain you some SNOT insights you never knew you wished for.
Starting Off Unhinged
Hinges and clips might not be the first thing you think about when you think about SNOT, but they can be very helpful especially if you have some room to work with. I think the most useful technique is stud reversal. I often use this technique for arches when I want to build holes or openings:

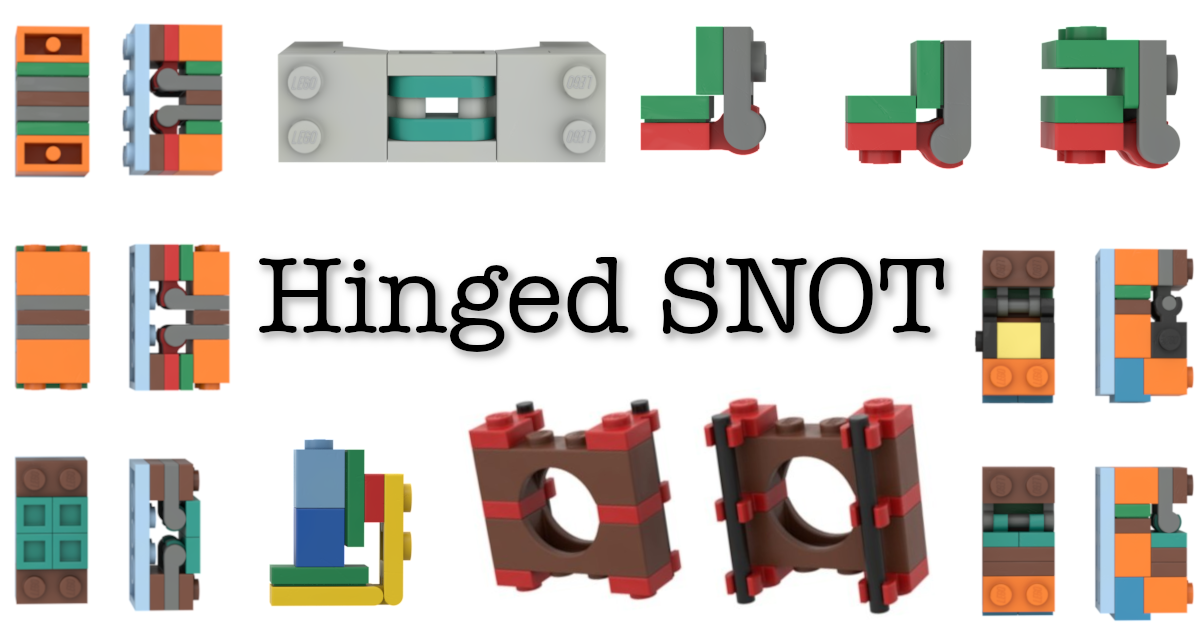
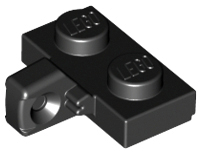
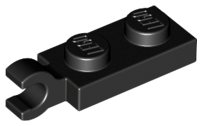
I admit I have just recently started using clips and hinges with SNOT myself, and I haven’t yet fully figured out its potential. There is some peculiar geometry to learn. One thing I have noticed is that some of the elements have the hinge part attached a little bit on the upper side of the element. Why is that? To show you what I mean I have focused on three types of elements.
Elements of Interest

The elements in the image above were introduced from 1980 to 1981 and they were probably all designed for different purposes. They were not the first hinges ever produced by The LEGO Group (TLG), but they will serve as great examples of different traits that I will highlight in this article.
As was thoroughly discussed in this great New Elementary article, the 3.18 mm bar was introduced together with the minifigure in 1978. Why? Because the minifigure needed something to hold in its hands like a shovel, broom or axe. But when the figure wasn’t holding the accessories, they needed to be stored somewhere else. Thus, the 1x1 with clip and the 1x1 plate with light attachments were introduced (the black and the white part above). In the beginning, they were mostly used to hold utensils. In the case of the 1x1 plate with light attachment, 1x1 plates (mostly in transparent colors) could be attached to them as lamps.
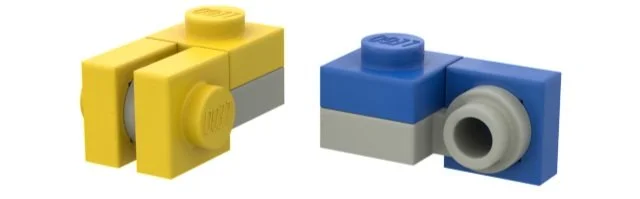
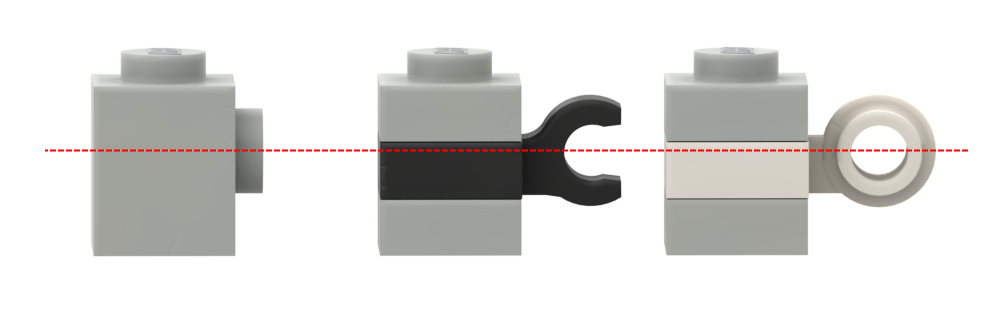
Above we can see the beauty of this part, and also that it was designed to be “in system” meaning other parts align nicely with it when it's used. Consider for a moment what would have happened if the ring on this element would have been centered horizontally. I mean, it is the most logical choice, isn’t it? I made a mockup of what that part would look like (the yellow example on the left below):


As you can see, a 1x1 plate placed on a centered ring would then have been logically centered horizontally but would have given us a quarter plate offset which is very hard to work with. The astute element designers decided to place the ring a bit higher up, presumably to keep it in system (like you can see in the blue example above).
This particular element was later sadly replaced by a similar version but with a thicker ring (4081b). I guess the thicker ring makes the element stronger but it introduces another quarter plate offset that is so hard to use. 😞

The Finger Hinge
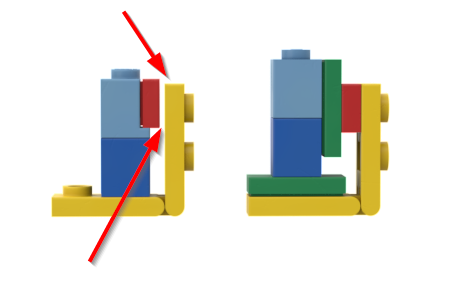
The finger hinge, on the other hand, was probably not designed by the same individual and was likely designed for another purpose. Finger hinges will serve as an example of what happens when you try to build with hinges where the pivoting point of the hinge is vertically centered.

Because the pivoting point of the hinge is centered horizontally (and placed exactly in the middle between the two hinge plates), if you try to use this element for SNOT applications, you will get an offset by a quarter plate in both directions. That is the same offset you get with jumper plates. So as you can see on the right side in the image below, it aligns up perfectly if we use jumper plates. But it gets really problematic to build with, again because of the offset geometry


As you can see on them, the pivot point is not centered horizontally on the plate. Instead, the element designers reused the same “in system” positioning like with the aforementioned 1x1 plate with light attachments. In later years, the same positioning was used for several other parts, pictured below. The “click hinge” was also introduced to obtain more friction and support more weight in fixed angles.

Why are these geometry changes and new parts significant? Well, this design choice was actually a very good thing for us LEGO builders because it makes SNOT easier.
Looking at the angles and potential collisions, because the pivoting point is placed slightly higher up on these elements, when we put these parts at right angles to each other they will still be “in system.” In the image below you can see how the hinge plates align when you place them in 90-degree positions against each other. All of these four variations have the parts offset in half-plate increments in one way or another.

Here are some further examples showing how this technique could be manifest in your builds:

These hinge techniques are often used in LEGO sets to attach smaller SNOT assemblies. For example, microscale buildings in the LEGO Architecture Skyline sets are often attached using this technique.
The True Beauty of Hinge SNOT
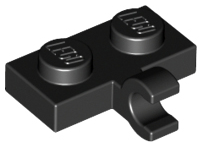
But the utility of hinged SNOT doesn’t end there. Just like the 1x1 plate is “in system” with the 1x1 plate with light attachment as I showed you above, the same thing happens if we attach a regular 1x1 plate with a clip (the black element in the diagram below) or a 1x1 tile with clip (teal below) twisted at 90 degrees with regards to the bar on the other plate.

Amazingly, the connections will stay “in system” and open up a whole new realm of SNOT possibilities (mind blown)! This functionality would not have been possible if the pivoting center of the hinge would have been centered horizontally. Thank you LEGO element designers of the ’80s for your foresight!
If you haven’t figured it out yet, we are dealing with the same ratio which makes regular SNOT possible. Take a look at this diagram:
Because the bars are centered with the stud on 1x1 SNOT bricks as indicated by the red line above, this means we can use hinges for even more SNOT applications. For some of you, this might not be new concept. But for me, the first time I saw this technique was in an official LEGO set and it is the reason why this article even happened!
That set was LEGO Creator Expert Porsche 911 (10295). On pages 63-64 in the instruction booklet, you are introduced to a SNOT assembly that makes use of this technique:

In this case, the technique is specifically used to place a few studs outwards from the car in order to later attach the mudguards while maintaining the shape of the wheel well.
Look at this beautiful transition using the same concept as an example:

In the diagram above, I’ve made use of one of the newest hinge parts 77808 Brick, Round 1 x 2 with Hollow Studs and Open Center with Bars. It is a mouthful, I know, but it is a very helpful element.
This is actually a way of mimicking one way of using the old version of the 1x1 plate with light attachment (4081a), which is useful because that part didn’t come in many colors and it can also be a bit difficult to come by nowadays. Hopefully there will be more techniques to come!
So that is the power of hinged LEGO SNOT (and the well-designed LEGO System that enables it). Though it can be a bit more complicated than using actual SNOT bricks, hinges provide an opportunity to make more custom SNOT solutions in any way you need them.
I hope you learned something useful today about SNOT and as always, please let me know if there are any factual errors in my article. A lot of the conclusions about how these elements were designed are mere speculations by me, but I think they make sense.
Best of BrickNerd - Article originally published November 28, 2022.
Have you ever used hinge elements for SNOT applications? Let us know in the comments below!
Do you want to help BrickNerd continue publishing articles like this one? Become a top patron like Charlie Stephens, Marc & Liz Puleo, Paige Mueller, Rob Klingberg from Brickstuff, John & Joshua Hanlon from Beyond the Brick, Megan Lum, Andy Price, Lukas Kurth from StoneWars, Wayne Tyler, Monica Innis, Dan Church, and Roxanne Baxter to show your support, get early access, exclusive swag and more.


