
Soaring Over the Winter Village: Hanging by a Thread
/The 2024 installment of LEGO’s Winter Village lineup is here, and it’s a beauty! 10399 Santa’s Post Office comes floating into view with a standout hot air balloon for delivering letters. And if your package is too heavy for airmail, you can always use 40746 Santa’s Delivery Truck and stick with traditional ground transport.

Join us today as we take a look at these sets, chat with the designer, and explore what is the best way to make them fly!
The Festive Builds
I got to work building these two sets that were provided by LEGO and was pleasantly surprised to find paper bags in the Post Office set! This is the first time I’ve encountered them myself. The Delivery Truck had the old style clear plastic bags. You can scroll through the gallery to see a bit of the building process.


The builds were engaging and included a few clever techniques, including how the light brick inside the hot air balloon is activated and the brick-built Post Office logo. That logo is a recreation of the iconography from the third Winter Village set from 2011, 10222 Winter Village Post Office.
Both sets fit right in with the rest of the Winter Village collection and will make a wonderful addition to anyone’s shelf, mine included!
Let’s Hear From the Designer
At Skærbæk Fan Weekend in September, Mary Wilson, the designer of the set, gave a presentation about Santa’s Post Office, sharing some details of the design process. Our Nerd-in-Chief, Dave Schefcik, was present and passed along the photos and some quotes from the designer.
I quite enjoyed how she talked about her inspiration process.

Mary Wilson showcasing the Post Office
Mary: “My favorite part is the ideation phase. This is where you come up with any possible idea. So if we know that it’s going to be in the North Pole, it’s going to be a post office, and there’s going to be elves, then we can go from there and say, ‘What crazy adventures are they getting up to? What does it look like? What kind of machinery are they using? How do letters get back and forth?’ This was actually one of the very first things I drew when I heard that I was going to be working on this project. This my way to get some of those first ideas out on paper.”

She goes on to show a whole series of small idea sketches and how they ended up getting incorporated into the set.
Mary: “So not only did I draw that picture, but I drew a lot of little pictures this. This is my way of getting all of those ideas out and splitting them up.”


Once the features were decided on, it was time to decide on the shape of the building itself.
Mary: “The third part is iteration. It’s trying again and again and again, making improvements as we go. With the shape of the house, we wanted it to be roughly a Tudor style. It fits in with a lot of the other winter villages having those peaked roofs. Then I started blocking out different ways that this could be built. Not only did I draw these, but I also built a lot of copies—either digitally or physically with bricks to see what felt right. And then the extra caveat was we needed a place for the hot air balloon to land, so there’s a lot of different little platforms. Or maybe we were talking about the mail going down a chimney or maybe just landing flat on the roof or going straight into a chute. And you can see, I was getting closer and closer to where we landed in the finished product.”


She talked about how the set ended up as a final product and when to call it “done.”
Mary: “It’s just this sort of iteration where you try one thing, then you say, ‘OK, but can we make it better?’ The answer is often yes, and that’s true for every single aspect of this model. So once you have one part, I would tackle the next. Every single time I built through the model, I would try to make improvements, and that led us to this, this cozy little North Pole post office.”
Sidenote: If you are interested in learning more about Skærbæk Fan Weekend, check out this BrickNerd article on the topic!
To the Skies
As soon as I heard that there was going to be a hot air balloon, I knew I was not going to be content with having it on the ground. It needs to fly! (And with it, Santa’s reindeer-powered sleigh.) Rather than building up a support structure from the bottom, I decided to go the other way and hang them from the ceiling. Time for a trip to the hardware store, where I picked up some supplies I thought would be helpful.

I started by finding the thinnest fishing line they carried. I wanted it to be as invisible as possible once it was on display. Then it was over to find something to attach that line to the ceiling. I chose a couple of options, including ceiling hooks, smaller screw eyes, and some double-pointed tacks. I also found a few hooked push pins at my house. I wanted something that would be strong enough to support the weight of the models without being visually distracting or leaving large holes behind once they were removed. While I was there, I found a roll of invisible cord to try as well.
Armed with my new hardware, it was time to figure out the best options to use for hanging the balloon. I quickly decided against the invisible cord as it was much too thick for this application and was not quite as invisible as its packaging suggested. The fishing line was very thin but still easy to manipulate and work with, so it was the best choice.

Trilene KNot instructions
The next hurdle was what type of knot to use. Now, unless you want to know about the obscure mathematical knot theory topic, my knowledge of real-world knots ends after I tie my shoes. Fortunately, the brand of line I purchased, Trilene, has its own knot named after it, the Trilene Knot. This is a very easy knot to tie, and I was quickly able to tie the line onto the models.
The most important part is choosing where to tie the line to the model. Tie it too low, and the object will flip over. This requires keeping the center of mass below the point at which the line is tied. I just used my fingers to hold it in various places until I found it was hanging like I wanted. This led me to tie it off to one side on the top of the balloon so that it would be at a slight angle once it was suspended.
The sleigh was a bit trickier to attach as it required more than one point to fully suspend it. Again I knew I wanted it at an angle and picked it up from various points by hand until I found two that gave it the angle I was looking for.
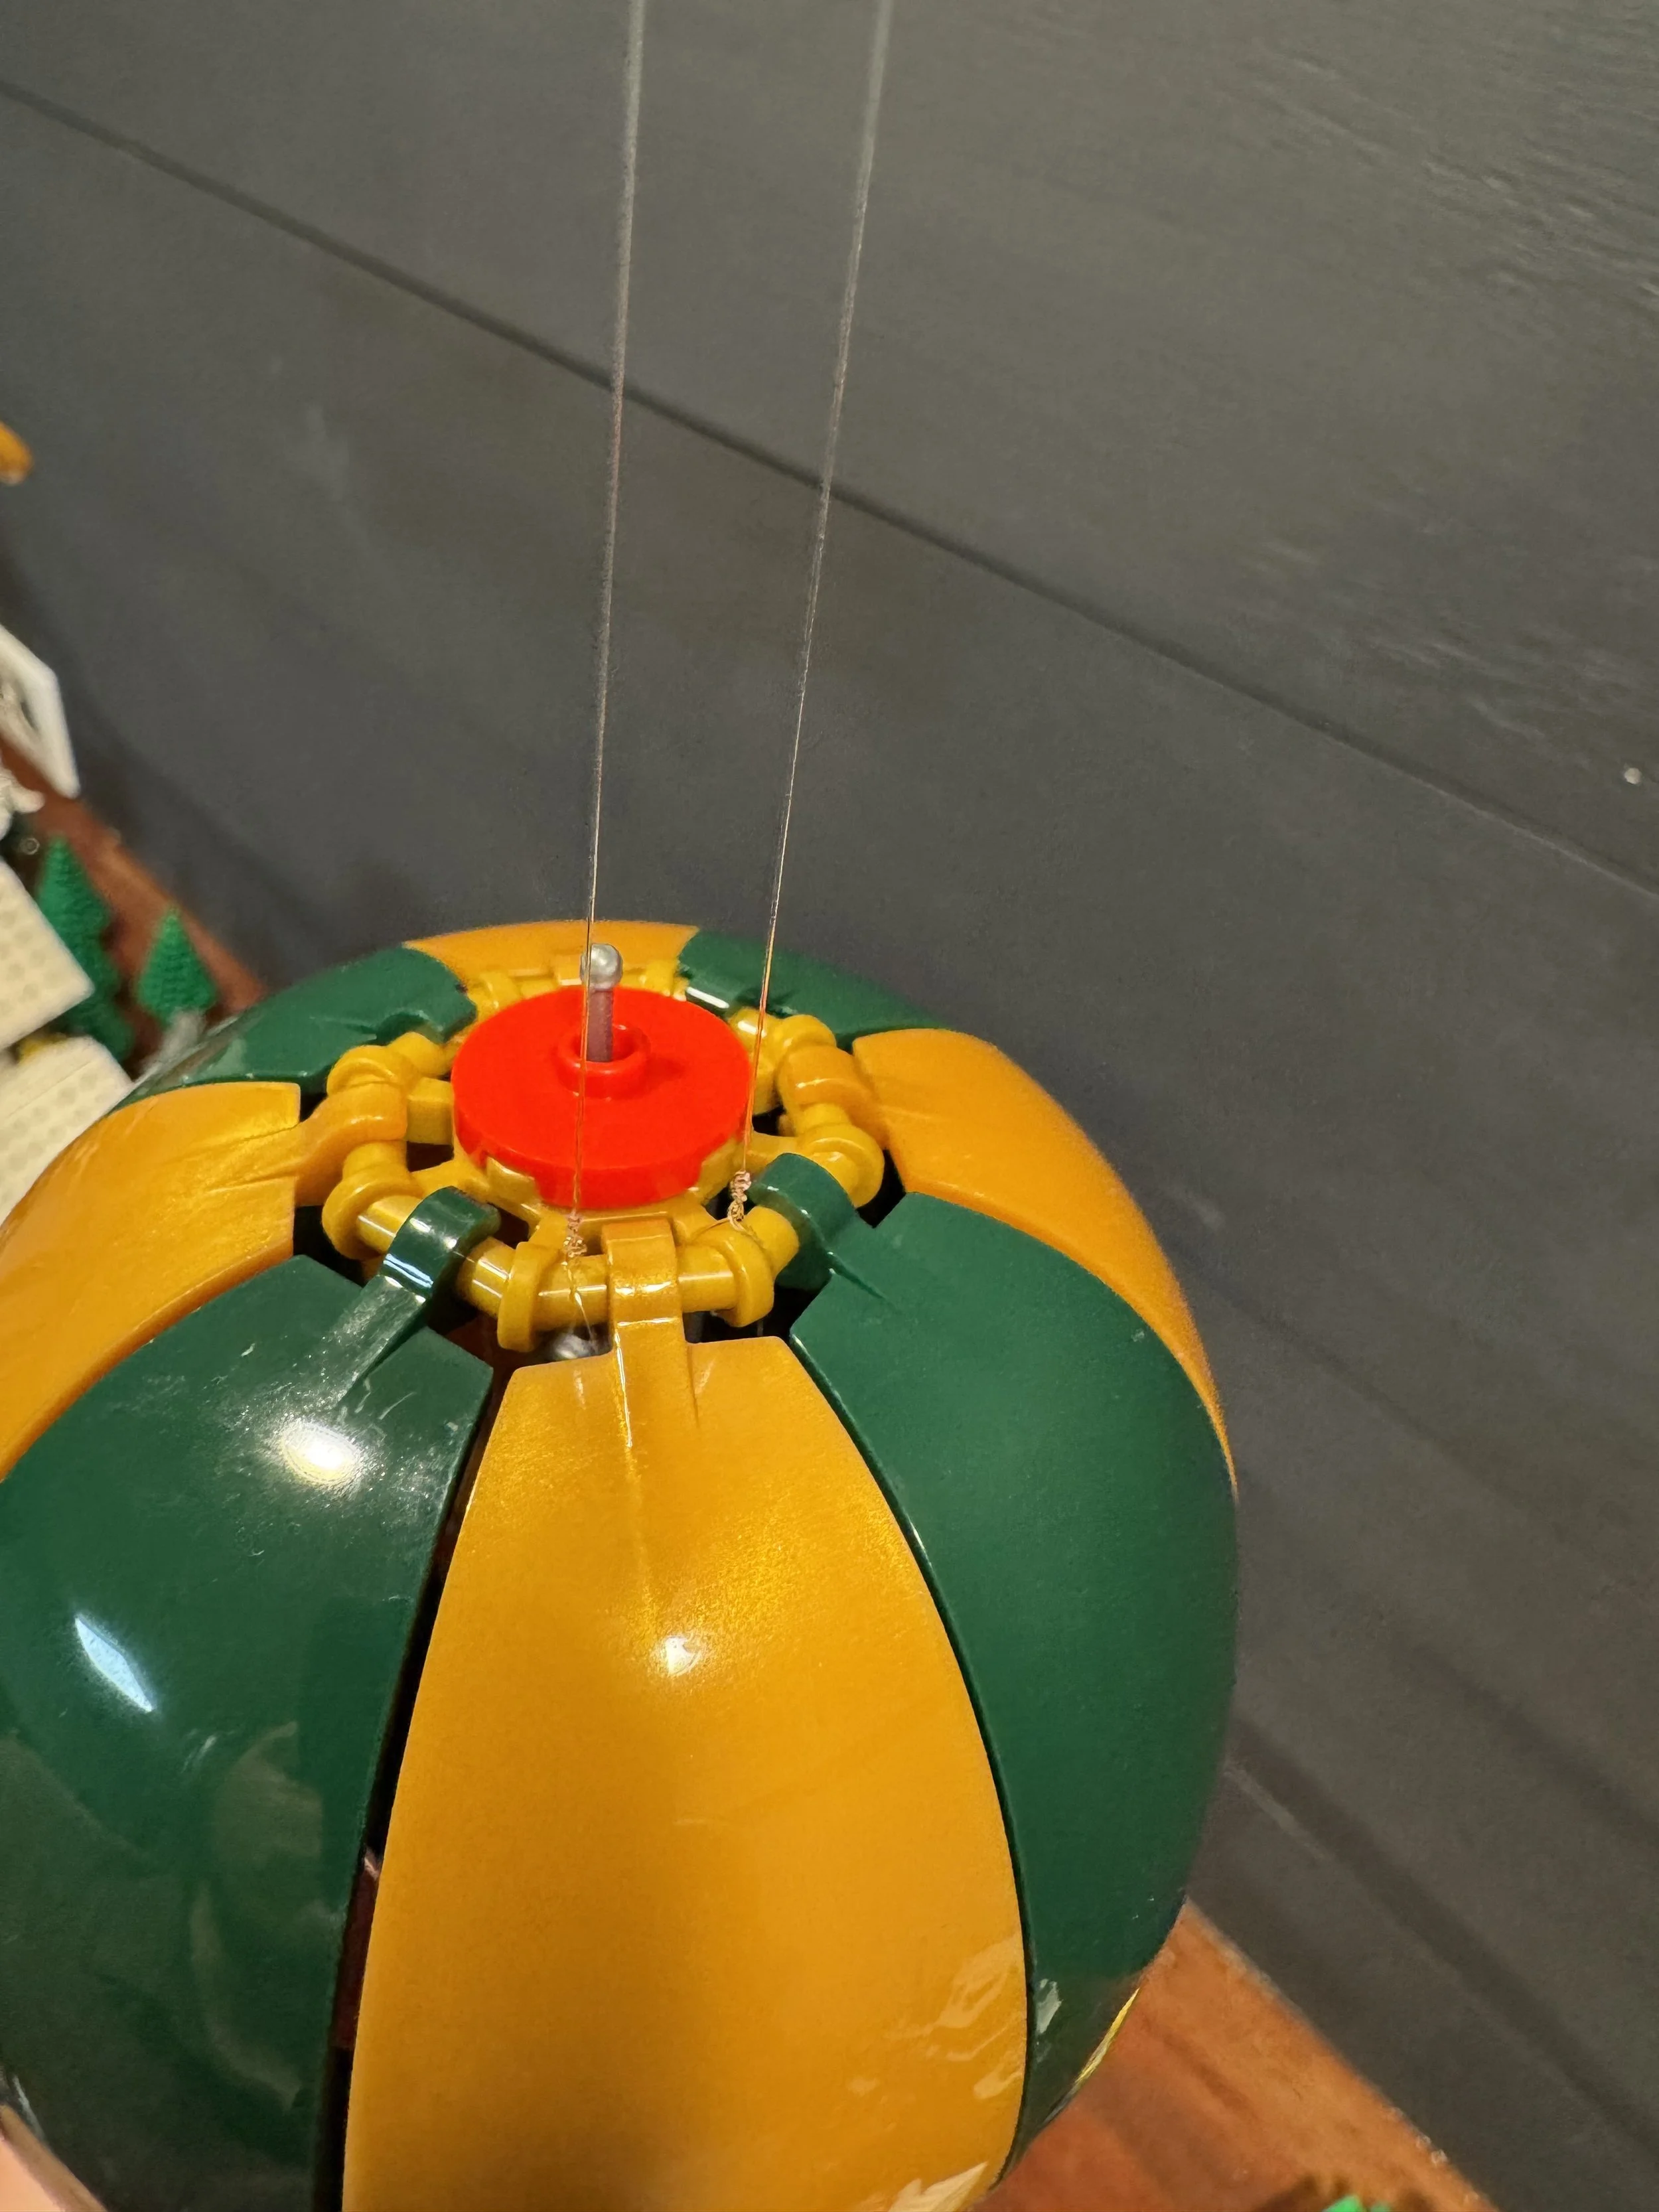
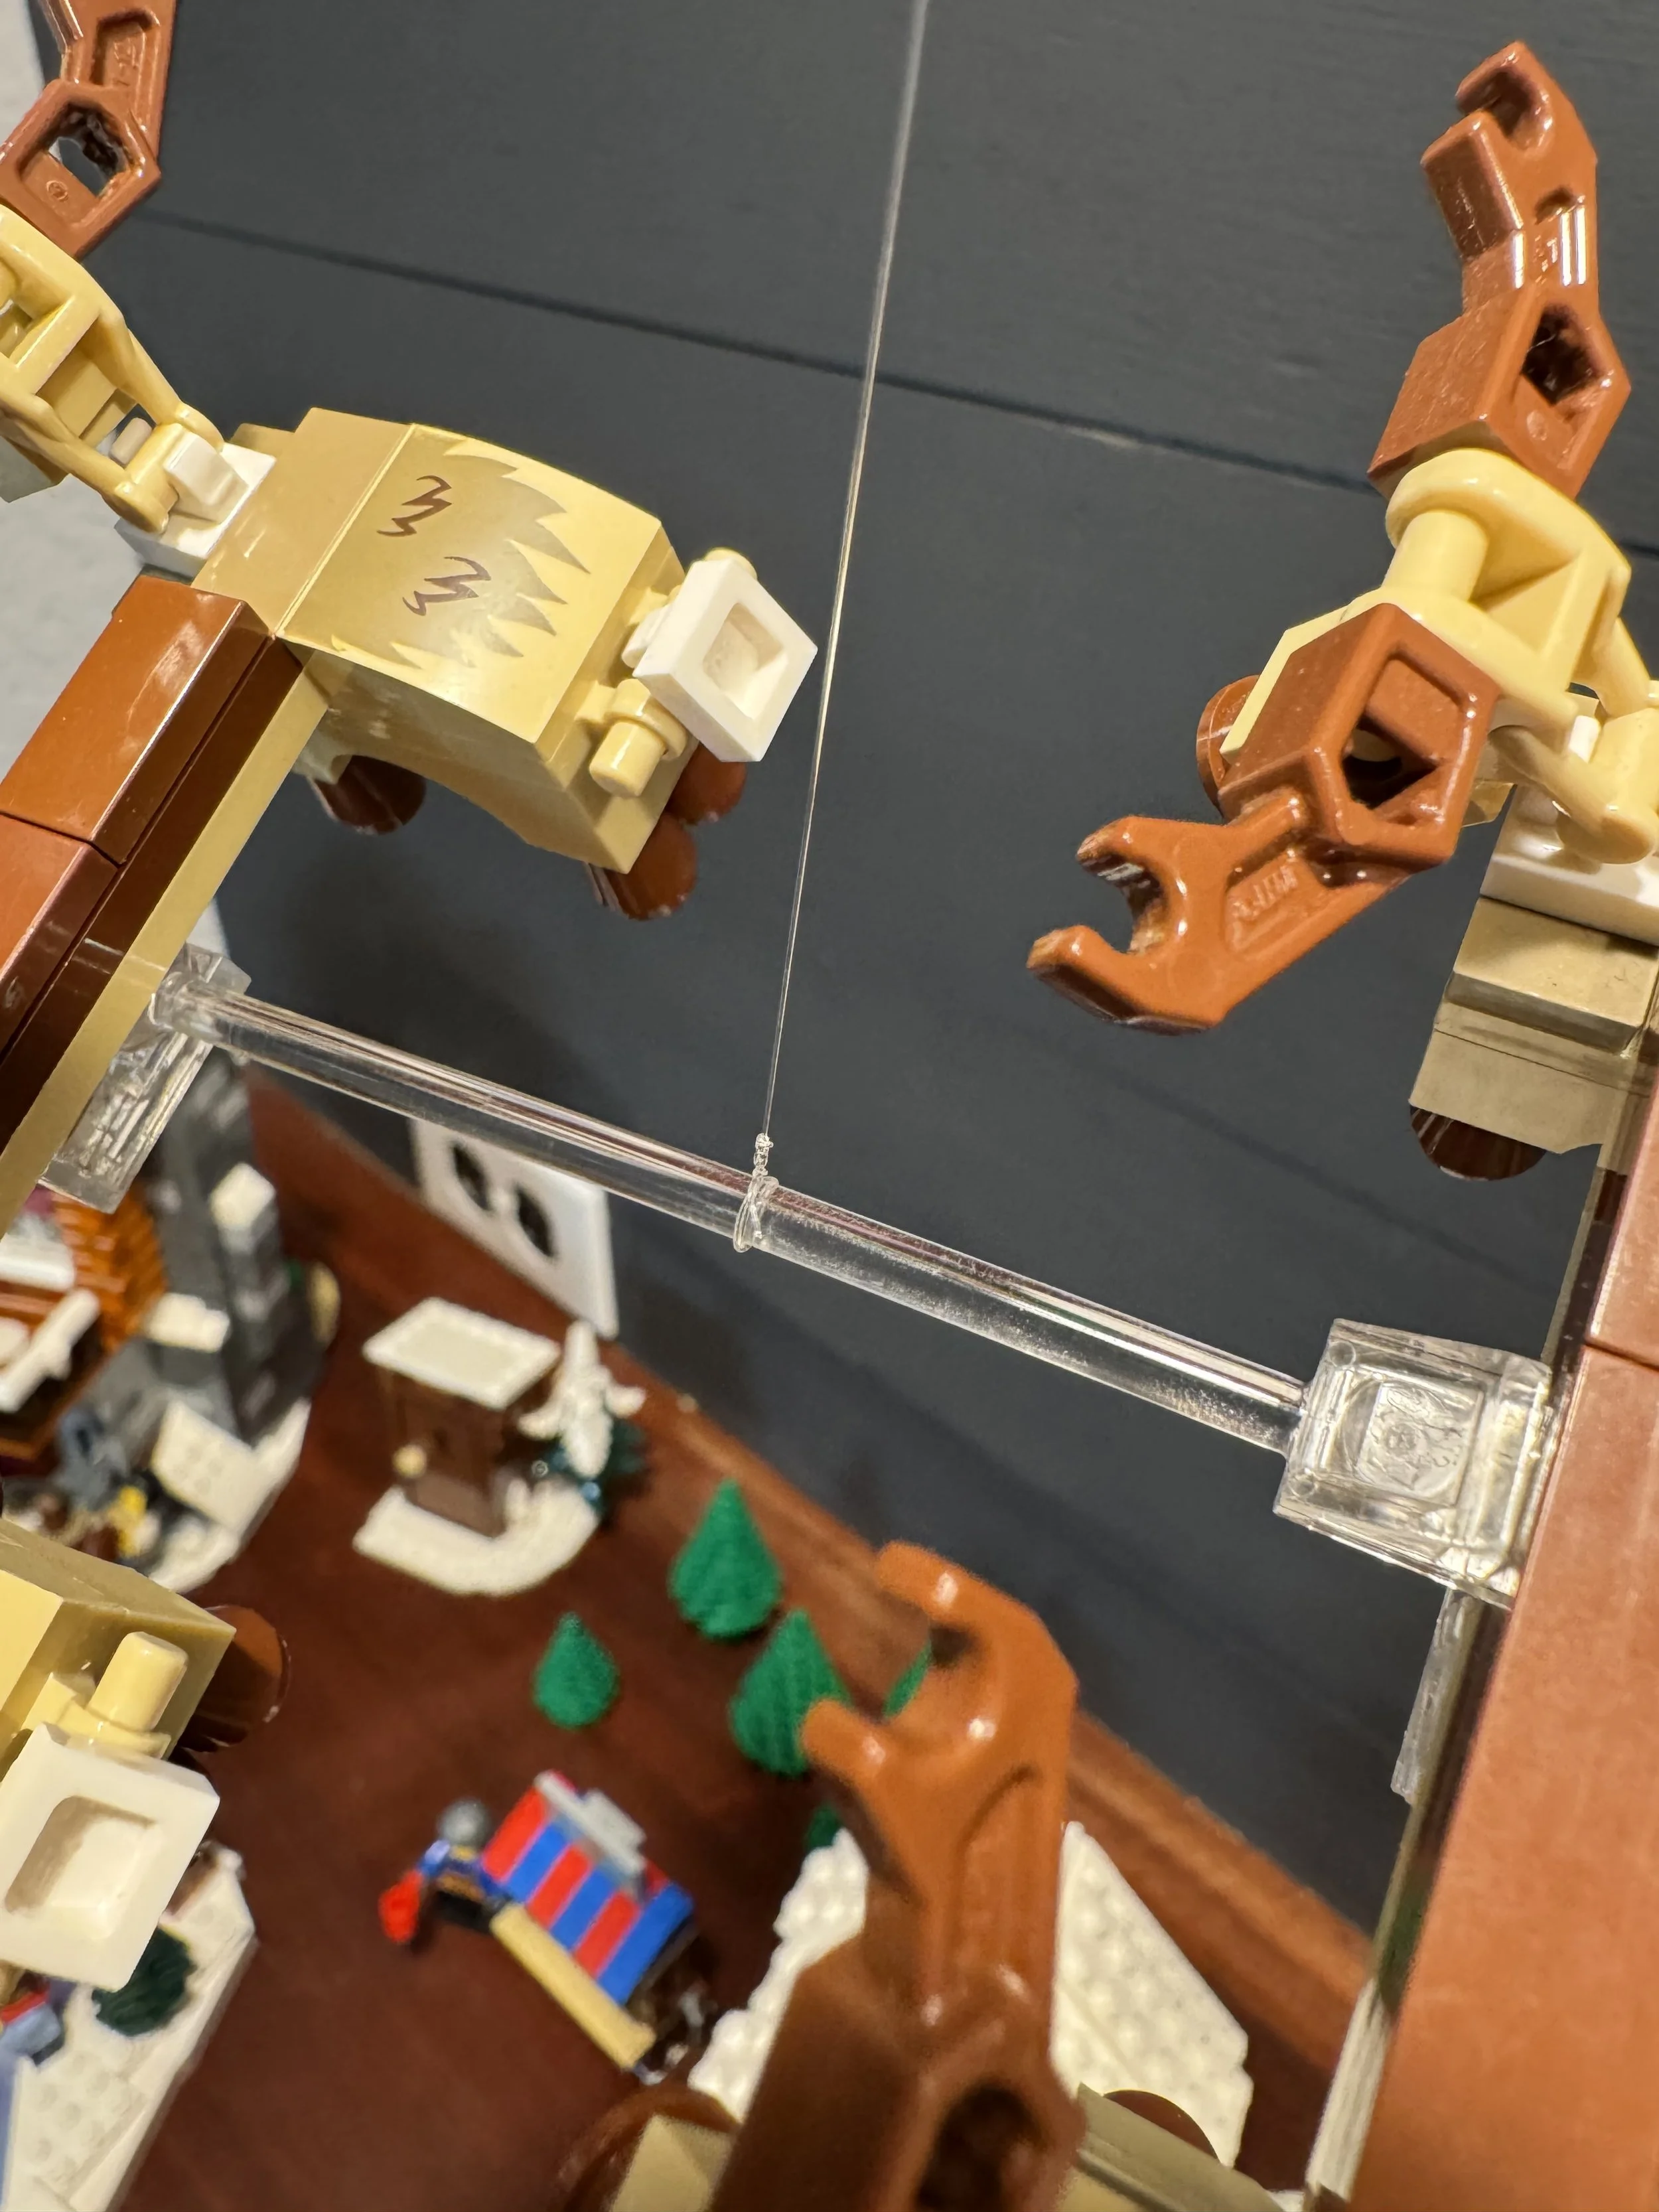
I had to add a second point to the balloon as it would just sit and spin with only a single line tied on. I measured out a bit more than twice the length of how far it needed to hang down in line and tied both ends onto the model. This created enough stability to keep it from spinning too much and also provided an easy loop at the other end from which to hang the model. I repeated the process with the sleigh and soon had two models with lines tied on and ready to hang.
Up, Up and Away

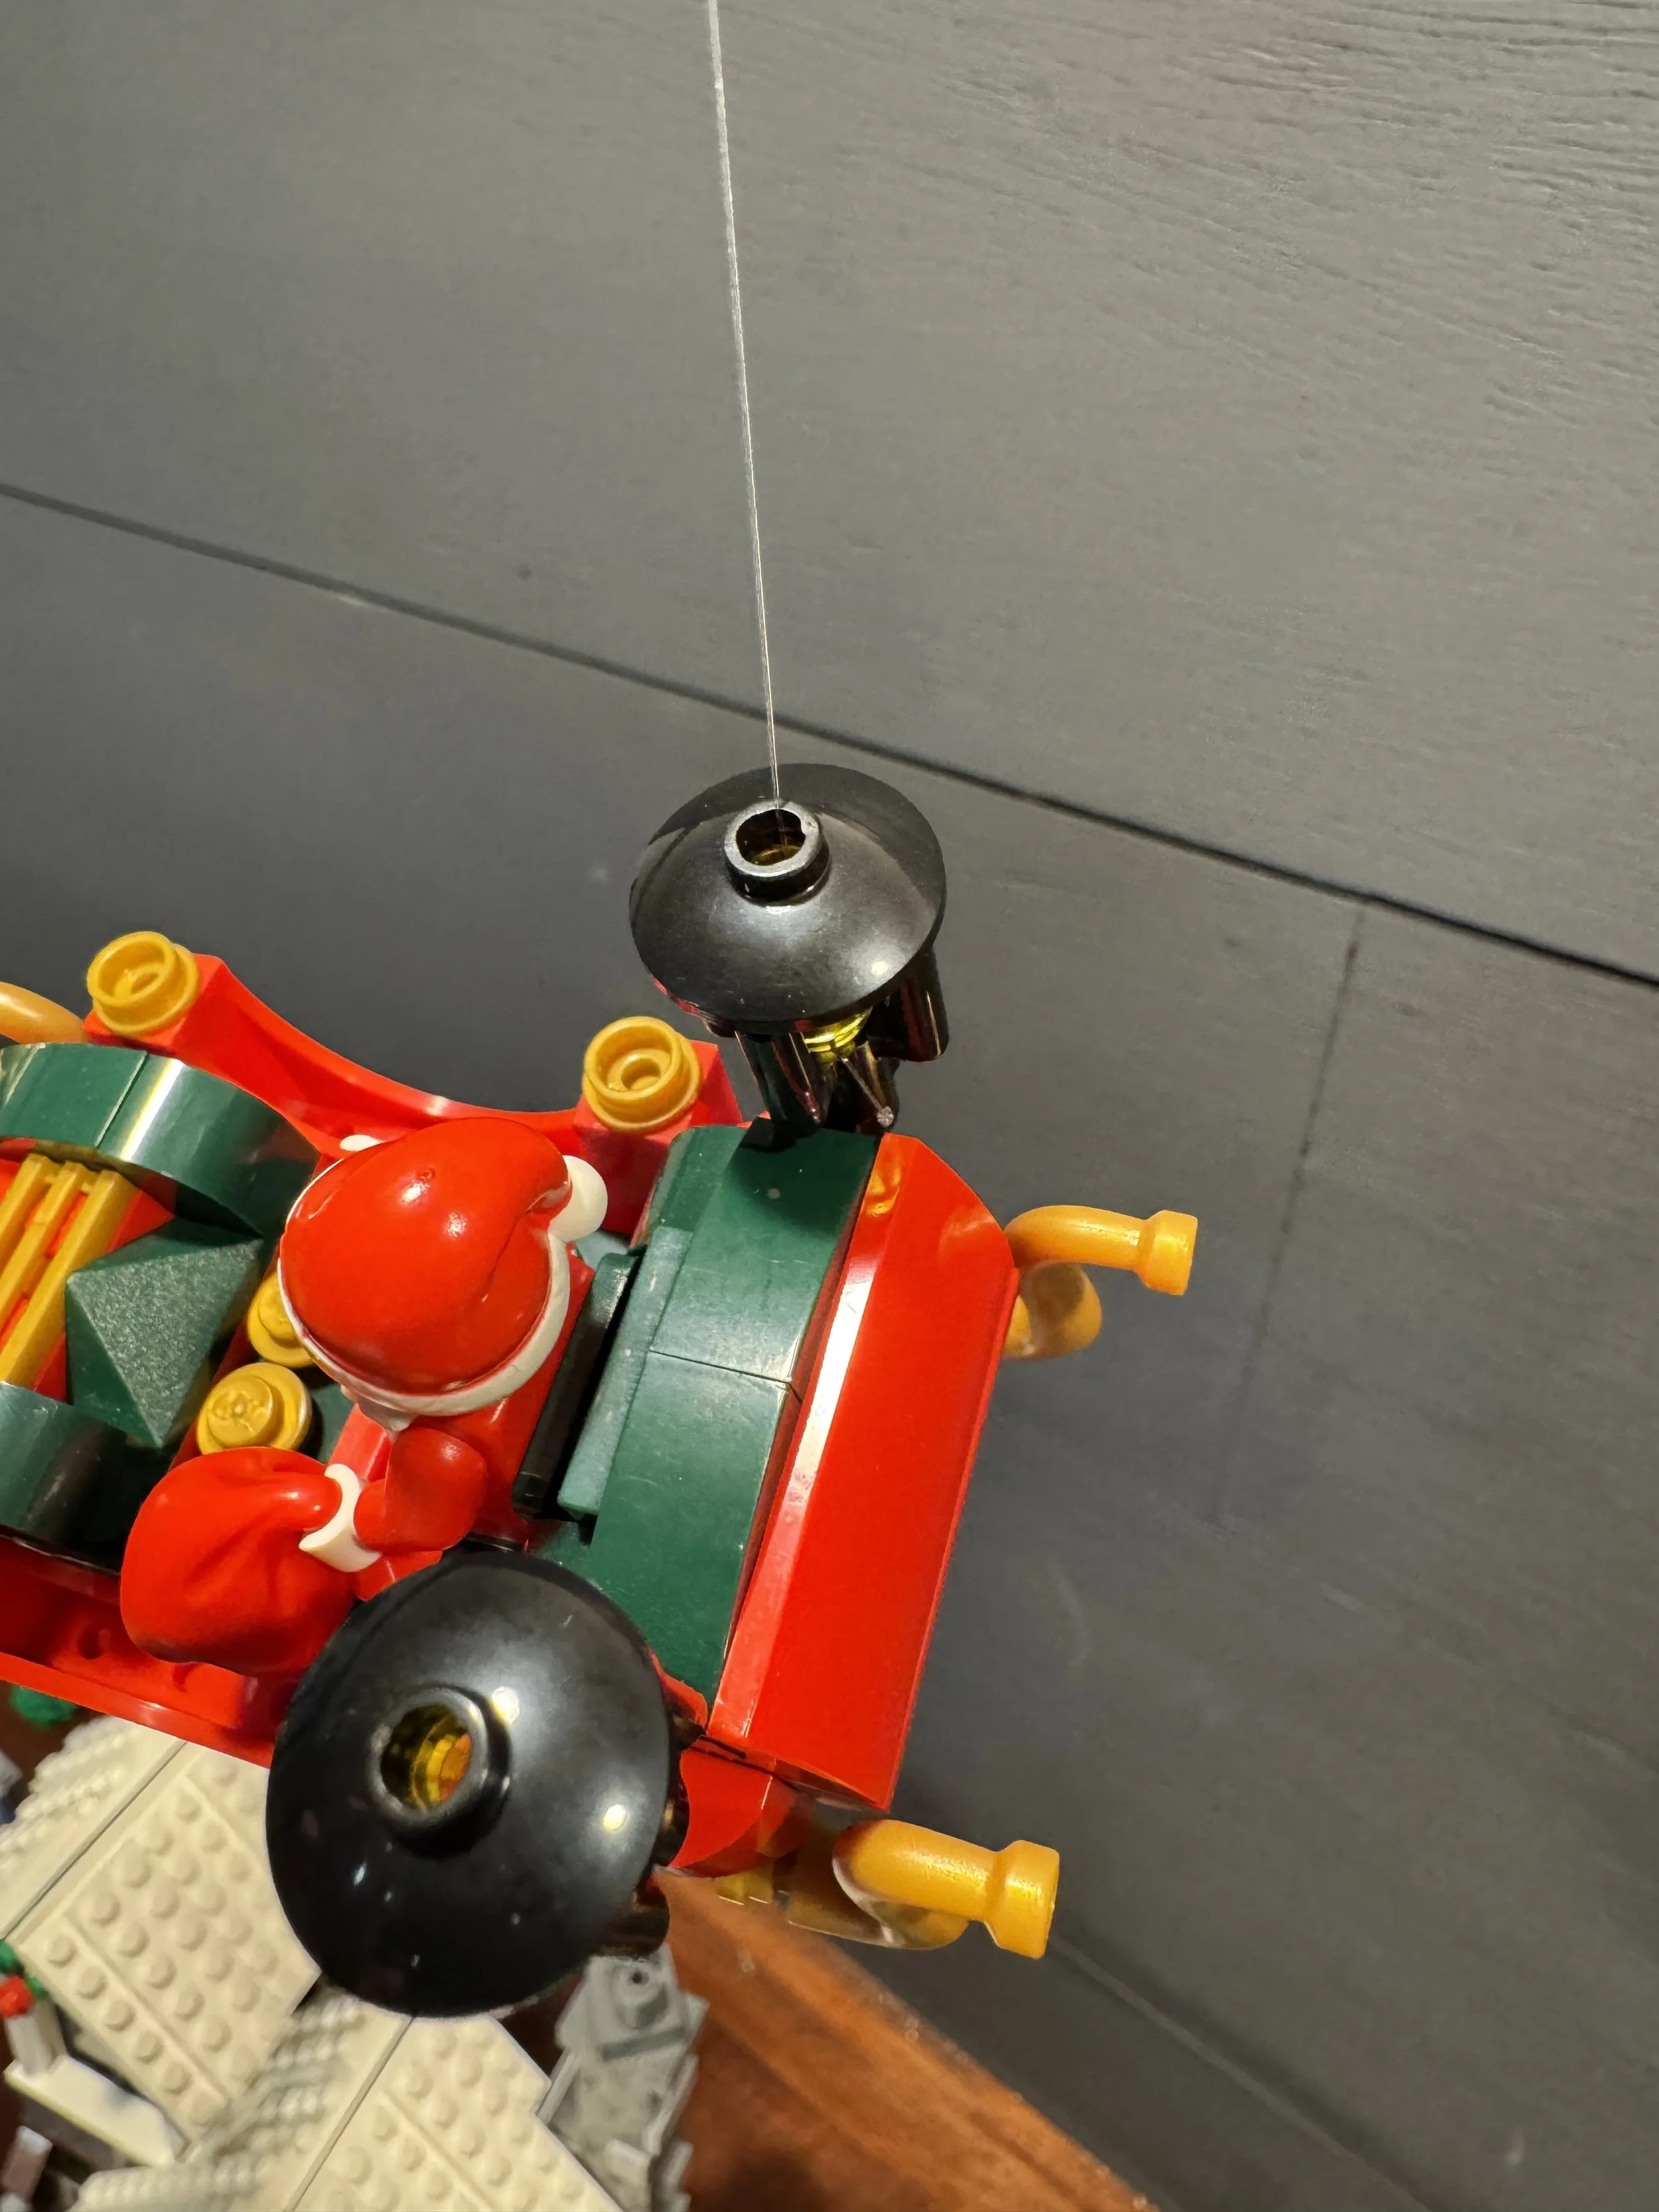
For where to attach to my ceiling, the hooked push pins seemed like the logical place to start as they would be the easiest to install and would leave the smallest hole in the ceiling. I was worried that without threads like the ceiling hooks and screw eyes, they would be slowly pulled out by the weight of the models. This proved to be unfounded with a bit of testing. The desired location was marked, and the pins were pressed into place, ready for the models to be hung.
One hook was used for each model, though more could be added to hold more weight. The hooks can be rotated to control the angle at which the model hangs, which makes fine-tuning the display easy. They are also small enough that they practically disappear when viewed.

Floating and Flying!
The pins held much better than expected and are the perfect easy solution! If you want to try this without creating any holes, there are adhesive ceiling hooks that would work just as well.
I’m very happy with how the effect turned out. The lines are close to invisible as I walk past, and it really does, like the sleigh is flying and the balloon is floating down to land.


I think you will agree with me that the floating sets really elevated my Winter Village display this year! However for me, it’s already time to pack it all away again until December 1st when the rest of the Christmas decorations are put up. We can’t let Christmas one-up Halloween! Though if you are interested in learning how others pack up and store their Winter Village displays, check out this BrickNerd article!
10399 Santa’s Post Office is available for around $100 US, and 40746 Santa’s Delivery Truck is available for around $20 US.
DISCLAIMER: These sets were provided to BrickNerd by The LEGO Group. Any opinions expressed in this article are those of the author.
Would you display a LEGO model by hanging it from the ceiling? Let us know in the comments!
Do you want to help BrickNerd continue publishing articles like this one? Become a top patron like Charlie Stephens, Marc & Liz Puleo, Paige Mueller, Rob Klingberg from Brickstuff, John & Joshua Hanlon from Beyond the Brick, Megan Lum, Andy Price, Lukas Kurth from StoneWars, Wayne Tyler, LeAnna Taylor, Monica Innis, Dan Church, and Roxanne Baxter to show your support, get early access, exclusive swag and more.


