The Art of Castle Building: Designing the Emerald City from Wicked
/Today’s guest article comes from Juan Rodriguez Lopez, a builder living in the Seattle area who has mixed his passion for architecture with his love of LEGO bricks. He shares a follow-up article about designing custom castles, this time focusing on the Emerald City from the film, Wicked.
My Most Ambitious LEGO Castle Yet
My love for castles is still going strong, and designing LEGO castle models has pretty much become my number one hobby… and obsession. (Read all about my former castles in my first guest article.) I’m always thinking about what the next build could be and how to make it feel special—something uniquely its own, something that adds a new spark to the collection.
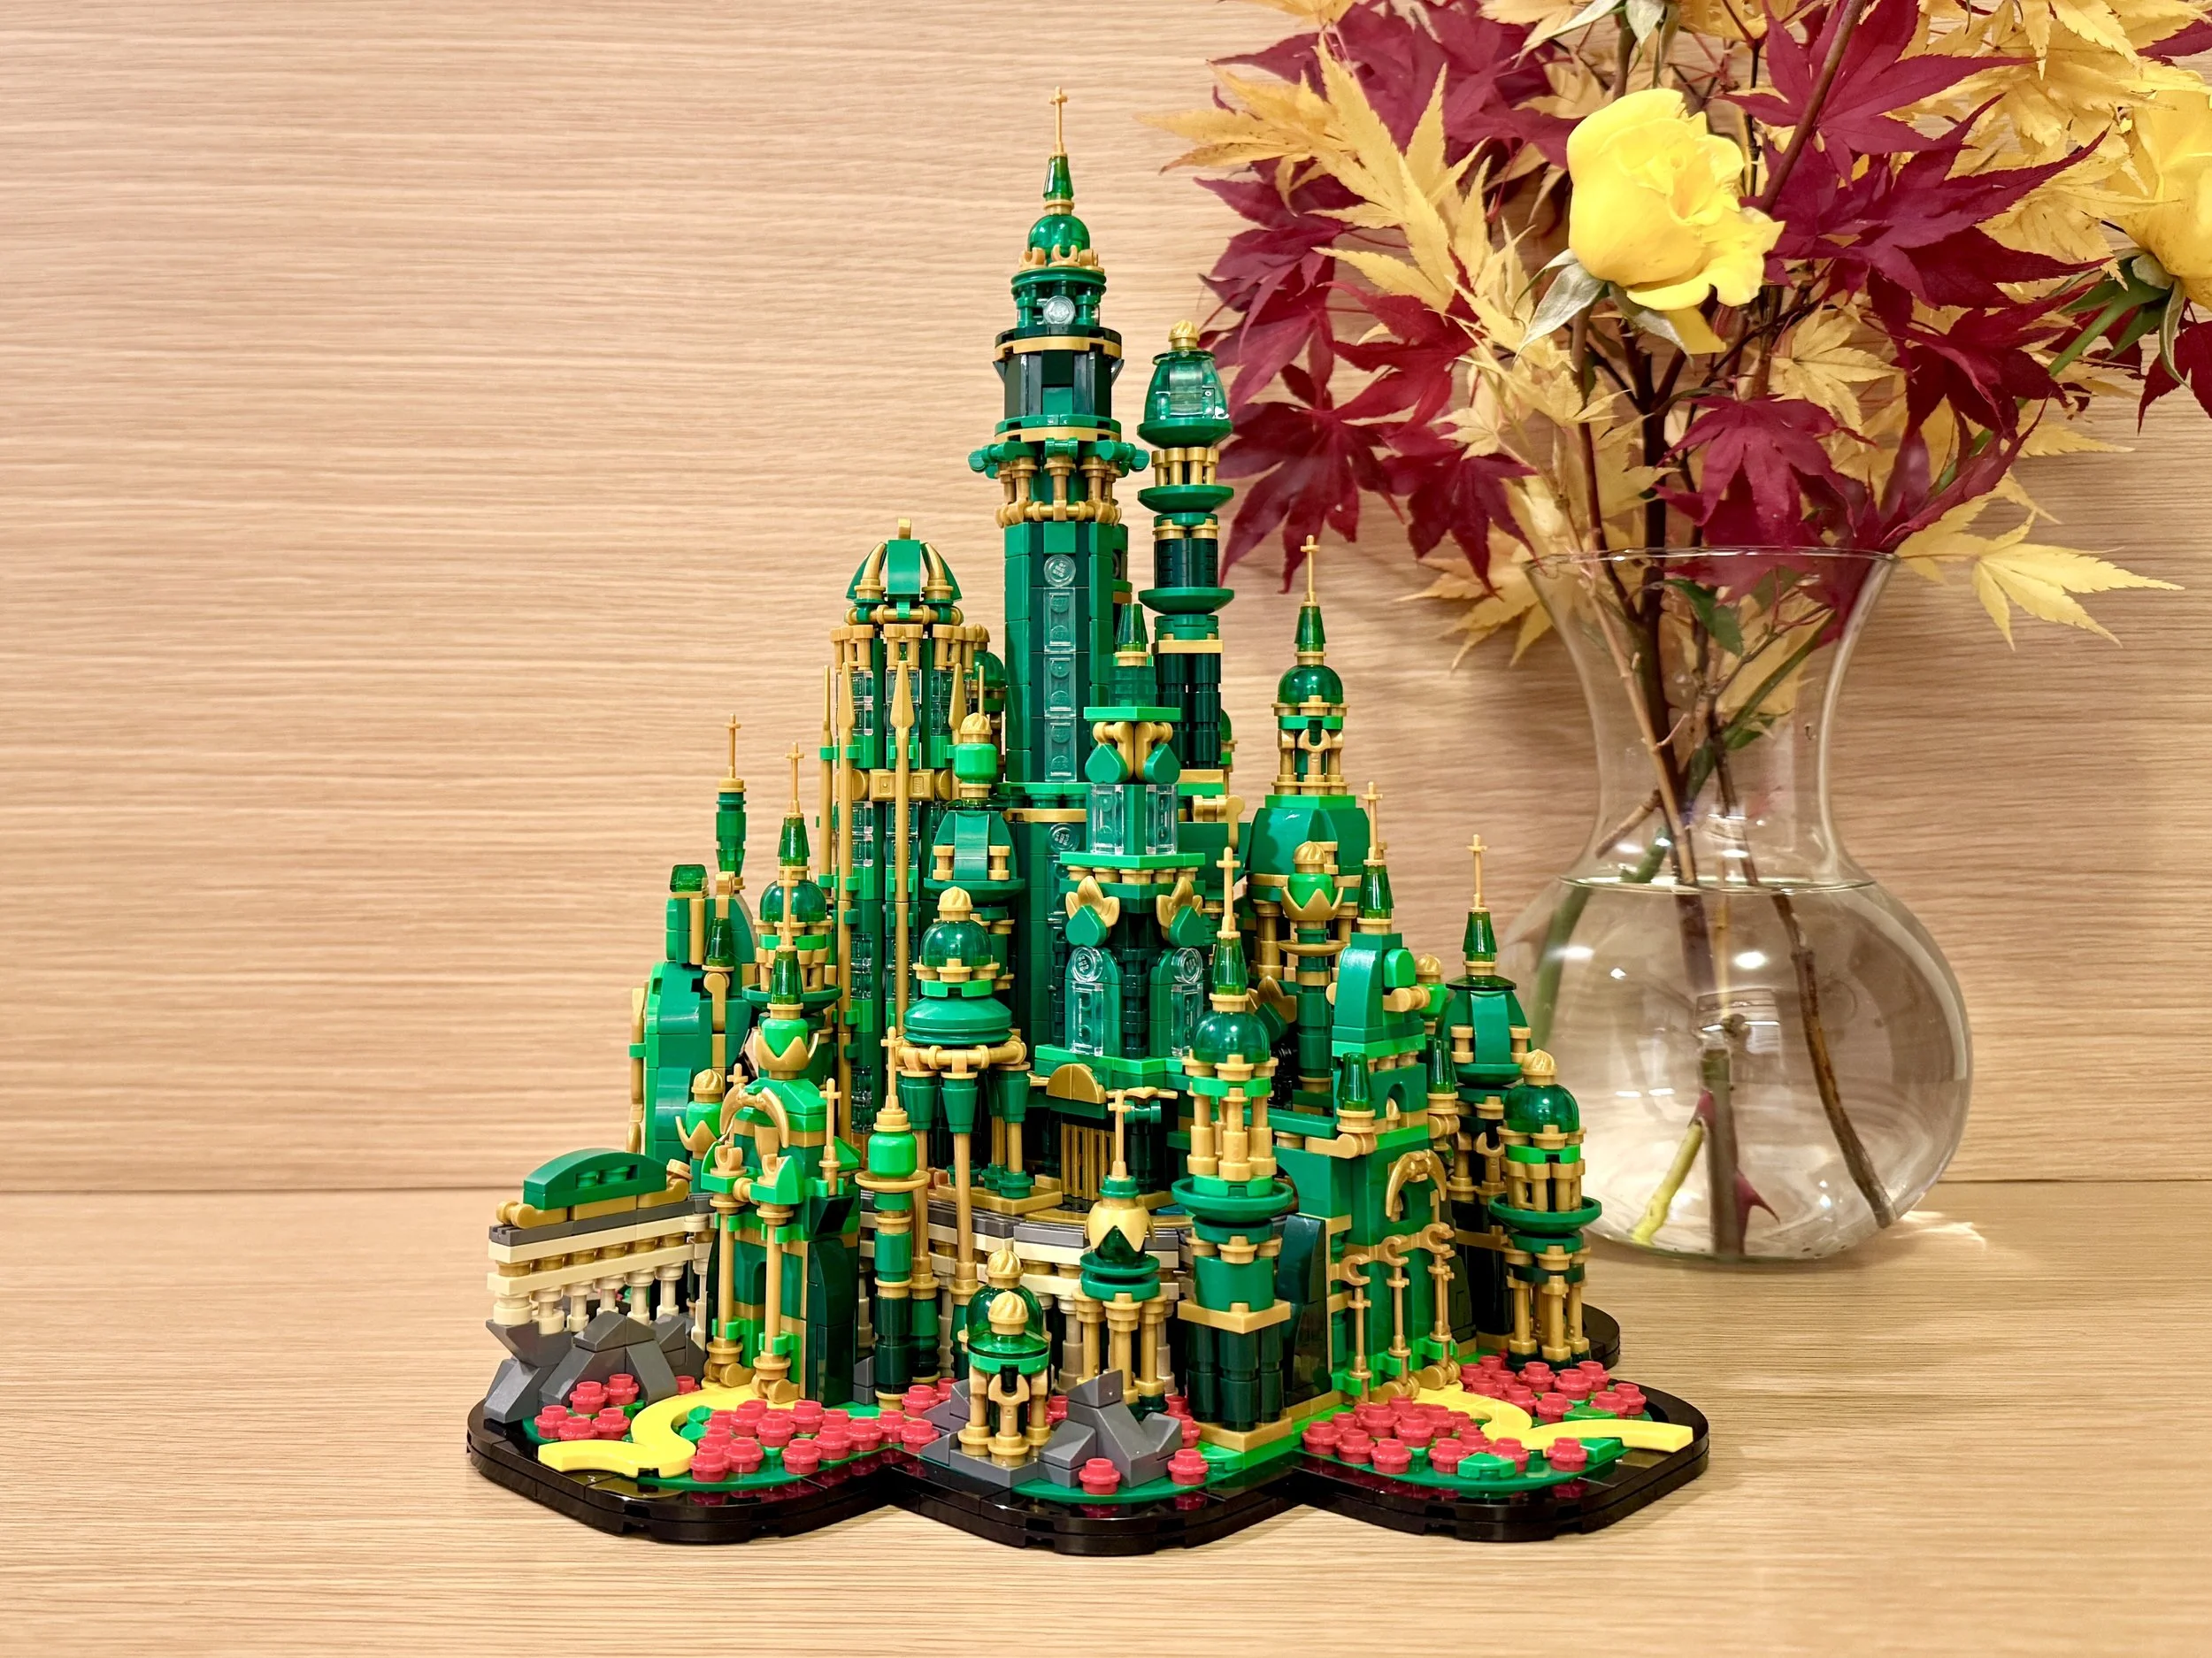
So when it came time to choose my next MOC, I landed on the Emerald City from the film Wicked for a few reasons. First, I’ll admit it: I was disappointed with the official Wicked theme LEGO sets. None of them really captured the city’s potential. Second, the green-and-gold color scheme was impossible to resist — a palette that would instantly stand out among my other models. And finally, I wanted a challenge. After a few castles, it’s easy to fall into familiar patterns and repeat the same tricks. I needed something that would push my technical skills and stretch my creativity.


Cracking the Scale Problem
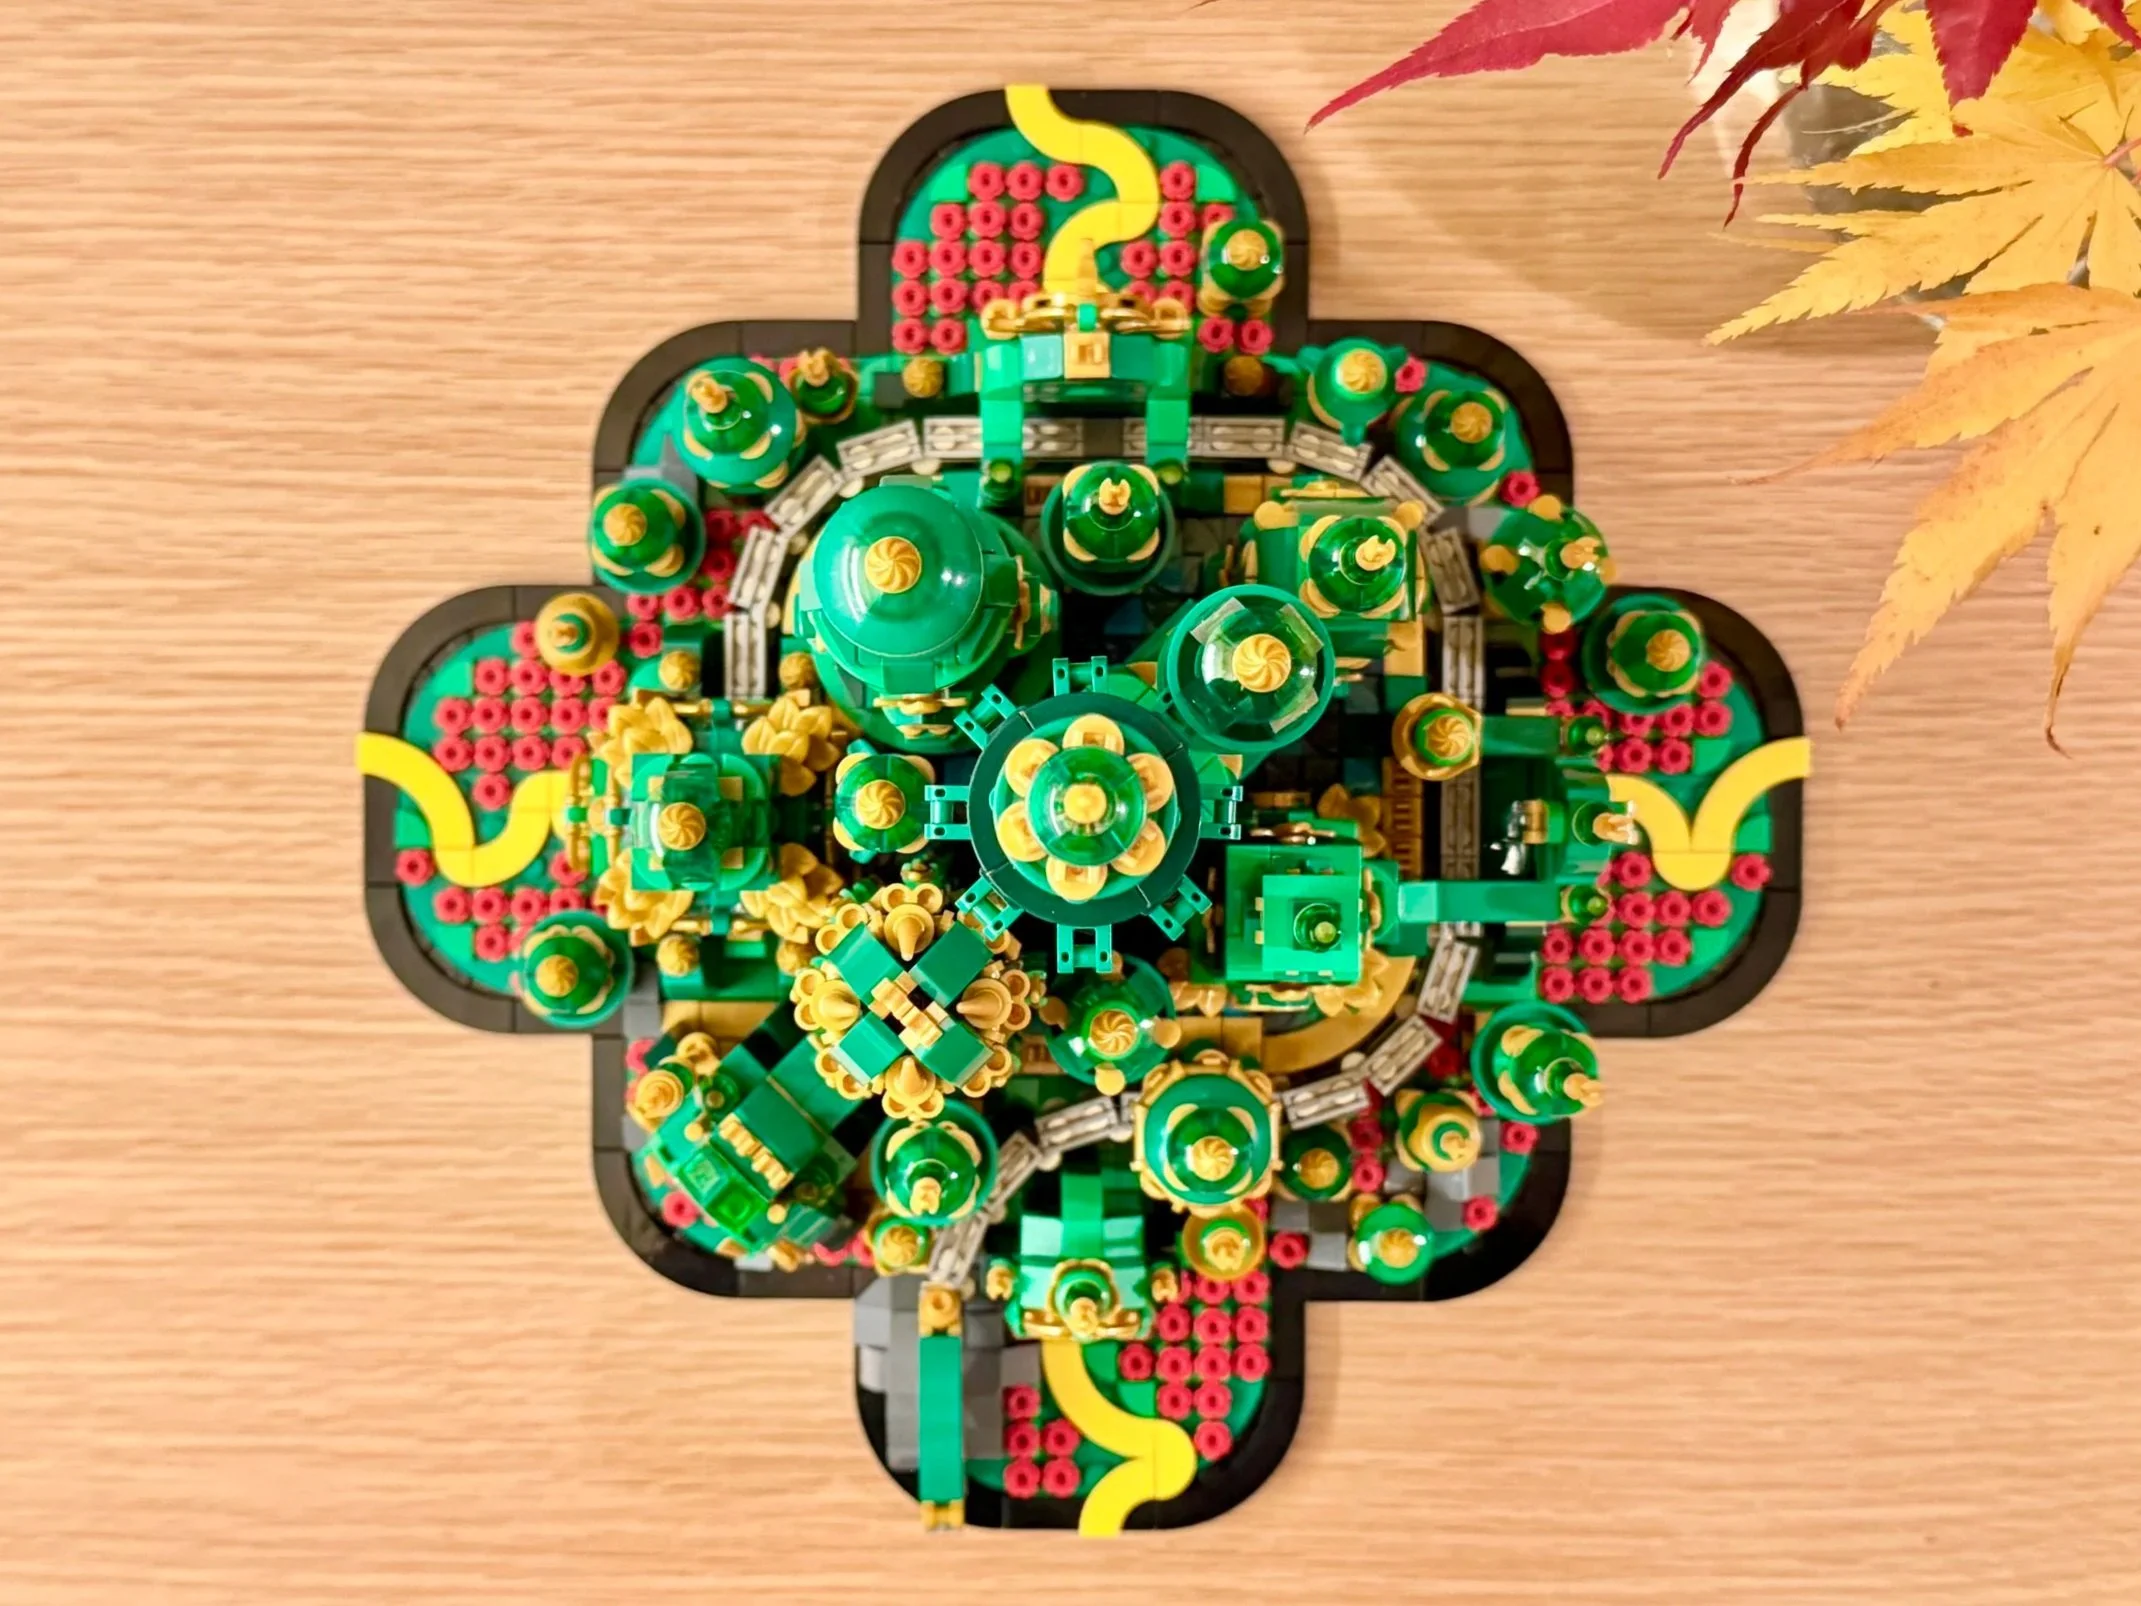
From the start, I knew scale would be everything. Unlike my previous models, which each focused on one main structure, the Emerald City meant coordinating a cluster of different buildings and towers—all of which needed to feel cohesive. I also had to balance the scale of the Wizard’s Palace against the rest of the city. I wanted it large enough to show off all the rich architectural details, but not so large that the model became unmanageable.

And architecture-wise? The films portray the Emerald City as a fascinating mix of Art Deco and Art Nouveau, with touches of Baroque and even Arabic influence. One of my biggest goals was capturing all those curves, ornate flourishes, and delicate gold filigree. That meant embracing a much higher part count. I’d say about three-quarters of the parts in this model are smaller than 2×2 studs—many are just 1×1—which was essential for achieving the level of detail the city deserves.

Yes… I Blew Past the 1,500-Piece Rule
This is my largest model yet, with the highest part count I’ve ever tackled. I know I once said I’d try to cap my models at 1,500 pieces, but I’ve learned that the design always has the final say.

If the best version of the build needs more pieces—or a lot more pieces—then that’s what it gets. And looking at the finished city, I have zero regrets.
Researching the City of Emeralds
Before I placed a single brick, I dove deep into reference material. Luckily for me, the Emerald City is iconic, and there’s plenty to pull from: posters, promotional images, merchandise, models, and even art installations. But most of my research came from pausing the film over and over again to inspect every angle, every detail.


Even so, it quickly became clear that the city’s actual scale was far too massive to fully replicate. So I focused on distilling the most defining architectural elements—the standout buildings, spires, minarets, and arches that truly shape the Emerald City skyline. Those became the heart of my LEGO interpretation.

The Fun Part: Exploration and Prototypes
Normally, I start a MOC by tackling the hardest architectural features first. But this time, after selecting the major buildings to include, I shifted to creating small-scale studies. This is one of my favorite stages of the entire process—pure exploration.

It’s not about copying what I see; it’s about experimenting with techniques, playing with shapes, and building tiny prototypes over and over until the right solution finally clicks. It feels like solving a puzzle using nothing but creativity and stubbornness, and honestly, I had the best time doing it.

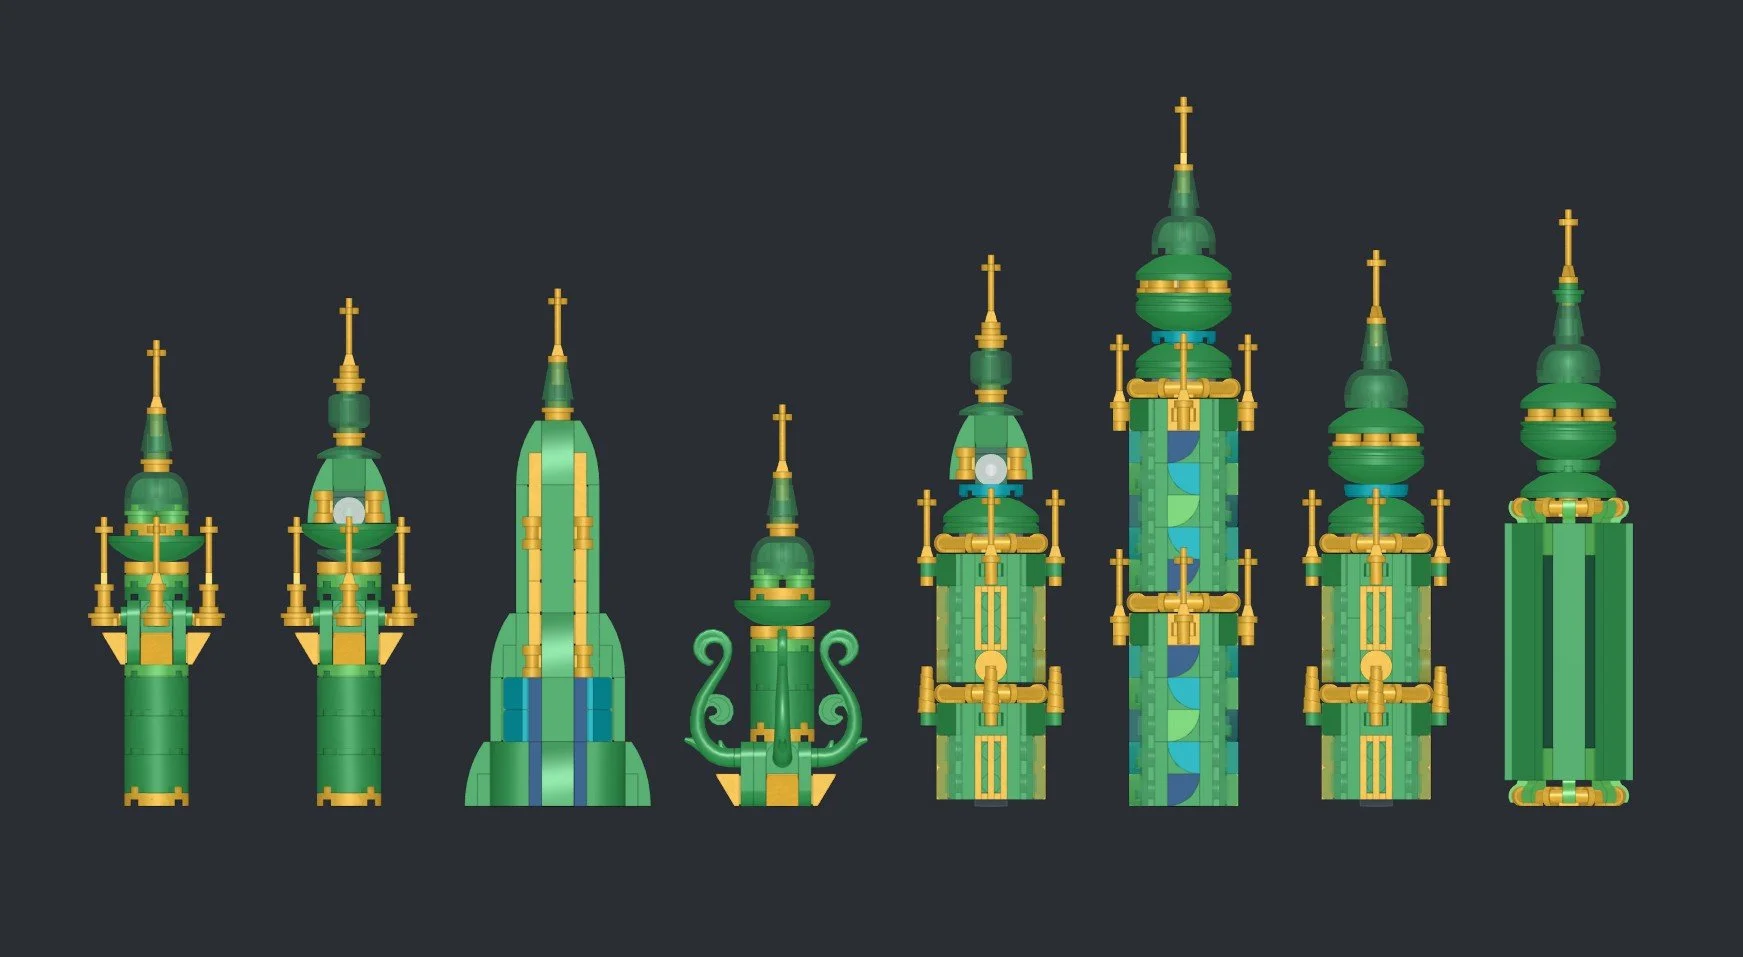


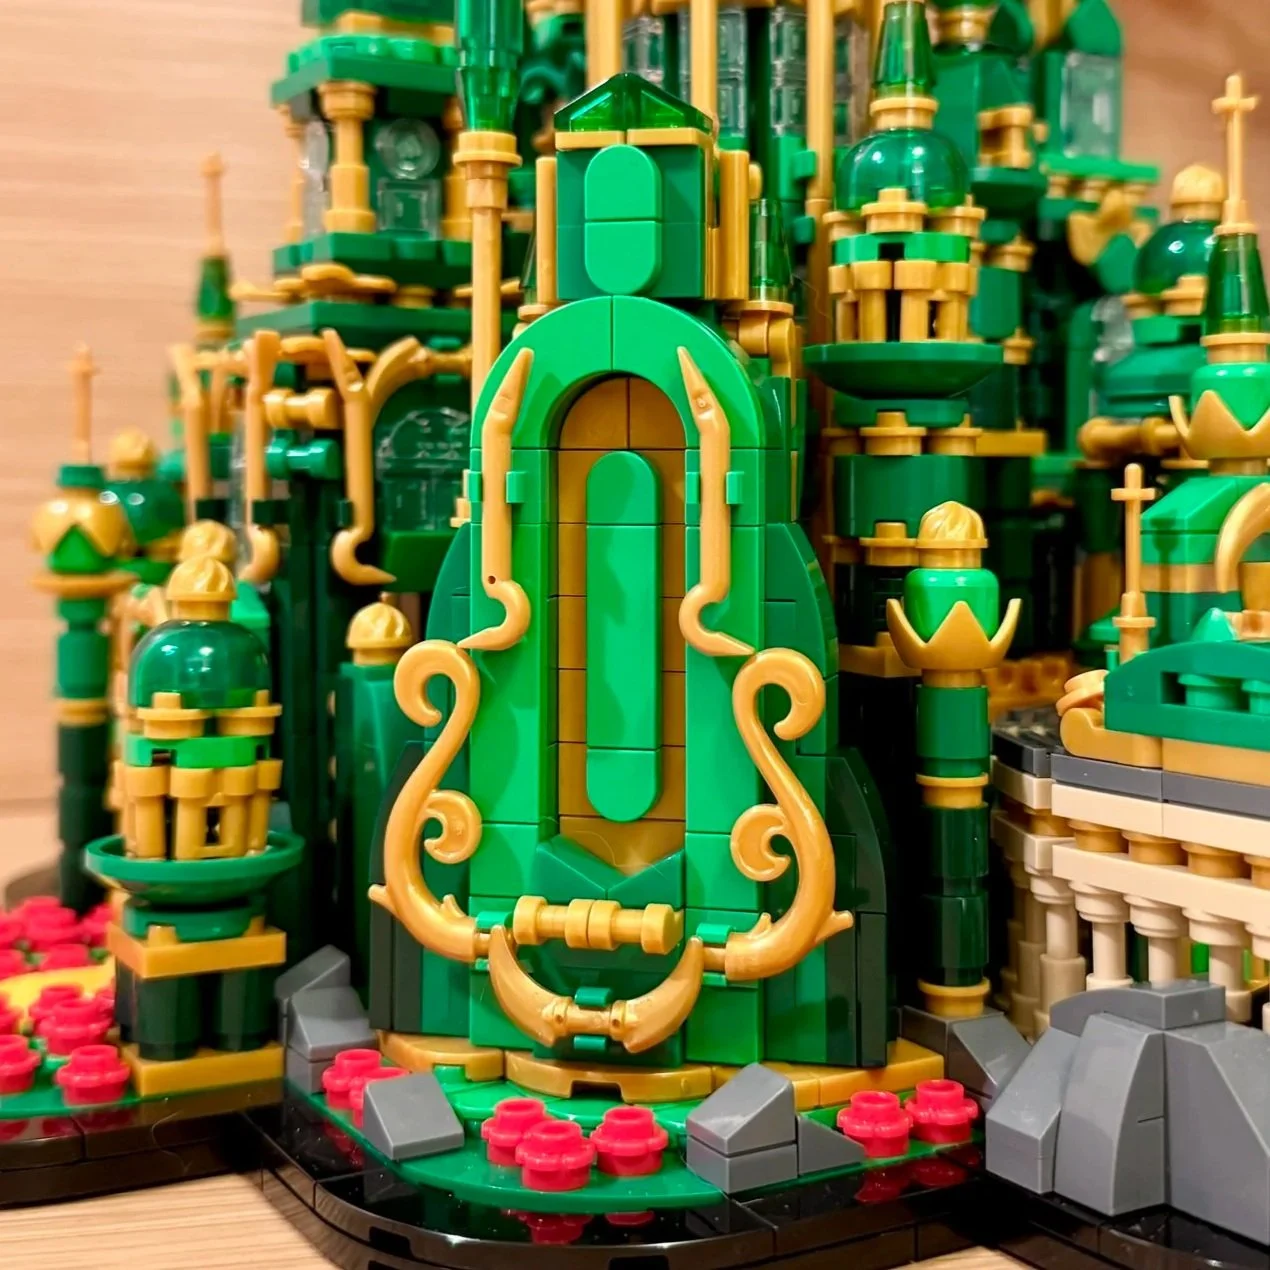
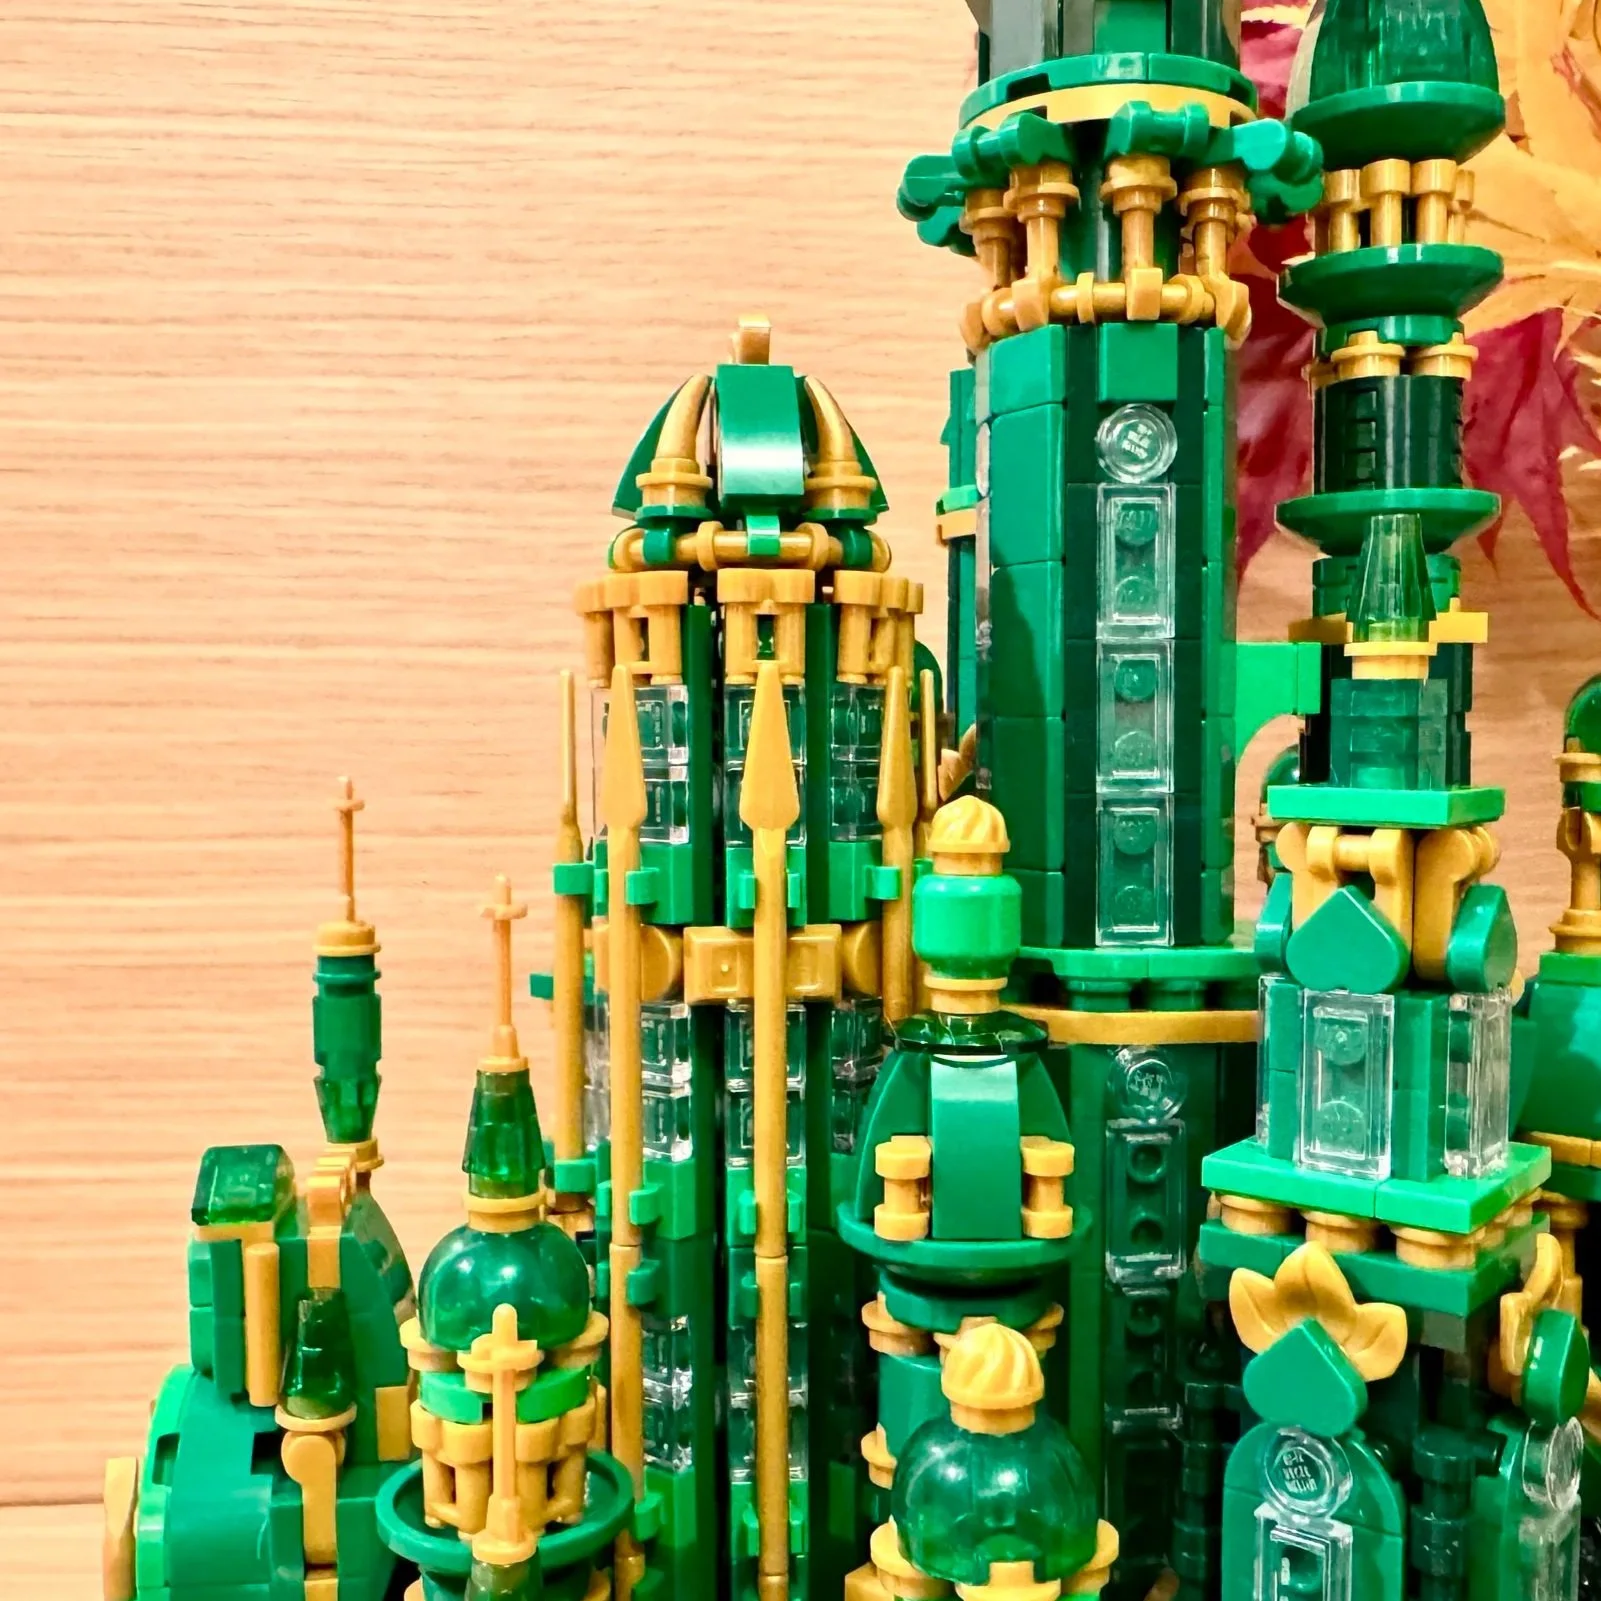
By the end, I had created around 50 prototypes for the city’s many towers and spires, with special focus on the main central tower—the one from which Elphaba dramatically leaps. It’s the tallest point in the model, so I spent a lot of time refining its shape and toying with the framing around the circular windows located at the very top. The green crystal spire at its peak needed to shine, and after many comparisons, I found the version that finally did it justice.

And that level of iteration was essential because the finished model contains 33 completely unique structures—buildings, towers, and spires—each designed individually. Not a single tower is a copy of another. They share certain motifs and architectural cues for cohesion, but each structure has its own silhouette, proportions, and details. The result is a skyline where every piece contributes something distinct.

One of my earliest goals for this build was ensuring that no two towers felt alike, and seeing all 33 together—each one with its own identity—became one of the most satisfying outcomes of the entire project.
Planning the City Layout
Next came the urban planning. With so many buildings in play, I had to figure out how they all connected—not just in shape, but in height, placement, and orientation. The city needed to feel organic, so nothing is arranged on a strict grid. Many buildings are offset or angled just slightly, creating the impression of depth, no matter which direction you view the model from. Hidden towers peek out between larger ones, giving the full 360° design a sense of discovery.


And speaking of 360°—this build fully embraces one of my core design tenets: every side should matter. There is no “front” or “back.” The city is meant to be viewed from all directions, just like the Wizard’s vision of a yellow brick road that leads to the Emerald City from every direction. Fittingly, my model includes four yellow brick roads leading to four city gates, one for each cardinal point.


Honoring the Lore of Oz
Another guiding principle I follow is incorporating references from the source material. The Emerald City gave me plenty to work with: places, artifacts, characters, moments.

The Emerald City Express was a must—an iconic detail from the newer films—and its inclusion gave me the perfect excuse to design a brand-new train station. Since the movie barely shows it, I had the freedom to invent a building that still felt true to the world of Oz. But of course, every train needs a track, and figuring out how to weave it through the city became one of the more unusual challenges of this build.
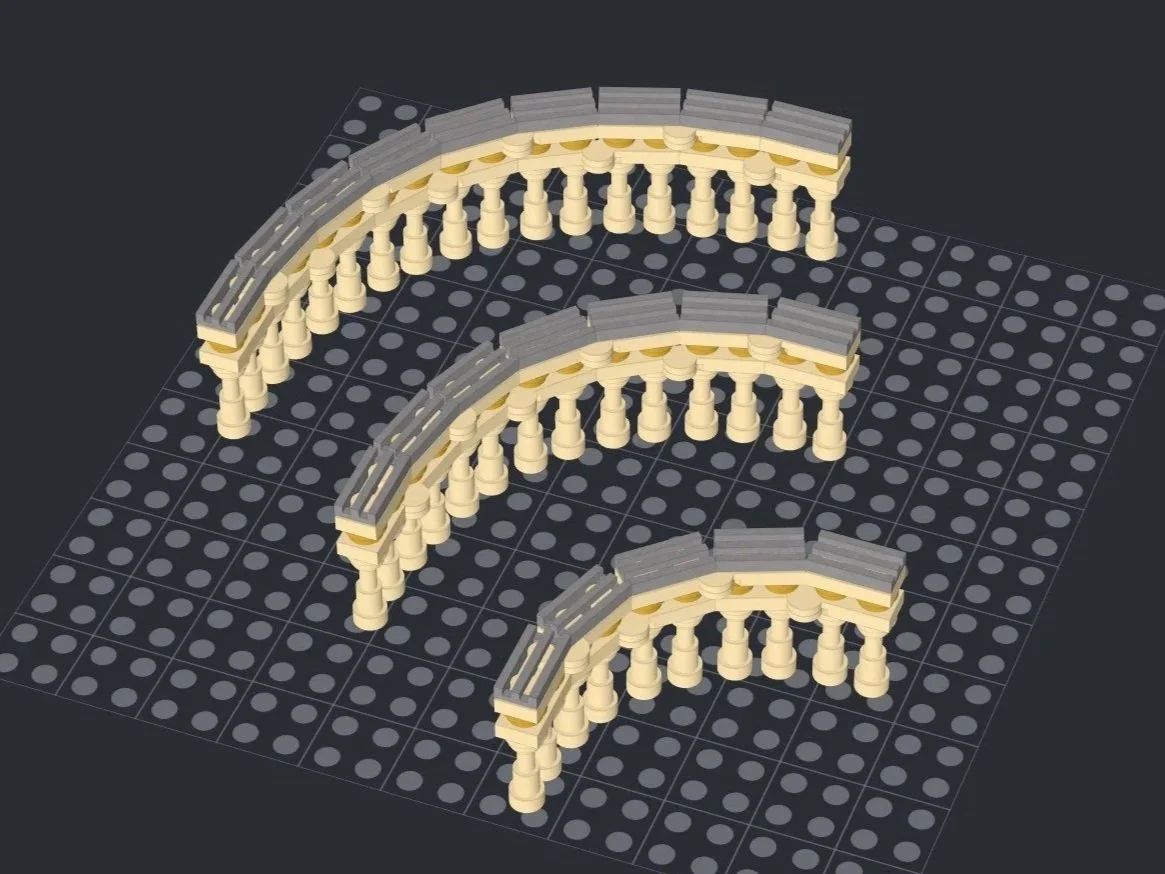
In the film, the tracks loop around the Emerald City and wind between the towers, so I experimented with different radii for the curved sections to see what would work best. Getting that curve right was crucial because it influenced how closely I could place the buildings to each other—and whether the layout felt rich and dense or left awkward gaps where no gaps should be.

I also knew the Time Dragon Clock had to make an appearance. While it’s not featured in the film’s Emerald City, it’s far too important to the world of Oz to leave out. Thankfully, LEGO had already made the perfect printed clock face in set 75684 Welcome to Emerald City. I built it right into one of the main city gates, making it a prominent feature and one of the first structures visitors “encounter” on their way in.
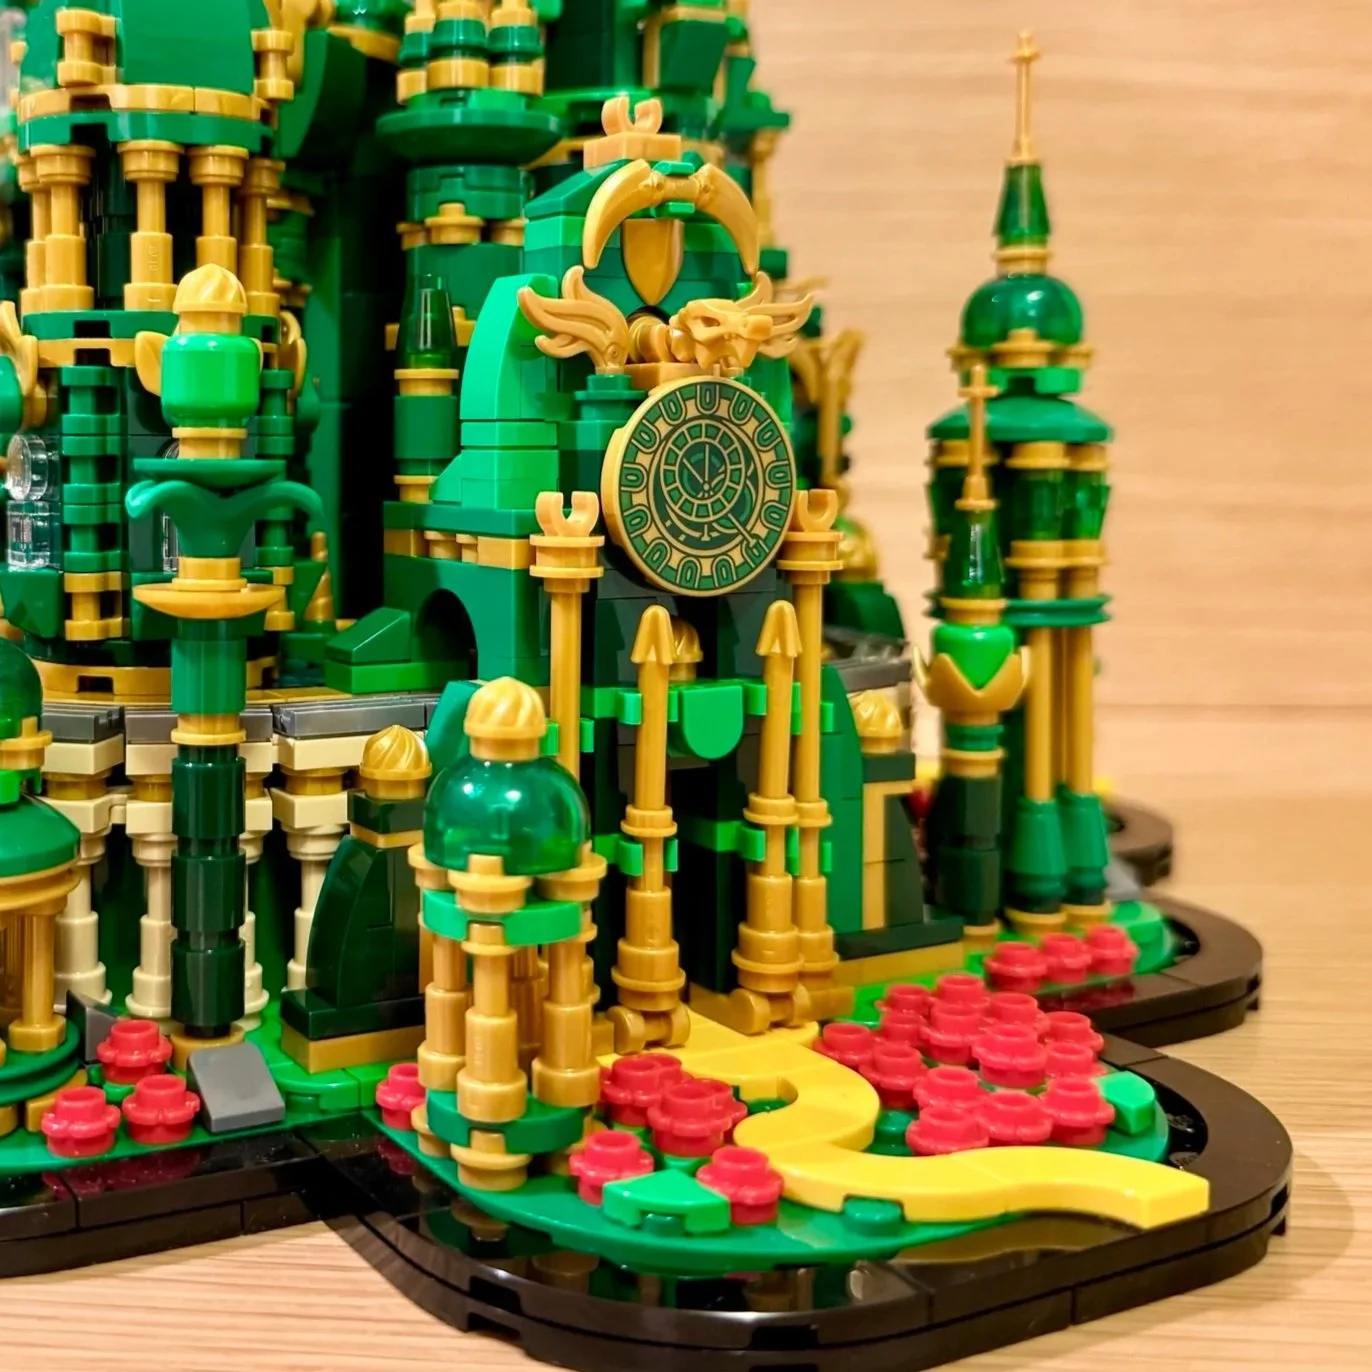
Another highlight is what I like to call the Grand Arch—a distinctive structure seen in the film that connects to the main palace body. Its unusual shape made it instantly recognizable, so I gave it a prominent place in the layout.

Wizard’s Palace & Character Details
When it came to the Wizard’s Palace, I knew I needed room for a special detail: the tower where Elphaba and Glinda attempt their daring hot-air-balloon escape. The moment is unforgettable, so I designed the dome at the top to open and close, just like in the film. When open, it reveals a hollow stud where a mini hot-air balloon can be attached. The balloon, of course, references the one and only Wizard of Oz—a must-have artifact.

And naturally, I couldn’t leave out Elphaba and Glinda. Glinda’s apartment is tucked into the city, marked by bright pink curtains on her balcony. Her bubble floats nearby, drifting upward through the towers. The only full character model in the build is Elphaba herself, soaring high above the central tower, defying gravity just as she should. It turned out to be the perfect finishing touch.


What I Learned Along the Way
I could talk about this model for hours, but in short: this was my most challenging build yet—and also the most rewarding. With each model I complete, I expand my personal library of techniques, tricks, and strategies. That constant process of learning and discovery is one of the best parts of building. Every time I solve a tricky connection or find a new way to represent a shape, it’s a thrill.
And sharing these creations with the world—and with the incredible AFOL community—makes the whole journey to the Emerald City even better.
All of the castle designs by Juan Rodriguez Lopez are available on Rebrickable.
What other castles would you like to see built in this size and scale? Let us know in the comments below!
Do you want to help BrickNerd continue publishing articles like this one? Become a top patron like Marc & Liz Puleo, Paige Mueller, Rob Klingberg from Brickstuff, John & Joshua Hanlon from Beyond the Brick, Megan Lum, Andy Price, Lukas Kurth from StoneWars, Wayne Tyler, Dan Church, and Roxanne Baxter to show your support, get early access, exclusive swag and more.