A Tribute To Trebek
/With the loss of Alex Trebek late in 2020, I felt the need to do something meaningful as a tribute to the man and his legacy of knowledge, service, and entertainment. My wife and I watch Jeopardy every day so the entire show, and especially Alex, have become fixtures in our lives.
The most appropriate idea—and the obvious one for me—was to build a LEGO MOC! (Silly Doug, did they think BrickNerd would feature anything else!?) I present to you, my LEGO Tribute to Trebek.
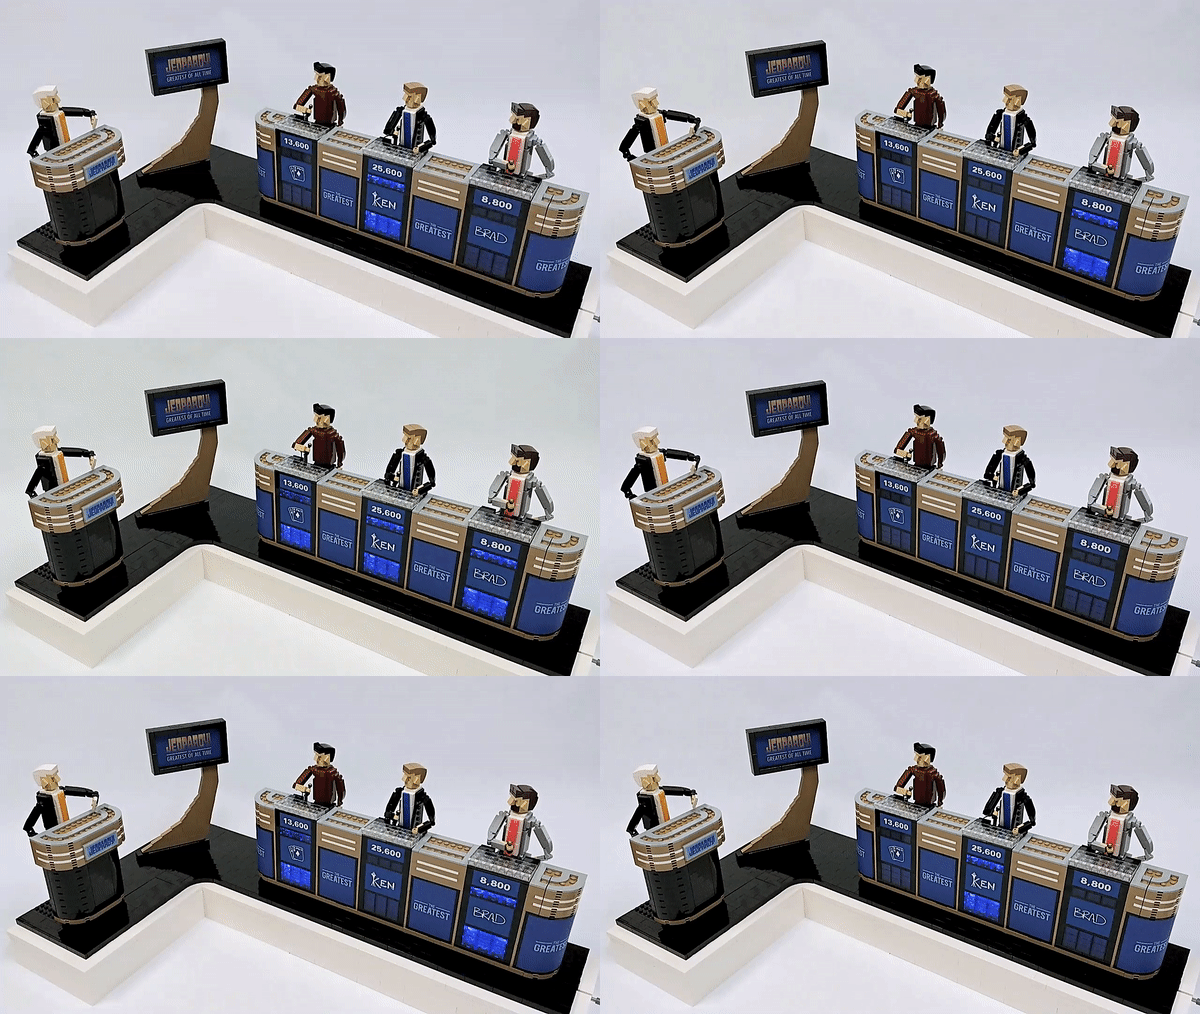
I decided early on a kinetic sculpture would best bring Jeopardy and Alex to life with bricks, and thus would make for another level of engagement. So without further ado, let’s see this thing in action:
(Many Bothans died to bring you this video… if Bothans represent the nights I spent working on this!)
Overview
So you’ve seen the fancy video, so why should you read the rest of this article?
My goal for this post is to describe the basics of the build and the process by which it came together, diving in deeper anywhere something was interesting to me, which hopefully means more fun for you too! Oh yes, there will be lots of pictures… and even a couple of GIFs! If that sounds interesting to you, then hold onto your butts and buckle up.
I started the journey of creating this MOC after a conversation with BrickNerd’s very own Dave Schefcik. He was curious if I’d like to write articles for BrickNerd and thought I might have a few ideas to contribute about MOCs with power functions—and maybe I could even document the process of building something new to feature. After a few weeks of noodling in November 2020 on Thanksgiving weekend (and a whole month before the new BrickNerd even launched), I got started building, finishing just now in late January 2021. Giving myself a couple of months kept the pace relaxed and also provided time to work on another concurrent build. It is amazing how having a deadline or convention or contest to build for really spurs you on!
Before you ask: I didn't keep track of the brick count, so your guess is as good as mine.
The MOC is a combo of System, Technic, Power Functions, and Mindstorms EV3 so I could achieve a smooth, display-worthy exterior that is motorized and programmed under the hood to perform some basic functions. All the motion is driven from one central power shaft attached to the Mindstorms motor and controller. That includes the players buzzing in, their podiums lighting up, and Alex rotating back and forth.
Everybody do the Alex shimmy!
A unique and pretty cool aspect of this project was that my brother, Greg, helped with the mechanism development. He’s got an eye for mechanical stuff due to his professional work as a test engineer. The lovable knucklehead helped mockup and give feedback for initial prototypes you’ll see below.
Creating a kinetic sculpture is a multi-step affair, and some steps blend into one another while others are strictly serial. So I’ve written up major steps below as best that I could, but I’d like you to see them as a loose collection—a fluid process of head-scratching and problem-solving—not too dissimilar to Jeopardy. I knew the answer of where I wanted to go, I just needed to figure out the right questions that would get me there.
Concept and Sketching
My first task with almost every LEGO MOC is to sketch out some concepts and write down key features on paper. This way I can explore options quickly and get a sense of what the result could look like. Sketching helps me visualize where I want to go and what the end result could look like.
My first sketch was a good start but it highlighted the stage setup from the current socially-distanced COVID-era of Jeopardy, something that I changed in my final model.
Initial concept sketch of my Tribute to Trebek
You can see I was playing with the shape and size of the stage, determining how much I’d build vs. leave out. I was also thinking about out how to light the podiums when a player buzzes in. One early concept was to physically slide white bricks into place representing the indicator lights on each podium. That might have been more accurate to the look of the show, but I decided that the complexity of the design wasn’t worth the added realism. I concluded that lighting up the podiums behind translucent purple bricks (from the recent LEGO Gingerbread House) would capture the right idea and be more feasible from an execution perspective.
My second series of sketches were not far from the final layout. I decided to transition the stage to the “Greatest of All Time Tournament” format which didn’t require a massive overhaul of the layout.
(LEGO brick separator included for scale.)
Research and Benchmarking
Beyond the myriad of Jeopardy images I pulled up for reference, the other initial research I did was to build LEGO versions of the amazing people who would populate the Jeopardy stage: Ken Jennings, Brad Rutter, James Holtzhauer, aaaand last but not least, your host, Alex Trebek!
As any sharp-eyed reader will notice, I blatantly borrowed the base-figure design from LEGO 7’s amazing Jazz Band Quartet build we featured in April 2020. I'm not usually excited about designing brick-built figures as I mostly work in minifigure scale, so this was a good way to have a tried and true design and port it over to my characters as needed. (That’s what LEGO building is all about, right? Borrowing techniques from the best builders in the community makes all of us better.)
Below you can see the first test-figure coming together:
Suit and ties
Next up, my brother and I looked for methods to move the contestants’ hands so it looks like they are emphatically buzzing in. I found inspiration in a model created for BrickCon, one of the largest LEGO fan conventions in Seattle. It was designed by the keynote speaker, Jason Allemann, aka JK Brickworks. You’ll likely know of him as the famous AFOL who designed the LEGO Ideas Maze and co-designed the LEGO Ideas Pop-up Book along with my pal Grant Davis. Jason is truly a master of kinetic sculptures, so I knew he’d have some great ideas!
Mechanism Development
The model ended up needing three different mechanisms:
Bump the contestant's hands to look like they’re buzzing in.
Switch the Power Functions on and off for the lights on the podiums.
Sway Alex back and forth through a rotation.
For the bump motion, once we used Jason’s camshaft mechanism, we never looked back. It’s simple and effective. You can see my brother below with the first prototype and to be honest, I barely changed it for the final model.
Hughes the Younger (my brother) and his camshaft mechanism
Next up was lighting up the podiums. I decided to use Power Functions lights to keep things within the “LEGO purism” world and also because they’re simple and effective. That would have been it, but I had another problem I had to figure out—how to time the lights with the buzzing in motion.
It turns out I could use a single solution to flip the switches at the same time as the buzzer bumper mechanism. It’s simple! Link the switch to the main drive shaft that already bumps the buzzer hands!
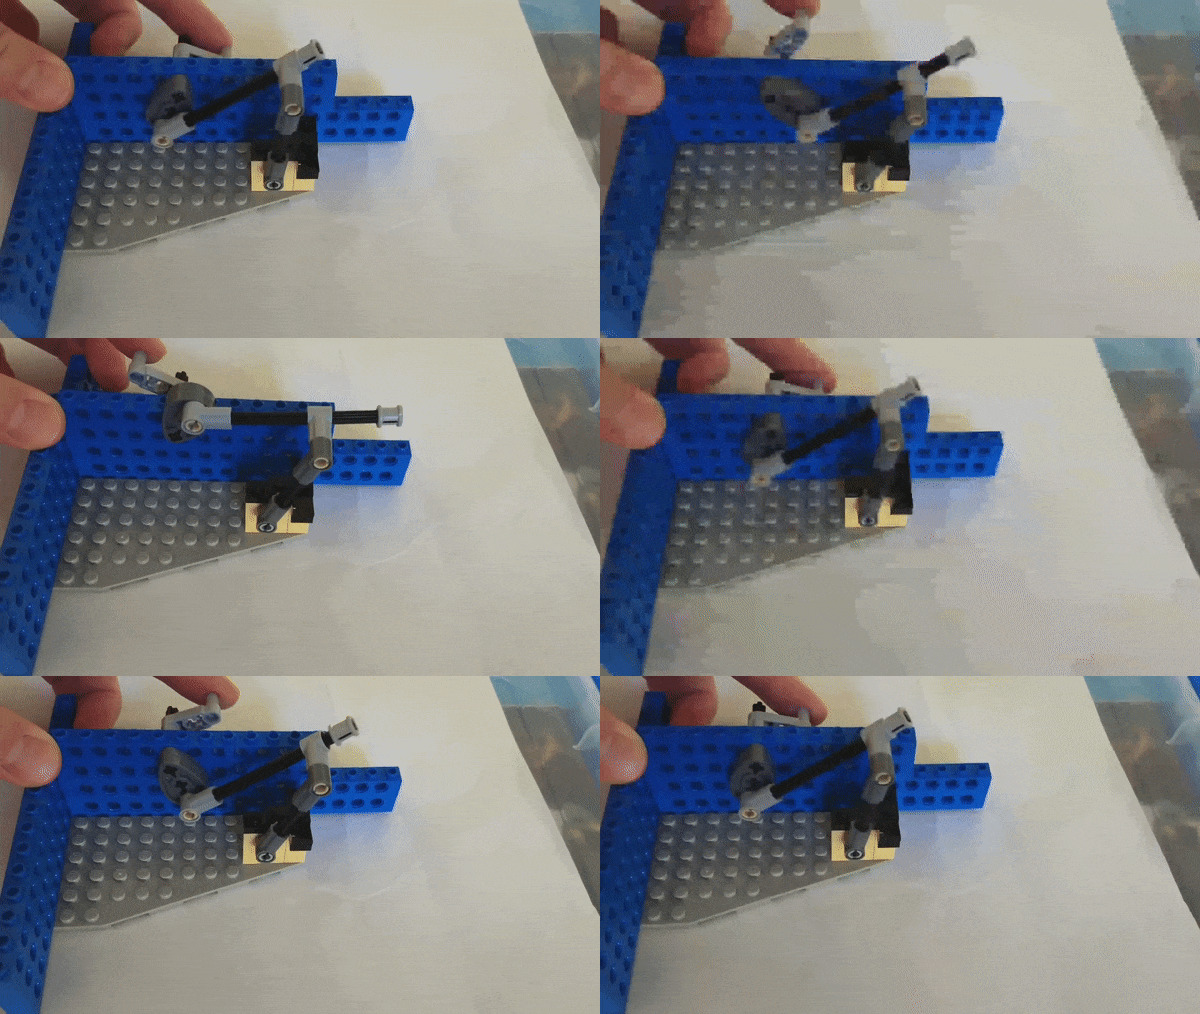
To make this work and flip the switches on and off I had to find a way to convert the rotational motion of the main drive shaft into linear motion. I chatted with my brother and he sent me some initial mechanism mockups to try out. His first attempt is below. I copied this but found it was a bit sticky and didn’t drive the switch smoothly when I made my version.
Light Switch Mechanism V1
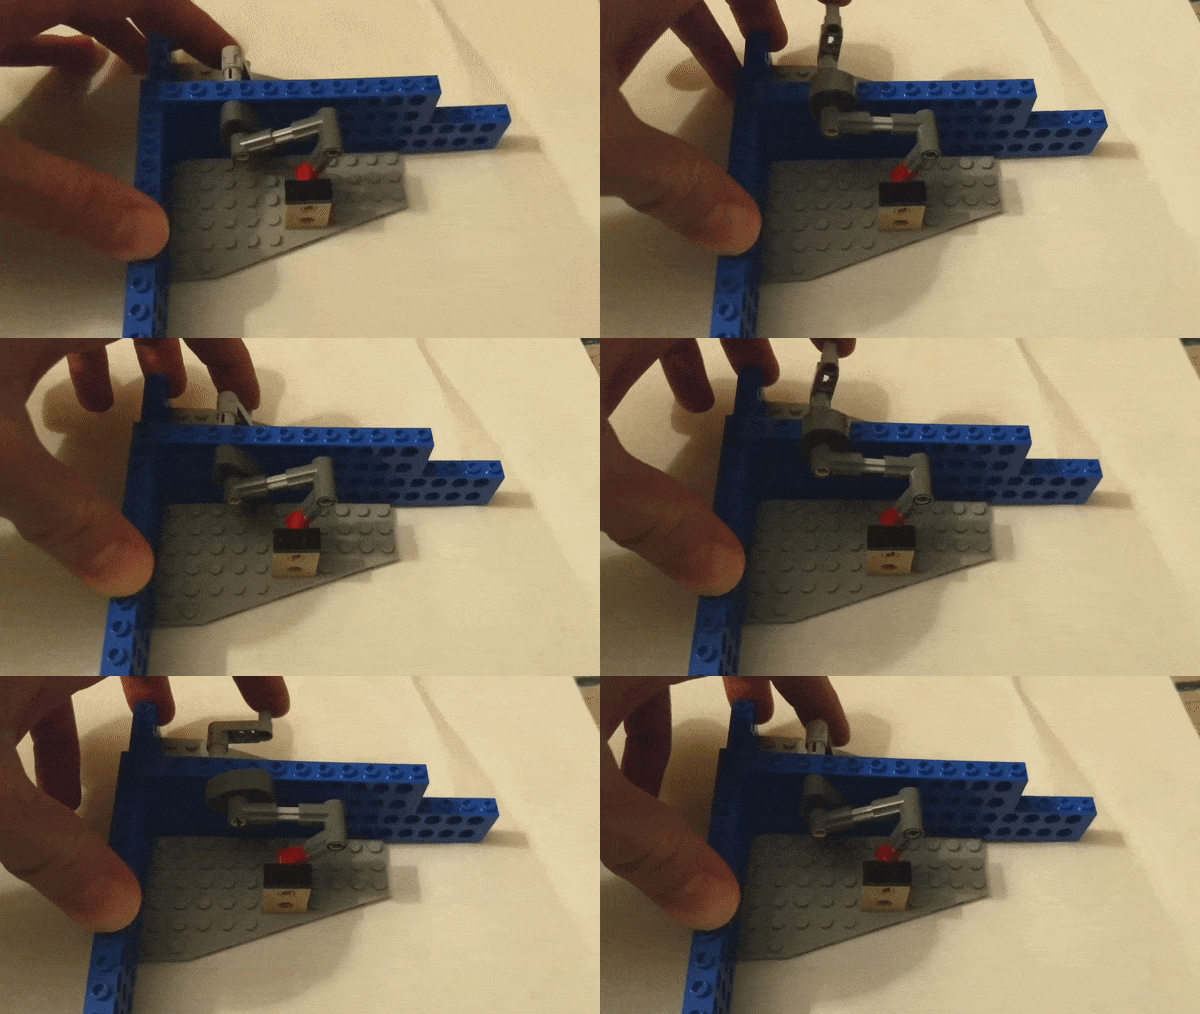
Next, he sent me this more controlled mechanism… but unbeknownst to him I had already moved on to a different final mechanism posted further below. (We’ll never know how this one would have worked out!)
Light Switch Mechanism V2
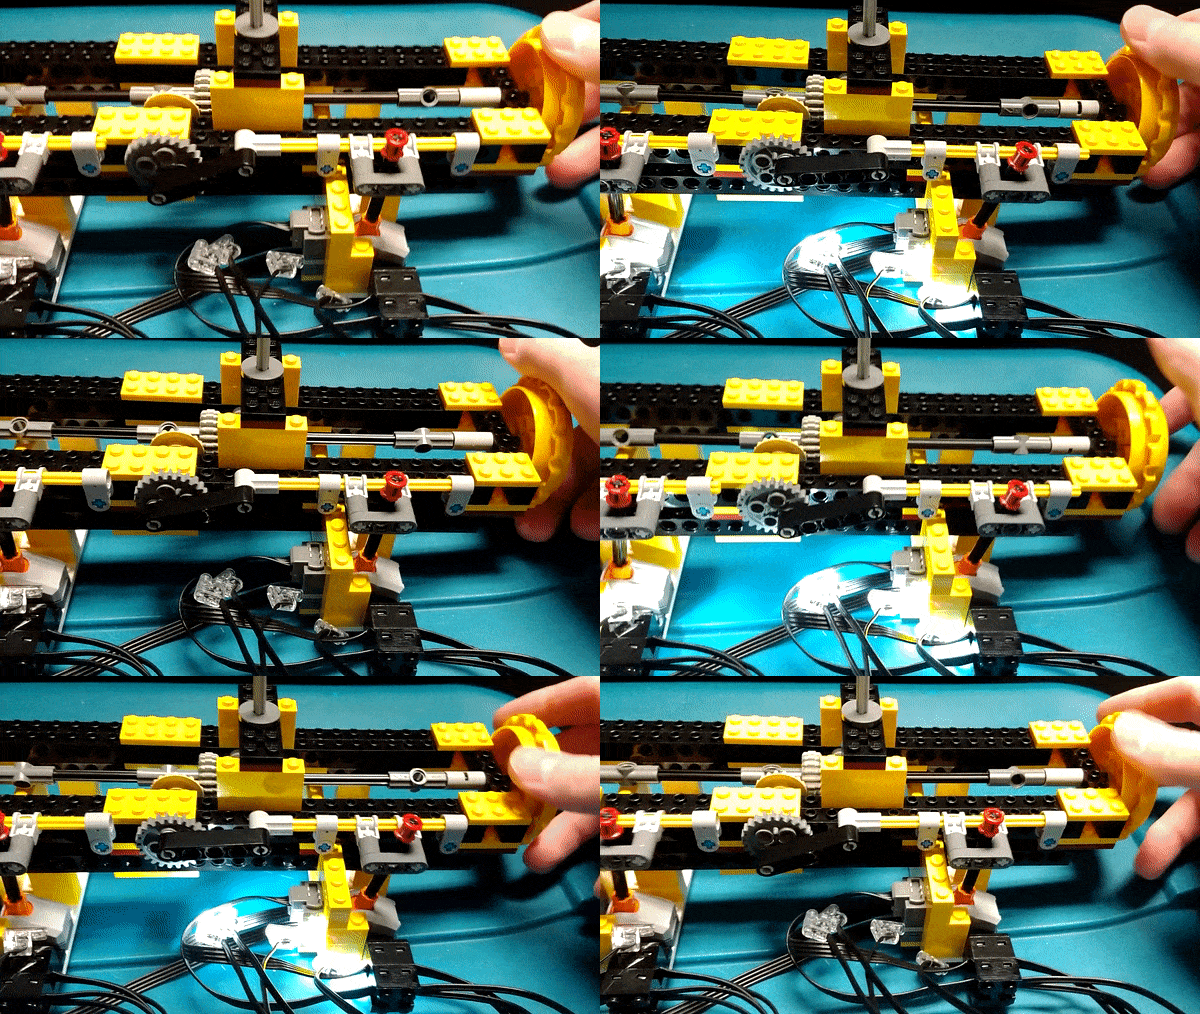
Based on the issues I was having controlling the travel and the stickiness of the prior mechanism (in combination with the fact the switch itself was rather friction-ey), I ended up pushing and pulling the switch by essentially forcing movement without connecting anything to it directly. I went to my favorite technic resource: The LEGO Technic Idea Book - Simple Machines, by Yoshihito Isogawa. There I found and subsequently modified one of his mechanisms to translate rotational into reciprocal linear motion.
That mechanism gave me just the control I needed, and thus I built a new technic frame to the dimensions needed to include three of these shiny new switches! To sync up the switch timing with the buzzer bumper, I simply had to take the end of the black link (near the center of the image below) and pin it to the correct hole in the grey gear.
The Final Light Switch Mechanism v3
As for the swaying method to make Trebek shimmy, I ended up using the same switch mechanism but condensed to fit below the floor of the MOC. No switch needed here, it instead pushes and pulls the base of the Trebek figure causing him to sway.
Flip the light switch mechanism on its side to get Trebek to shimmy!
Covering the Mechanism
Once I had all three mechanisms working (which was SO satisfying!), I moved onto building the podiums and the “pretty” box to cover up all the internal ugly stuff. I had to ensure the podium looked just right, so I carefully crafted the front façade in a way that left space to integrate the lights and shafts which would ultimately stick up through the tops of the podiums to bump the hands.
The podium itself is a pretty straightforward design, only requiring some relatively simple SNOT work (studs not on top) to get the color patterns and striping right. As many AFOLs know from hard-earned experience, many of the best LEGO MOCs are just a façade with a literal rainbow of bricks on the inside. The lesson here is to use what you have on hand!
The hardest part of making the final shell was threading the wiring from the lights through the structural supports. The lights themselves are designed to fit snugly into the holes of Technic bricks, so all that was left was to shine them into the compartments behind the translucent purple bricks.
As you can see, I decided against making the back pretty. It’s fun to see all the innards exposed from the other side, art is messy, and I knew I’d want to share!
The secret sauce… the view from behind the curtain
Stickers
Though I know this might be the third-rail of LEGO building, I realized early on that to make my MOC feel as authentic as possible, I would need to use some stickers. Stickers grant the ability to replicate patterns, colors, and text just right, and can take a good MOC to a great one. In my case, creating custom stickers required quite a bit of detective work online to grab imagery to work with or modify as a reference. With some editing in GIMP (a free Photoshop alternative and simple enough to make any photo shine) and quite a bit of graphic design in Corel Draw, I think I got the colors, numbers, and text just right!
Detailed recreation of the Jeopardy font which isn’t available publicly
When the designs were ready, I arranged them all on one page and printed it on a sticker sheet. I use Avery 6470 Removable ID Labels because they stick well, the printing looks solid (though matte) from a regular consumer printer, and they peel off easily with little to no residue when you’re ready to disassemble later (if you ever take your MOCs apart… that’s a whole other article to be written).
Graphic design of the stickers, with enough border to make it easier to cut
Pictures and Video
Another whole article could be how to photograph a MOC. I won’t get into the particulars of taking pictures and video here, but you know… I did it. And if you’re curious, yep, it takes a lot of time to stage, photograph, and edit! I can’t recommend editing your photos enough to clean up dust, clear the background and make your MOCs really shine.
The fellas playing for the GOAT (and sadly not the LEGO kind but maybe just as valuable…)
However, that effort is increased—maybe even multiplied—when video is involved. I don’t take videos of my MOCs often, plus video editing is really time consuming… so I’m glad I find it fascinating and super fun rather than tedious! (Kudos to all the LEGO YouTubers out there who do it every day!)
When planning the video I decided to do something different than the typical view of the mechanism repeating over and over (of course I got that footage too). I knew I wanted to tell a story, and what better way than to parallel various bits from Jeopardy episodes, and even better: aspects of the GOAT Tournament itself! This involved scouring the internet for source material then playing around in Pinnacle Studio with various clips until the final video I wanted emerged like a sculpture after hacking away the extra marble.
Conclusion
I had finally found my answer in the form of many questions, and what a game that was! I was able to build on the genius of many other intelligent minds in the AFOL community, and I couldn’t be happier with the result. Thanks for taking this ride with me. I hope you enjoyed the peek into my process and being rewarded with pictures and GIFs along with some occasional witty prose.
You can see more of my work and high-resolution images of my Tribute to Trebek build on my flickr page. To conclude, I’ll simply parrot Ken Jennings as he closed out his recent episodes of guest-hosting Jeopardy: “Thank you, Alex.”
Have you ever been inspired by other builders when creating a MOC? Leave your thoughts in the comments below.


