All Roads Lead to Rome: Building the Eternal City, Part II
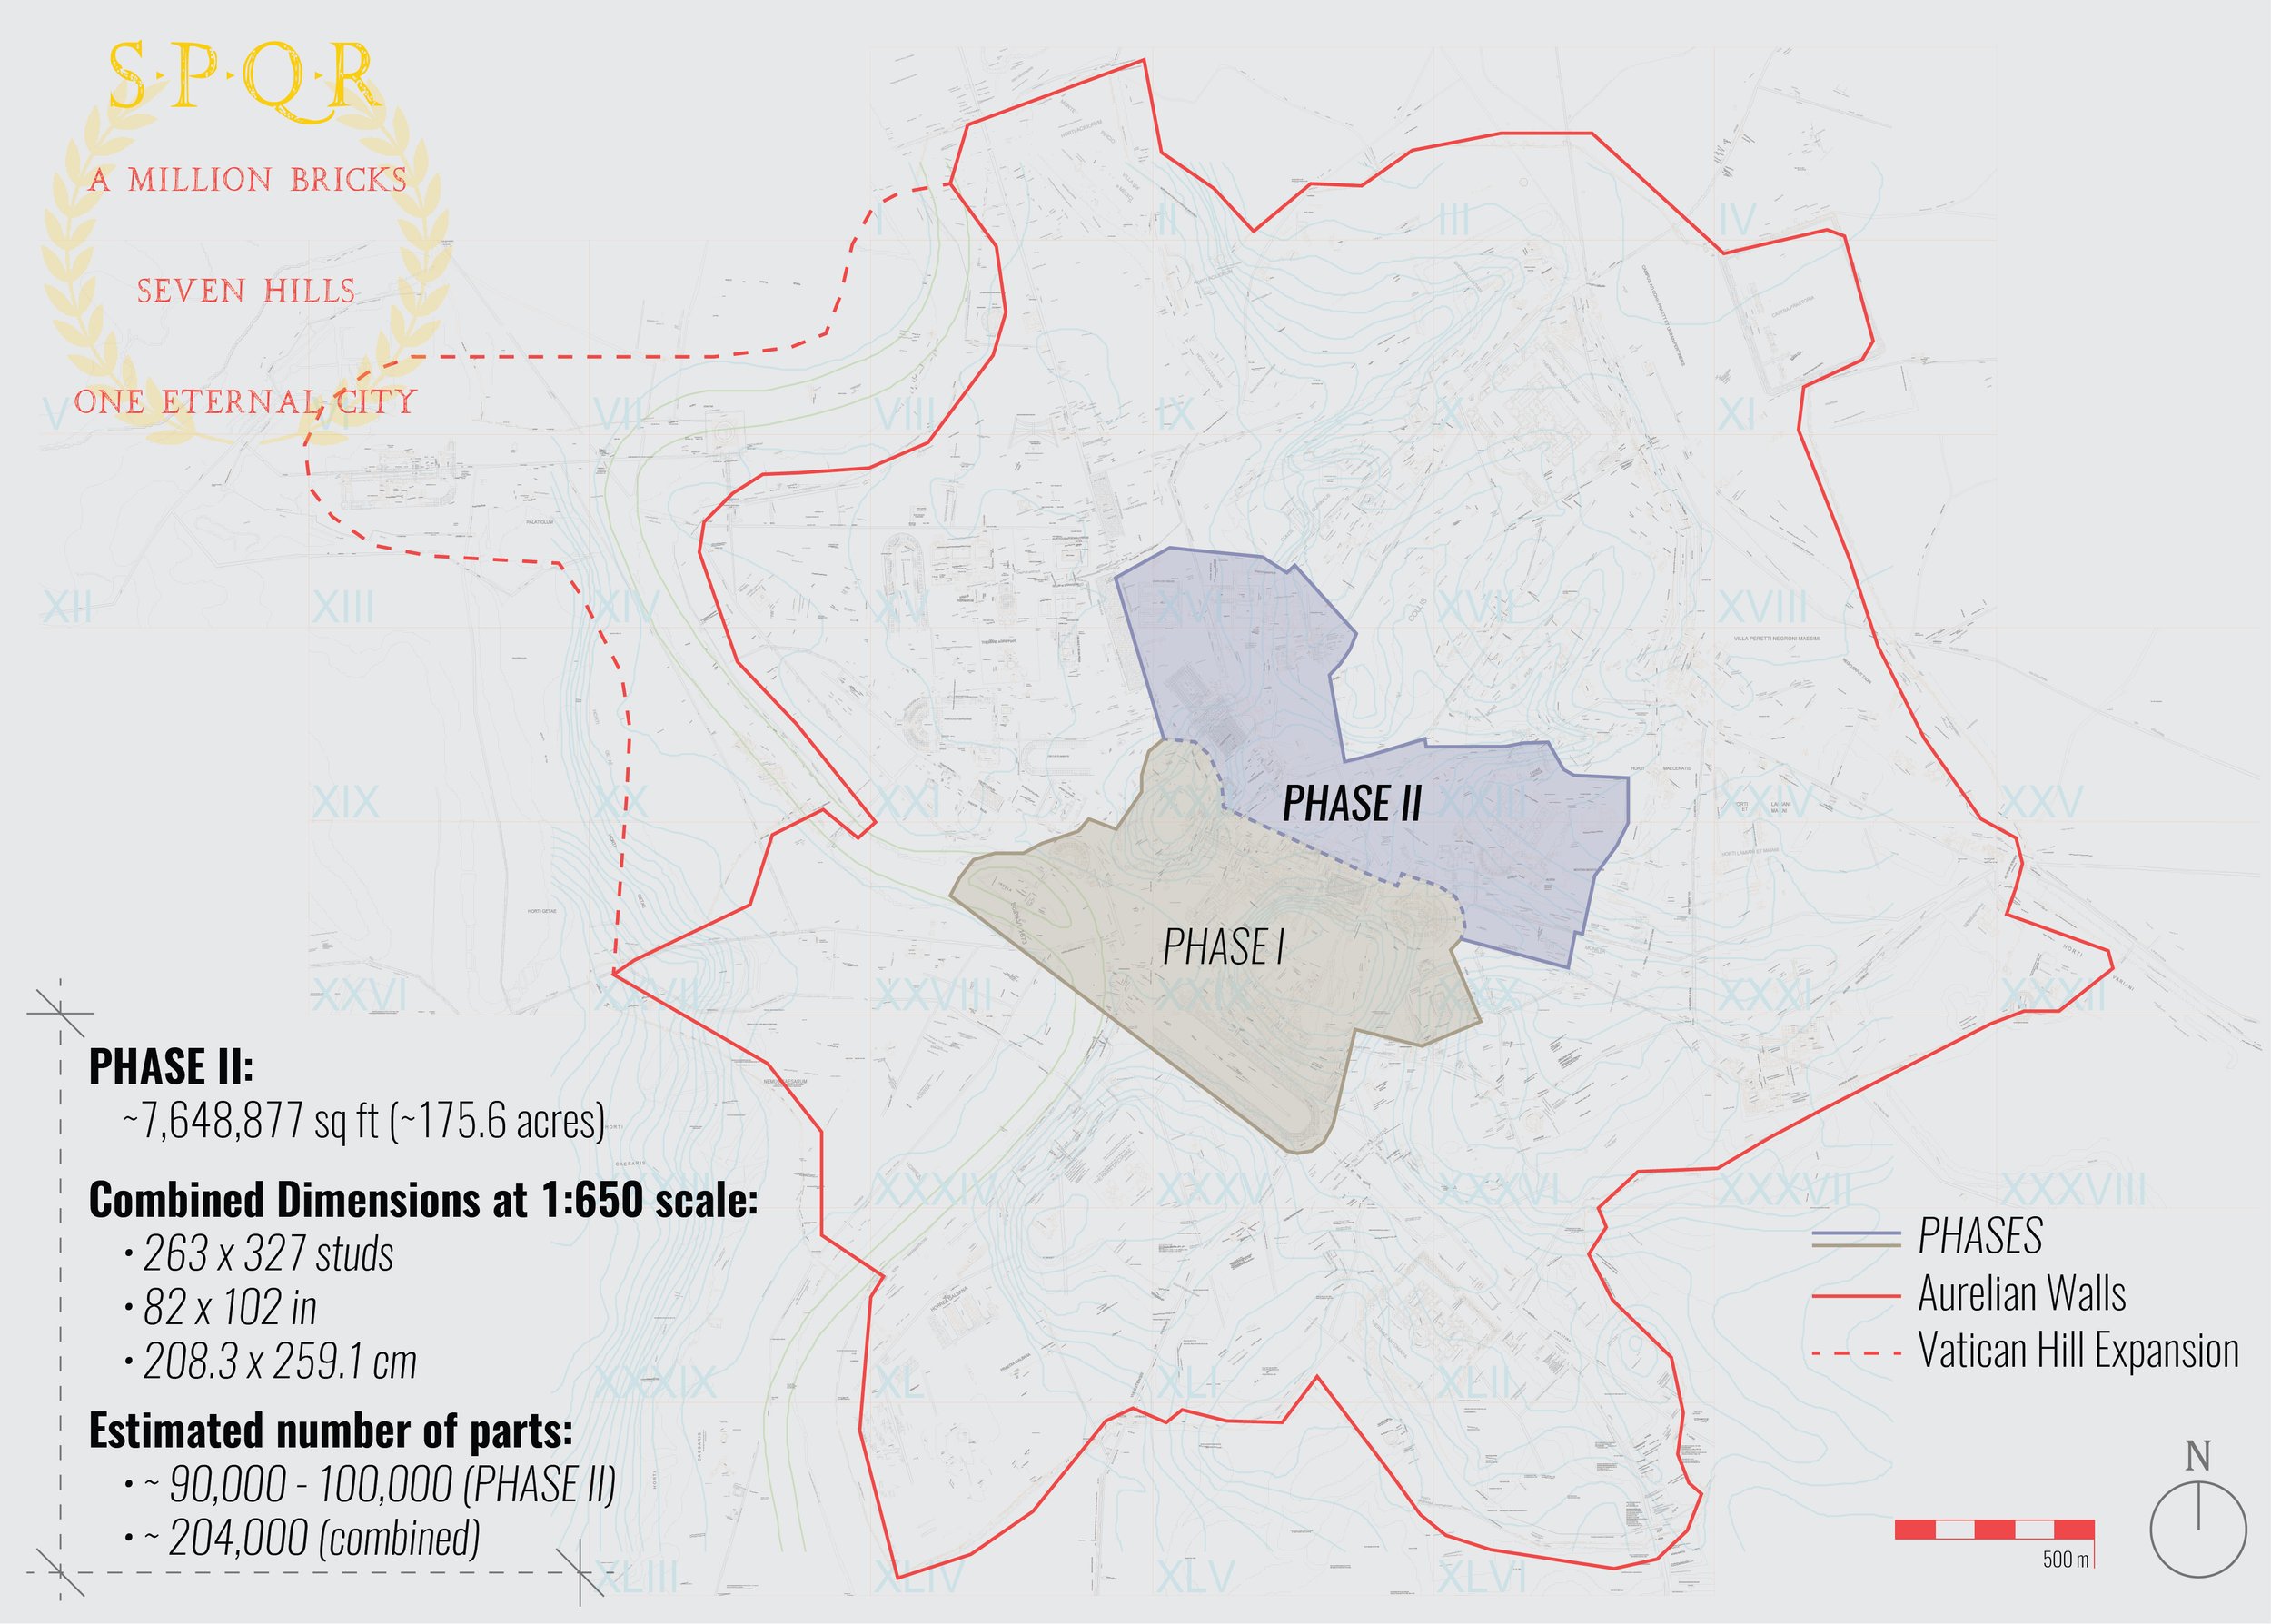
/Welcome back to Rome! Or, rather, Rocco Buttliere’s 1:650 scale version of it. En route to replicating the entire part of the Eternal City that lay behind the ancient city walls, this world-class architecture building expert has finished Phase I of the monumental task, covering about a tenth of the area that eventually will make up the SPQR project.
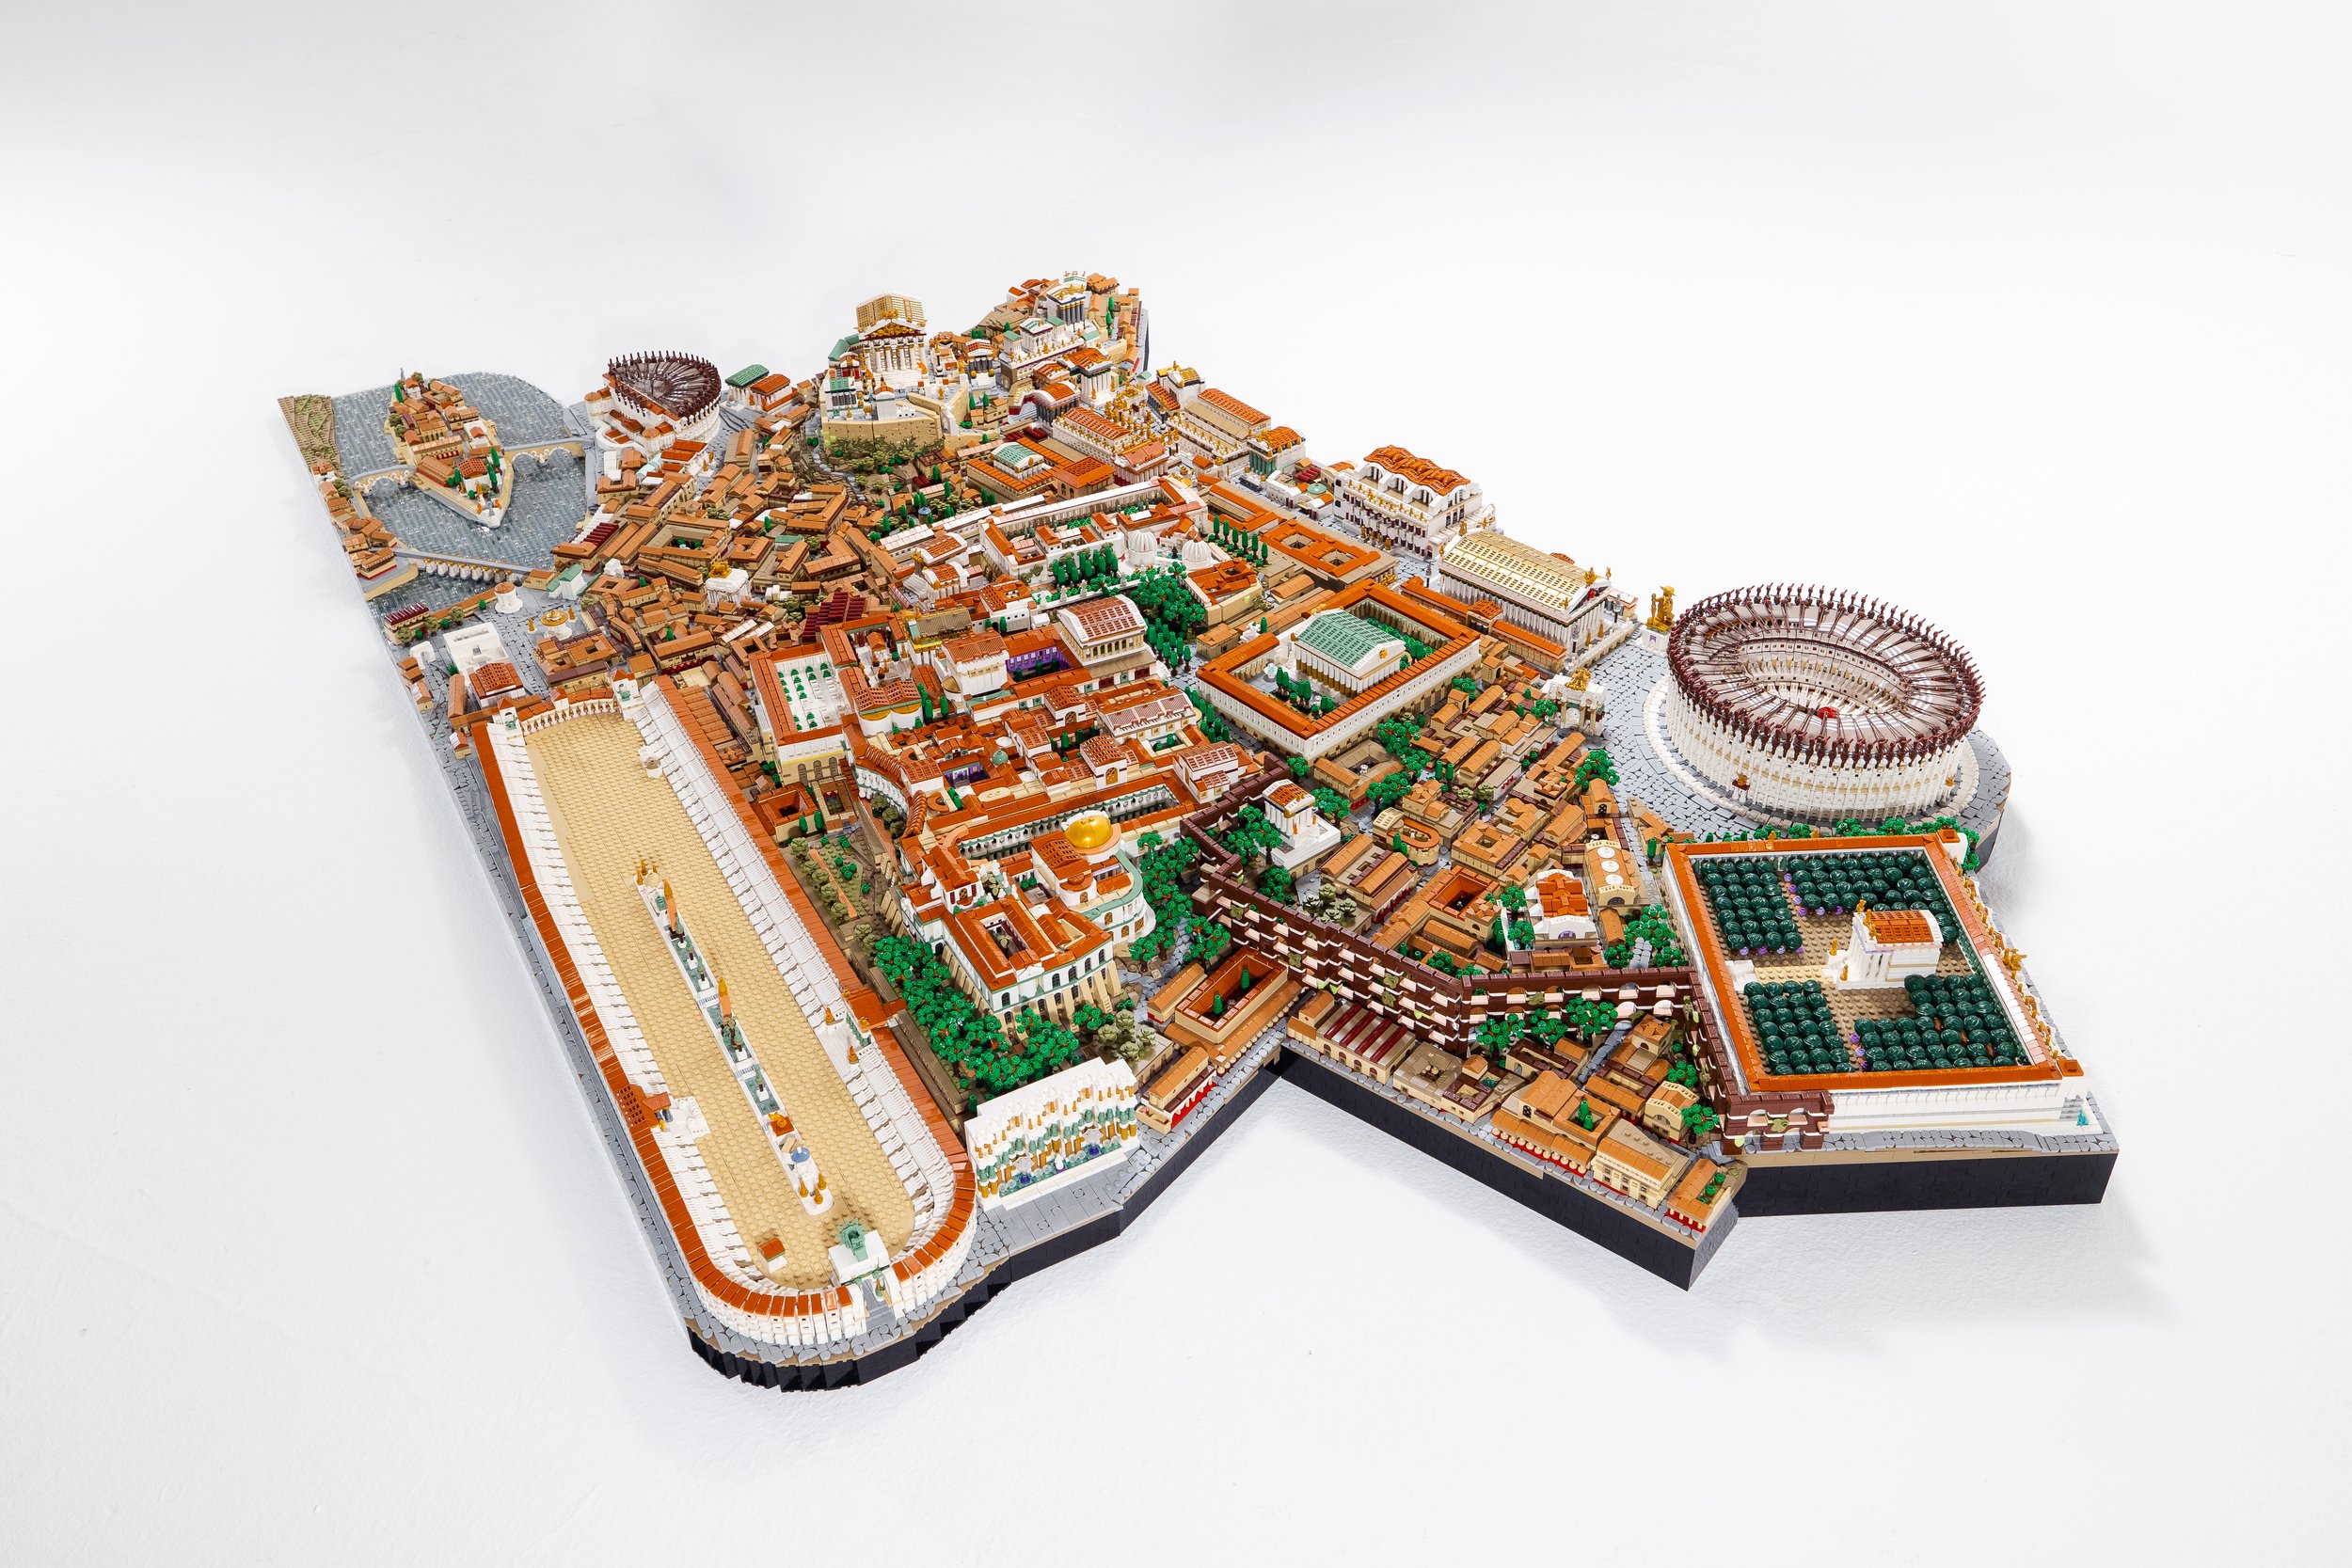
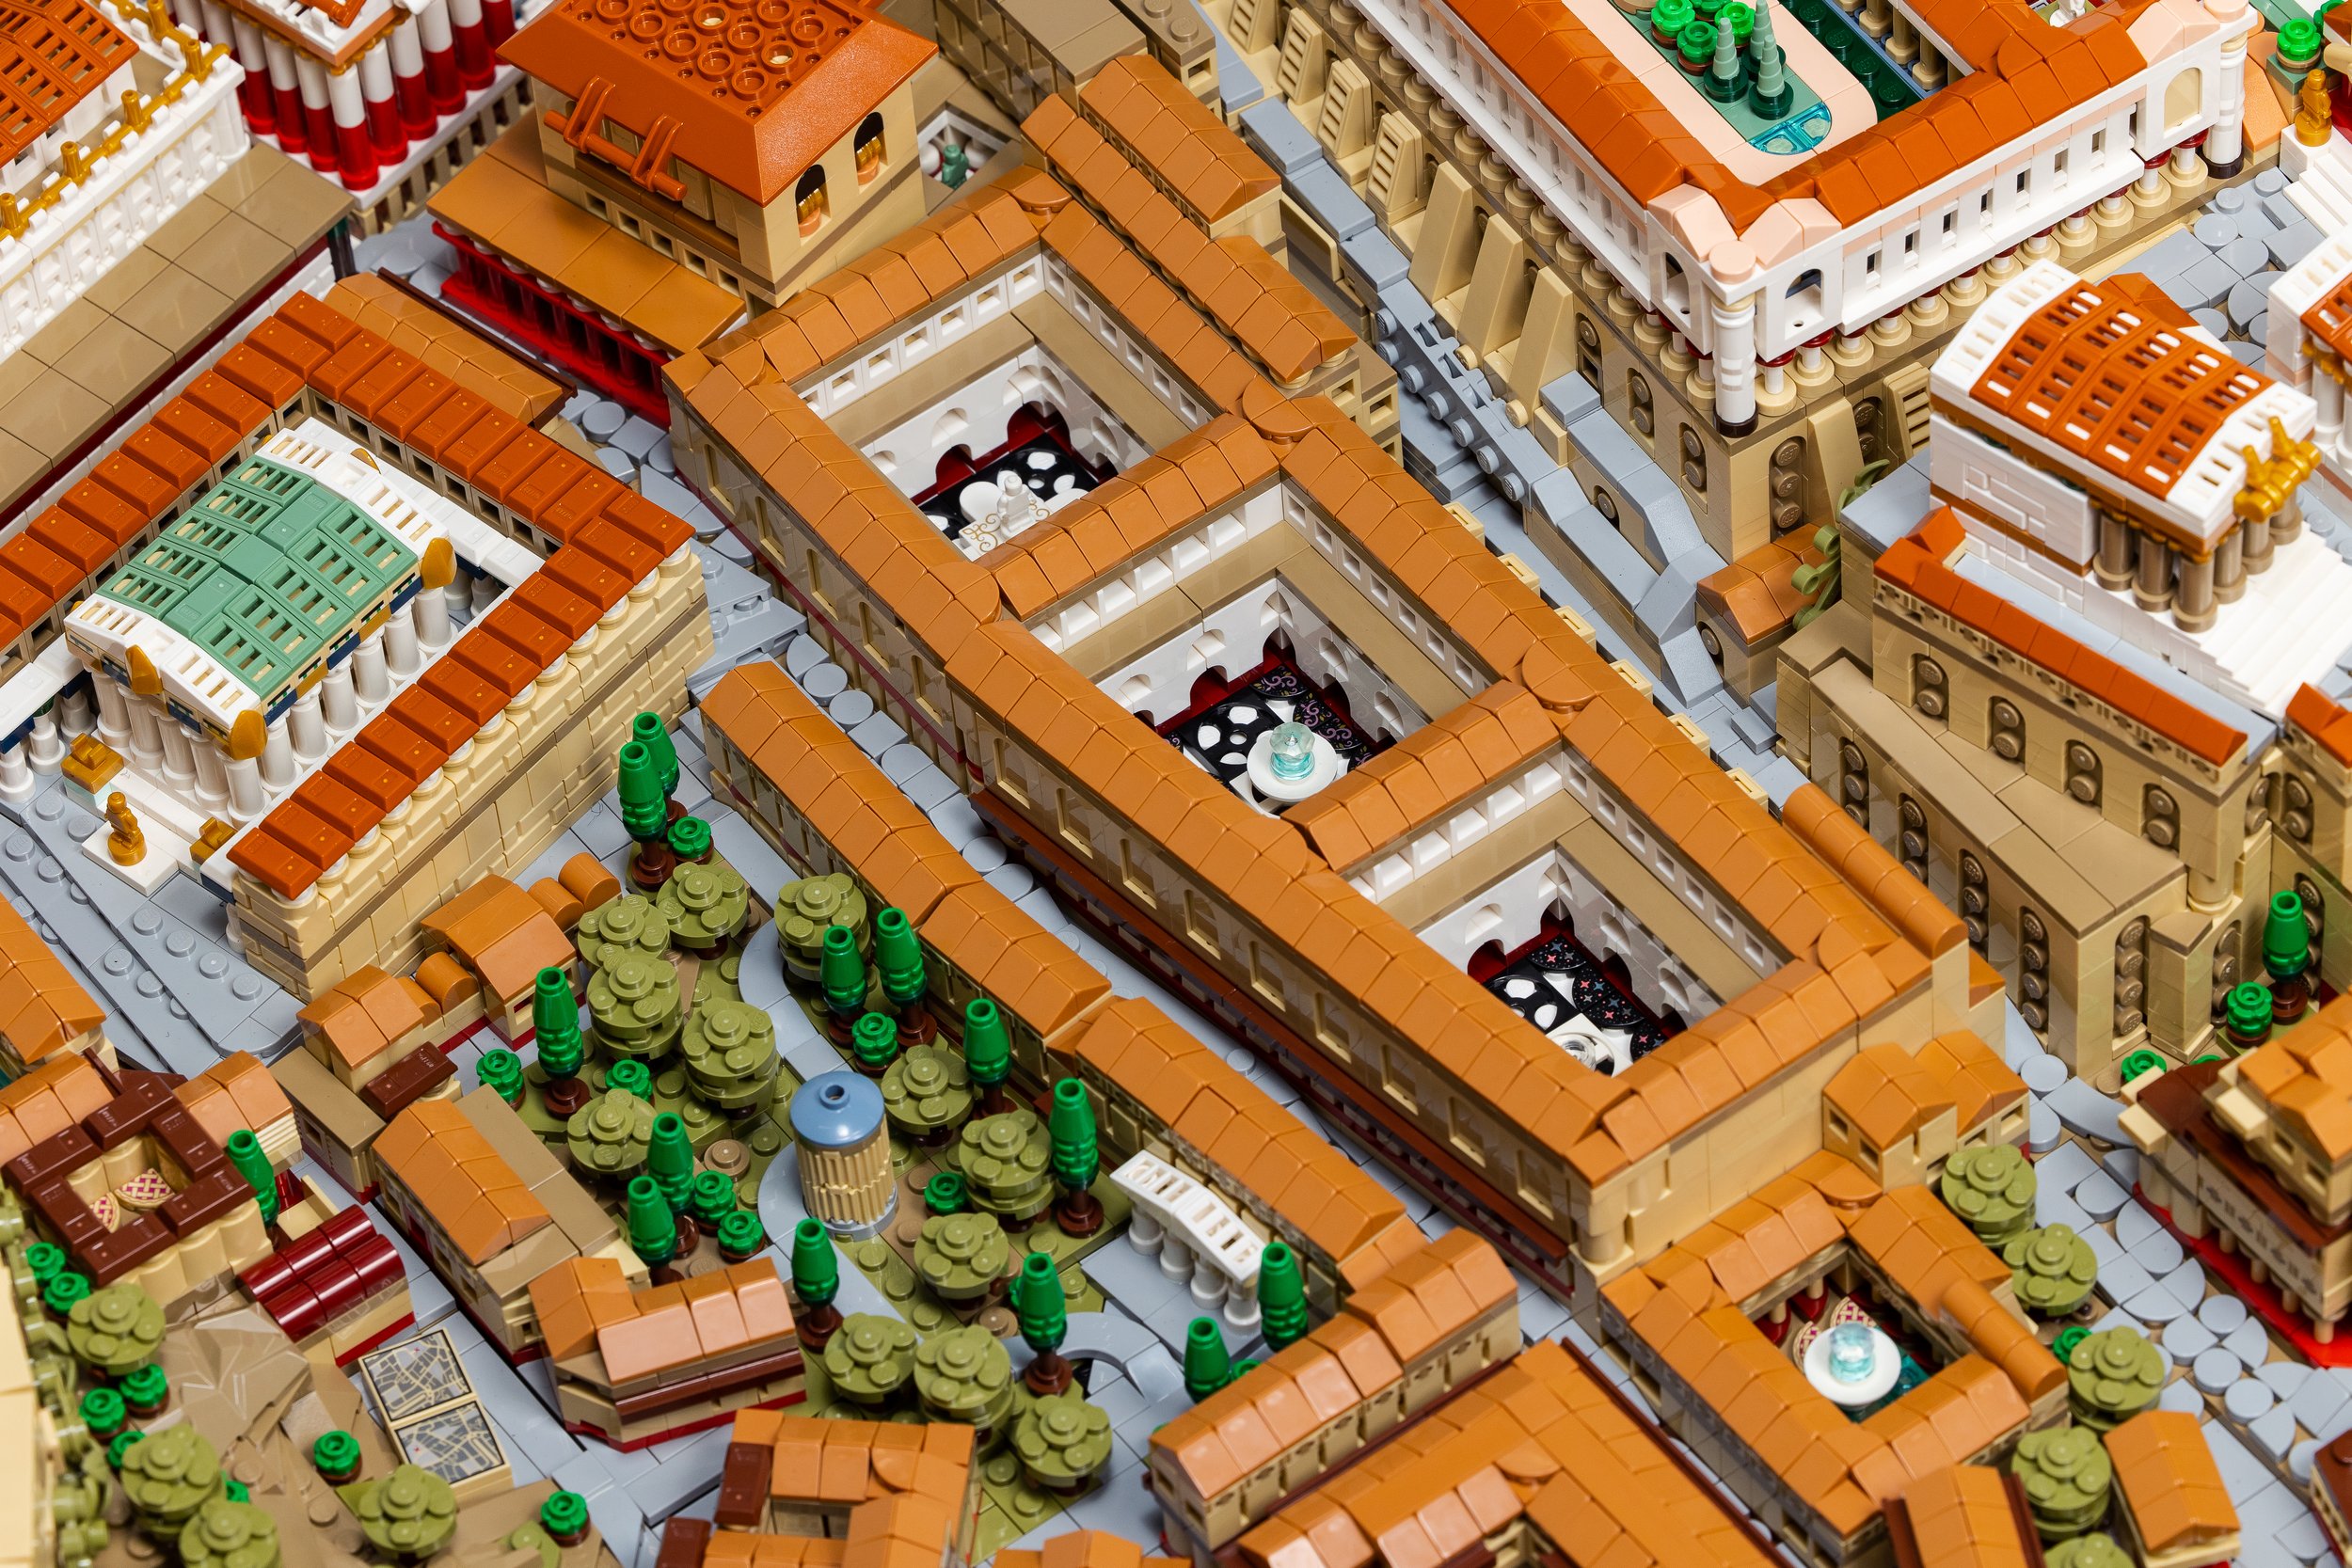
The city center of ancient Rome, in all its 104.000-brick splendour. Photo © Rocco Buttliere, MMXXIII
We sat down with Rocco to discuss the endeavour. If you haven’t already, make sure to read Part I of the interview first, where Rocco talks about how he came up with the idea, his meticulous research, angles and shapes that are difficult to get right using the square medium of LEGO, and using Stud.io during the design process.
Devil in the Details
BrickNerd: I have to say, my head still hurts a bit from looking through the roughly 500 images you sent me as background information before this article—mainly because there’s simply such a staggering amount of detail in these builds, which is all the more impressive when you consider the sheer scale of it. Other builders would probably have decided it’s not really necessary to go through the trouble of levelling out the half-plate offset at the base of cheese grater slopes when using them to build a roof, for example, or even including pretty intricate details inside a miniature model that nobody else will even see. Why is this important to you?

This is the amount of work that goes into making those cheese grater slopes sit flush. Photo © Rocco Buttliere, MMXXIII
Rocco Buttliere: The more work I’ve done and the more tangentially related books I’ve read, the firmer my position on detail has become, to the point where I take as much care as possible to capture the identity of each and every building (including and especially those of whose provenance we are fortunate enough to know quite a lot). I’m often struck by just how overused the view of “realism from 30,000 feet” has become. To me, such an approach starves a piece of any soul upon closer inspection, and all the while smacks of indecision or frustration with the medium and/or scale.

Interior detail. Photo © Rocco Buttliere, MMXXIII
The goal from the outset of returning to Ancient Rome was to imbue within this piece a vitality in the form of a Stoic logos. Logos in the Stoic sense is a pervasive and omnipresent life-force within all things, animate or inanimate. There’s a clear difference between representing a nondescript insula with a monochromatic façade and one which instead uses: various red elements at street level to represent the typical exterior painting of insulae, protruding brown elements between upper stories to represent wooden balconies and extended floorplates, and numerous variations on 1x1 plates at the roof line to represent the cluttered density of windows.
Same interior detail—hardly visible in the finished model, but still there. Photo © Rocco Buttliere, MMXXIII
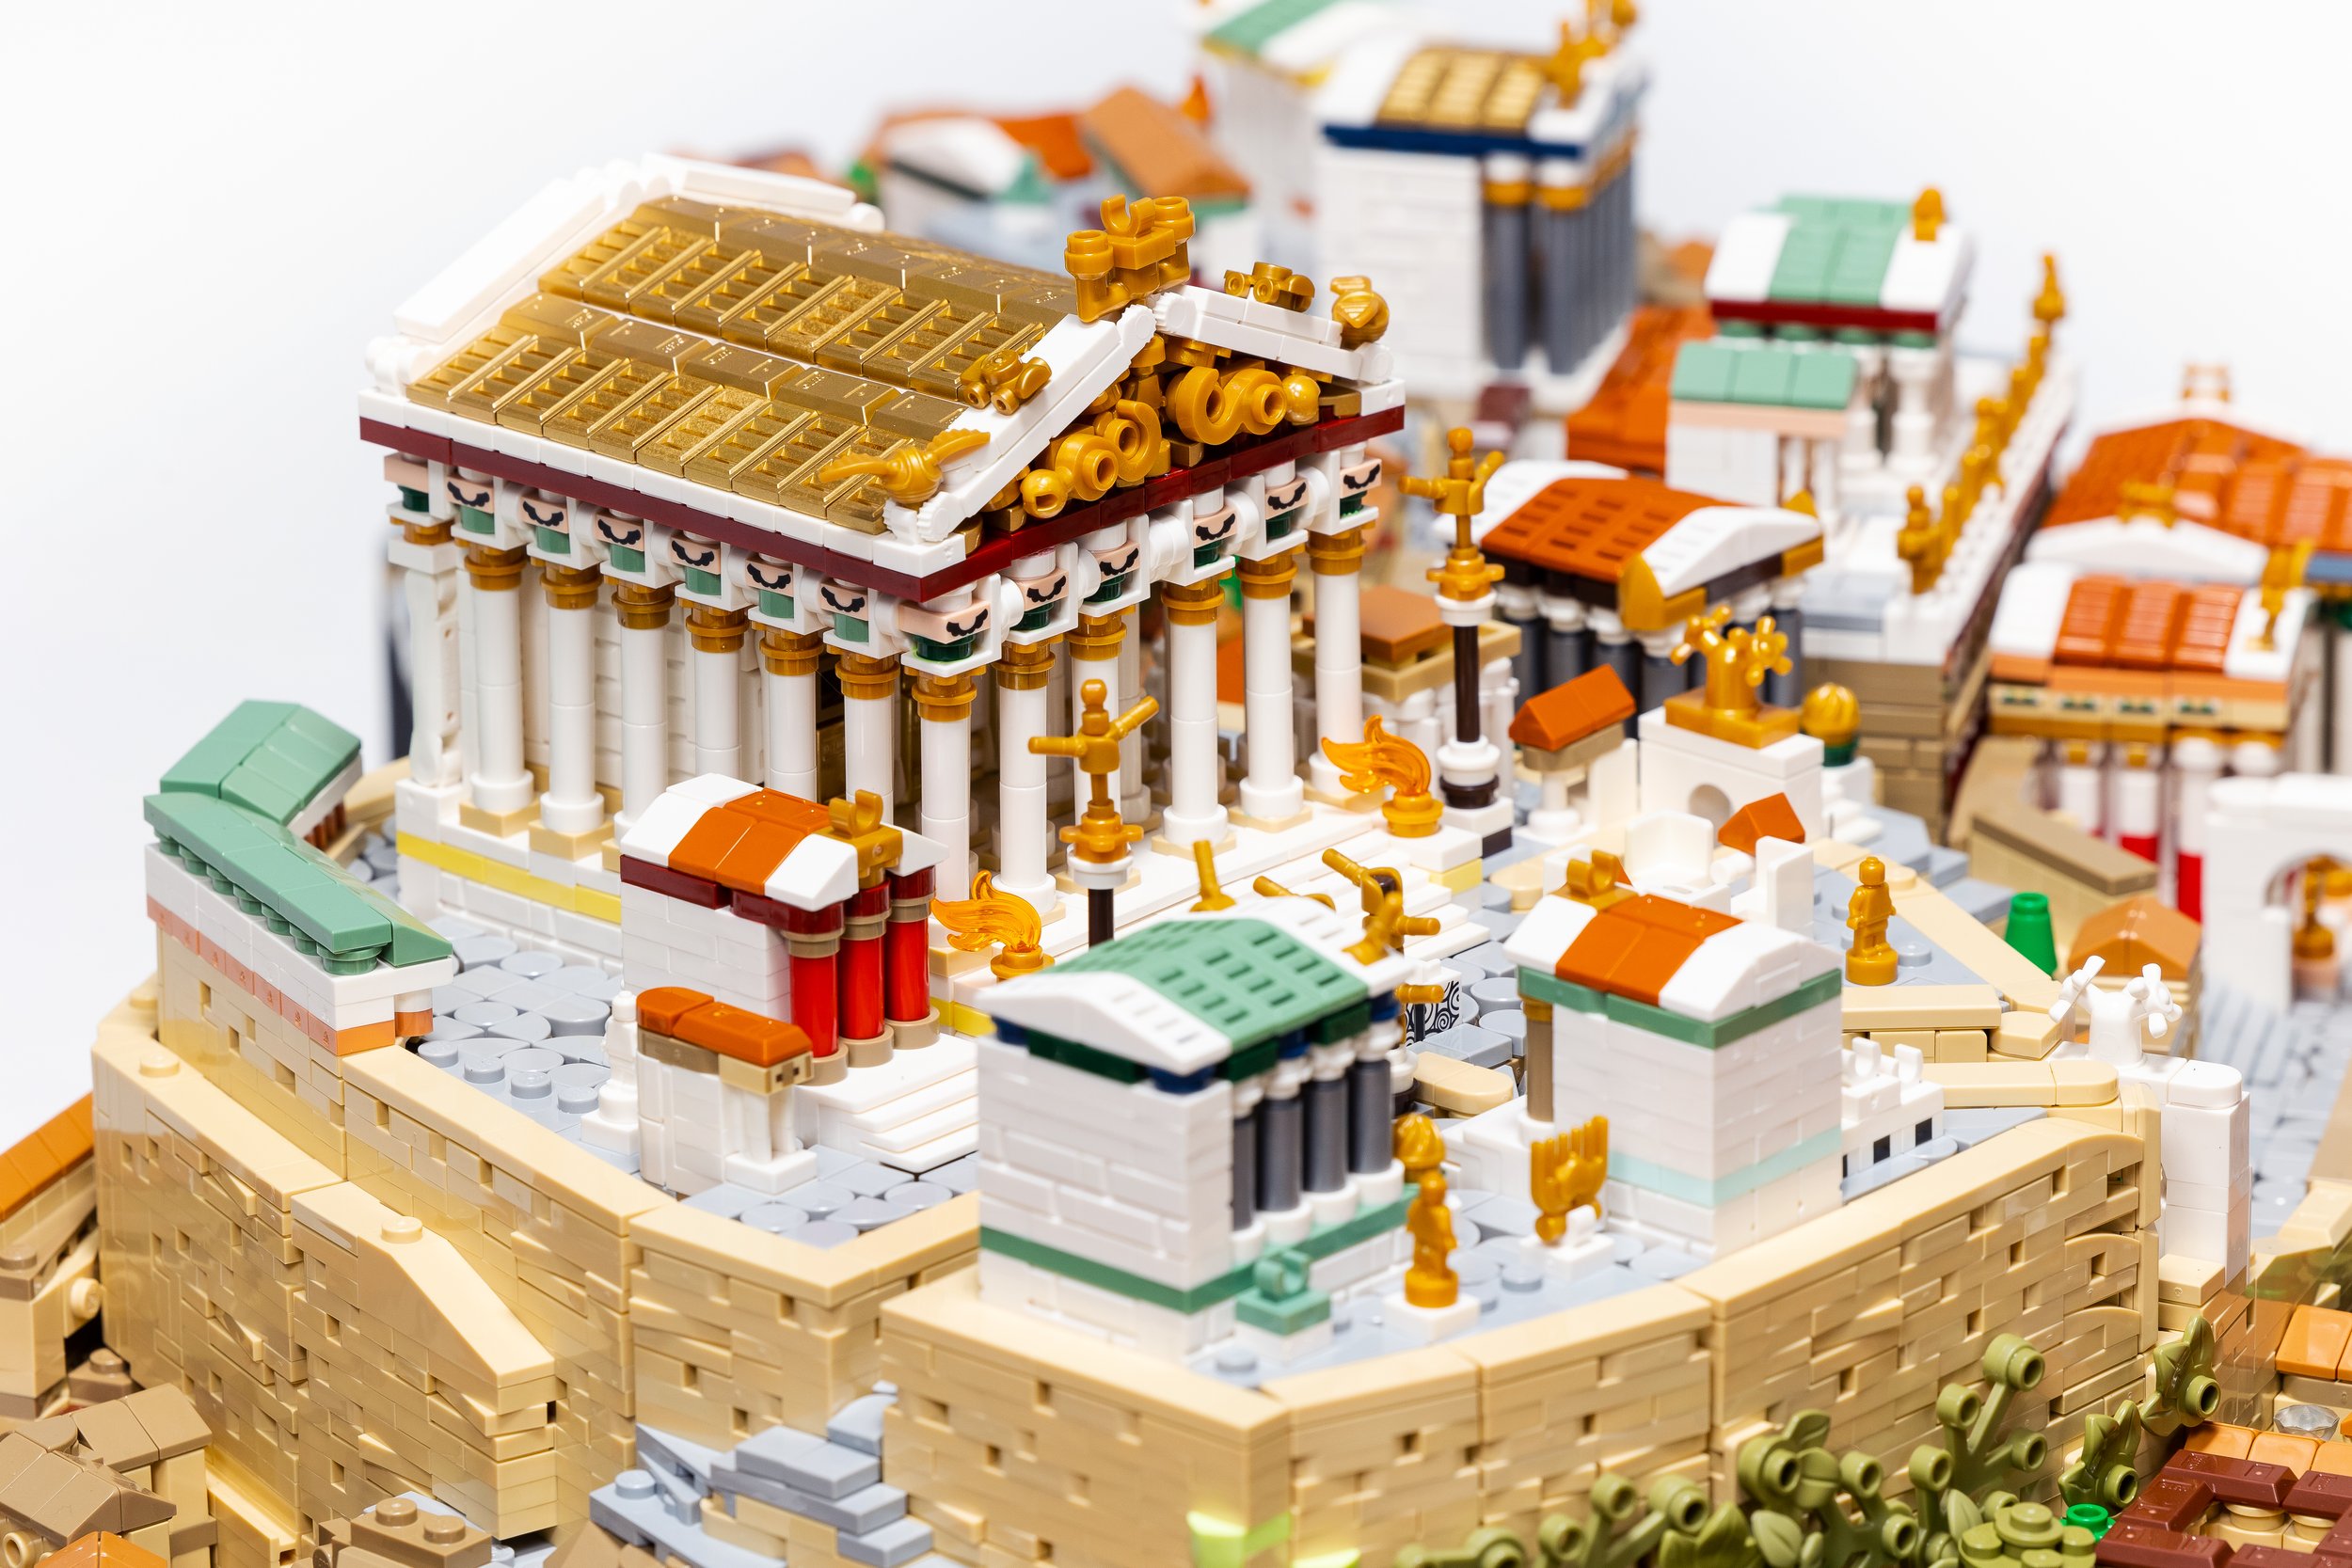
Then there’s the depiction of the monumental structures, which require even more nuance, such as the roof tile treatment you mentioned. In terms of individualizing each of these, I really believe it comes down to nuances beyond just color, primarily the ornamental parts usage. The Heliogabalium on the Palatine Hill, for instance (see image below), uses printed 1x1 tiles on the portico floor to form a sunburst motif, as befits a temple originally dedicated to the Syrian sun-god. The pediment is then adorned with overlaid star elements, but the references don’t end there! The pediment is topped off by a “golden snitch” element, which is about as close a reference you could possibly get at this scale to Jupiter’s Eagle. Following the untimely demise of the temple’s patron emperor, Elagabalus, it was rededicated to the foremost deity of the Roman pantheon. Whereas strict scholarship might classify the simultaneous presence of the sun and eagle motifs as anachronistic, I prefer to include both in an effort to show – not merely tell – the historical record and to clearly illustrate the temple’s continued use and relevance over several centuries. (You can see a timelapse video of the Heliogabalium build in this Instagram reel!)

The Heliogabalium, with cheese grater slopes sitting flush on the roof, and the golden snitch standing proud on top. Photo © Rocco Buttliere, MMXXIII
Keeping up to Date

Fish in a pond, clearly! Photo © Rocco Buttliere, MMXXIII
BN: When it comes to finding these solutions to intricate challenges, I’m sure that new parts and new printed patterns or stickers are helpful. For example, you’ve used an enormous amount of the 1x2 plates with rounded corners in the Colosseum, and a transparent sticker with some koi fish to illustrate a reservoir of some sort in the Cermalus section. Do you find it difficult to keep track of what LEGO releases?
RB: I’ve always been fairly ambivalent toward new parts and colors. I feel that most challenges can be overcome to a sufficiently convincing degree with simple reiteration and existing parts. That said, new colors do go quite a long way in adding nuance to a piece. Individual landmarks must be treated as self-contained expressions of a given period in Roman history, while also being given an aesthetic treatment that forms a connective tissue to precedents elsewhere throughout the contiguous landscape.

Applying the fish sticker, digitally, in Stud.io! Photo © Rocco Buttliere, MMXXIII
That fish sticker from set 41380 is indeed an outlier, but one which I can easily foresee using among private imperial gardens elsewhere in phases yet to be realized (you can see the sticker being applied in this Instagram reel). Likewise, the use of other printed parts tend to be specifically representative (as in the aforementioned sunburst motif of the Heliogabalium) or generic enough for rather ubiquitous details (such as the 1x1 white plate with a printed black square for windows).
In terms of keeping track of all the available new parts, that’s where I rely on monthly updates from our good friends over at New Elementary and Brickset!
Ingenious use of the aforementioned 1x1 white plate with a printed black square for windows—combined with a ladder element to create the colonnaded enclosure. Note also the tiles with padlock prints! Photo © Rocco Buttliere, MMXXIII
A Colossal Task
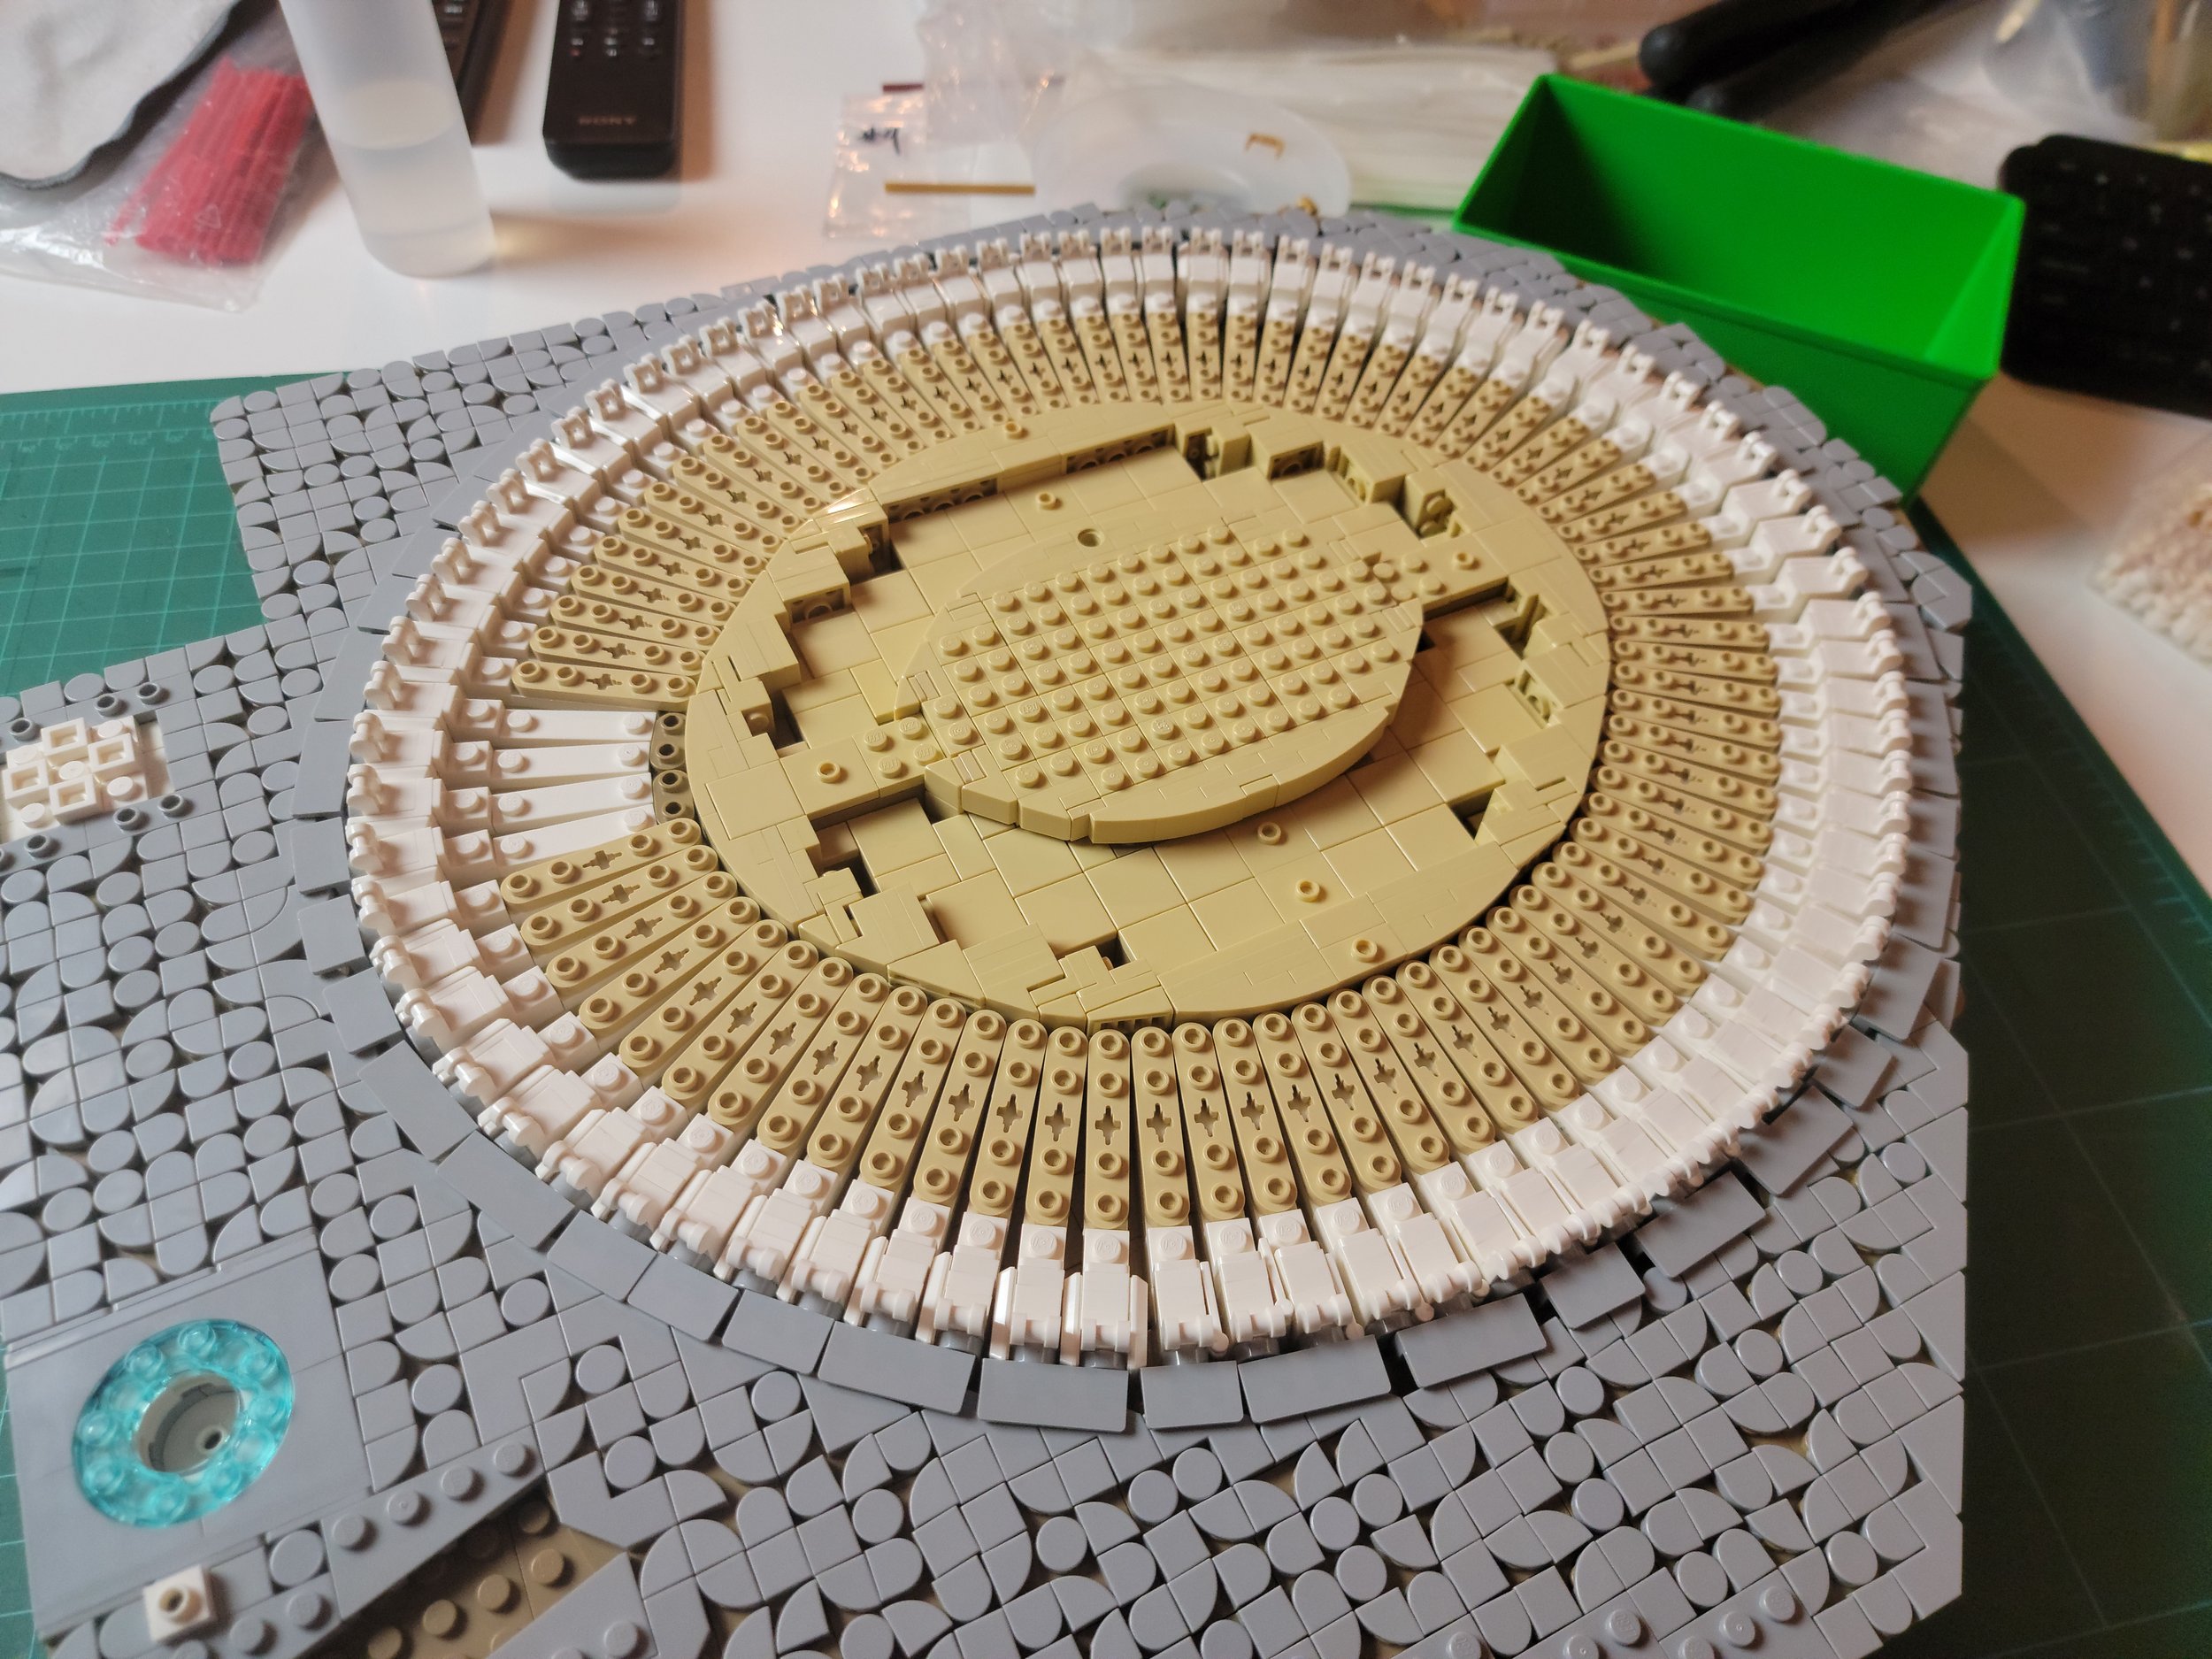
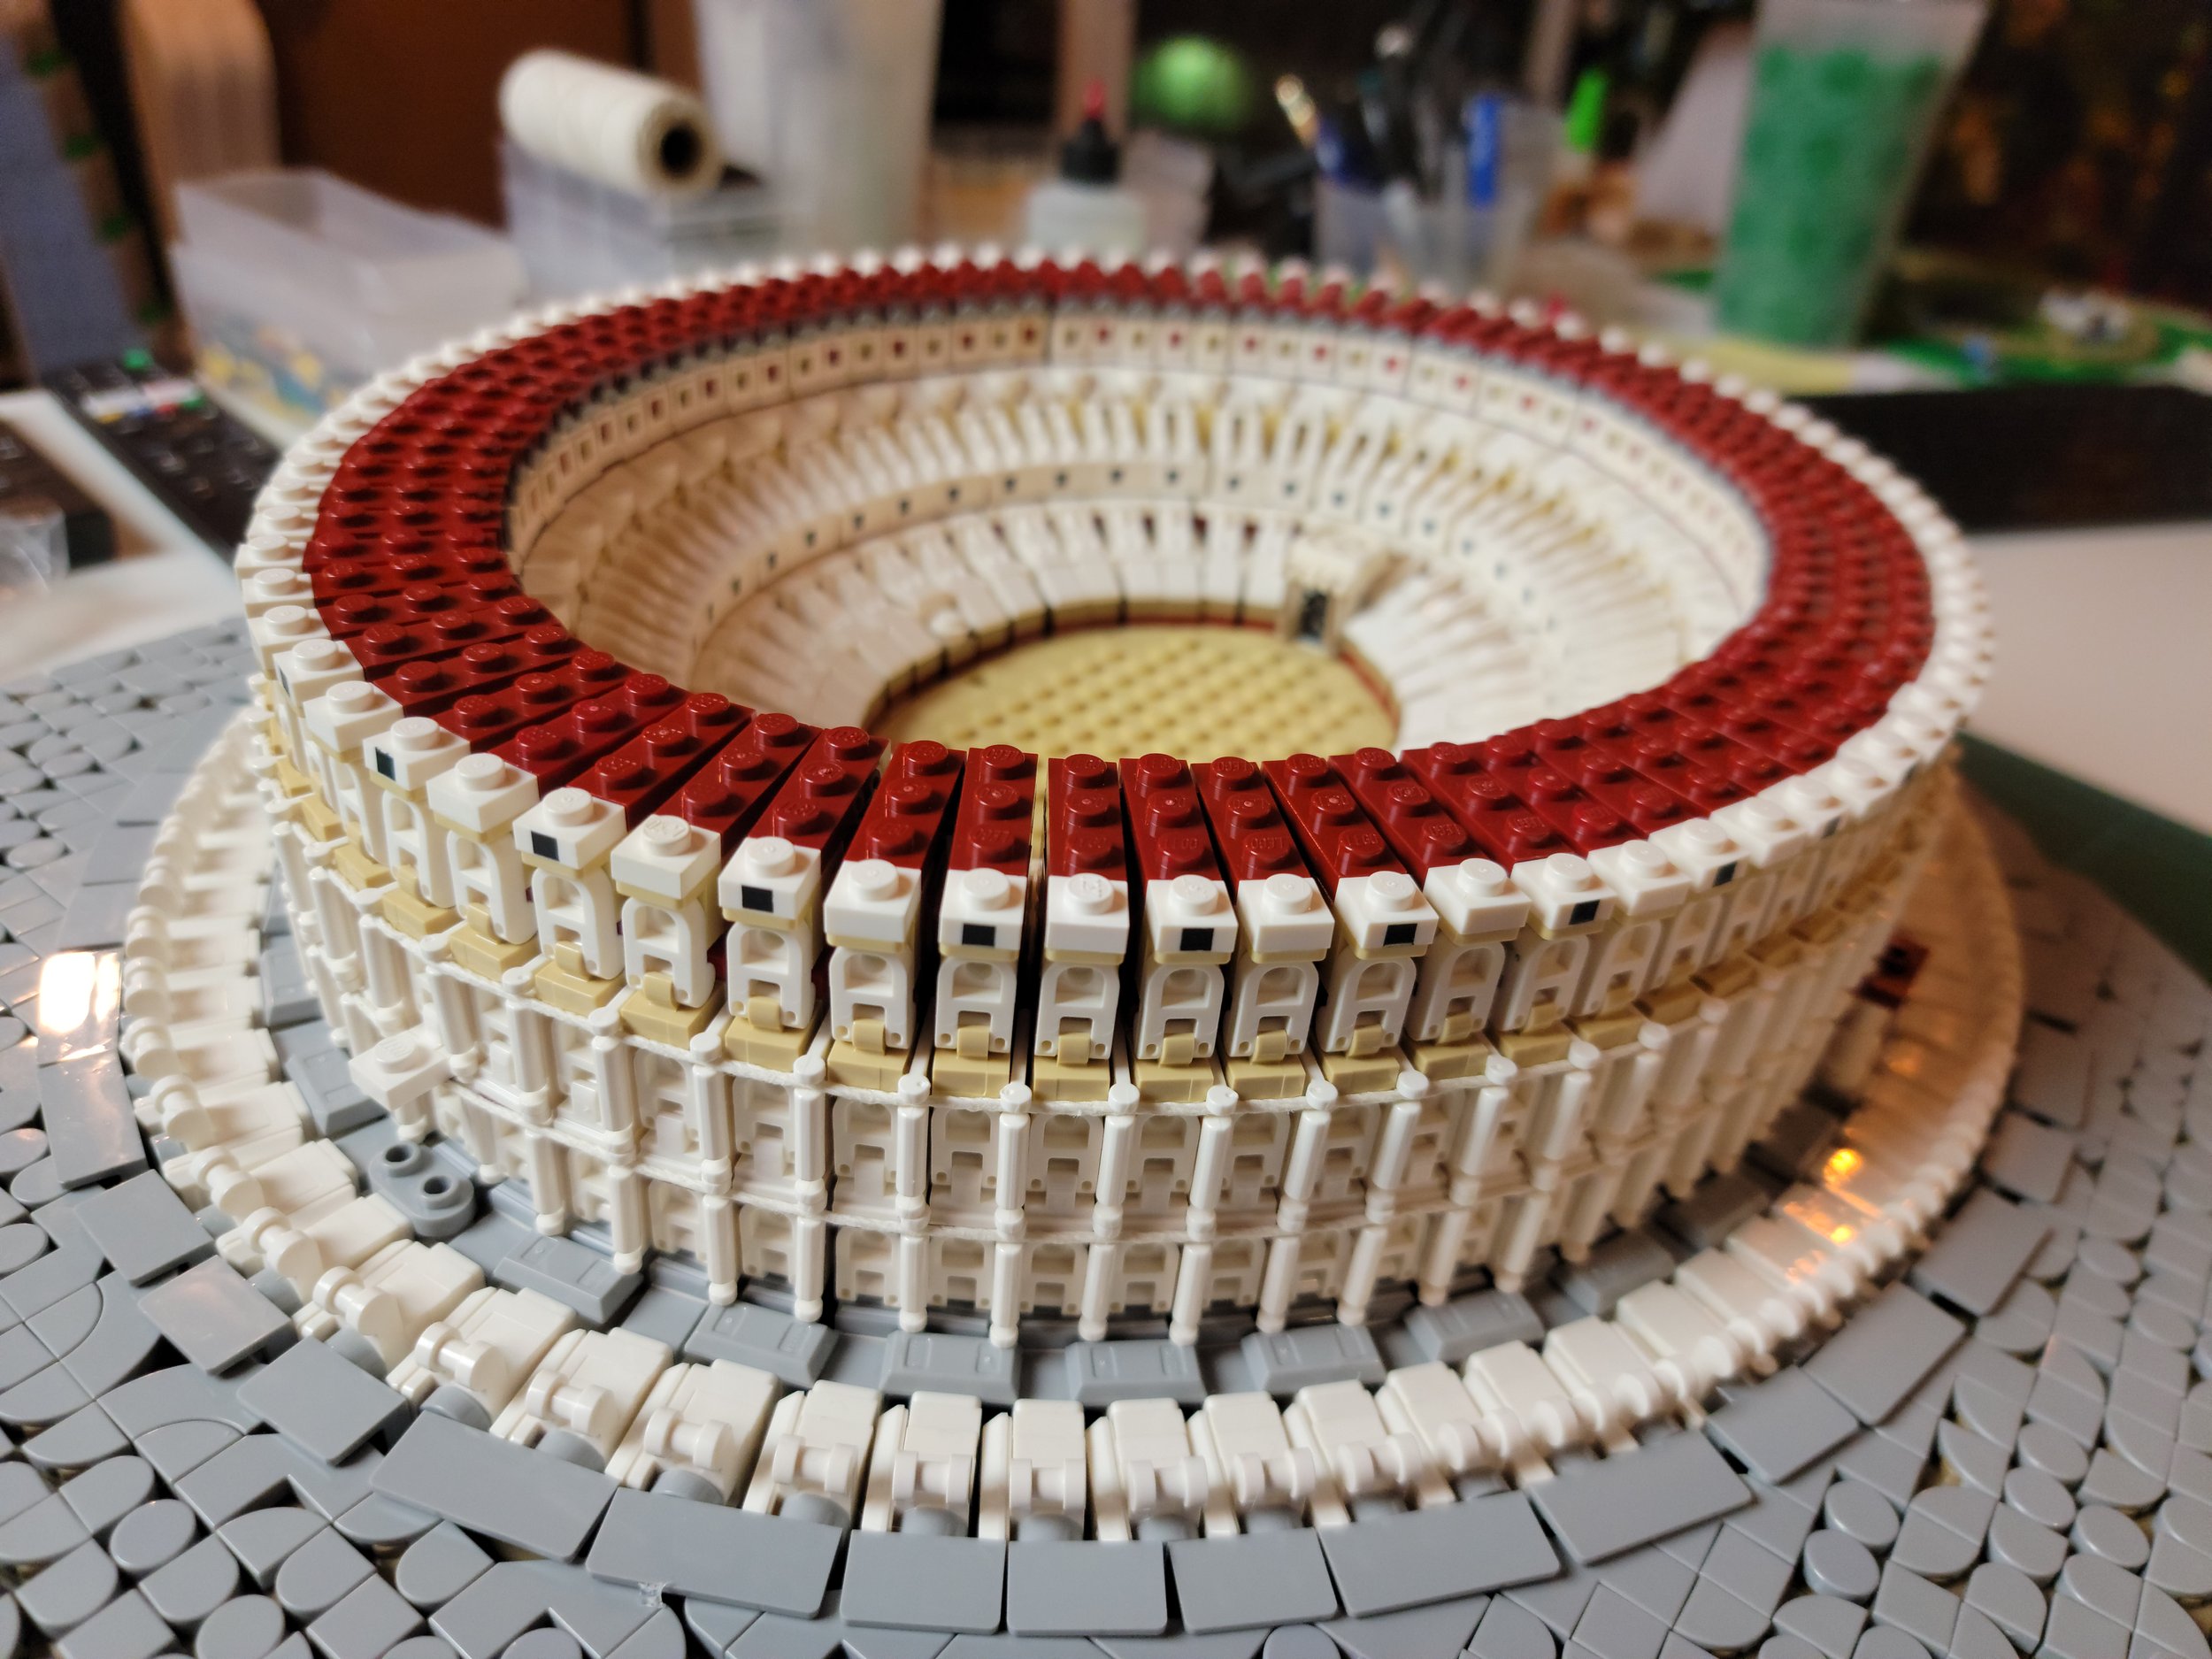
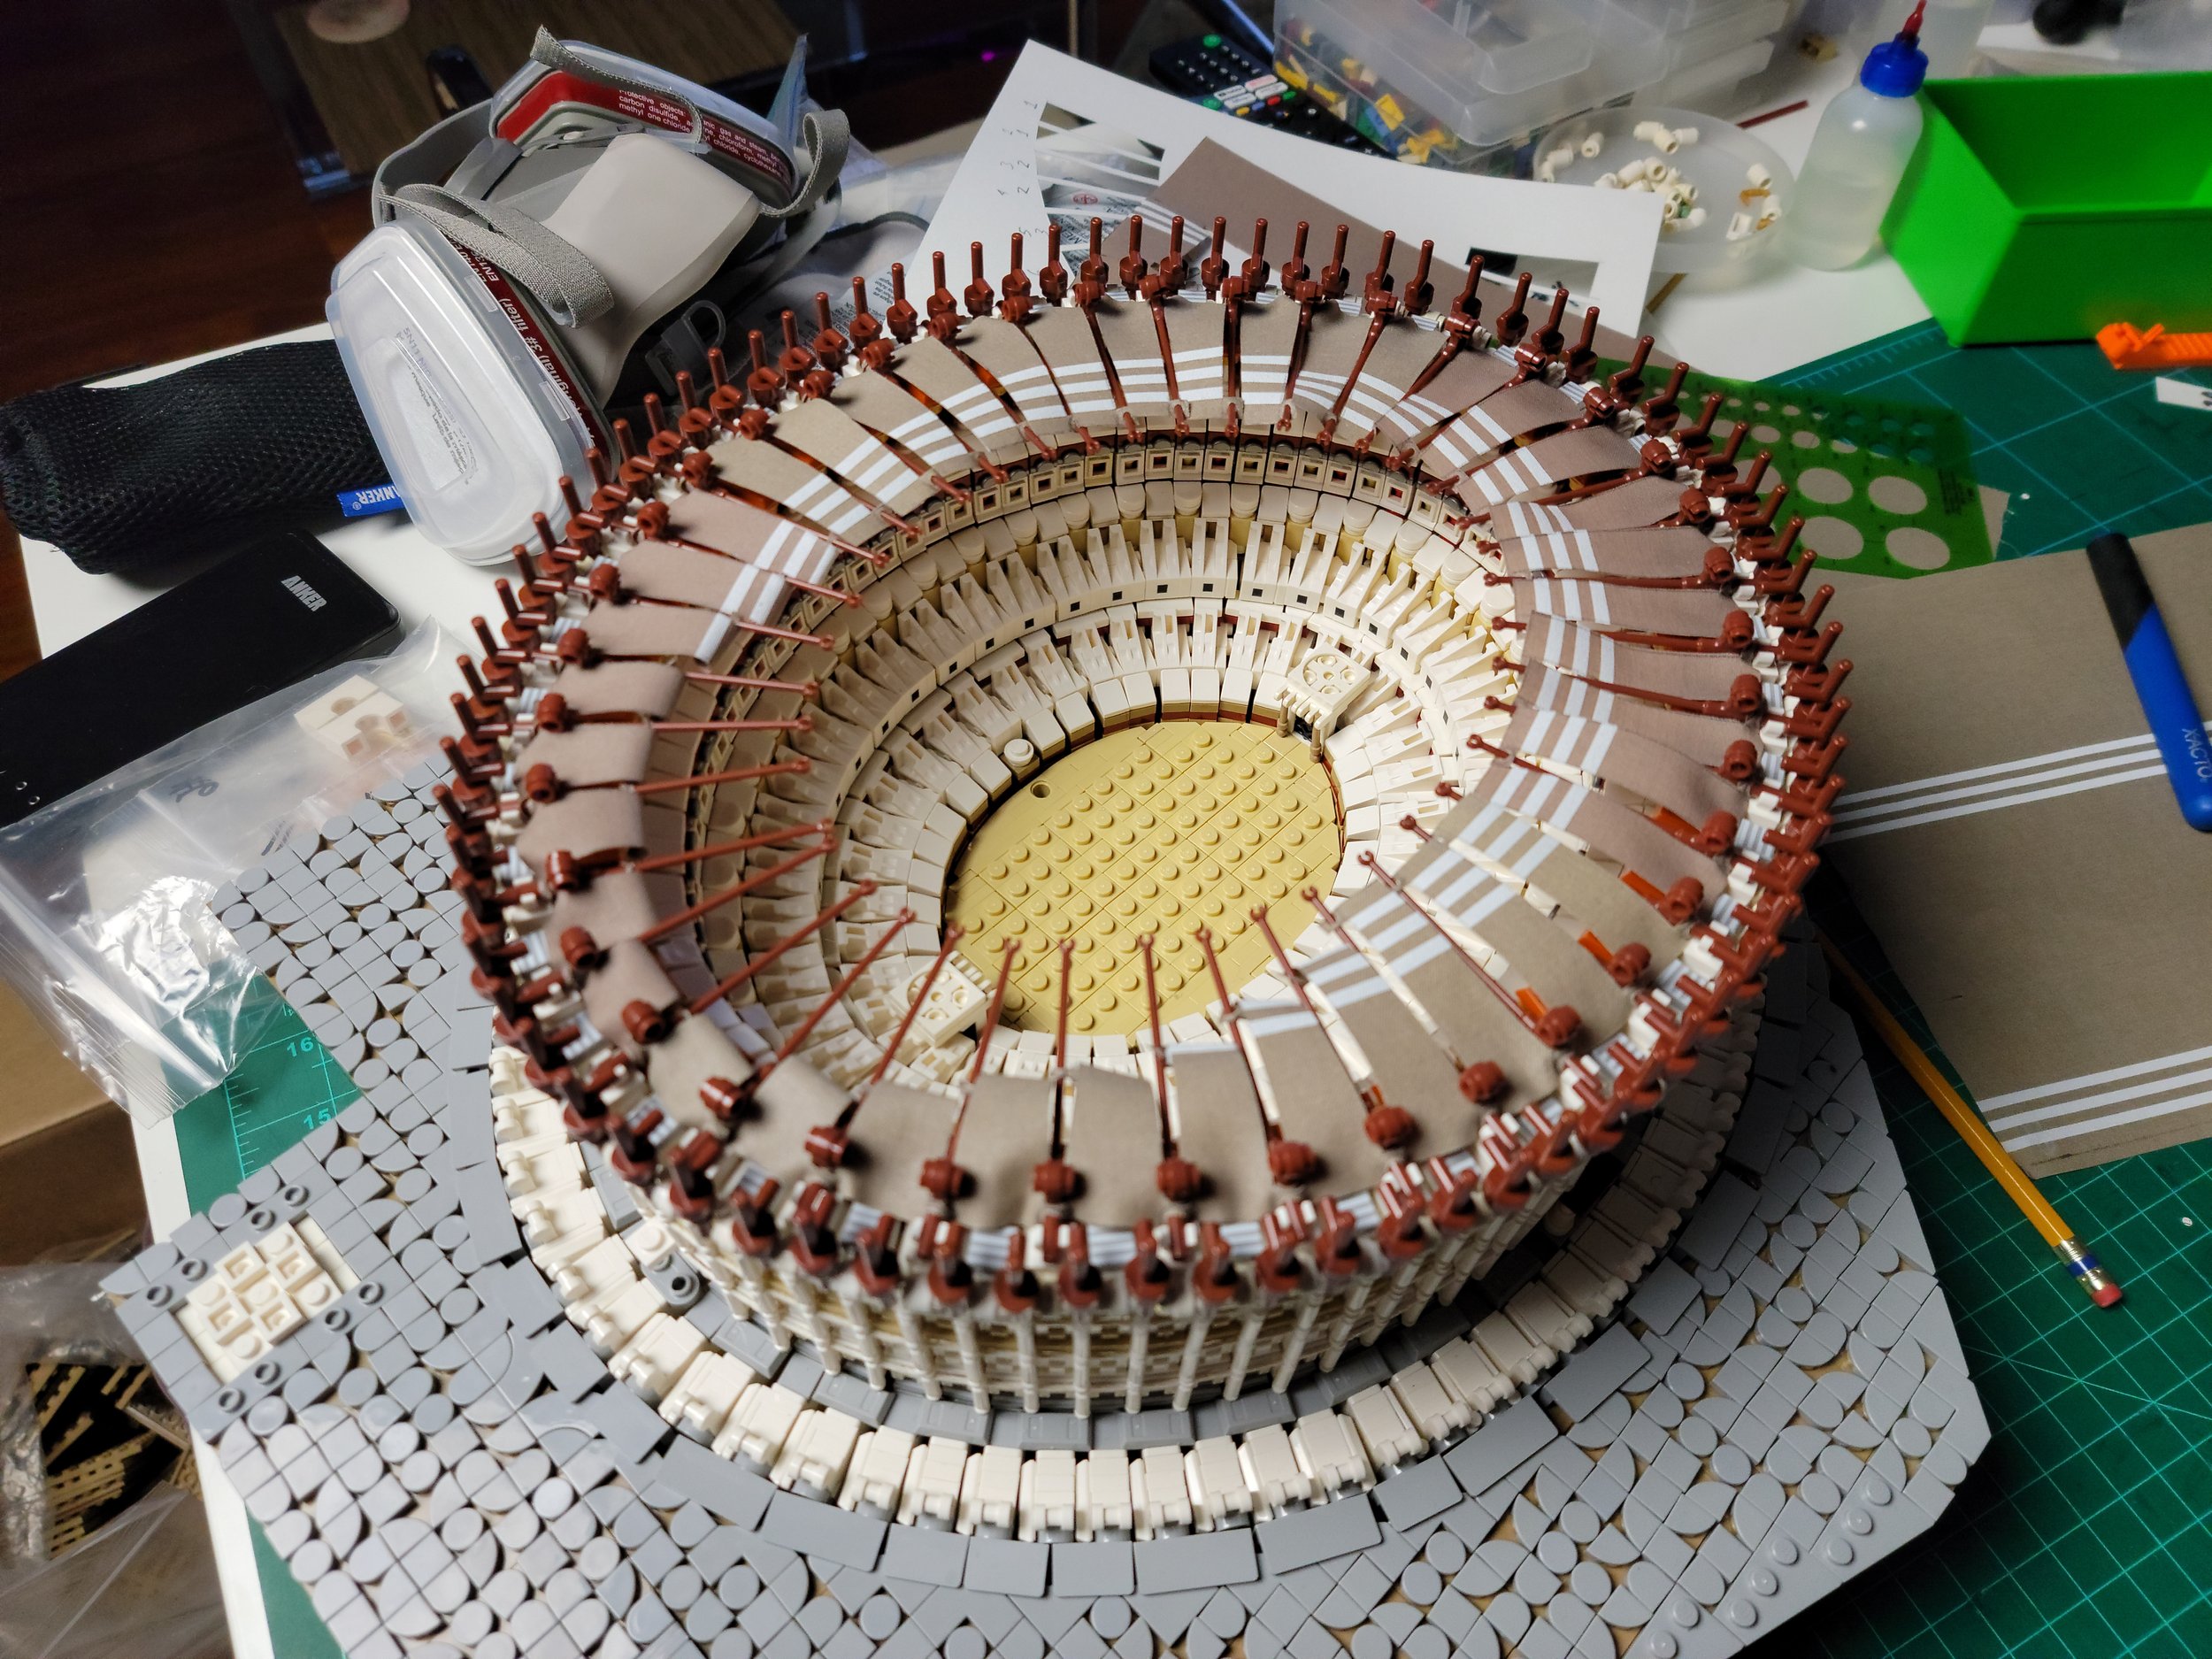
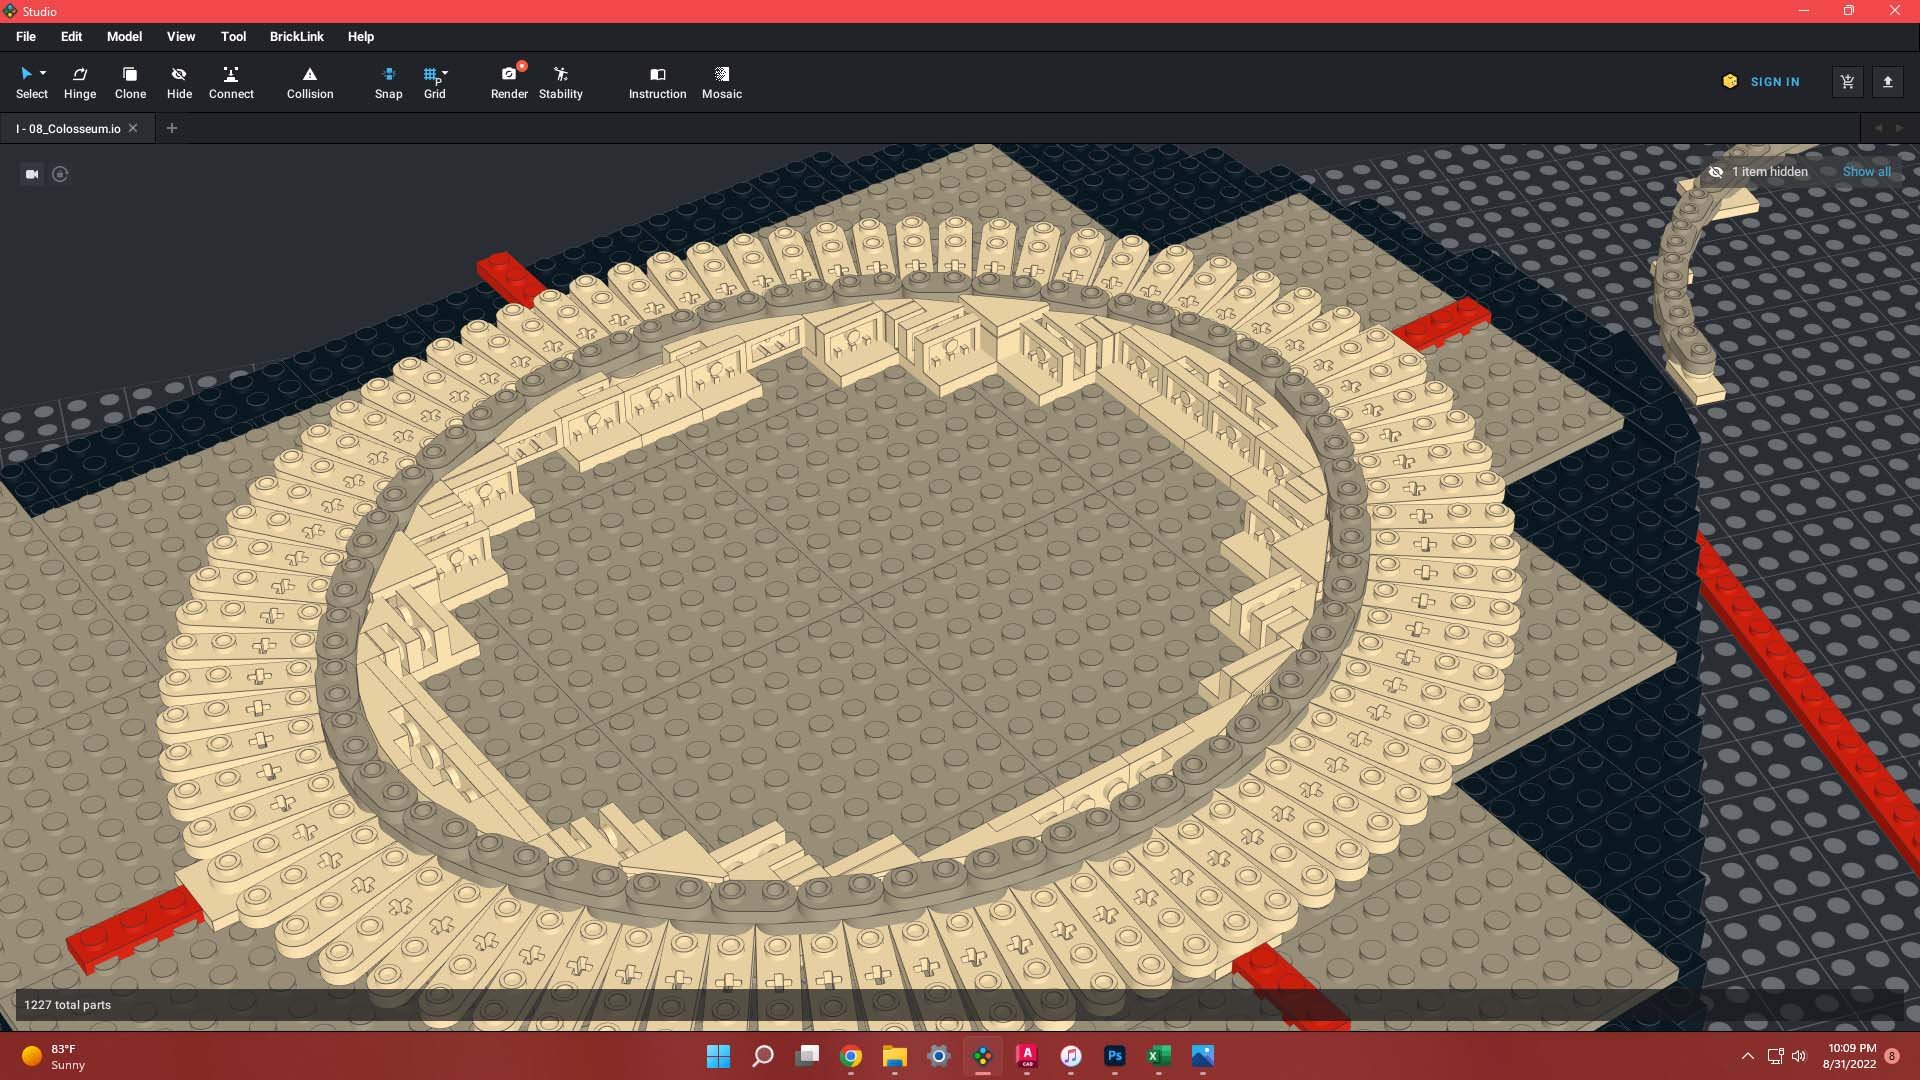
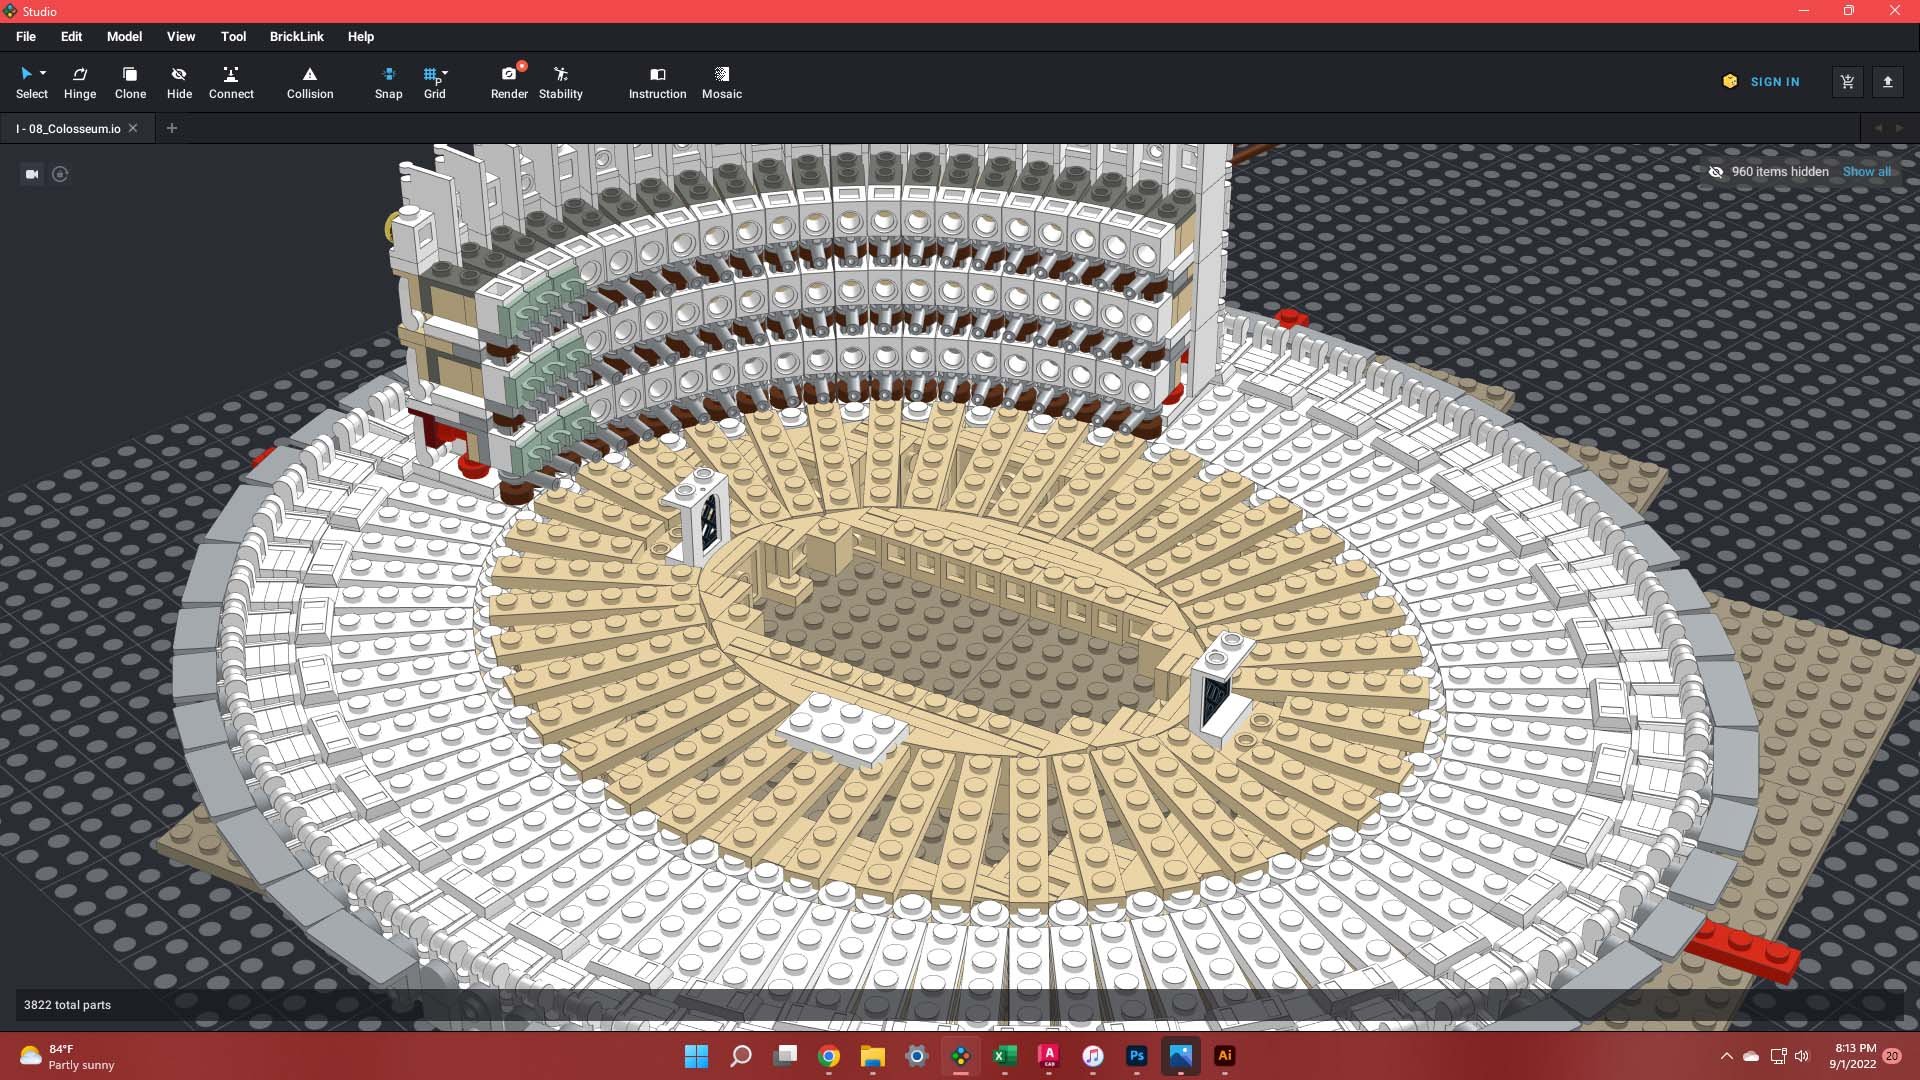
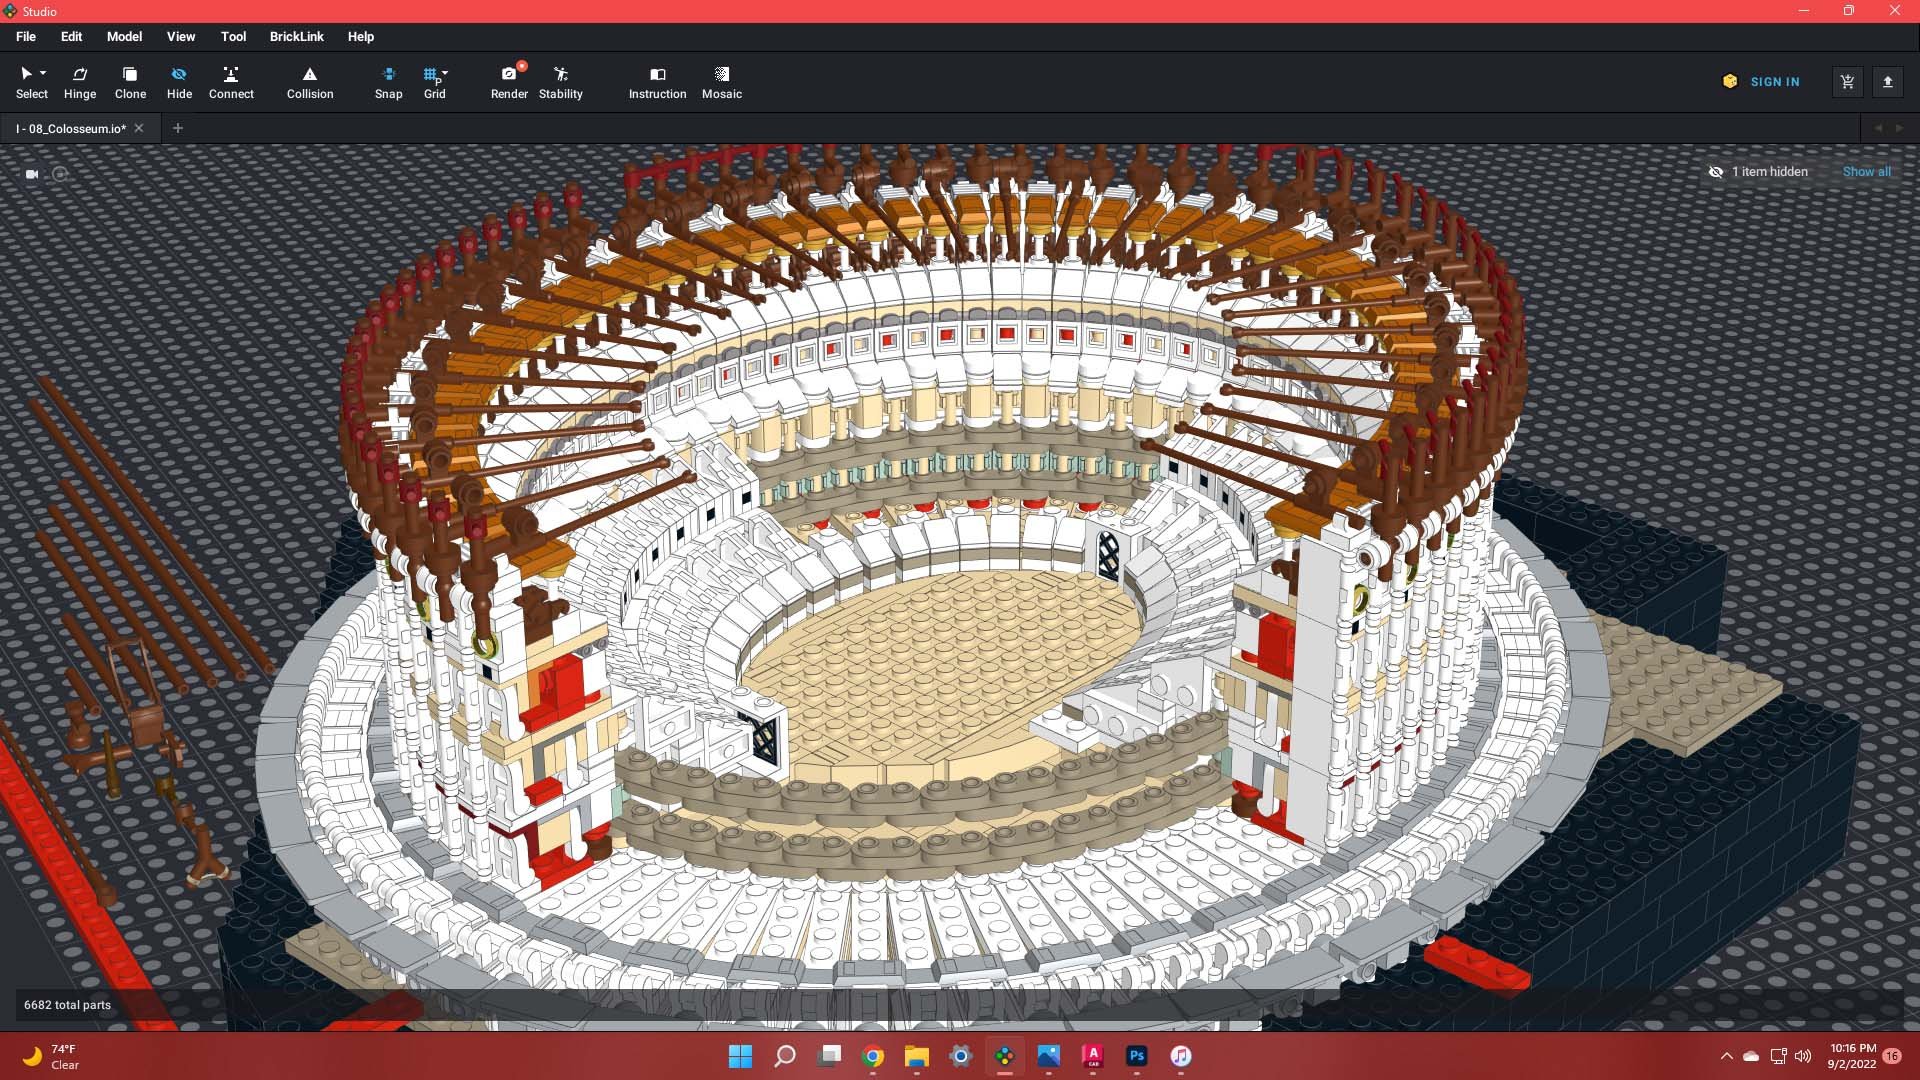
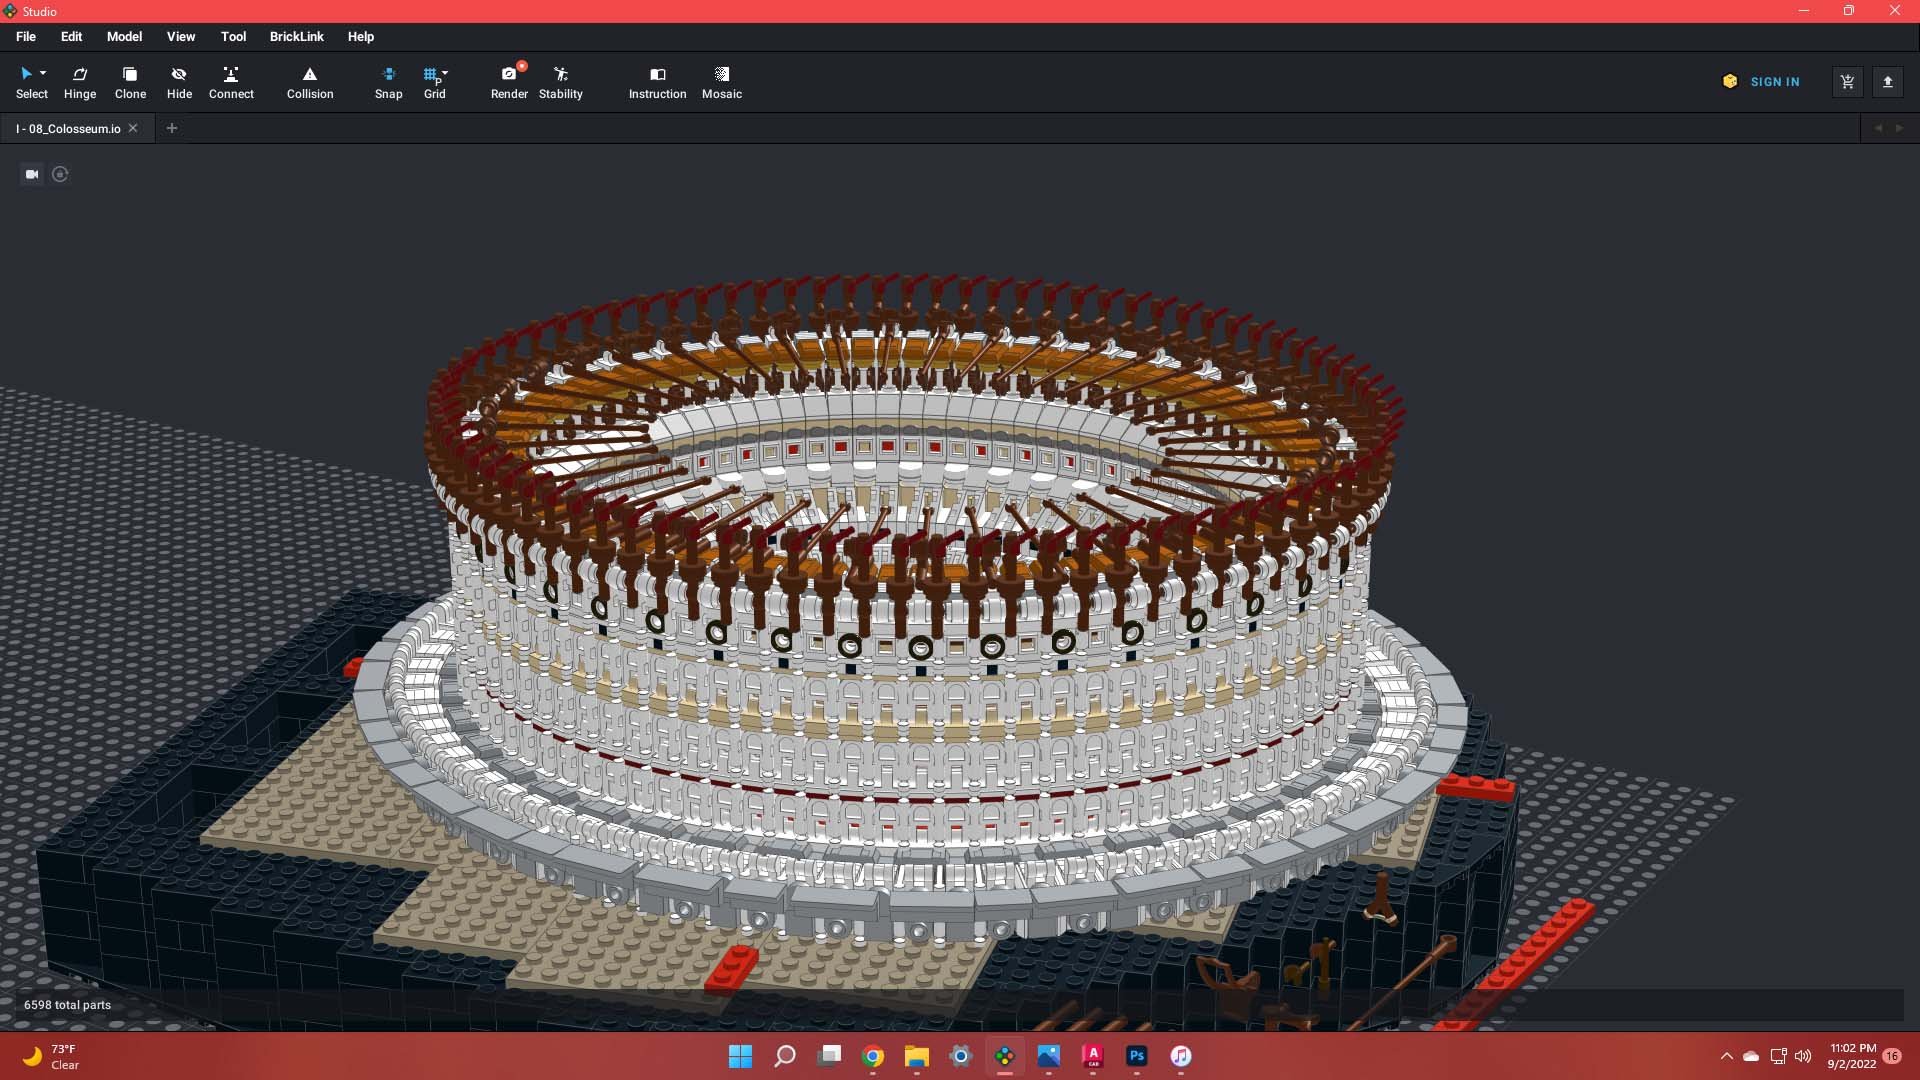
BN: Speaking of the Colosseum: That is probably the most instantly recognisable structure in all of Imperial Rome, not least because most of it is still standing. Of course, LEGO released their own microscale Colosseum a couple of years ago. That measures roughly 60 studs across, whereas yours is roughly 40 studs—and still, yours contains almost 2,000 pieces more than the LEGO set. This probably says something about your use of tiny parts, but I’m guessing also something about how challenging it was to design a structure of that complexity and shape?
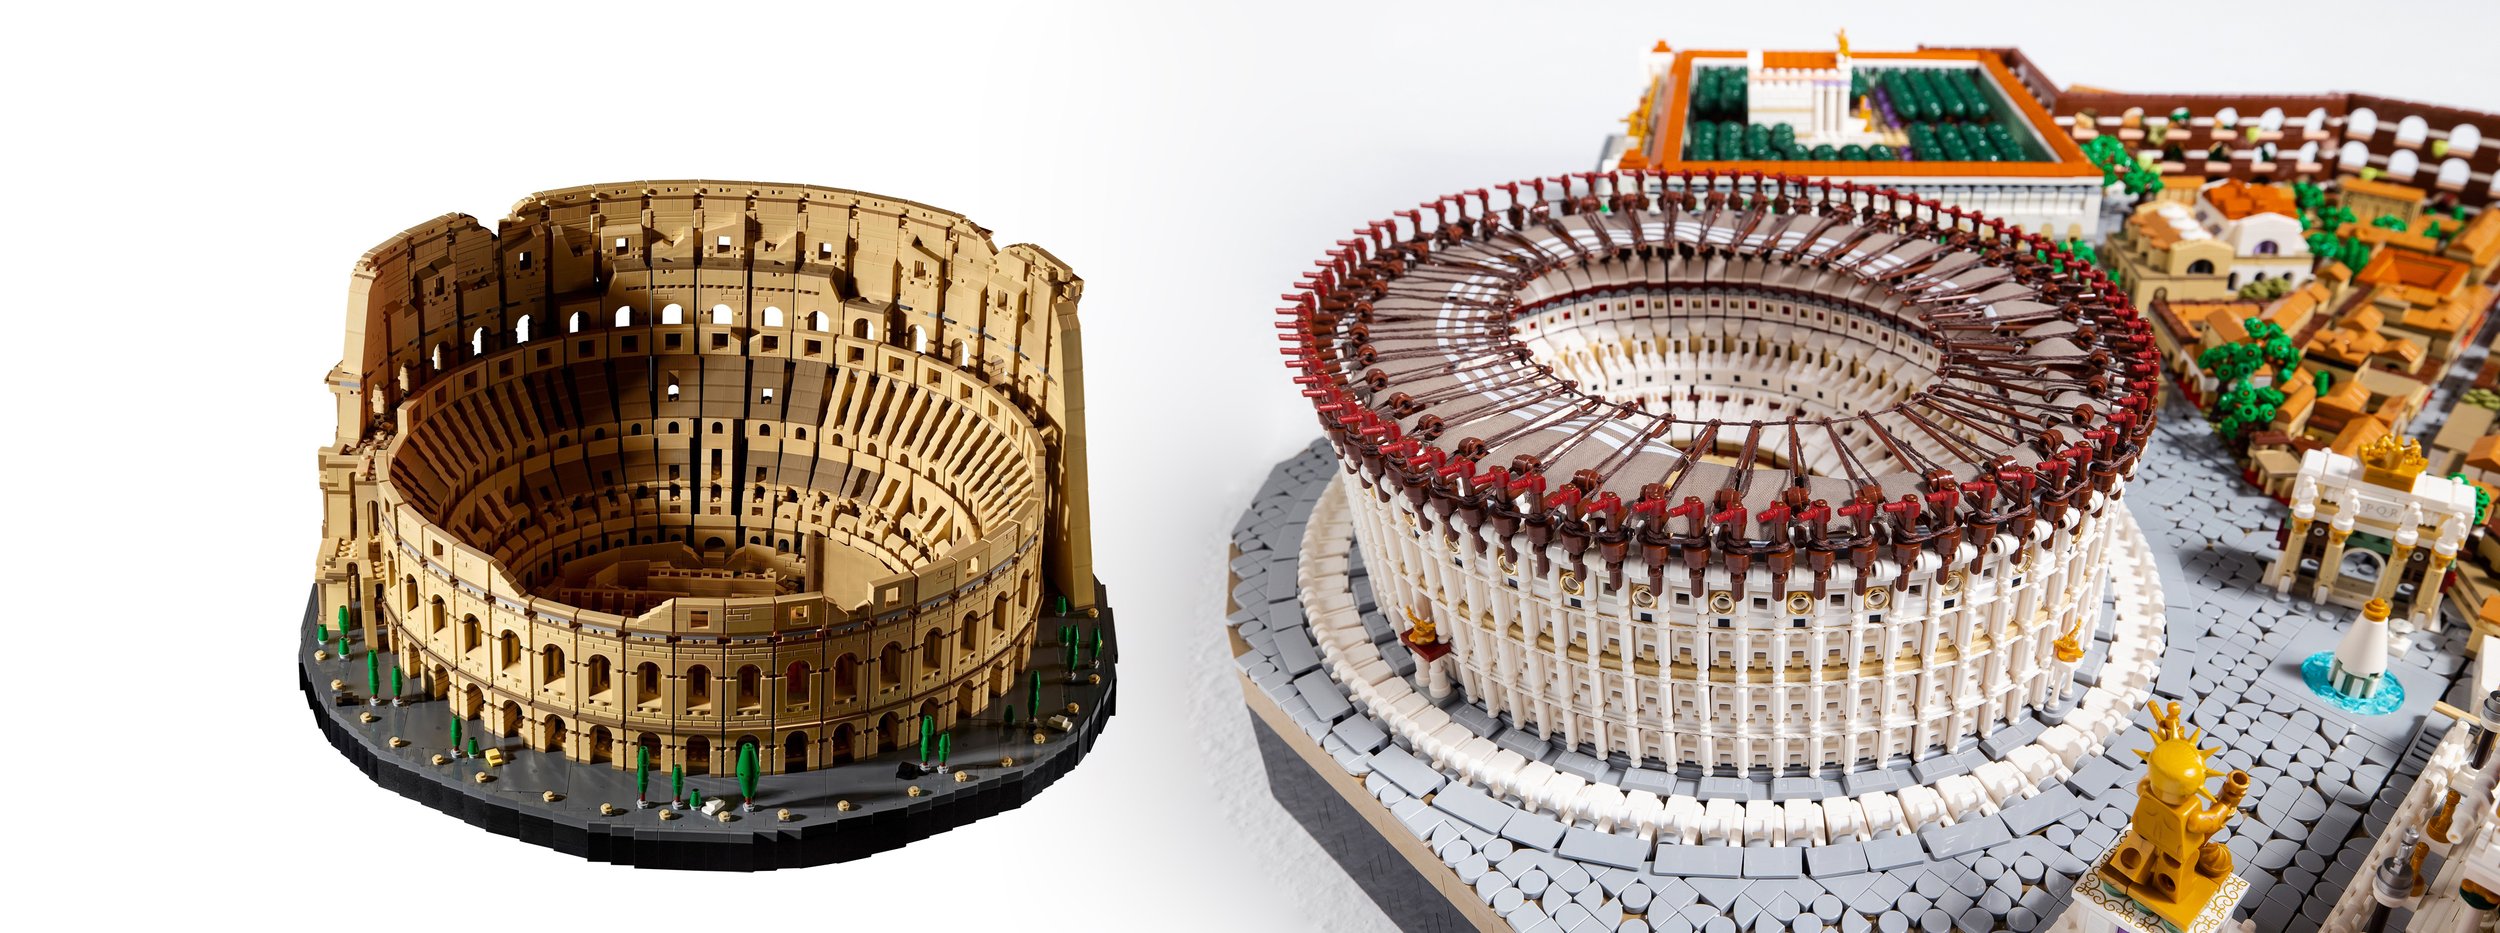
LEGO’s Colosseum, designed by Rok Zgalin Kobe (left) and Rocco’s Colosseum (right). Rocco’s is a little bit more detailed—and, not to mention, not yet damaged by the great earthquake in 1349! Photo © Rocco Buttliere, MMXXIII/The LEGO Group
RB: Designing the Colosseum was challenging on a couple levels!
First, there’s always a fair amount of trepidation in tackling the most iconic works of a particular region or stylistic movement. Notre-Dame de Paris and Taj Mahal both come to mind as recent examples of bringing something new to the conversation with works that had been given the LEGO treatment countless times prior to my 1:650 representations. The Colosseum falls in the same category for the reasons you gave, as well as the daunting fact that it represents a foundational period in Western civilization.

Second, there was the challenge of avoiding superficial revisionism of my previous Colosseum model from the 2019 commission diorama. One anecdote which immediately comes to mind here is from Elton John’s recent autobiography, ME. In one passage, he recalls a time he met Michael Jackson at dinner. Elton remembers Jackson seeming rather dejected and unable to continue a conversation for any meaningful amount of time. The impression here for Elton John was that Jackson had spent half his life trying to outdo himself by surpassing previous successes. This struck a chord with me as one of the comments I field most frequently on social media after posting a new piece is “You’ve outdone yourself!” While all art is cumulative and based in precedent, seeking to “outdo” one’s self is such a specious endeavor as it never allows you to properly learn from the unique experience crafting each new piece has to offer. Instead, you’ll be left comparing each new work to previous highs, rather than ensuring you are properly avoiding such self-referential tendencies throughout the design.
The execution of this tightrope walk came in the form of simply going back to the basics of research and architectural reconstructions. No one is so well-versed in any subject matter that they’re above revisiting the fundamental lessons to which the most inexperienced might first be exposed. I started by addressing the fact the Colosseum is ringed by eighty arches, each of which is framed by semi-columns on each floor: Doric on the first, Ionic on the second, Corinthian at the third, and finally, Corinthian pilasters framing the alternating square windows of the attic.

Turntable bases, minifig wands, finger hinges, wedge plates, the aforementioned 1x1 plates with black print, old windows, roller skates, ingots, fishing rods (more about those later!) and custom-made sails. Photo © Rocco Buttliere, MMXXIII
My previous iteration used upwards of ninety exterior archways. So, my first step in the redesign was to create a ring using eighty 1x2 rounded plates, overlapping in a two-plates-thick basket weave fashion, then finding possible underlying studs of overlap. Having accomplished this in physical bricks, the next step was to digitize the geometry; first in AutoCAD, then with exact angles in Stud.io. This eighty-point “barrel ring” would span a circumference of the ellipse located roughly halfway between the arena floor and the outer façade. This meant that extending each of the eighty segments outward from the barrel ring would leave a noticeable gap between each archway. That’s where the rounded “spines” of book cover elements would be wedged into place for the protruding half-columns which run the whole height of the façade.

A closer look at the Colosseum, where you can make out some of the parts used. Photo © Rocco Buttliere, MMXXIII
For those interested in a far more visual-alongside-textual breakdown of the Colosseum structure, I’ve gone ahead and made this exclusive Patreon Design Insights post public for all to see! You can also take a look at the full 7-minute time lapse of the building process on YouTube (and we’ve included some in-progress shots in the slideshow below).
NPU FTW!

Lady Liberty + Minifig satchel.
BN: In her story on your 114.000-piece Jerusalem build, BrickNerd contributor Kitty mentioned some of her favourites among your unusual parts usages. I could continue with boomerangs, skiing goggles, and what I assume must be a minifig satchel and a Statue of Liberty headdress making up the chariot sculpture at Circus Maximus. Do you have a favourite “NPU” in Phase I? Or were there any particular instances where you struggled to find out what to use and then suddenly went “oh. That’s perfect.”
Building the chariot sculpture using reference material. Photo © Rocco Buttliere, MMXXIII
RB: You’ve certainly been paying attention if you noticed those skiing goggles! Those go quite a long way toward enlivening what would otherwise be fairly plain undersides of triumphal arches. We’ll let the viewers find those on their own!
If you’ll permit me to return to the Flavian Amphitheatre for a moment, I would definitely point you in the direction of the fishing rod elements used in the construction of the velarium! Realizing the extents of this retractable awning was a must on my list of ideas to further pursue that logos in Phase I. I had long-since settled on the need to use hemp cord for the rigging and cut-to-fit wedges of canvas for the sails, but the fishing rods were the framework on which the full scheme was realized.

I’ve talked about—and shown!—for years how the perfect parts usage, in my mind, are those which succeed both on visual and functional levels (refer back to that Jerusalem article and the discussion on the Temple Mount façade as just one example). The fishing rods used for the velaria sheltering the amphitheatre and the smaller Theatre of Marcellus (in the image below) provide this necessary visual reference to the timbers which once held the awnings aloft. At the same time, the hook at one end, the bar-sized handle at the opposite end and the closed loop running perpendicular to the handle allow the entirety of the rigging to be woven continuously while the individual wedges of hand-cut sails are looped between adjacent rods. The multiple points of integration within each rod also allow for the tension of spooling so much hemp cord to be resolved within a single, moulded element, rather than between multiple interconnected bricks, which would likely lead to loosening over time.

Using fishing rods, custom-cut cloth and string to create the velarium of the Theatre of Marcellus. The same technique was applied to the Colosseum. Photo © Rocco Buttliere, MMXXIII
BN: Do you have any idea how many of those minifig trophy figures you’ve used?

RB: As a matter of fact, yes! There are 164 minifig statuettes / trophy figures and an additional 42 statues of Nike made of a combined golden wand and two minifigure hands. As with my piece depicting Vatican City, it always surprises me how interested the public is in the prevalence of these elements when used extensively throughout a piece. I suppose it’s a sign of a convincing level of realism that the far rarer elements go unnoticed among the details.
Then again, the statuettes are typically placed quite prominently and were certainly intended to be focal points of a given setting. I’ve made sure, though, that especially keen observers will be rewarded for looking into small courtyards throughout the diorama!
There are at least four minifig trophies in this picture. Can you find them? Photo © Rocco Buttliere, MMXXIII
A Substantial Project… At a Substantial Cost
BN: I mentioned your creative parts usage previously. I have to go back to one particular part, namely your near-limitless use of the old-fashioned plain minifig vests in white, also in the Circus Maximus. Those vests have never appeared in a larger number than two in any LEGO set, and was only ever released in the year 2003… which brings us to the issue of cost. You’re using parts from pretty much LEGO’s entire history—the ancient 1x1x2 windows are an excellent example of that—and there are more than 100.000 pieces in Phase I only, not to mention the 1-1.5 million bricks you’re estimating the whole Rome project will eventually swallow. This is, as far as I know, not a fully-sponsored or commissioned thing like many of your previous endeavors, so how does your funding work? And do you have to buy the bulk of your pieces through BrickLink?

expensive. Very expensive. White minifig vests, only produced in limited numbers in 2003. Photo © Rocco Buttliere, MMXXIII
RB: Hmm, I do think the Circus Maximus is the only spot in Phase I where I’ve used those white minifig vests, funnily enough! They were implemented in an effort to better conceal the gaps between archway façades, not unlike those on the Colosseum. Despite the fact the circus was finally monumentalized in stone under Trajan in the early second century CE (roughly fifty years after the construction of the Colosseum), it was decidedly sparser in its exterior adornment. This, naturally, led to a simpler design using the minifig vests to seal said gaps; a technique which certainly could not be replicated on any broader scale given the rarity of those parts.

1x2x2 windows and plates with black print, to create windows. Also very expensive… when you need just short of 100 of those old white windows, which went out of production almost 45 years ago. Photo © Rocco Buttliere, MMXXIII
You are correct that this is a personal endeavor, not a commissioned piece like the 2019 original. My phasic approach to its realization is largely oriented in the most economical direction possible. One thing I’ve learned after several years of fulfilling large scale landscape commissions is that the economies of scale are such that you’re far better off designing as much as possible and holding off ordering any bricks until an enormous area has been designed. Ordering 100,000 bricks consisting of more than 1,700 unique parts for Phase I, as it turns out, resulted in more than fifty separate Bricklink orders. That’s miles better than if I’d ordered parts for each of the fifteen or so subsections at a time as they were designed!

LEGO online Pick-A-Brick. Not where you want to buy your parts if your project has a deadline.
Of course—and there’s simply no sugar-coating this—Bricklink is the only viable platform on which to acquire any meaningful amount of parts for a large project. Sadly, I have found the LEGO Pick-a-Brick system to be little more than virtue signalling. The reality is that the ordering system is as likely to simply fail to process an order from the start as it is to take months to receive even a few batches of “standard” SKUs. I sincerely wish I could say that customer service at LEGO were accommodating and efficient in their efforts to ameliorate these shortcomings. Unfortunately, that has not at all been the case in my experience and the parts ordering process spiralled ever downward for two months, resulting in the cancellation of multiple large orders and subsequent reordering on Bricklink (which arrived the following week).

Maybe not quite what LEGO’s Pick-A-Brick system was set up to handle. Photo © Rocco Buttliere, MMXXIII
Though I wish my professional interactions with LEGO would result in the bare minimum of efficient communication and basic order fulfilment, it is not lost on me just how meaningful it is that Bricklink is a largely more efficient community of small business owners who know how to get the job done! Then again, I have several go-to suppliers based on relationships I’ve fostered over my years in the community. I genuinely feel for those in the community who do not have this buying power and are left choosing between higher costs on Bricklink and largely disingenuous options from LEGO directly. That is among my chief concerns when it comes to the limited supply of bricks. To be fair, I am conscious of the fact my typically large orders may not be the norm; so while I concede limiting the access is their business prerogative, it is also mine to instead support the small business owners on Bricklink.

A really cool commemorative plaque. This is given for a limited time to those who subscribe to one of the tiers on Rocco’s Patreon page. Photo © Rocco Buttliere, MMXXIII
Lately though, I have been leaning hard into the solidarity of the community. It’s going to take a village to realize the full extents of SPQR, which is why I launched a Patreon page in 2022. While much of the content is specifically tailored toward the ongoing SPQR project, it is intended to highlight all aspects of my small business, from the creative process to the logistical challenges of timelines and shipping work across the country for BrickUniverse exhibitions. Likewise, it is also the only place to receive early access to my custom buildable kits, as well as exclusive, Patreon-only kits such as the commemorative plaques marking the completion of each phase. It was certainly an adjustment setting aside extra time to post regular, patron-only insights. In the end, though, more thoroughly documenting the design + build processes of my work is something I had been eager to start for some time, especially when considering the potential for an exhibition timeline of the finished piece, tie-in books, articles such as this on BrickNerd, and so on.

Rocco’s Patreon landing page.
Building Big and Where to Start

Every proper project needs a proper logo! © Rocco Buttliere, MMXXIII
BN: I tend to build smaller stuff, and I’ve always looked up to people who are able to think so much bigger, especially when the attention to detail is still cranked up to eleven. But what would you say are the biggest challenges with building something so incredibly huge as this, especially if you think about all the phases together? And where do you even start?
RB: I would say that the greatest inherent challenge was not being too hard on myself whenever the design of a specific area was taking longer than expected. There were countless head-scratchers throughout the design process for Phase I. Early on, it was an adjustment realizing that the level of detail I required would result in, for example, taking the better half of a whole working day to design a temple with a footprint measuring only 4x8 studs. But as I progressed, I came to accept the process of moving from one landmark to the next, stopping between each bout of digitization to scour my textual resources and write down all the pertinent details of the next subject landmark. Notebook entries varied anywhere from just a few lines pertaining to said 4x8-stud temples to more than three or four pages covering larger constructions such as the imperial domūs on the Palatine Hill.

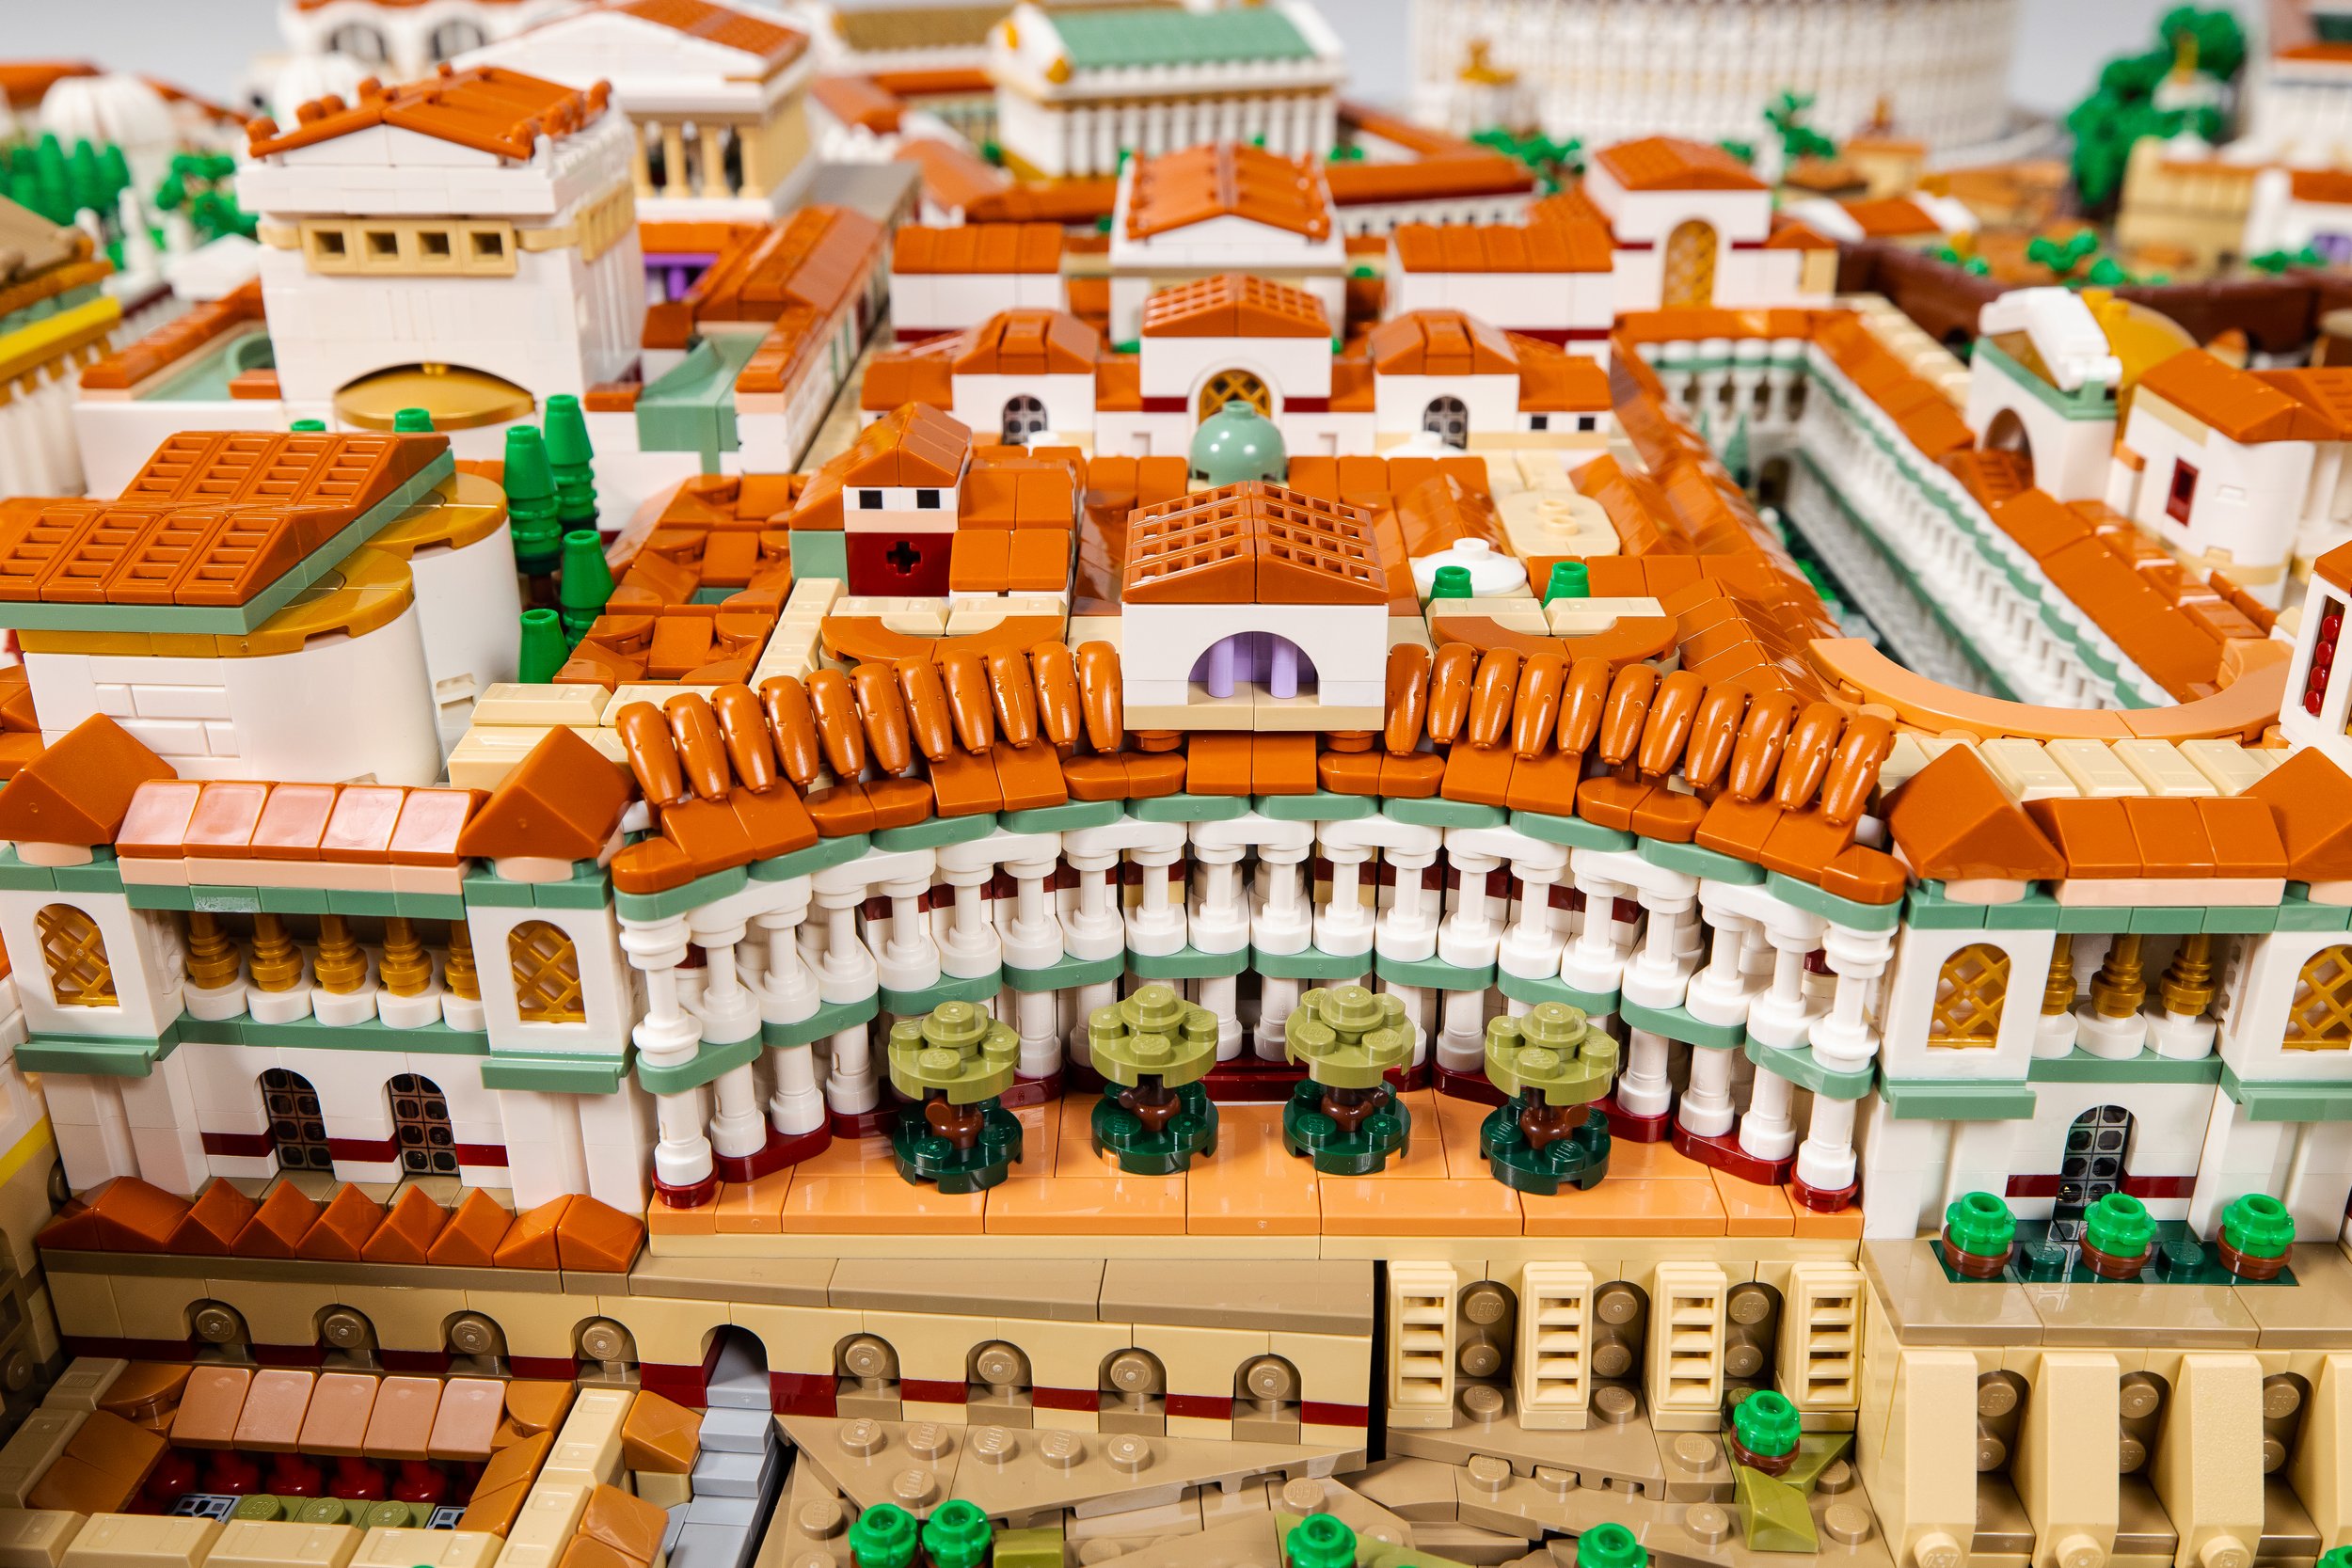
Palatine Hill, packed with detail. Photo © Rocco Buttliere, MMXXIII
This modus operandi provided a scalable and widely applicable rhythmos to what might seem like an endless slog from one area of the landscape to the next. The variation of inputs into this eight-months long design process is what kept me going and kept my inspiration fresh by not staring for too long at my studio screens or the pages of any single reference book. On top of that, I had also explored the ruins of these subject areas in preparation. The process was multi-layered, but ultimately boiled down to showing up to the studio desk for more than a thousand hours of design, followed by another several hundred over the ninety-day building process.
As far as starting goes, I typically begin designing landscapes at the lowest elevation. In this case, that was the Tiber River and Tiber Island, from which point everything grew up and out, one subsection at a time.

Crossing the Tiber: the only original bridge still standing in rome, the Pons Fabricius. Photo © Rocco Buttliere, MMXXIII
From Work in Progress to Work of Art
BN: Your in-progress shots show Phase I taking up an enormous amount of space on the floor of your apartment. For how long did it do that?
RB: It slowly grew to cover the floor of my studio over the course of about three months! It even got to the point where the door had to be closed so that a certain Julius Caesar of mine wouldn’t be lounging in the Circus Maximus during the morning light. He came, he saw, he fits, he sits!

Sunrise in ancient Rome, with Julius Caesar right where he belongs. Photo © Rocco Buttliere, MMXXIII
It’s always funny when folks at the live shows ask whether I miss having the work set up at home. The reality is that I usually can’t wait for the work to be shipped off to BrickUniverse. It’s never lost on me just how fortunate I am to have a steady gig with regular exhibitions, especially in this line of work. As far as I’m concerned, I would be happy if the work never returned home and always remained going from one gig to the next. Only time will tell!
BN: You say that you’ve spent “a few thousand hours of work” on this so far, and that you’re well on your way to realising the entire project of SPQR. Do you expect to have to adjust anything from Phase I as you move along with the following phases? And are you now completely done with Phase I—or will you revisit it whenever new parts come along…?

When do you STOP? Nice fountain, by the way. Photo © Rocco Buttliere, MMXXIII
RB: Is anything ever truly done? I would consider Phase I to be mostly complete at this point, not least because I used solvent on most of the structural connections to ensure its permanence as an exhibition centerpiece. I still say “mostly,” however, because there will be a bit of trimming around the edges to accommodate unforeseen challenges once adjacent subsections are added.
The important thing to note is that the level of detail in the execution ensures that it will hold its weight in the long run. Even as new discoveries are made which may shift the current archaeological consensus to which my piece is being designed, the representations therein will remain vital snapshots. At the end of the day, decisions have to be made and I am willing to accept the contemporaneity of my artistry to render it mostly permanent. The consequences of never starting for fear of being wrong down the line are ultimately far more deleterious.


And the Madness Goes On
BN: Just a month after having revealed the finished Phase I, you announced Phase II. Do you know how many phases it’ll take to get to the end of the project—and do you have a rough idea of when you’d like to see your 655 square foot behemoth finished?
RB: Phase II is indeed currently underway! I’ve been reticent to put a number on the expected number of phases. I’ve been wrong before, and there’s really no way to gauge the boundaries and scope of the next phases without first having designed the previous. I suppose that seems obvious, so more to the point is the honest truth that I simply don’t know.

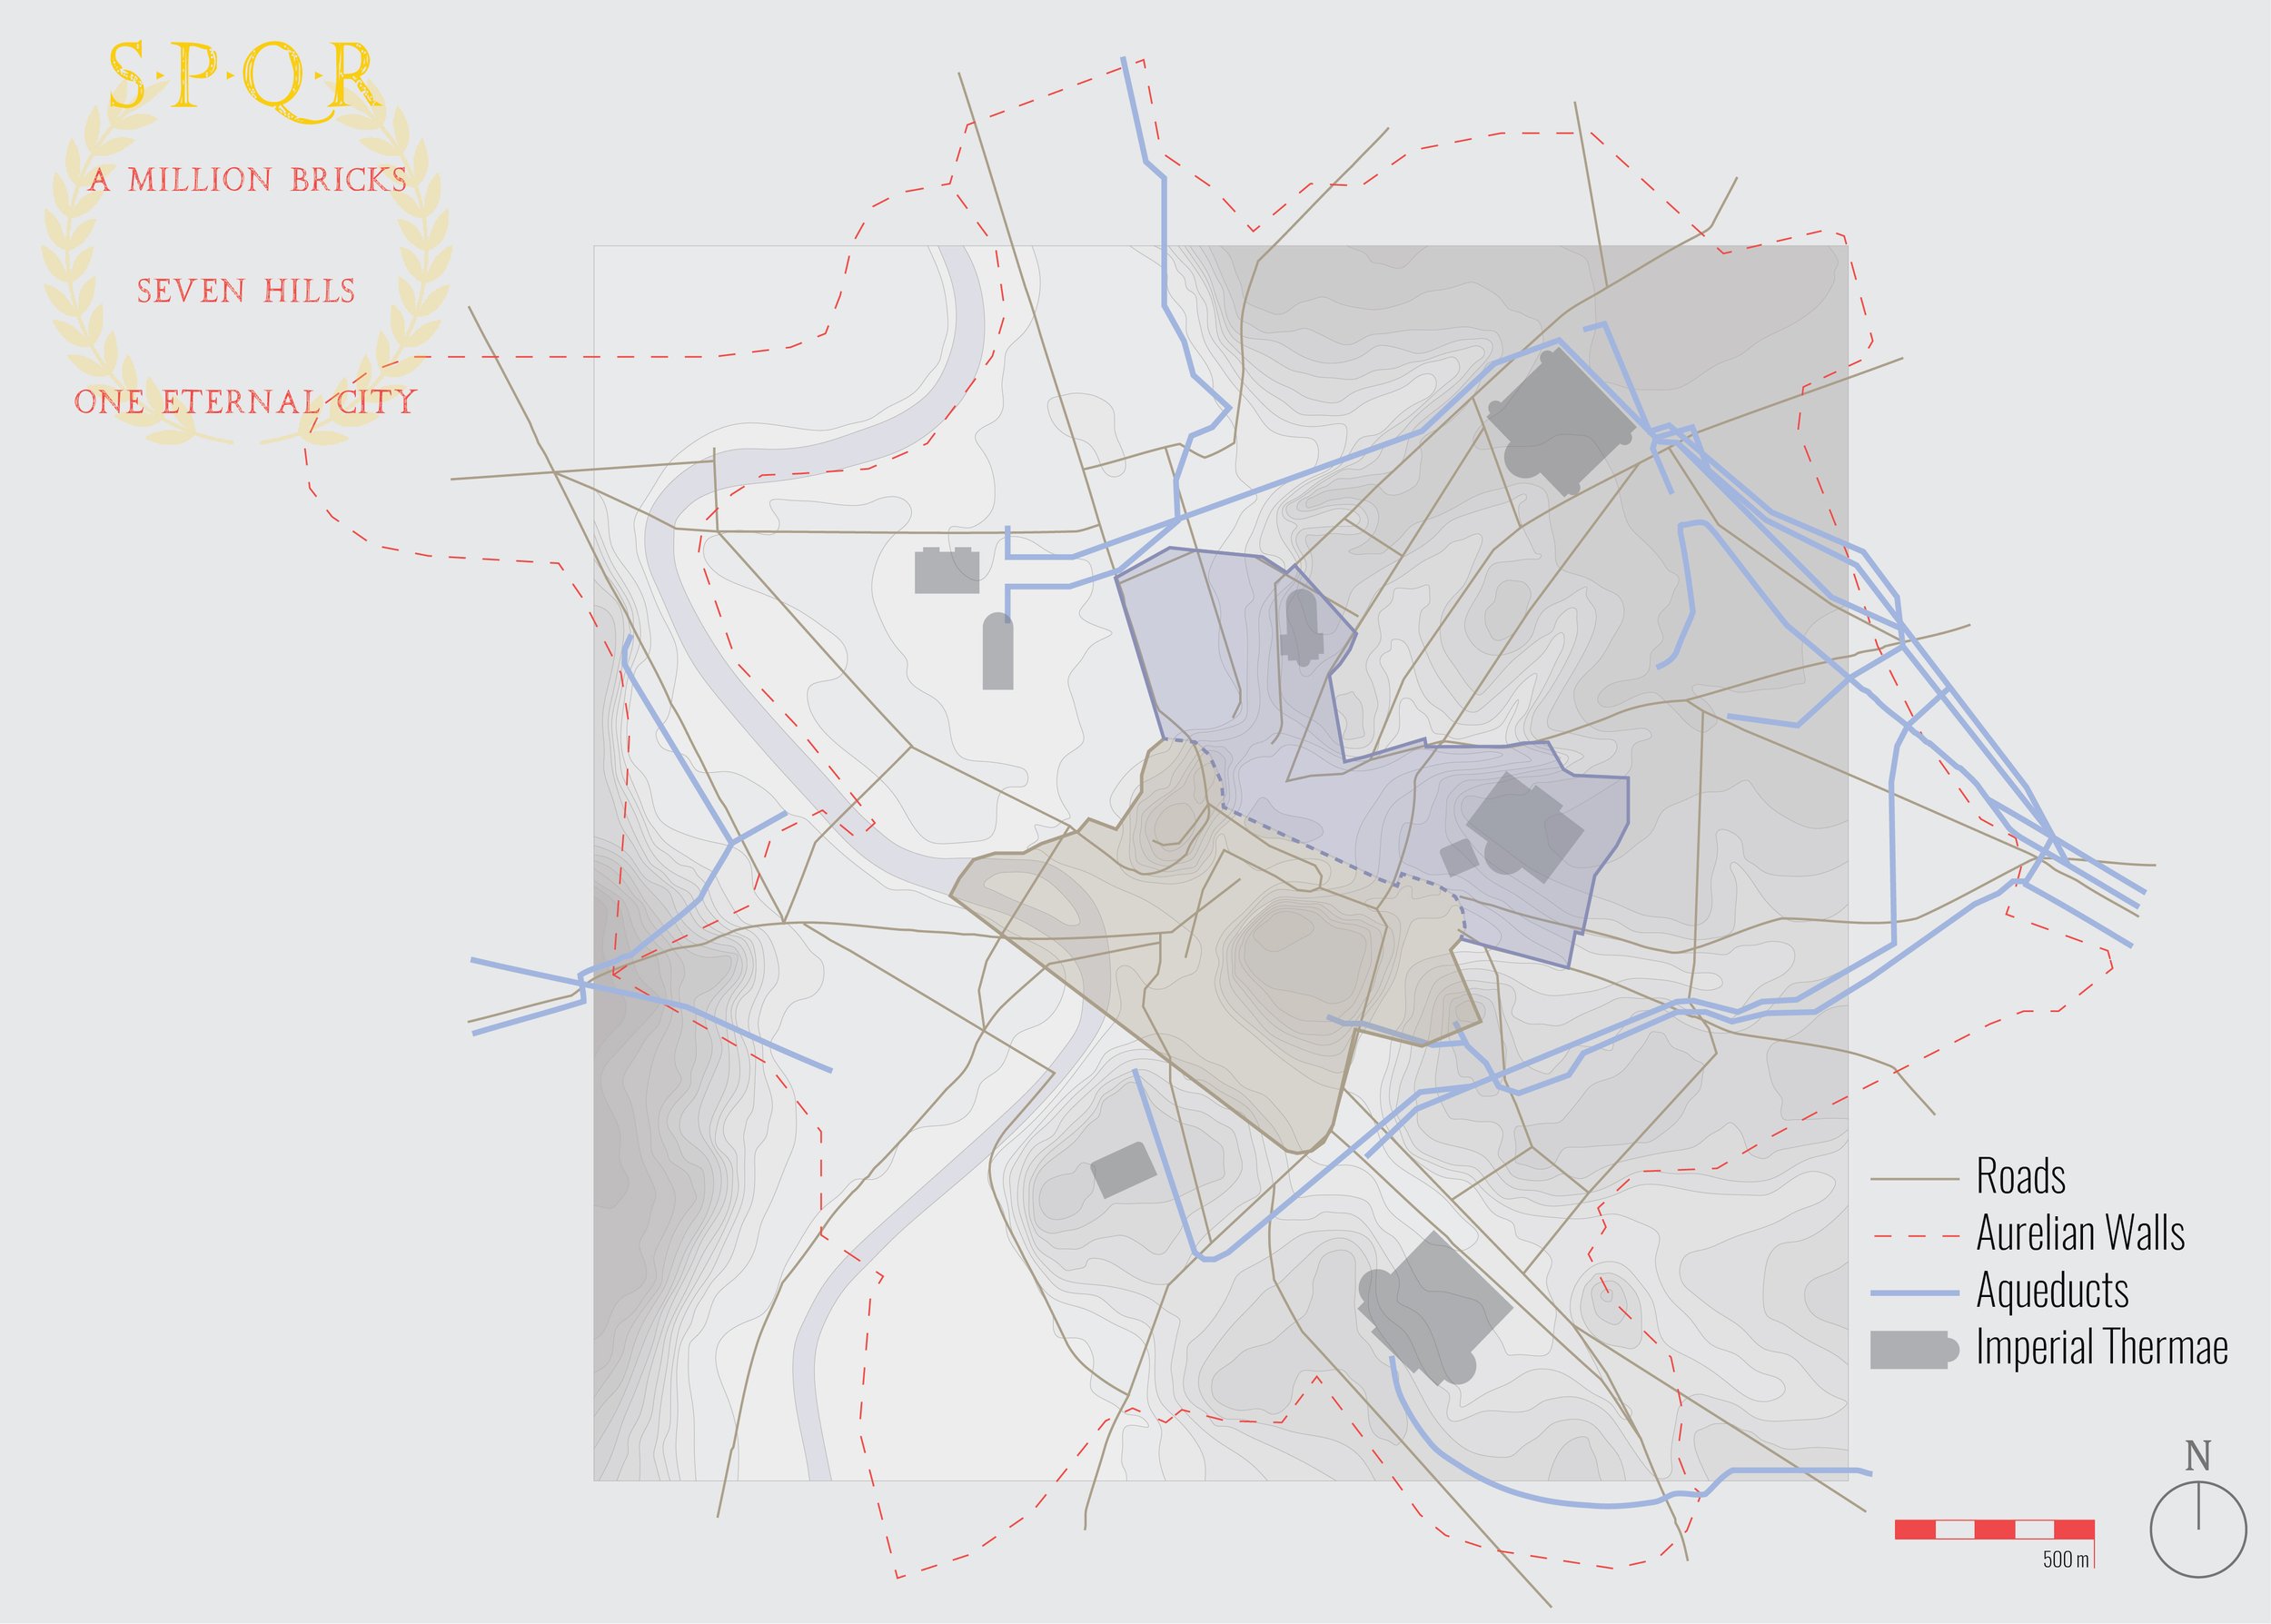
Compare the finished Phase I (in this photo) with Phase II (below) and the rest of the SPQR project, and you get an idea of scale. Photo © Rocco Buttliere, MMXXIII
Now ideally, the patronage will keep growing alongside the project. So long as I can build the kind of self-reliance in which such a long-term personal project is possible—and especially if the patronage were to take off beyond expectations—the timeframe could shift in a more favorable direction.
One maxim I’ve felt confident stating is that the fully realized landscape will easily eclipse a million bricks. There can be little doubt in that regard considering the current diorama is already in excess of 100,000 bricks, and there is likely well in excess of 90% of the land area within the Aurelian Walls remaining!

End Notes: Connecting With the Public
Rocco setting up his exhibition at Brickworld Chicago, 2015
BN: Let me finish by asking you something that I hadn’t thought about until I was preparing for this article. The LEGO hobby has evolved enormously since I first met you and saw the beginnings of your amazing Chicago layout back in 2015. Since then, you yourself have obviously evolved tremendously as a builder, and raised the bar many times, from Chicago to your superb London diorama, from becoming the first LEGO builder to assemble a scale model of an entire country to setting up your own business—but considering how much more people in general are aware of what can be done with LEGO, do you find that it takes the same or more work to make an impact with the models you’re working on these days?
RB: Truth be told, I don’t quite keep up with what makes a splash in the LEGO fan community these days. The fact of the matter is that ever since returning to live exhibitions in mid-2021, I’ve leaned into gauging the public response to my work. Having been a part of BrickUniverse since 2015, I’ve witnessed the visceral and authentic reactions of the public at seeing just how far brick-building can be taken; from a hobby as a fan, to a career as an artist. I certainly remember where I started out in the fan community back at Brickworld Chicago, and while I don’t imagine myself as having moved beyond that for one instant, the harsh reality is that the cost of post-pandemic logistics are such that I can’t justify sending any new work to unpaid exhibitions.

Applying the finishing touches to the Hagia Sophia. Photo © Rocco Buttliere, MMXXIII
On the flipside, my priorities for the kind of audience I hope to expand upon and the kinds of gallery-style exhibitions I hope to build in perpetuity have never been clearer. I have always strived to maintain an air of humility in the face of the loftier superlatives exhibition-goers kindly toss my way, much preferring to fall back on the honest admission that each new piece should always be a challenge and a learning experience. At the end of the day—like the aforementioned “experts” in their fields—no one is so knowledgeable as to not reevaluate and challenge precedent and none are so experienced as to completely ignore the sources of inspiration which were once the sole drivers of their formative creativity.
It’s the personal connections I make with children and adults at each and every BrickUniverse exhibition that is the way in which I can make the most impact. I believe this to be scalable in the long-term, provided I can successfully shift my business model toward self-reliance through a combination of patron support and steady sales of custom buildable kits. Today, it’s at least fifteen weekend exhibitions each year; perhaps in the future, it will be three or more months in a museum, before moving on to the next.
I’m very fortunate and grateful to have found an audience, and especially grateful to BrickNerd for helping to spotlight my efforts every once in awhile. There truly is no other LEGO fan media outlet that puts in more time, more effort in curation or more thoughtful analysis of this many-faceted gem of a community. Best believe you’re still Bejeweled!

All done setting up, preparing for the onslaught of the public! Photo © Rocco Buttliere, MMXXIII
And with those very kind words from Rocco leaving us blushing, we wrap up a fittingly monumental interview about a monumental project… which is still only about 10 per cent done. For now, you can watch the brilliant model film on YouTube, but I’m sure we will eventually come back to Rocco’s Rome here at BrickNerd—after all, all roads lead there.
Have you ever considered building a whole city out of LEGO bricks? What’s your favourite NPU in Rocco’s Rome? Have you seen any of his work up close? Do you echo his sentiments about online PAB? And did you get the Taylor Swift reference? Let us know in the comments below!
Do you want to help BrickNerd continue publishing articles like this one? Become a top patron like Charlie Stephens, Marc & Liz Puleo, Paige Mueller, Rob Klingberg from Brickstuff, John & Joshua Hanlon from Beyond the Brick, Megan Lum, Andy Price, John A., Lukas Kurth from StoneWars, and Wayne Tyler to show your support, get early access, exclusive swag and more.