Rise Above the Clouds
/Why look at the clouds from below when you have a much better view up above! Carter (Carter Witz) and Hadden (Roanoke Handybuck) prove this to be true with their wonderful collaborative MOC, Cloud Life. I was able to catch up with the builders and find out how such a collaboration happens—and get an insight into their creative process.

Cloud Life
Planning and Collaborating
Chris: Hey guys, it was great to see this in person at Bricks Cascade. Thanks for taking the time to dig a little deeper and nerd out over this fantastic MOC! First up, this was a team effort between the two of you—how did the planning for this project go?

Blue is carter (LEFT), green is Hadden (RIGHT)
Hadden: Hey Chris! Thanks for the interview! Planning was very spontaneous and it took place in a 60ish minute Discord call around 2.5 weeks before Bricks Cascade. We sent some concept art back and forth, picked one as a general aesthetic style to follow, and then I drew a quick sketch to get the general layout we could reference. Carter chose the left side, and I built the right side as well as the full bridge. (Highlighted in blue is what Carter built, and in green is what I built.)
Outline sketch
Carter: Due to the fact that we only had a few weeks to prepare and build our collab, the planning process had to be pretty quick. We went from having no idea what to make to having a layout and theme figured out in a matter of hours. Hadden has a much better planning mindset than I do, so he did a lot of the heavy lifting in this process.
Chris: Did you run into any specific challenges as you collaborated?
Carter: Nailing down a good size for our build to be was a little tricky. We knew from the start that we would have very little space in our luggage. Both of us flew to Portland for the convention, and neither of us had check bags for our flights. Also, Hadden designed the amazing base for the build, and replicating it was quite a time-consuming task for me.
Hadden: The base design was quite fun for me, and I got a lot of grumbling and complaining while Carter built his side. All in lighthearted fun I’m sure…
Chris: You mentioned concept art before—how did you go about picking a good reference?
Hadden: From the aforementioned concept art planning call, we picked one that best fit the description that we wanted to use bright colors. While the concept art itself is fairly weathered and desaturated, translating the general concept into LEGO would naturally shift to using brighter colors.

Eagle’s Bridges by Davide Pellino
Chris: You both flew into the convention—did you each bring your part of the build to assemble on site or was it completed before the con started?
Hadden: Haha, well… We were SUPPOSED to have it done before the con started, and one of us did… I’m a rather slow builder and ended up having to build one and a half buildings at Eli’s house with his collection before we took pictures and transported it to the con on Friday.
Carter: I finished my half of the build the night before I had to fly out to Portland—it was quite the grind the two weeks leading up to that. I made my part to separate into a few sections for traveling, so I just had to assemble those chunks when I got to Oregon.
The Details
Chris: Let's dive into the MOC itself now. I love the variety of bright colors throughout the build! You mentioned wanting to use bright colors but was the extent of vibrancy fully planned out in advance or did it come out as the build progressed?
Carter: We always wanted a large variety of colors in the creation, but I think it did tend to get brighter as we worked our way up the build. I wasn’t sure how some of the more vibrant colors would work out when planning, but I think they fit really well in the end.
Chris: I gotta say, one of my favorite sections is the wonderful bridge with the supports below. It looks so natural and well-integrated into the model. Can you talk a little about the design process for that? What did you use to achieve that curve across the top?

Hadden: Thanks! With the layout of the build, the bridge was the only break in the intentional negative space between our sections, so I wanted it to be a little more visually interesting than just a flat walkway. The techniques implemented aren’t anything revolutionary, and it’s just three flex tubes running the length to hold the shape. The middle has a bunch of headlight bricks to attach to the planks of the walkway, and the outer two were clipped onto with the 1 x 1 modified tile clips into jumpers—and then the well-known technique of minifigure hands into tiles. I’ll also point out those new wedge tiles (5091 and 5092) used to get the 45-degree angle off the main supports. I bought one of the new Speed Champions sets just for those parts since there were only a few overly expensive listings on BrickLink at the time.
Chris: You both clearly excel at fancy LEGO maths—are there any techniques you are especially proud of and want to highlight?

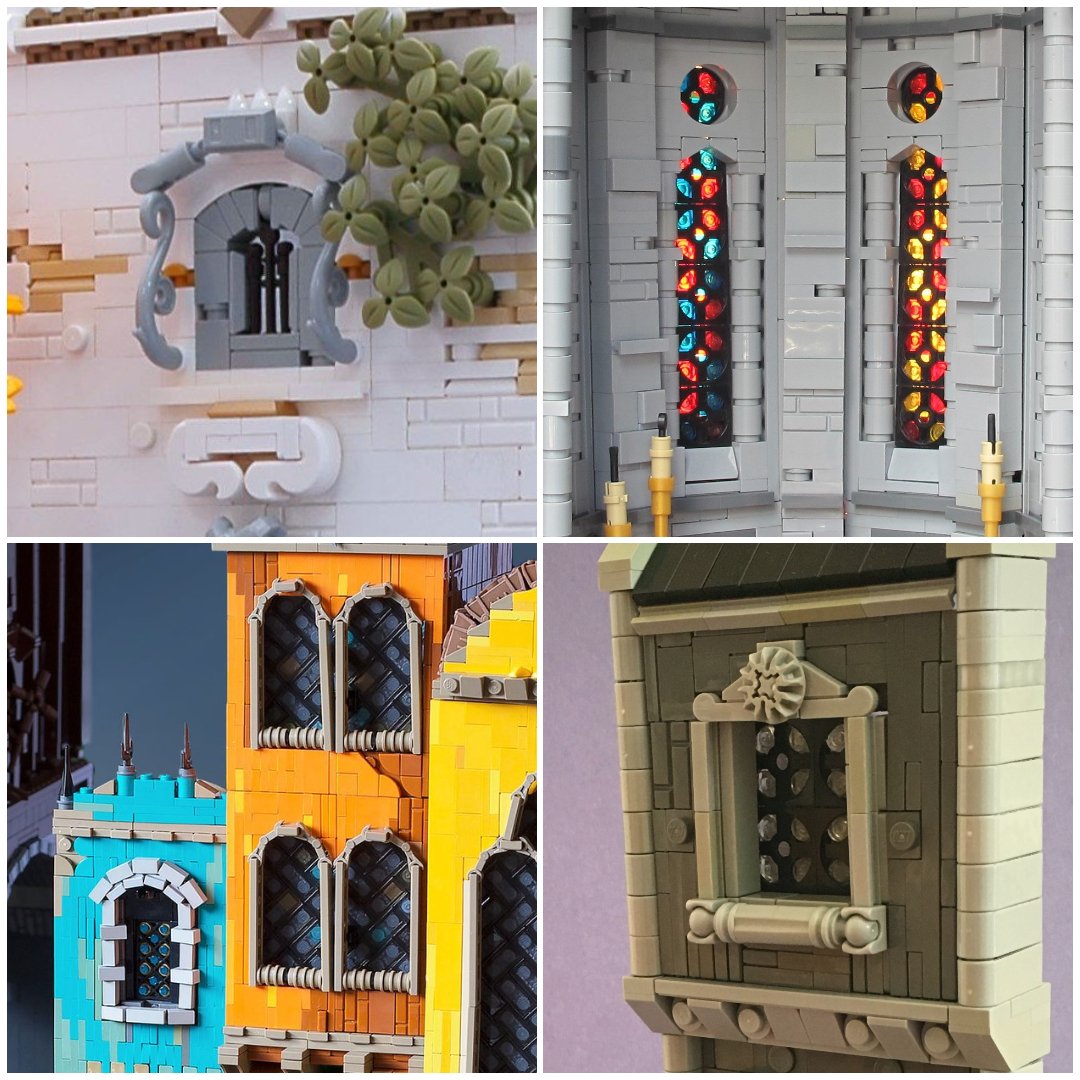
Rubber band plants and unique building intersections
Hadden: The 45-degree section on the dark red building matched LEGO dimensions “close enough” (though it didn’t match perfectly in LDU, sorry to disappoint you Chris), and it worked without the need for further iterations, which was a huge blessing. The hexagonal tower implemented a tablescrap technique I’ve had lying around, and it’s always nice to know that all the tablescrapping isn’t entirely useless. I’ll also add that Carter designed the deceptively complex poster that is visible on the backside of the build—it’s quite a fun little design, and didn’t want to let it go unmentioned!
Carter: I always really enjoy building plants in LEGO, so trying to come up with fun and unique plants for all the buildings was a highlight for me. My favorites would probably be the green rubber bands in the windows and experimenting with using the minifigure net piece as a basket for flowers (expanding on a technique I first saw used by César Soares).

Rear view of Cloud Life
Colors!
Chris: I don’t want to miss a single detail of this—is there anything else you want to mention about this MOC?
Hadden: Let’s nerd out about the colors for a second! The build uses all the sand colors that LEGO has produced (Sand Red, Sand Purple, Sand Blue, Sand Green and Sand Yellow, aka Dark Tan), as well as all the bright and vibrant classic colors from the debut of the LEGO brick (White, Black, Red, Blue, Green, Yellow). The final color count is 60 different colors visibly! Carter got the jumpstart on the actual buildings and defined the visual style which I made an attempt to match on the same caliber. Although, I think this whole collaboration was just a way to justify Carter spending $3.51 on the violet flower that you can see in his section. ;)
Carter: Haha, I agree that all the colors were a lot of fun to use (retired ones especially). I want to mention that Hadden really took this build to the next level by coming up with the super cool bridge and base designs—top level stuff for sure. Also, huge thanks to Eli for letting us trash his LEGO area and take pictures at his place!
[Interviewer’s Note: They provided a full list of colors!
Black, White, Dark Grey, Dark Bley, Light Grey, Light Bley, Sand Green, Dark Turquoise, Pearl Gold, Green, Trans. Yellow, Tan, Orange, Reddish Brown, Brown, Lime, Dark Green, Bright Green, MDF, Flesh, Sand Blue, Yellow, Bright Light Orange, Dark Tan, Red, Magenta, Olive Green, Metallic Silver, Flat Silver, Dark Red, Dark Brown, Trans. Dark Pink, Lavender, Medium Lavender, Dark Azure, Medium Azure, Very Light Orange, Pearl Dark Grey, Violet, Bright Pink, Medium Orange, Trans. Clear, Trans. Brown, Trans. Dark Green, Medium Lime, Medium Blue, Blue, Bright Light Yellow, Light Yellow, Bright Light Blue, Light Blue, Sand Red, Sand Purple, Dark Orange, Light Flesh, Medium Tan, Dark Blue, Aqua, Trans. Medium Blue, Trans. Light Blue
Yeah. That’s a heck of a list.]
Wrapping Up
Chris: Thanks again for sharing this MOC, the design process, and what it can be like to collaborate on a tight schedule. I have one more curveball question for you. What shape is the best shape?
Hadden: The Penrose triangle, obviously! ;) Nah, in all seriousness I’ll always be a big fan of hexagons—cheese slopes are integral when designing hexagons, and I do love cheese. I also find the tiling pattern from regular hexagons satisfying, and it makes great board game layouts too (Catan, Gemini Gauntlet, etc...).
Carter: Pizza is generally round, so I’ll go with a circle.
Chris: While I do love myself a hexagon, and I might even go so far as to say that Hexagons are the Bestagons—you had it right the first time. The Penrose triangle is pretty sweet, but then again I might be a bit biased in that regard, given I use one as a profile picture. And if you don’t know, Gemini Gauntlet is a board game based on the 2014 LEGO collab Micro GARC and designed by AFOL Josh Derksen! Now Cater has made me hungry, I wonder if they make a hexagon shaped pizza?
Best of BrickNerd - Article originally published April 18, 2024.
What do you think about cloud based MOCs? Are you afraid of heights? Let us know in the comments below!
Do you want to help BrickNerd continue publishing articles like this one? Become a top patron like Marc & Liz Puleo, Paige Mueller, Rob Klingberg from Brickstuff, John & Joshua Hanlon from Beyond the Brick, Megan Lum, Andy Price, Lukas Kurth from StoneWars, Wayne Tyler, Dan Church, and Roxanne Baxter to show your support, get early access, exclusive swag and more.