So You Want To Build Your Own Fighting Robot...
/Best of BrickNerd: Weekend Highlight — Article originally published October 5, 2021 (and you can see these robots in action this weekend in Seattle at BrickCon).

DISCLAIMER: The following building tips and advice are intended to be used by adult LEGO users only! Building, testing, and fighting should be done with proper safety eyewear, supervision, or in an enclosed area that is separating you from any potential dangers.
Lack of intricacy is not obligatory, but it is preferable
In Part 2 of our Combat Robots series, I will discuss how you can get started building your own robot. If you missed the first installment, check it out here.
Efficiency, robustness, and simplicity over intricacy should be your build philosophy. In a turn of complete opposite to other LEGO subgenres, you should focus on building a machine that is simple to maintain, and does one, or perhaps two basic things really well.
If you’re reading this, it’s because you want to get started immediately
As a beginner, you’ll want to ensure that your robot is capable of moving under its own power. I’ve included two drivetrain starter templates that you can download.

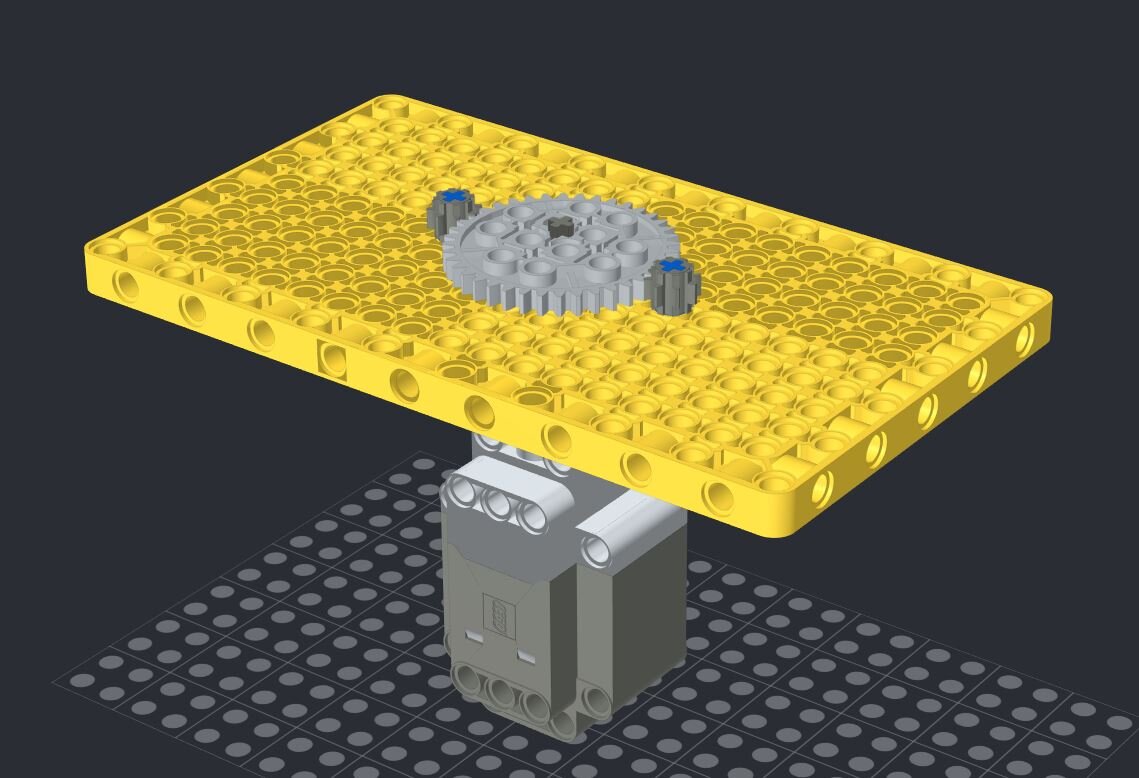
Single side drive pod, for building a two-motored, 4 wheel drive base. Instructions here.

Base for a 2 wheel drive, with room to expand to 4wd with chain. Instructions here.
Avoiding Early Mistakes
Here are some tips if you plan on building your own custom design. Firstly, to avoid many of these beginner issues, you may want to build a 2wd robot instead of a 4wd. Also, nearly all good designs are based on tank-style drive.
The very first error you are prone to making is constructing a chassis that is incapable of moving. Firstly, make sure that your drive base has at least 0.5-1 studs of clearance from the ground. Using tires with a 37, 49.5, or 62.4mm diameter gives optimal space to build below the axle and still maintain enough clearance to prevent getting beached on a high point on the floor.

Approximately 0.5 studs of clearance when using 49.5mm diamter wheels
The next error to avoid is building a 4wd base that is too long. Building too long of a base may prevent your robot from being able to turn. Your base should be near square, or even wider than it is long.

18 studs long by 28 studs wide
If you are mounting your drive motors 90° to the wheels, use cross-gear pieces instead of bevel gears. Bevel gears mounted at 90° will slip when your robot is attempting to turn, thereby making your robot unable to maneuver.

yes do this/ no plz
With a 2wd, you should pay attention to the center of mass in relation to your wheels. Having your wheels too far forward, or too far back might cause significant oversteer or understeer. It might be advisable that your batteries are near, or even directly center to the turning axis of your drive.

Daisy-chains don’t work
Finally, do not daisy-chain gears to power sets of drive wheels. It’s too much friction, and the motors will overheat. Chain link is mostly reliable. Perpendicular drive axles are also functional.

Perpendicular axle drive
The Fine Balance
When building for a competition, the rules surrounding weight limit is the primary restriction you must build around. In Battle Bricks, the weight limit is two pounds, and in the UK, one kilogram. The reason that weight limits in robot combat exist is so that one cannot simply build an invincible cinder block.
It can be difficult to balance the weight of your bot. I would recommend dividing your build into subsections, so you can calculate the necessary weight for crucial parts:
-Batteries and Receivers
-Motors
-Weapon
-Frame and armor
-Wheels and drive components
Individual weight of parts can be found on their respective entries on Bricklink. Since batteries, receivers, and motors are always part of your build, you can determine the remaining allowance of weight after estimating what is being allocated for those components first. If you are allocating 205g for the batteries and AA battery pack, 48g for IR receivers, 163g for two Ls and an XL motor, then you’ve used up 416g against your robot’s weight limit. If, for instance, your weight limit is 1000g, then you have a remaining 584g for weapon, frame and armor, and wheels and drive. If you use Studio to build your robot, you can use the physical information window to roughly tabulate its weight.

example of pulling up info on studio: From the Toolbar>>Model>>Model Info>>tab to Physical Information
Power Overwhelming
Choosing the appropriate batteries is important, as they are what limits the total amount of mechanical output your robot is capable of. Firstly, check your local ruleset to see what you can use to power and control your robot. Find out if you are only allowed to use 100% LEGO, or if there are some exceptions for third-party peripherals.
Batteries
Summary: More power = more good. Find ways to make more power possible under given limitations so your spinny things can spin faster.
As a children’s toy, there are certain safety features built into LEGO battery boxes and peripherals that are meant to limit the voltage and current. This severely under-powers your peripherals that are connected to those battery boxes. In order for your electronics to run optimally, you’ll want to make sure you hit the ceiling of what is possible under these safety features. Find the batteries that work best for you. The limitations you are working under are:
-the total maximum electrical output from a limit of six batteries per box.
-the internal over-current protection(it’s an internal mechanism that breaks the circuit by heating up when there is too much electrical current. You will run into the wall of over-current often. It is a dominating limitation, and you will have to adapt your building techniques to work around it).

Not all batteries are equal. If you plan on using standard LEGO battery boxes, I would recommend rechargeable NiMH AA batteries. I’ve found the batteries with the most consistent output are Energizer Rechargeables, and Panasonic Eneloops. The number of cells in the AA(or AAA) box is the limiting factor. With single use alkaline batteries, each rated 1.5 volts, you equal 9 volts maximum, the recommended voltage for LEGO peripherals. NiMH rechargeables are at an average 1.2 volts, totaling an average 7.2 volts. With the Energizers and Eneloops, I’ve found them to be greater than their rating, averaging between 1.3-1.4 volts per cell.
But why not go with single use alkalines?
…
Do you really want to swap out to fresh single-uses after every two minute fight?

$$$$
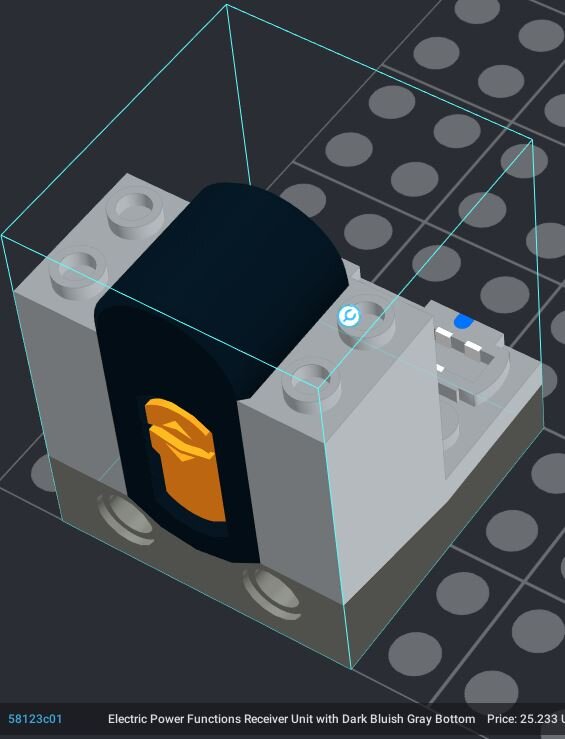
LEGO LiPo battery
LEGO did manufacture their own LiPo battery to be used with Power Functions. While LEGO-purist, it's only 7.2 volts, meaning that it is not capable of optimally powering your motors. It should not be completely disregarded, however; it is lightweight, which makes it ideal for a hobby where there is a weight limit and every gram spared can be put into other components of the robot. One major downside is that this part is discontinued, and it is quite expensive on the aftermarket.
For more information on batteries and LEGO battery packs, I’d recommend the following reading: Here.
Wait, That’s Illegal
Can we stop using these, already?
If you are in the UK, rules state that you need standard LEGO control modules, either an IR module, or the Technic Hub.
If you have no purist rules to adhere to, join the dark side. Power your LEGO peripherals by the most non-LEGO means possible. There are a number of manufacturers who make LEGO-compatible Bluetooth modules, and even Bluetooth/LiPo battery combos.
I am not paid to specifically endorse any third party products, so all I will say is that there are certain Google search terms you can type in, such as, “third party LEGO controllers,” which will provide you with multiple third party LEGO-compatible Bluetooth module hits. These modules are great for their instant plug-and-play.
BrickController2
While I will not endorse any third-party products, I will, however, endorse an app for controlling your robots. It is a control app for your third party Bluetooth modules, and LEGO brand modules, including IR. This app allows your modules to be linked to a Bluetooth gamepad via your iOS or Android phone. It is perfect for basic controls that your robot uses. Check it out here.
Why is this important? While third party modules have a GUI within their native phone apps to control your creations, you will find that using a phone screen with zero tactile sensation is cumbersome when using it under the stress of your creation being potentially destroyed. Using an analog controller is what you want to control your robots.
Mapping Tank-style steering to a single analog stick with BrickController2
Mapping all steering to a single analog stick frees up your second stick for a weapon (I prefer to map spinning weapons to the left stick, so as to finely control ramping the power up, and avoid tripping over-current protection).
Map the left motor and the right motor to the up/down axis of the analog stick. Select one of the motors to be “inverted” in the selection screen.
Map the left motor and the right motor to the left/right axis of the analog stick.
Play test the configuration. If the forward/backwards drive is reversed, un-invert the “inverted” motor, and select “invert” on the non-inverted motor. If the left/right controls are reversed, select “invert” on both motors.
If any of these steps confuse you, watch the tutorial videos in the Eurobricks forum thread to learn the basics of gamepad mapping with the app.

Labels are examples and may not reflect axis names, port channels, or receiver device type
Understanding Motor Usage
Understanding the characteristics of LEGO motors is important for optimizing your builds. Once again, I’m going to link you to someone’s body of work who is far smarter than I am. I’d highly recommend reading through these statistics. Just about everyone who builds has gone over this, and it will give you a general idea of the applications that each motor is capable of performing: Here.
Let’s lay down some general rules of motor usage for the certain subsystems in your robot:

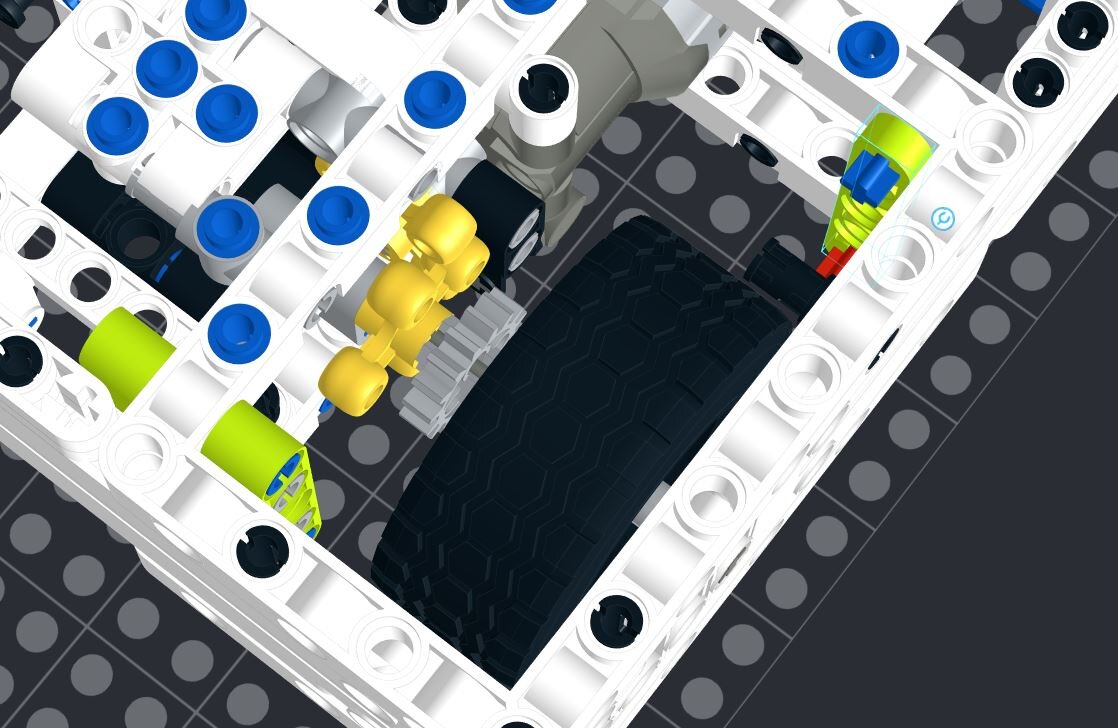
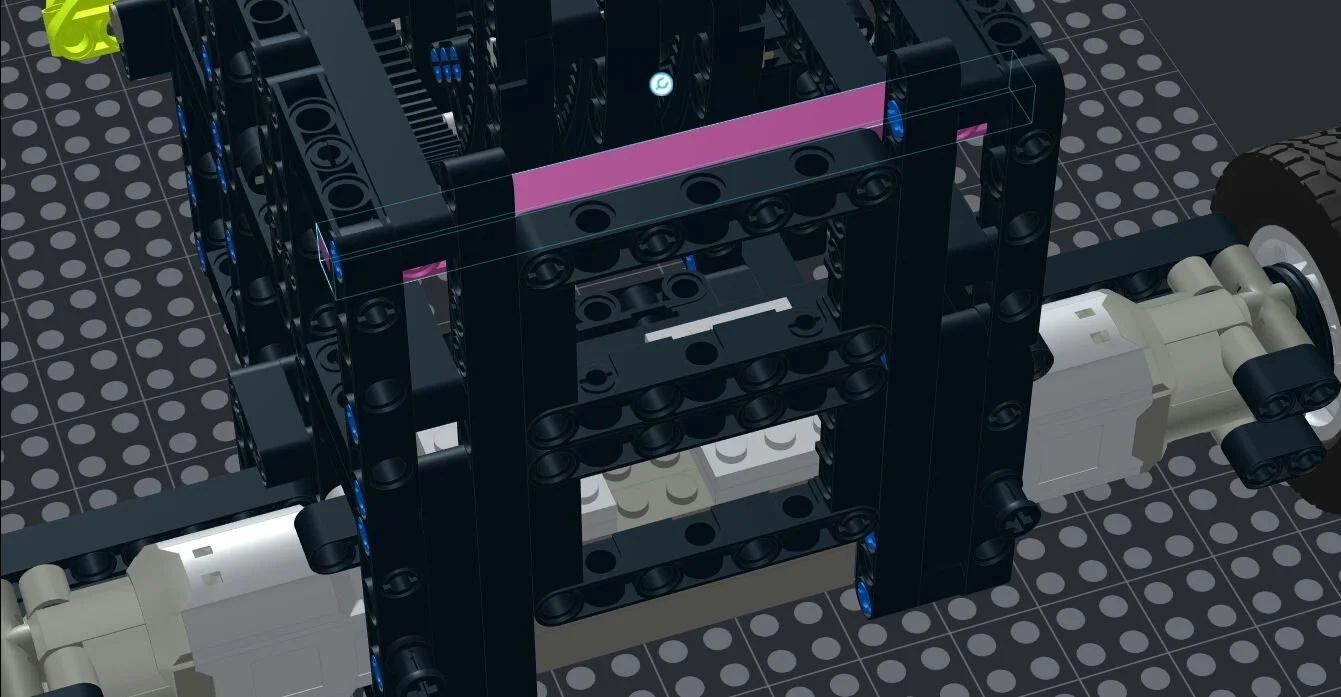
Internal view of a 4wd bot with four PF L motors
Drive: L motors or XL motors - direct drive off L motors is usually sufficient to provide you with a good balance of speed and torque, as well as weight usage. You can use XLs if you have weight to spare, want extra pushing power, or are planning on gearing your drive. It may not be recommended using more than two XL motors per robot. You run the risk of your robot over-currenting.
I would not recommend using M motors for drive, as the extended period of hard usage causes them to overheat.

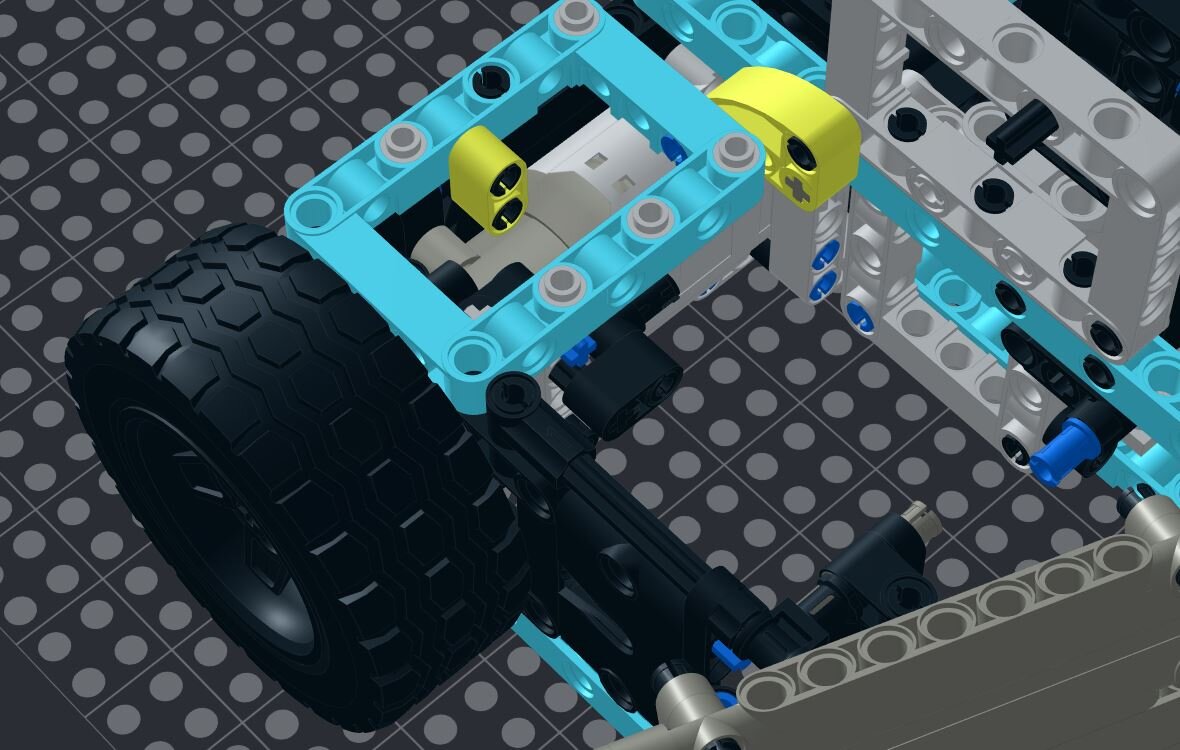
Two pf xl motors, geared to 1:1.667
Hammer weapons: 2 XLs. You need to be able to swing a heavy mass, far from the point of rotation, as quickly as possible. Only XLs can provide the immediate torque, and also be geared for speed.

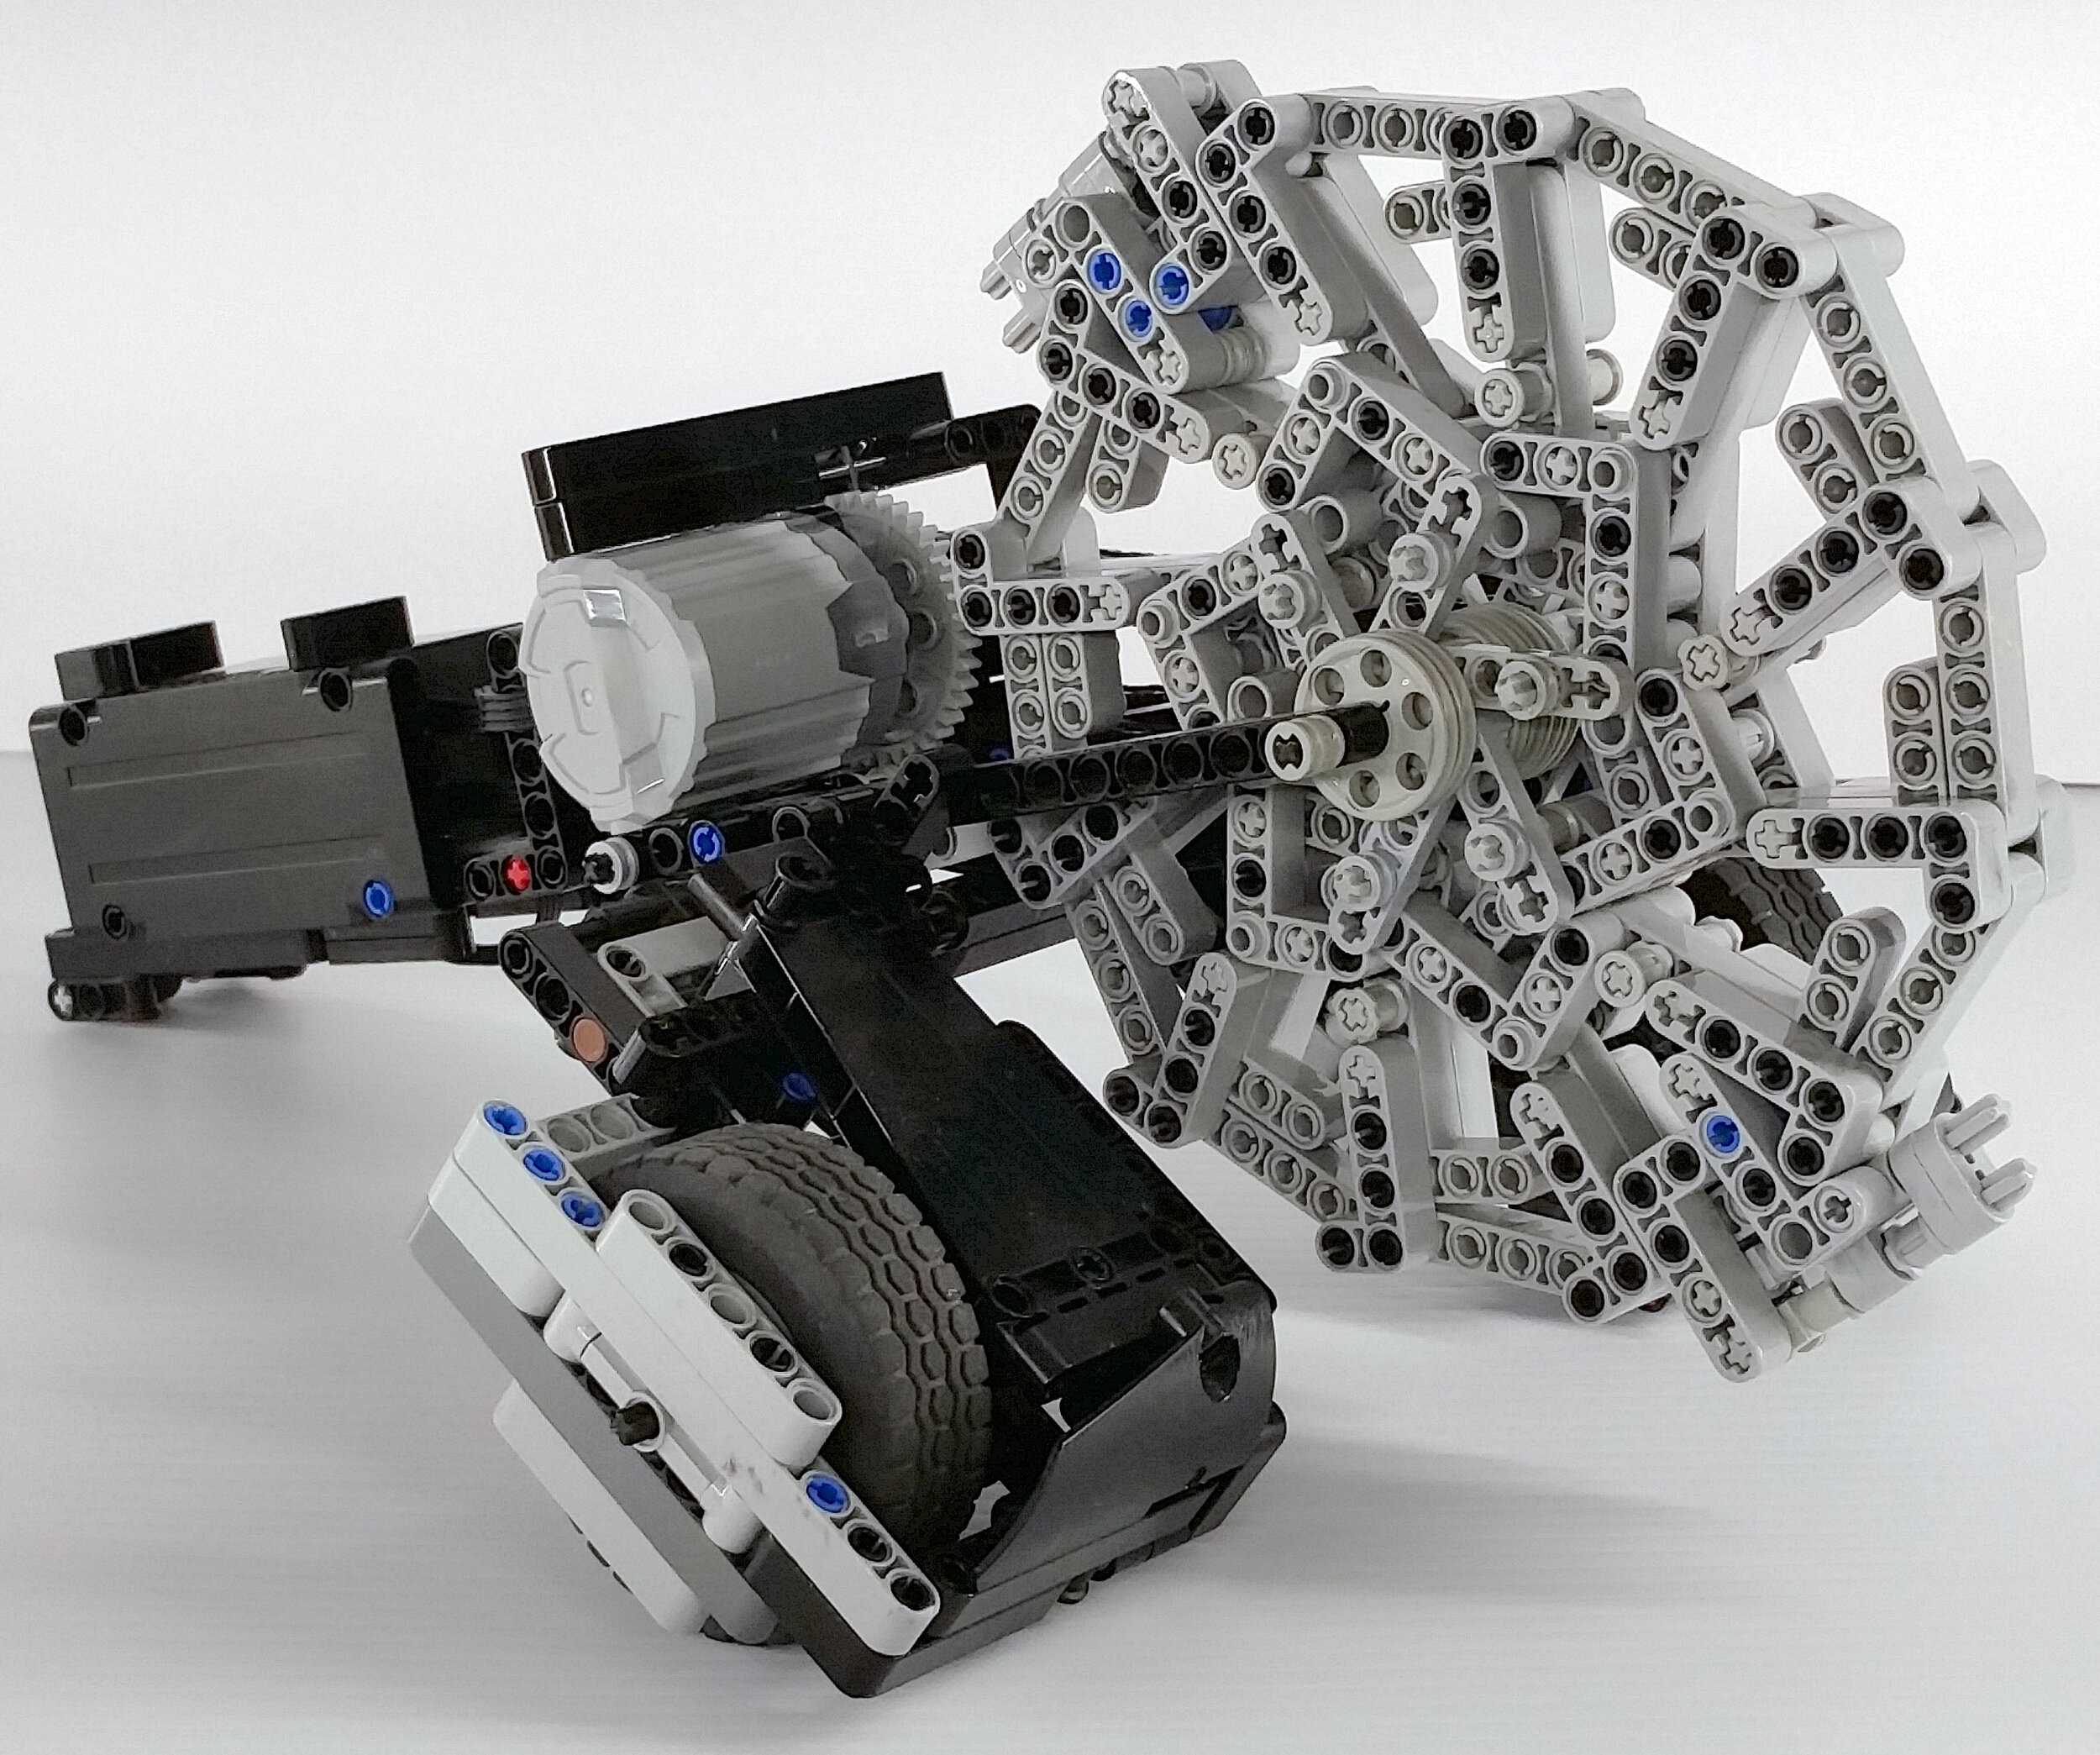
a pf XL motor geared to increase speed 7.5 times
Spinning weapons: 5292 Buggy motor, XL, two Ls, or train motor.
The 5292 buggy motor is the ultimate motor for spinny things. You can run weapons on a 1:1 ratio and is the fastest motor LEGO has produced, being able to produce upwards of 1700RPM. However, this motor is extremely expensive on the aftermarket. Another downside is that LEGO power supplies are incapable of providing enough power for the buggy motor to run optimally. Buggy motor requires use of a PF power cable and its shape also makes the motor difficult to mount. That said, even with a standard PF power supply, the buggy motor is still the singularly best choice for most spinny things.
XL motors are capable of being geared toward speed, rather than torque. XLs are heavy, and may require cumbersome gearboxes in order to run at high speeds.
L motors may be twinned to run a high-speed weapon. They can be used when there is a restrictive clearance inside the robot frame.
Train motors can run spinning weapons on a 1:1 ratio. They make a good budget weapon motor, and don’t require expansive gearboxes. The major disadvantage of this motor is that the internal gearing can be physically worn down.
Lifter weapons: XL, two L’s. Pretty self-explanatory. You need a lot of torque. Ultimately, deciding on your lifter motor depends on the geometry of what you’re building.
Gotta Go Fast

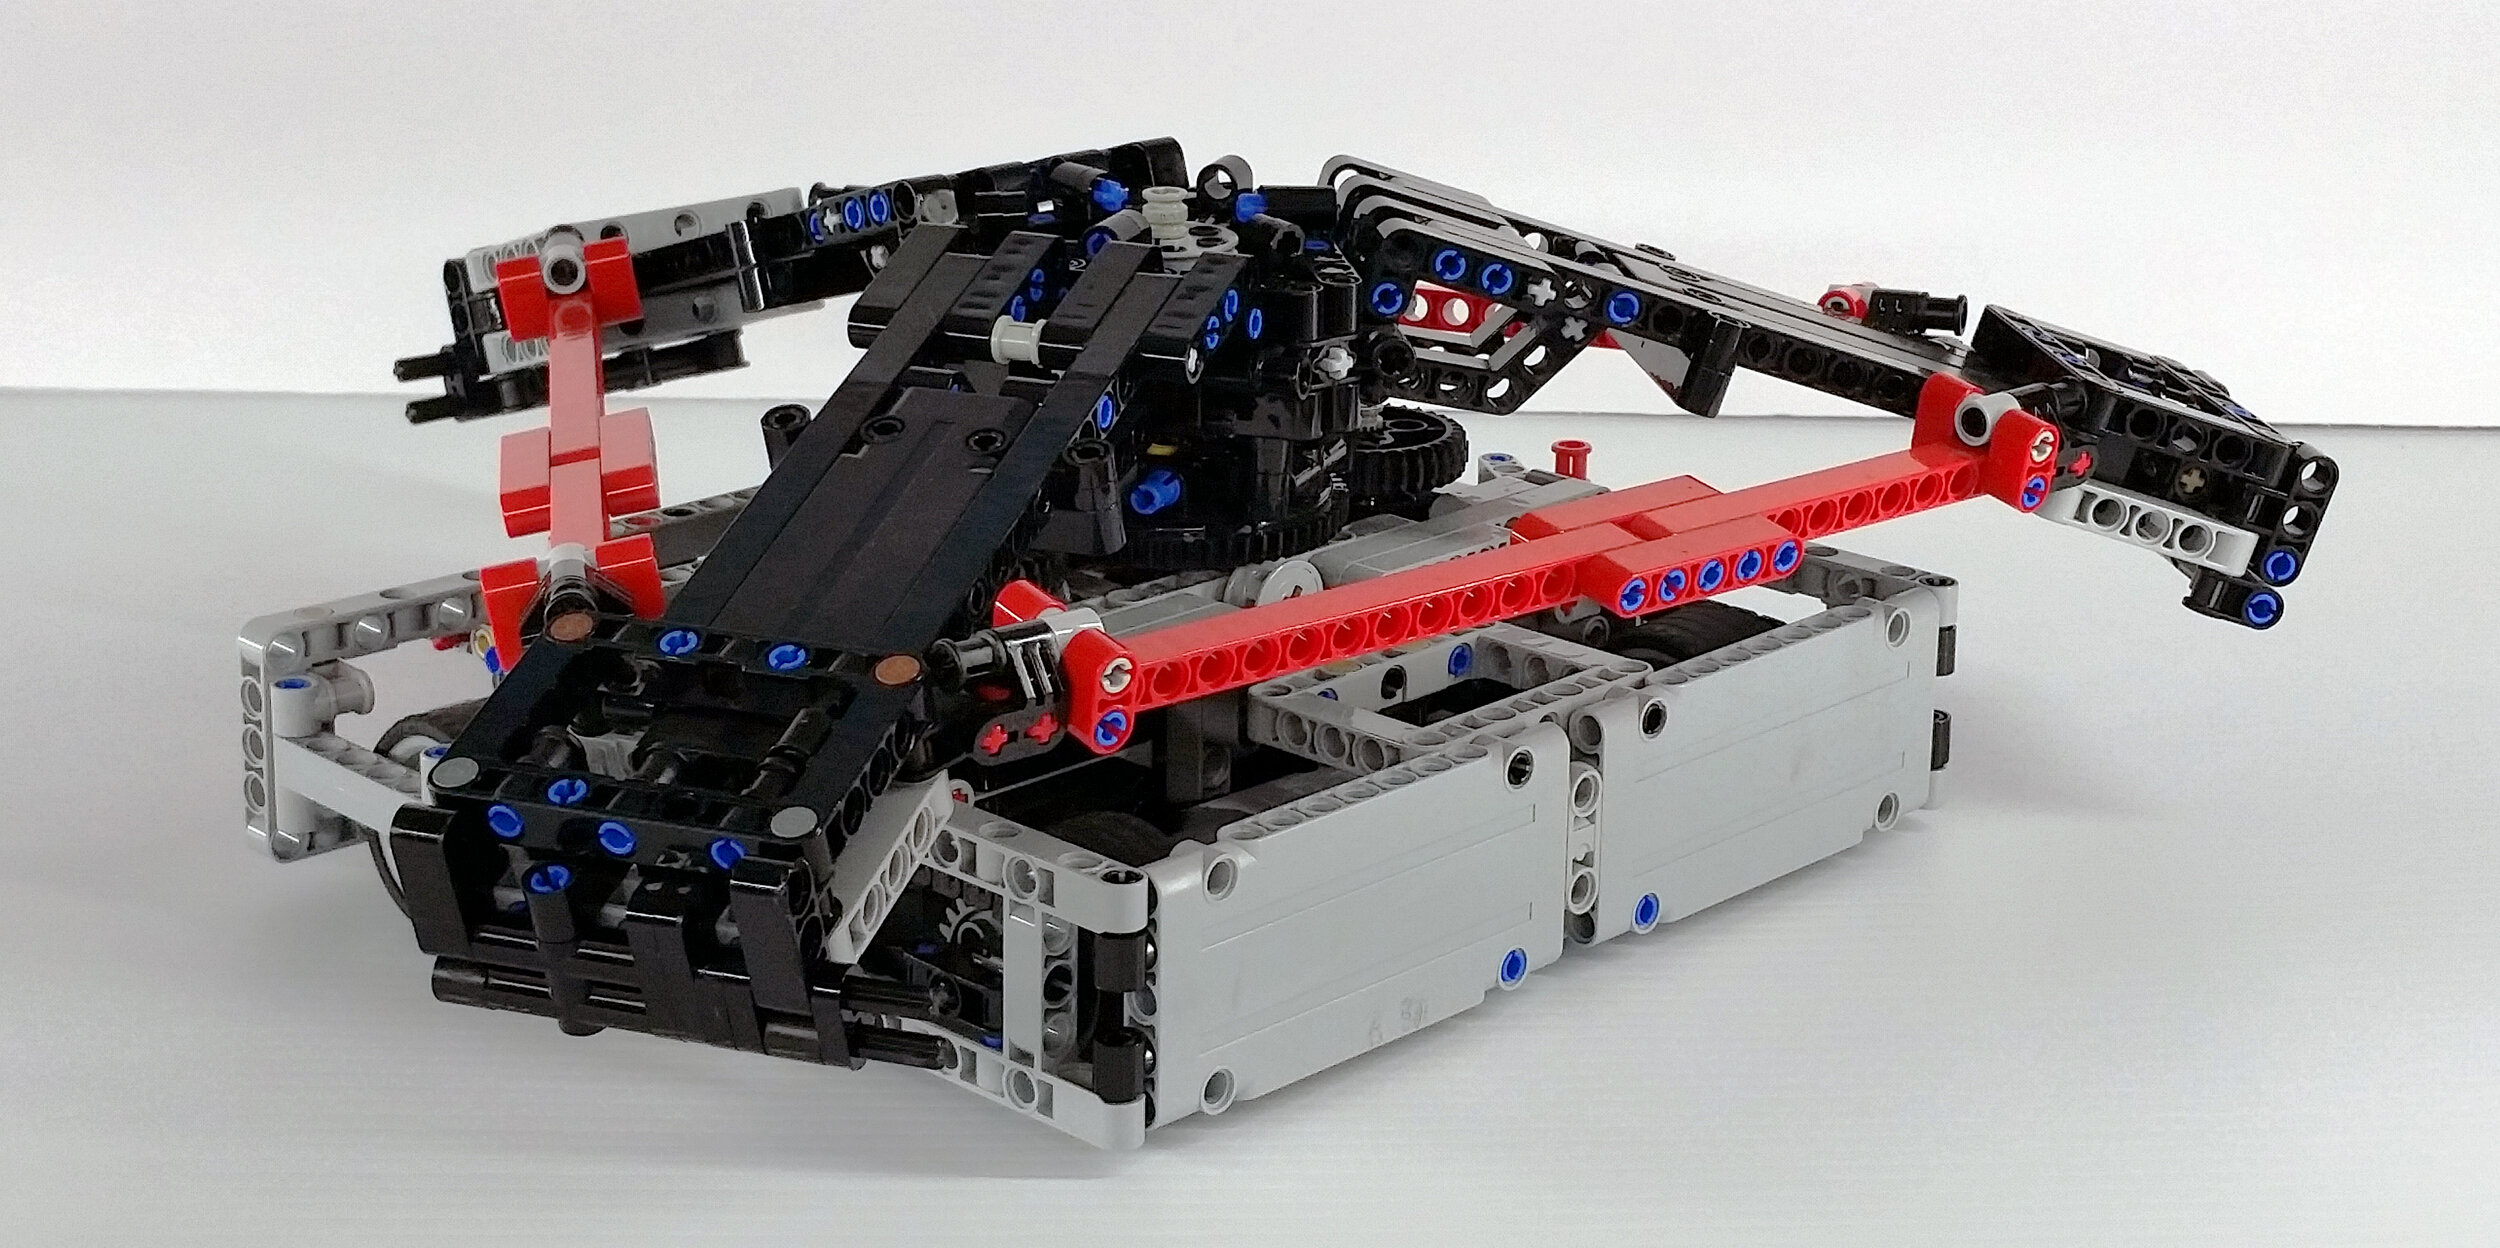

This is not an effective spinner design
Spinning bits of LEGO to damage other pieces of LEGO takes more finesse than just getting the maximum RPM out of a motor. Likewise, having a weapon with a large diameter does not guarantee effectiveness, either. Your weapon design should be built to have a large moment of inertia, as well as having an effective bite. I would highly recommend watching the following video, as it better explains these concepts than I can: Here.
In relation to building with LEGO, you can do the following to increase the effectiveness of your design:

Teeth designed for punching. weapon Disk total approx. 200g. Aysemmetrical for maximum bite
Design a weapon where most of the weight is around the perimeter. Take the examples of the robots pictured in the previous gallery. All utilize parts built outwards, with an internal negative space, essentially turning them into spoked-flywheels.
Metal parts, such as level crossing weights, boat weights, and train axles can be utilized to increase the total weight of your weapon. The bare-minimum, golden-weight of a spinning LEGO weapon is at least 140g. You can especially use metal parts to make smaller diameter weapons heavier. You may also use weights to shift the rotational axis of the weapon, and assisting you in creating asymmetrical weapons, to allow for greater bite.
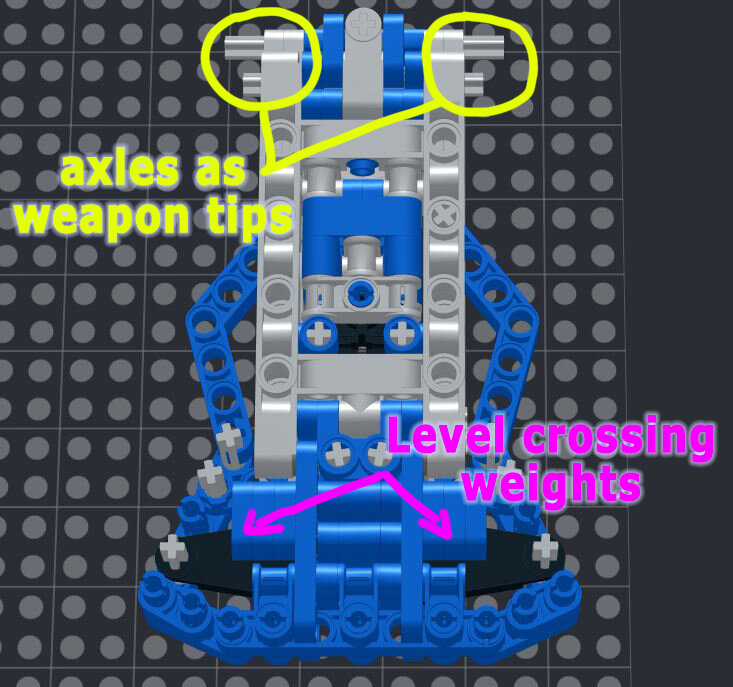
Teeth designed for shearing. weighted with level crossing weights and metal train axles. Weapon bar total Approx. 160g. Aysemmetrical for maximum bite
The most effective weapon tips are designed to focus the energy of the weapon into a single point. Insofar, there are two effective types of tip design philosophies in LEGO robot combat:
-Punching, a weapon tip designed to directly deliver all energy into the frame of the opponent. Use a small, flat, reinforced extended tooth on a large diameter disk/bar.
-Shearing, a weapon tip designed to separate seams and break pins. Use a protruding axle as the weapon tip.
For gearing and increasing your weapon’s RPM, you can use this page to calculate a rough estimate of what your setup is capable of: Here. Note that RPM calculations are theoretical, do not account for load, and may not accurately reflect the real-life RPM of your set up. For a spinning weapon, you should be looking to achieve upwards of 1000RPM.
This is where you should’ve started reading

First iteration of my disk design, well before mounting it on a pair of wheels
Remember where I implied that you should begin at building a robust drivetrain? Well I lied. You should really be starting at the weapon design. If you are confident in being able to build a decent chassis, then design your combat robot should be built around the prototype of your weapon.
Slip Clutches
A slip clutch is a mechanism that implements friction to prevent over-torque. In the case of your spinning weapon, a slip clutch prevents your weapon motor from stalling when the blade is unable to move, and prevent over-current and possible permanent damage to the internal magnets when your weapon blade recoils from impact.
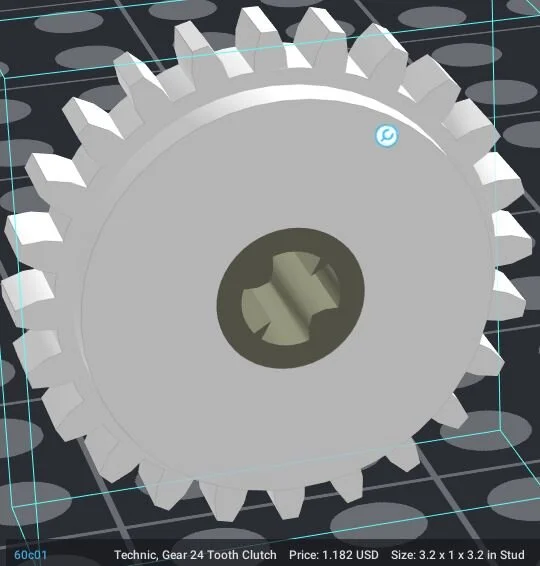
LEGO makes a 24T slip clutch gear(76019 / 76244) that you can use when gearing your weapon. In the case of the 24T slip clutch, you will probably have to twin them on the drive or follower axle, since their friction is too little to allow for proper energy transfer from the weapon motor to the heavy mass of the weapon.
If the 24T slip clutch is not something that you find applicable to your build, I might suggest building your own. Here are some examples:

WilF Slip Clutch:
The WilF Slip utilizes a differential gear and a dead axle on the opposite side of the input to act as a slip clutch. The dead axle is a 3L axle w/stud. The stud of the axle is embedded in the 3L liftarm, and is what provides the friction.

Skit Slip Clutch:
The Skit Slip Clutch is embedded in the weapon disk/blade. The pictured axle and 24T gear are independent from the weapon, and not locked in, only held by a pinhole. The friction and interlocking is provided by the surrounding 8T gears, two of which are mounted on friction pins. The example uses a pair of these slip clutches. Below is a clearer example of this type.
Cross Bracing
The ability to add cross bracing is what allows more rigid builds in Technic, in comparison to System bricks. Add cross bracing to interlock crucial components of your frame, as well as weapon. Strategically place where your cross bracing will go, as it will steadily increase the weight of your robot.

In the next part of this series, we will interview the builders of the two international robots from the Battle Bricks 2021 tournament. Stay tuned!
Have you built a robot purposely designed for destruction? Do you object to the flagrant abuse of LEGO bricks? Leave your thoughts in the comments below.
Do you want to help BrickNerd continue publishing articles like this one? Become a top patron like Charlie Stephens, Marc & Liz Puleo, Paige Mueller, Rob Klingberg from Brickstuff, John & Joshua Hanlon from Beyond the Brick, Megan Lum, and Andy Price to show your support, get early access, exclusive swag and more.