The LEGO National Mall: Building and Illuminating L'Enfant’s Vision
/Best of BrickNerd - Article originally published March 3, 2021.

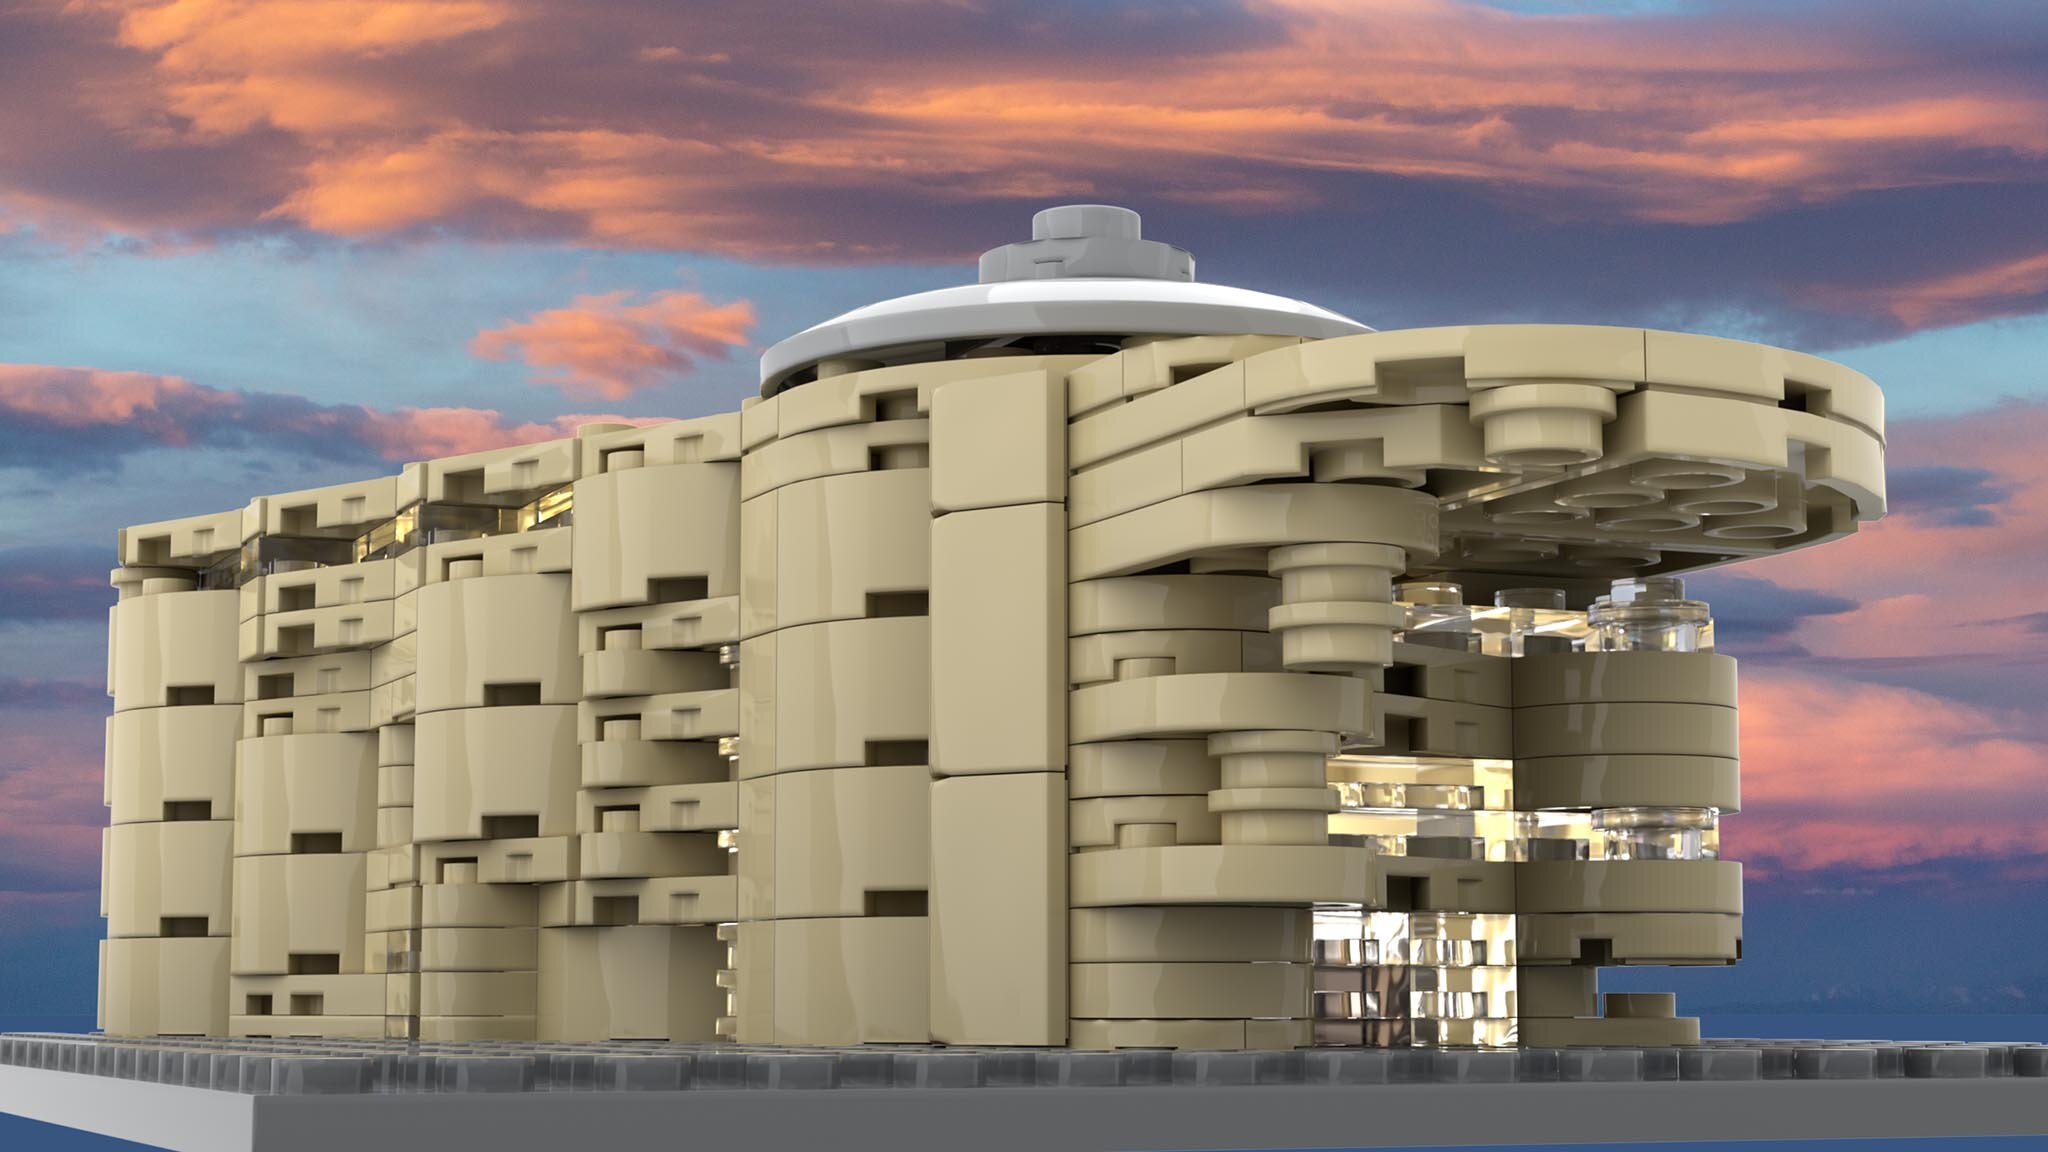
Illuminating work by Wayne Tyler
You ask: L’Enfant, qu'est-ce que c'est? (or maybe you put it more like I would: L’Enfant, what is that?). Why, it’s not a what, it’s a who! He was the Frenchman who designed Washington DC. Pierre Charles L’Enfant to be precise. In what became known as the L’Enfant Plan, this notable fellow laid out the basics of the city that we all recognize today including a roughly mile-long park that eventually became the National Mall.
I can’t think of anything that better evokes for me “the best of America” so completely. The Mall encapsulates fantastic treasures of architecture, natural beauty, history, art, science, and more into one walkable beautiful park containing a seemingly endless string of top-notch museums!
For builder Wayne Tyler, as our DC correspondent El Barto first covered here in 2018, the National Mall project was an exciting new exploration of custom MOC building using the LEGO medium. He was inspired by two of the Architecture line sets: the Lincoln Memorial, and the US Capitol and decided to take the plunge to build more.
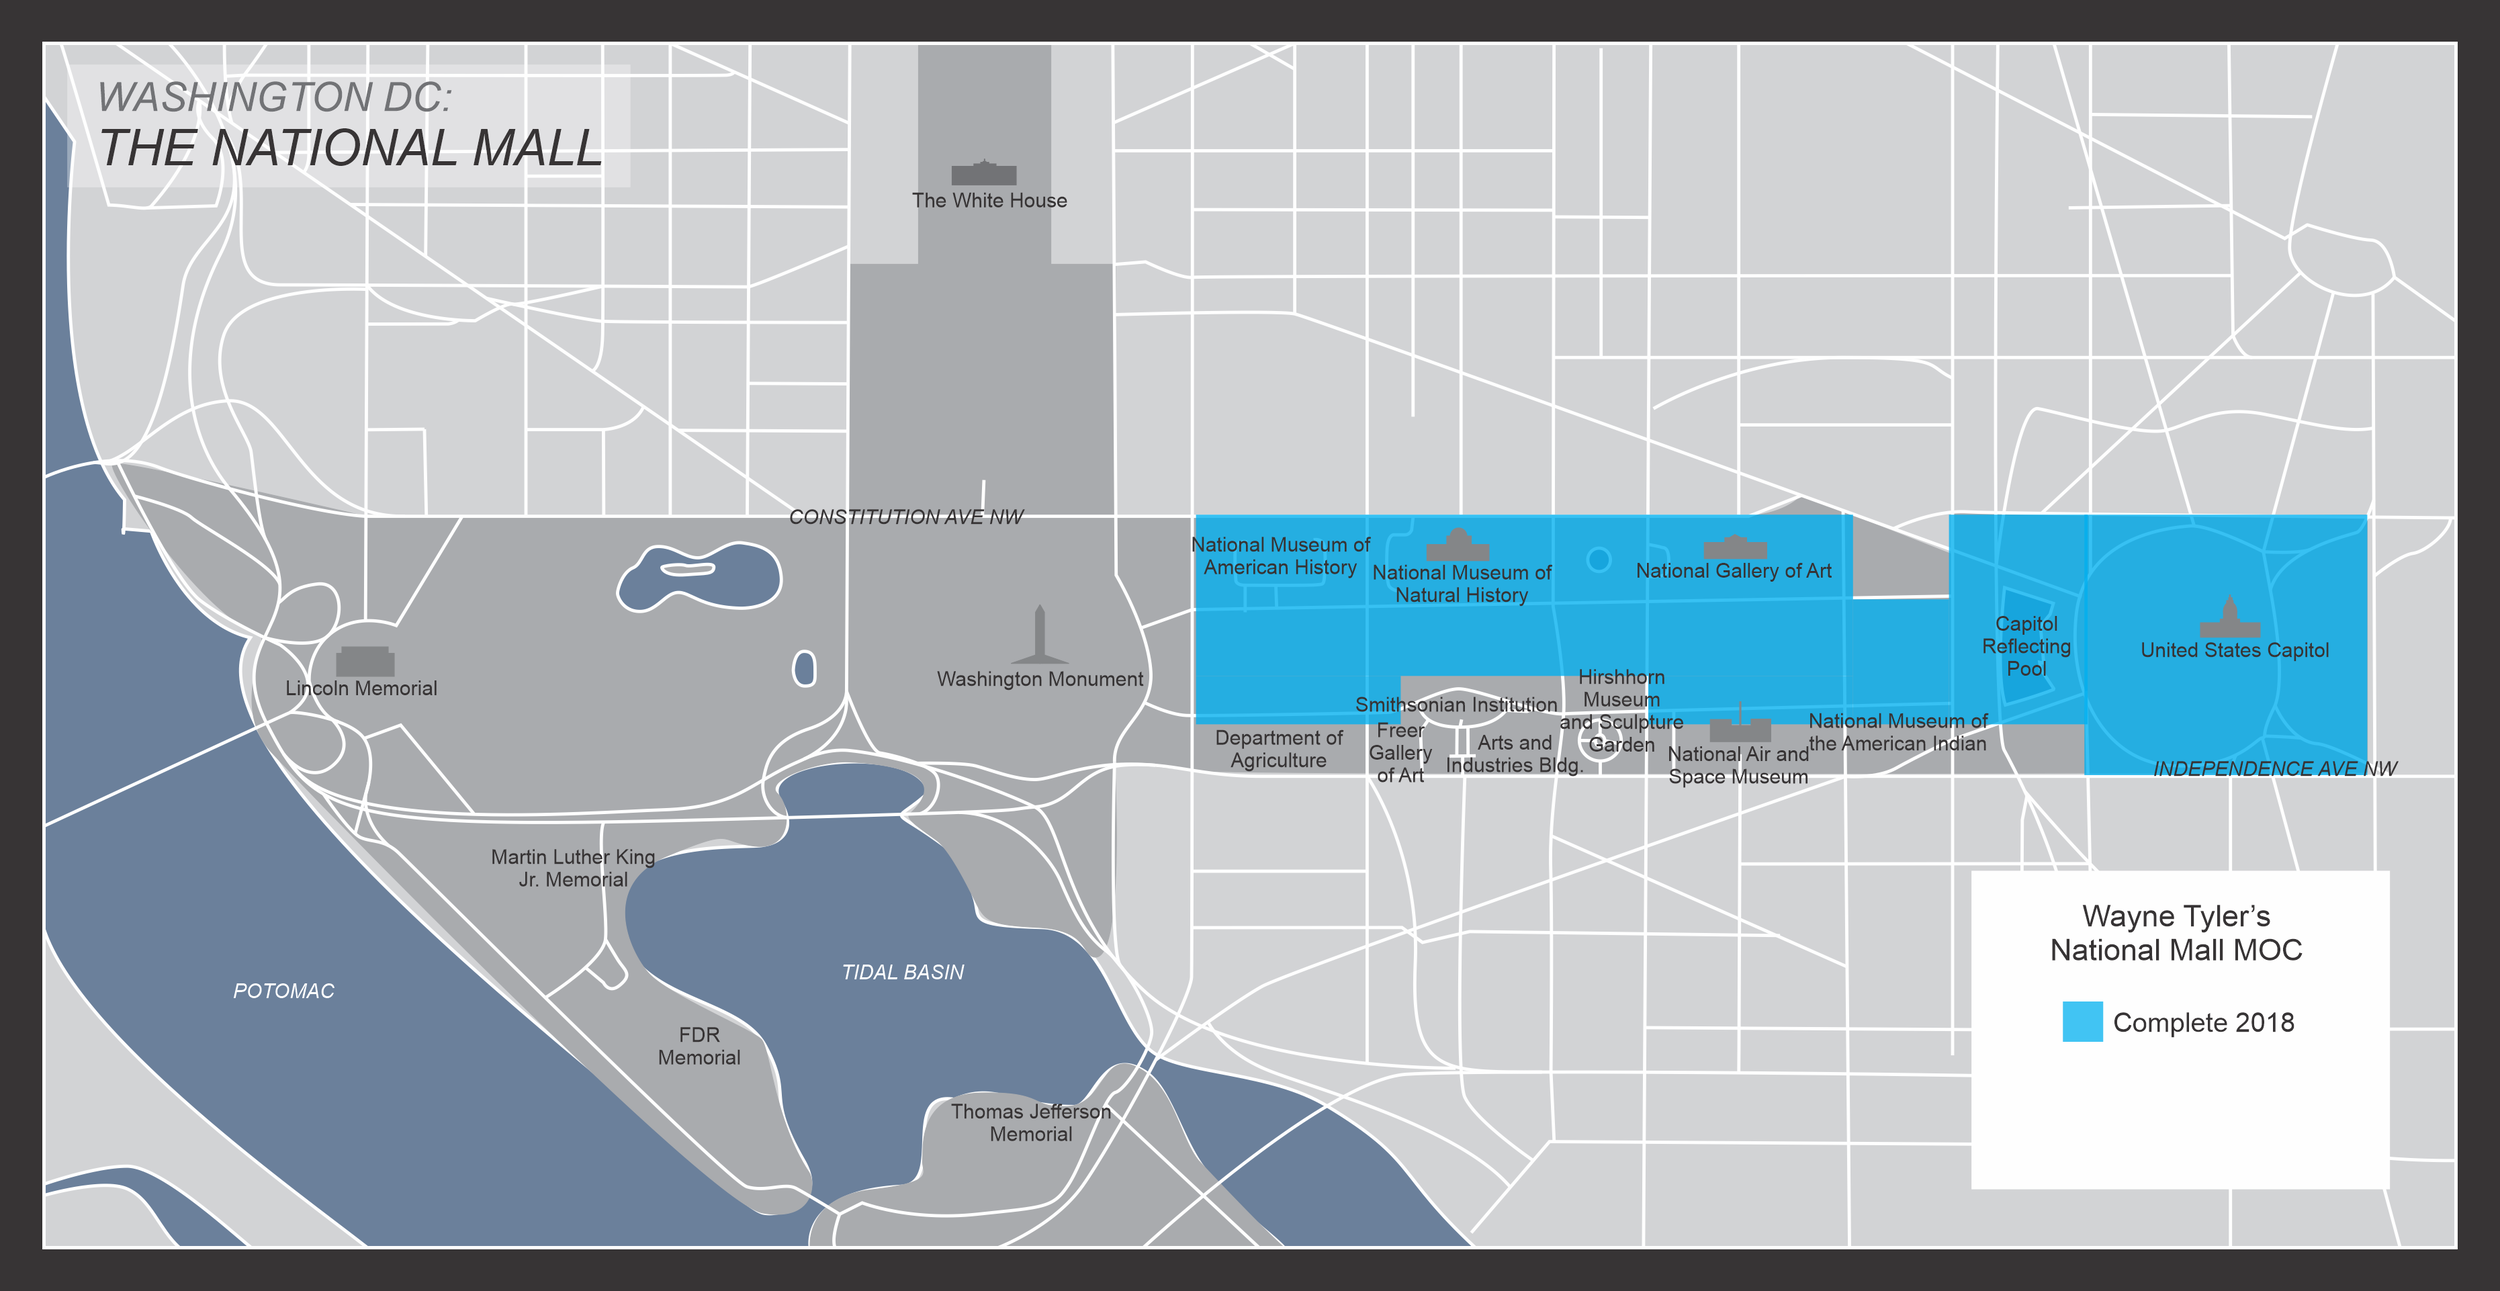

Wayne’s progress as of 2018.
At the time of our prior BrickNerd post, Wayne believed he was one year into a four-year project so now in 2021 it’s high time to check in. Is he done yet!?
We sat down with Wayne to get the scoop—and the answer to our question is a resounding NOPE, it’s not done yet. It looks like the four-year estimate is going to keep growing, just like the scope and ambition of the MOC (just don’t let it become another Boston Big Dig, Wayne)!
Never fear, Wayne has not been idle since 2018 - the build has been heavily expanded and is in the process of being fully lit up… and I can say from experience that it makes quite a splash when on display!
The new stuff! Oooo pretty lights!
Let’s dive in and learn all about the project, the updates, the plan, and much more!
Doug Hughes: Hi Wayne, what’s new in the MOC since the previous BrickNerd article?
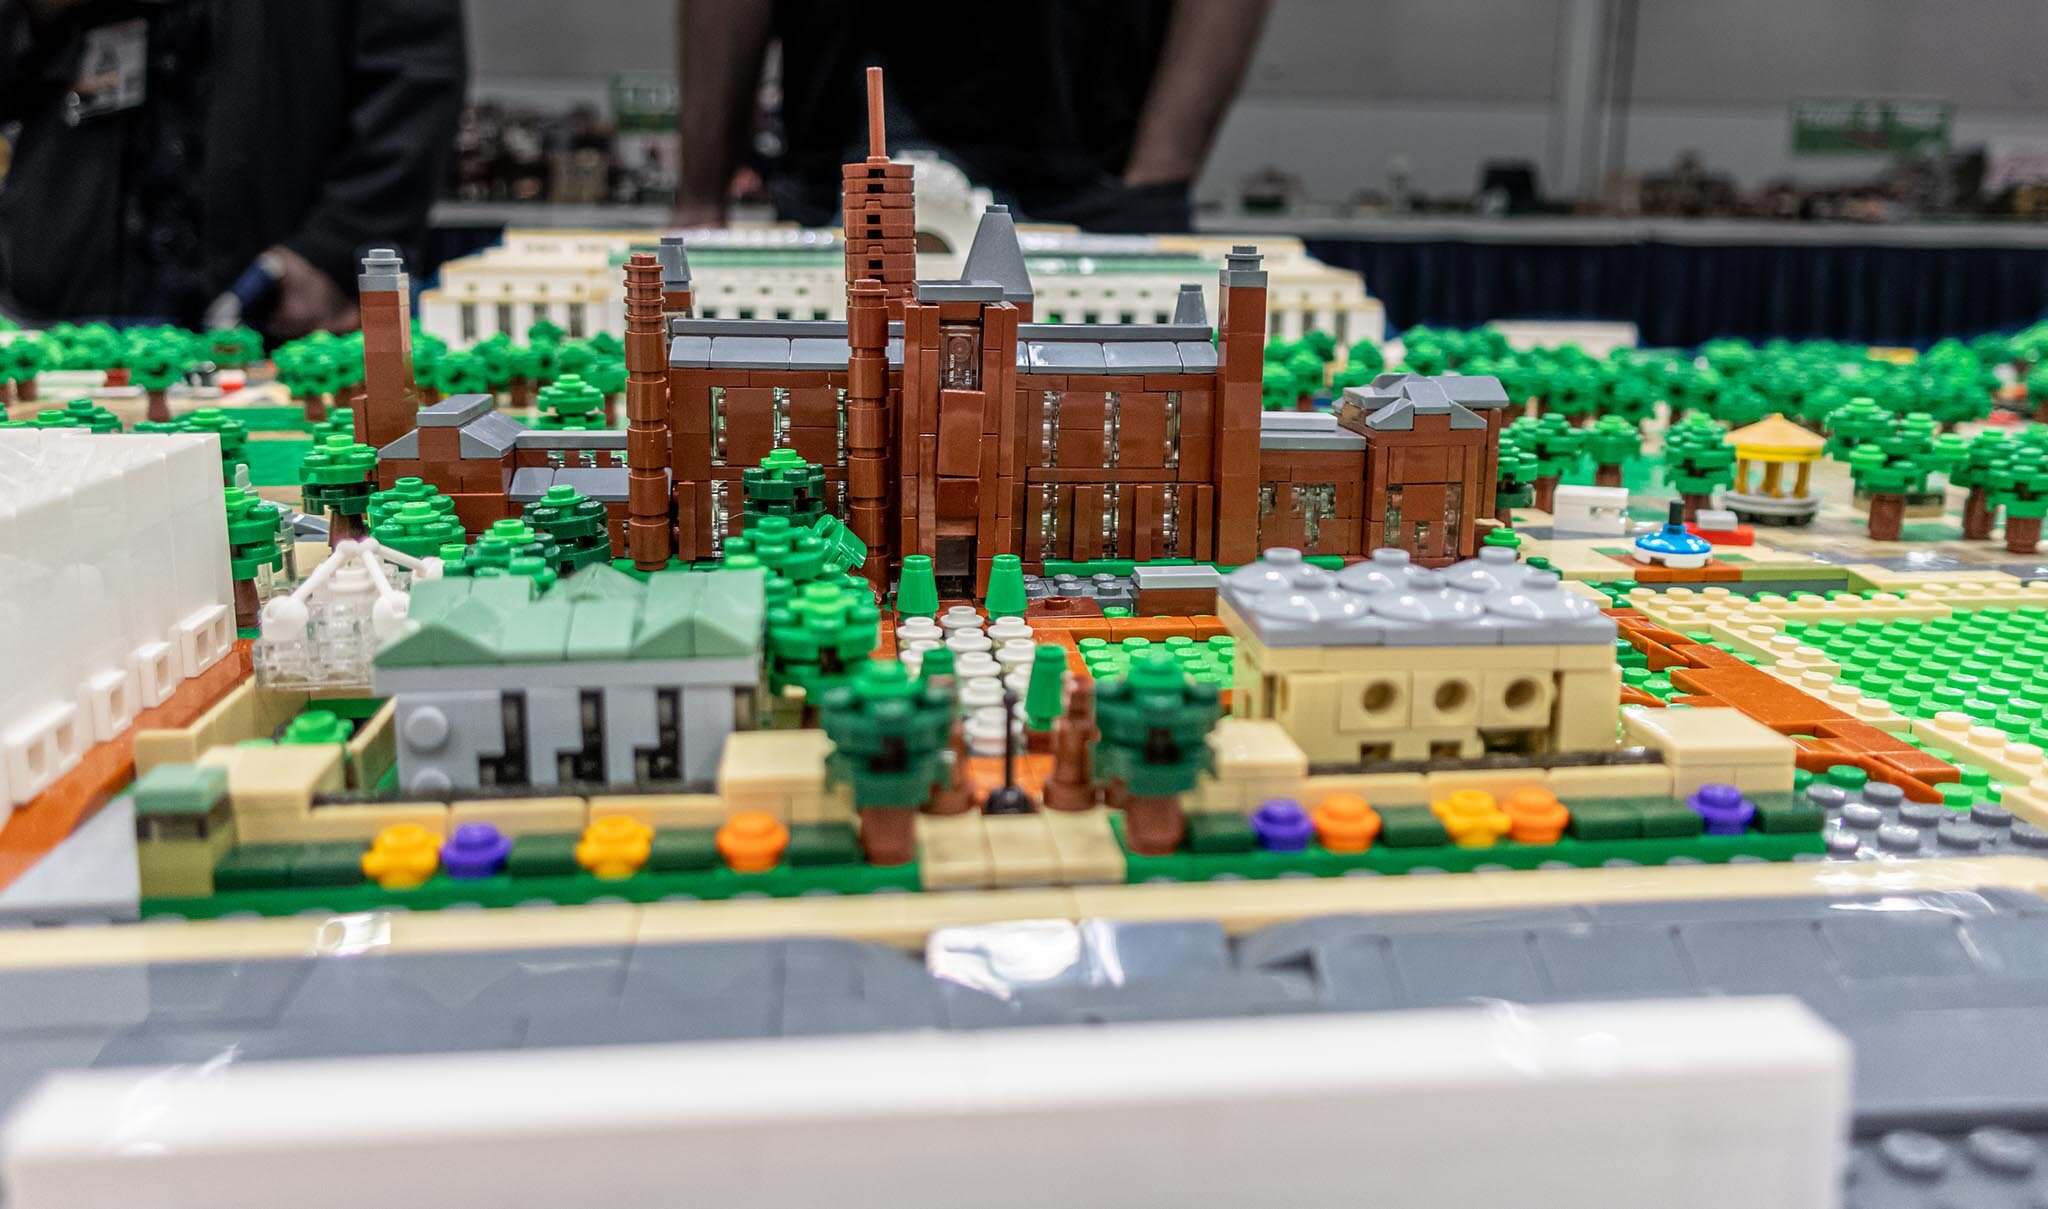
Wayne Tyler: The first Bricknerd article about the National Mall project was posted in April 2018. At that time, the Mall consisted of most of the buildings on the north side: the National Museum of American History [NMAH], the National Museum of Natural History [NMNH], the National Gallery of Art [NGA] Sculpture Garden, the NGA West Building and included Capitol Hill, the Capitol Building (LEGO set 21030) and Union Square with Capitol Reflecting Pool. It also had the central grass panels and other terrain features around the buildings.
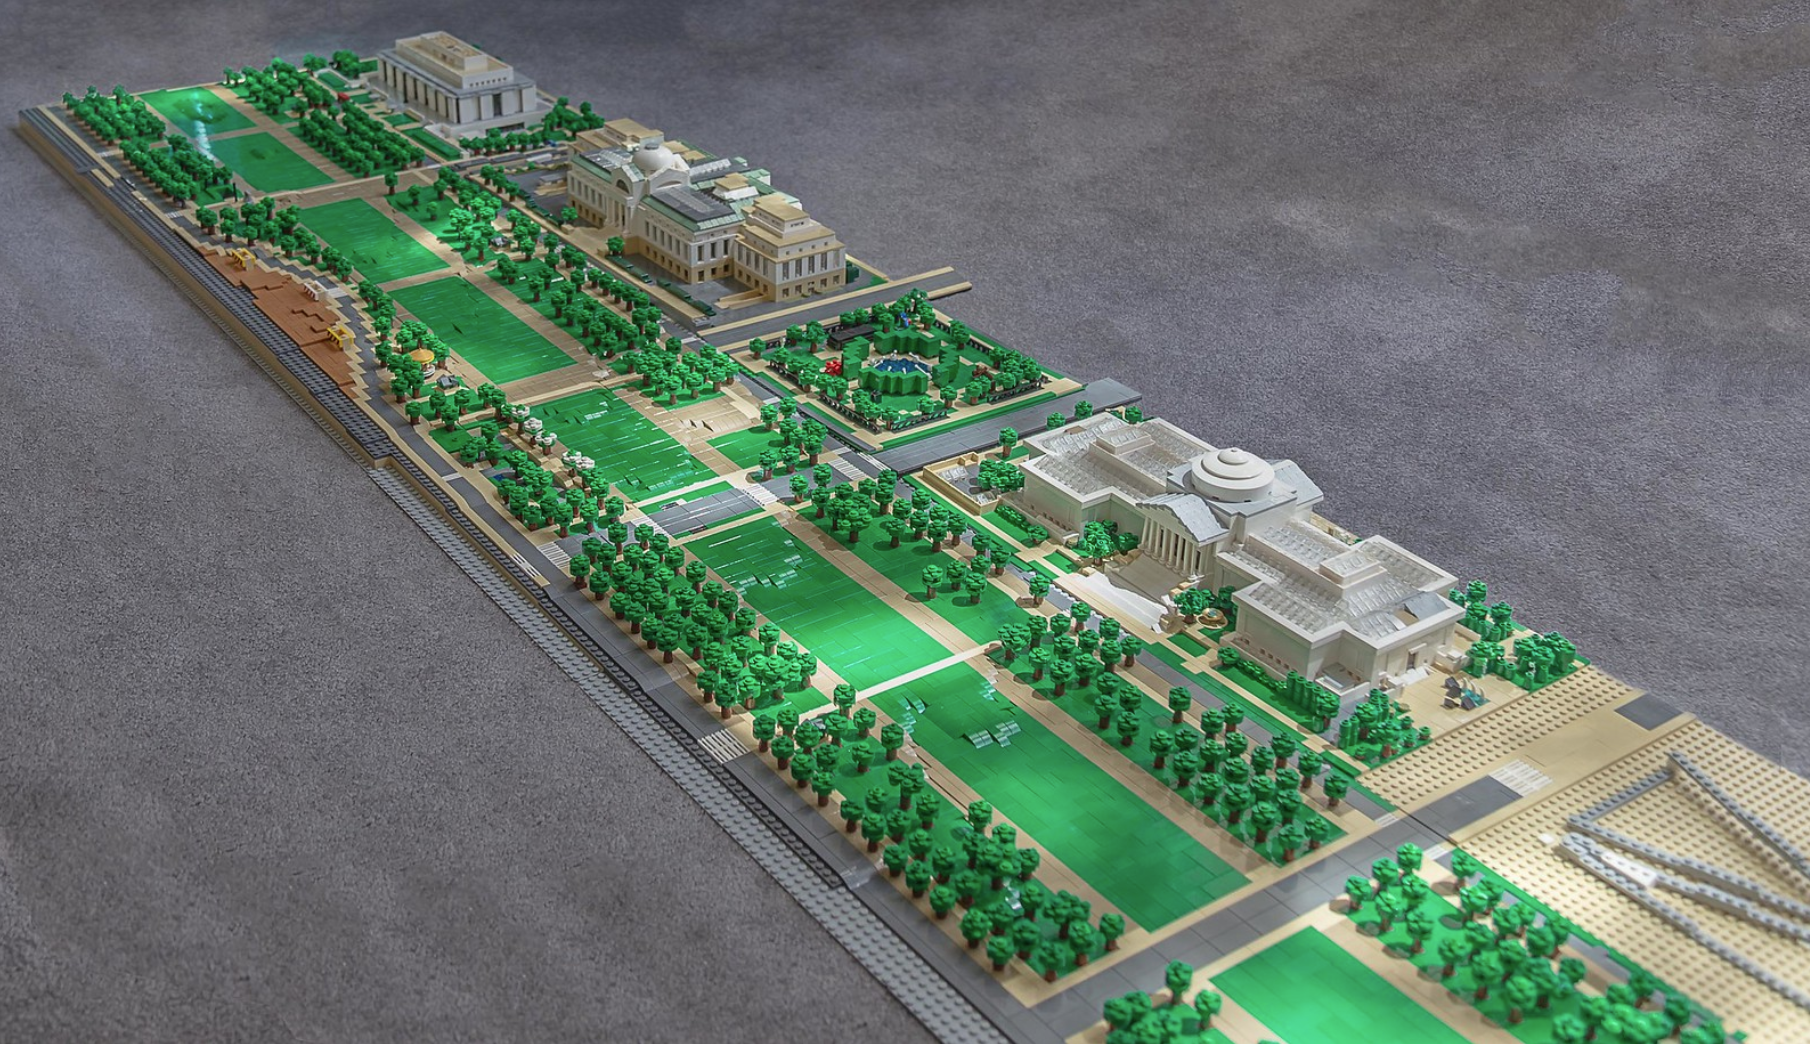
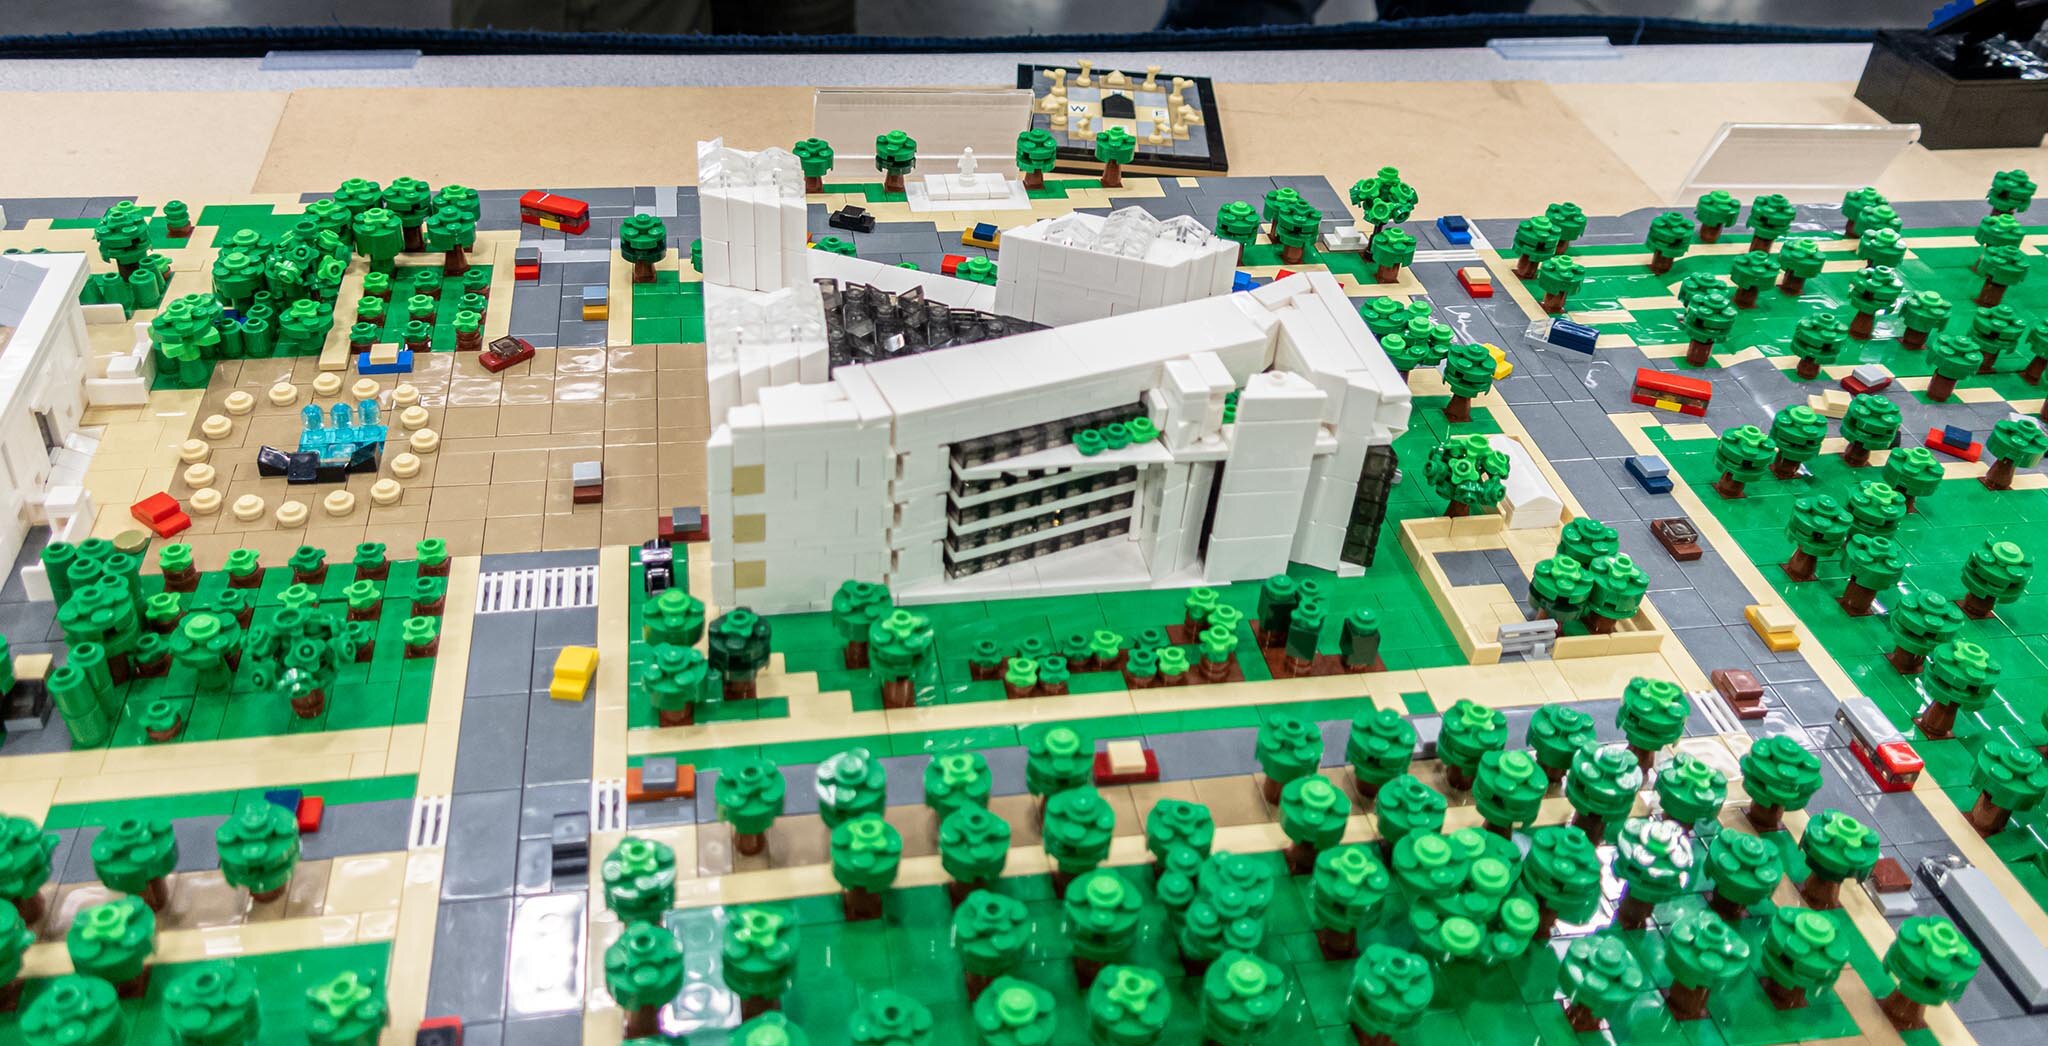
Today, the north side is complete with the addition of the NGA East building (designed by I.M. Pei). I’ve also completed some of the buildings on the south side: the Department of Agriculture, the Smithsonian Complex and the National Air and Space Museum [NASM]. The National Museum of the American Indian [NMAI] and the U.S. Botanic Garden buildings have also been completed, but the surrounding terrain for those has not been added. There is a prototype for the Hirshhorn Gallery, and the Smithsonian Museum of Arts and Industry has not been started.
I also constructed the Washington Monument Grounds. All told, the length of the projects went from a little over ten feet to near sixteen feet and the width doubled from one and a half feet to three feet.
Wayne’s been busy! Here’s all the Additions over the last couple years in Green and Yellow
Doug: It appears that existing areas of the MOC have also had some work done, so what have you changed and why?
Wayne: When I first approached this project, each building neatly fit on one or two 32x32 stud base plates and a 48x48 stud base plate was perfect for the central grassy areas, but I hadn’t counted on including roads as part of the design process. When I realized that having Constitution and Independence Avenues was important to layout it meant that I had to shift everything I had built by five studs.

Constitution Ave in all its glory!
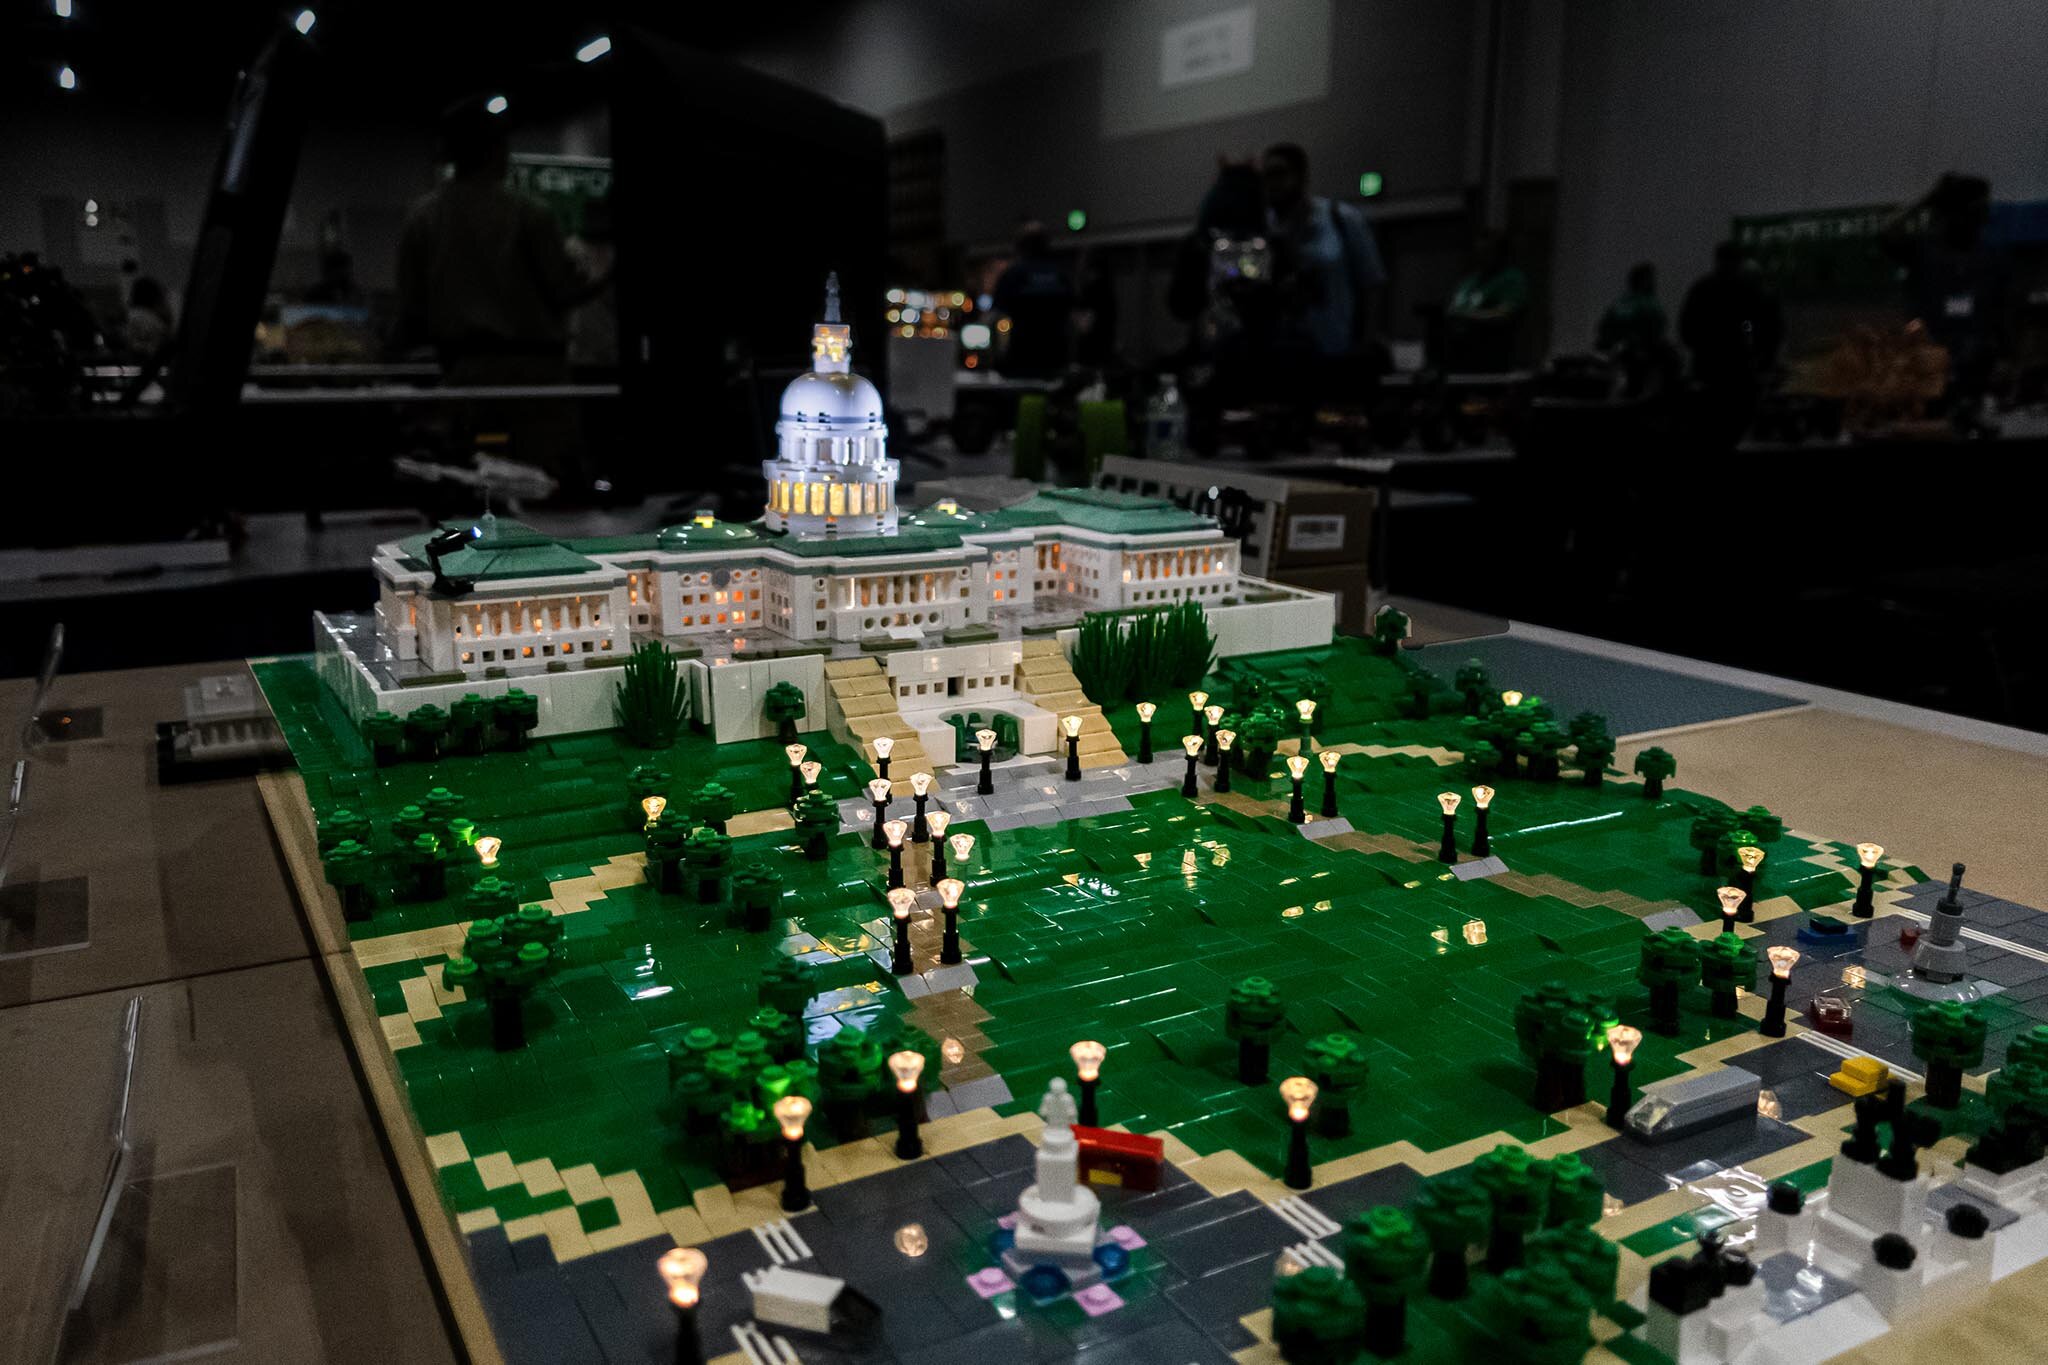
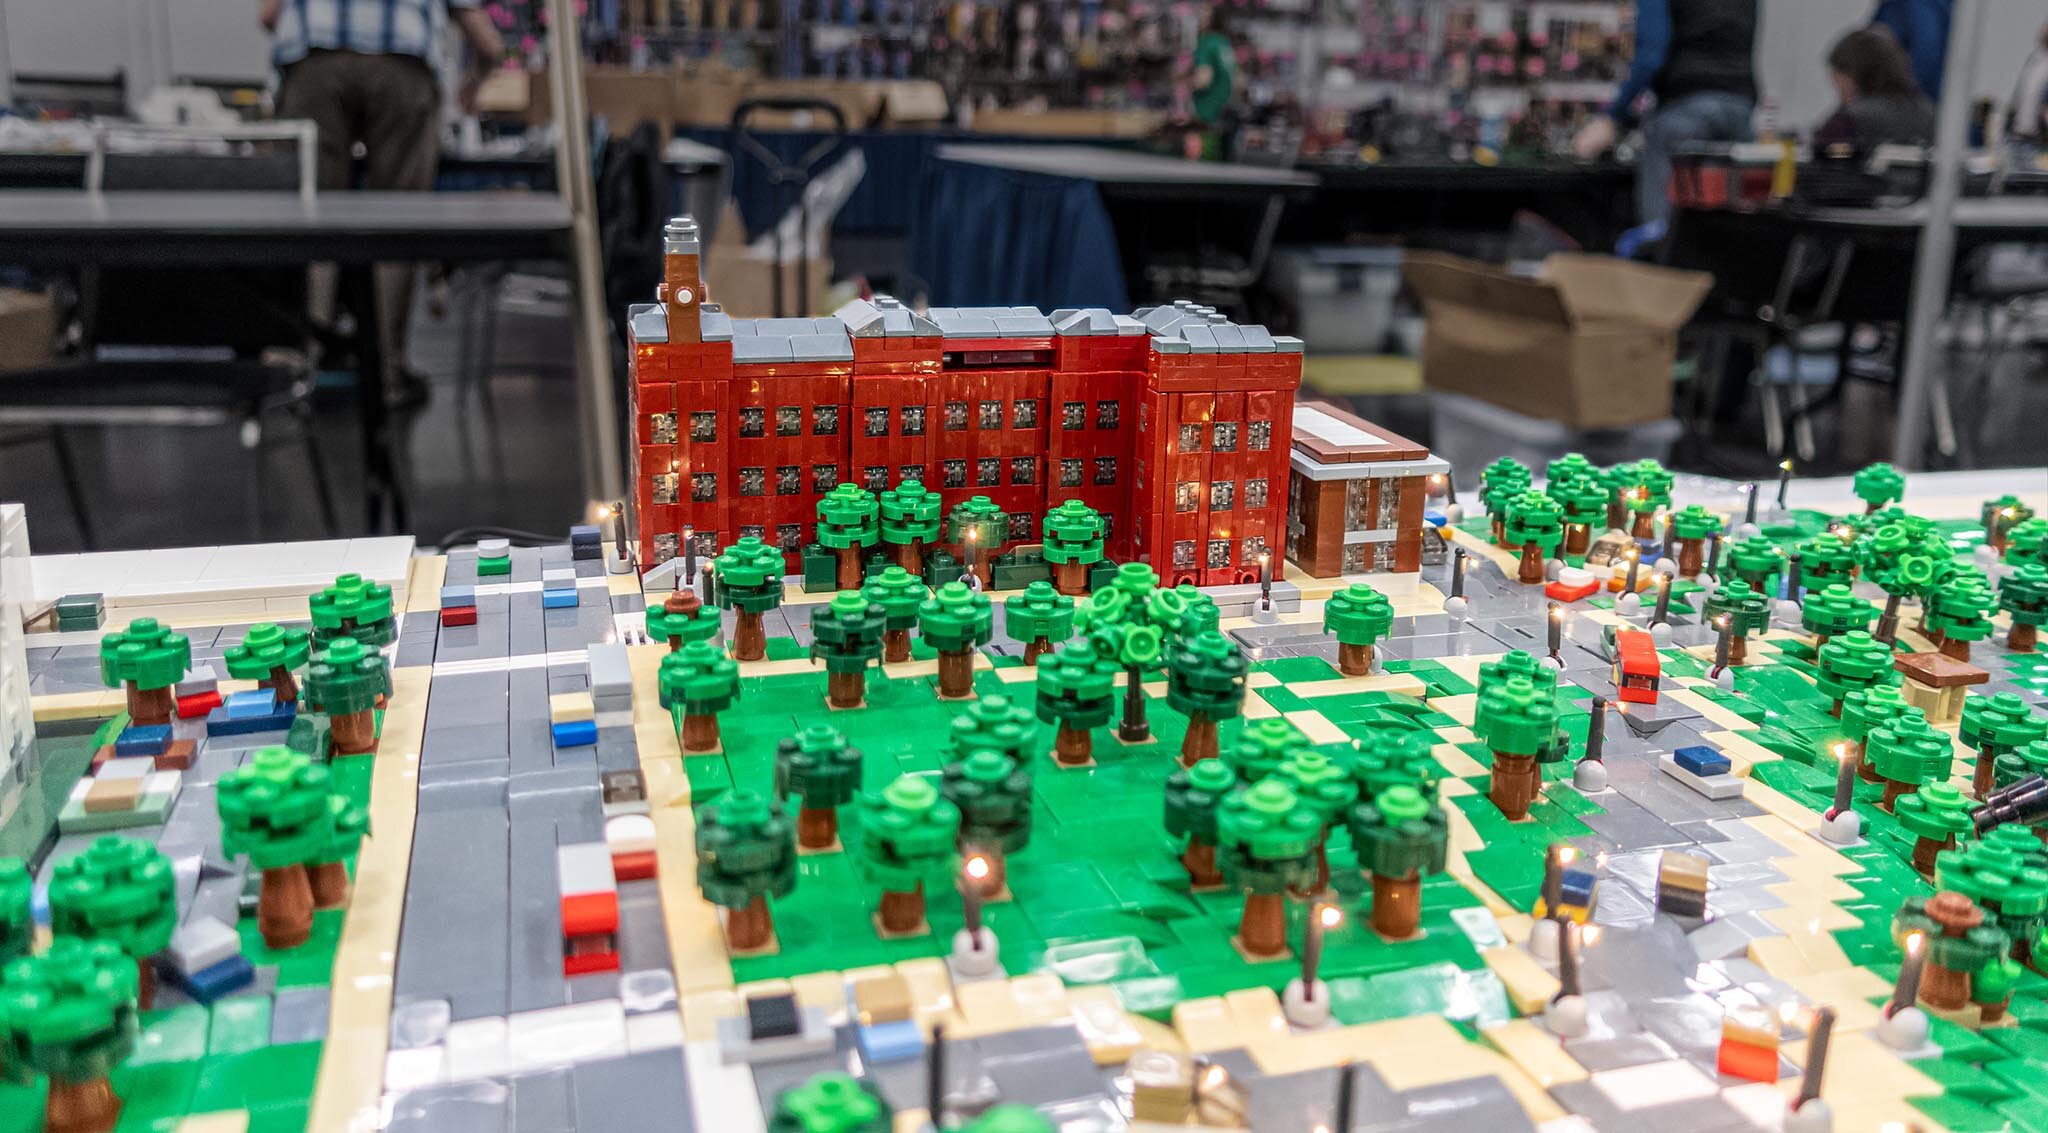
At the same time, I decided I wanted to add lighting in the form of streetlights and interior and exterior building lights. That meant creating a space underneath each section where wires for power could be placed, so I added a three-brick tall “crawlspace” under each section. It also meant that the buildings themselves had to be redesigned to allow light from inside to be visible from the outside, and to make sure that the light looked realistic (coming from windows, doors and skylights). To do it right and make sure everything connected up correctly took a couple of months of rebuilding. It is MUCH easier to build something from scratch with these constraints in mind than to go back and redesign and rebuild existing models.

Rebuilding the NMNH with Crawlspace and the addition of Constitution Ave
Doug: Adding lighting seems like an incredible amount of work. Could you tell us a little more about that?
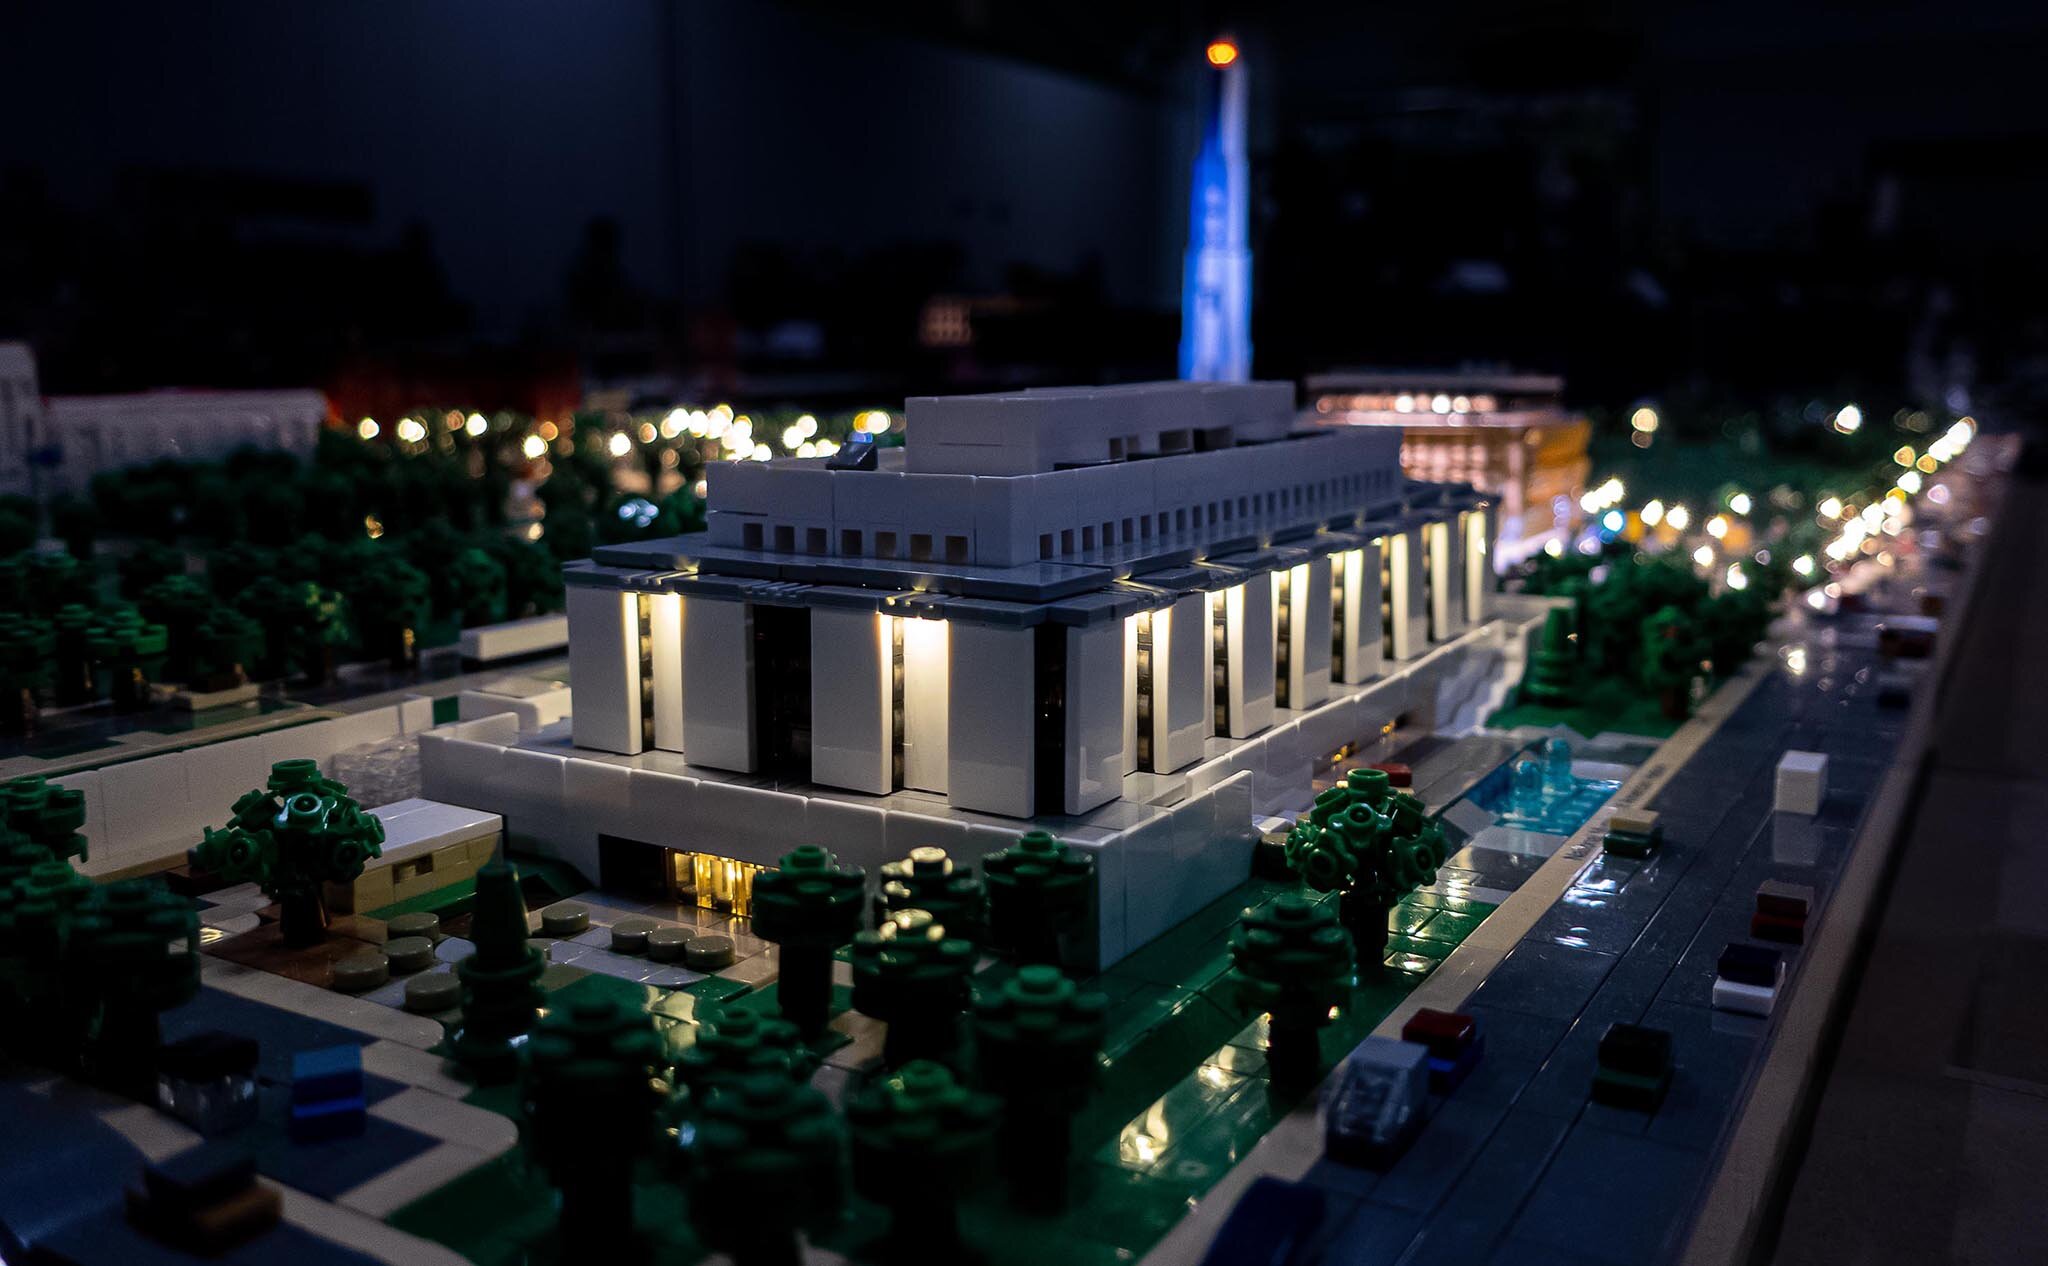
Wayne: The decision to add lighting to the Mall created another level of complexity. I designed and built the Washington Monument Grounds as a test to see if, 1) the lighting would look realistic, given that this is a microscale build, 2) figure out how to run the power for the lights between all the sections that make up the entire Monument Grounds (it is comprised of fifteen individual sections that all fit together) and 3) see if whatever setup was involved could be assembled and disassembled relatively easily and quickly for displaying the Mall at LEGO events.
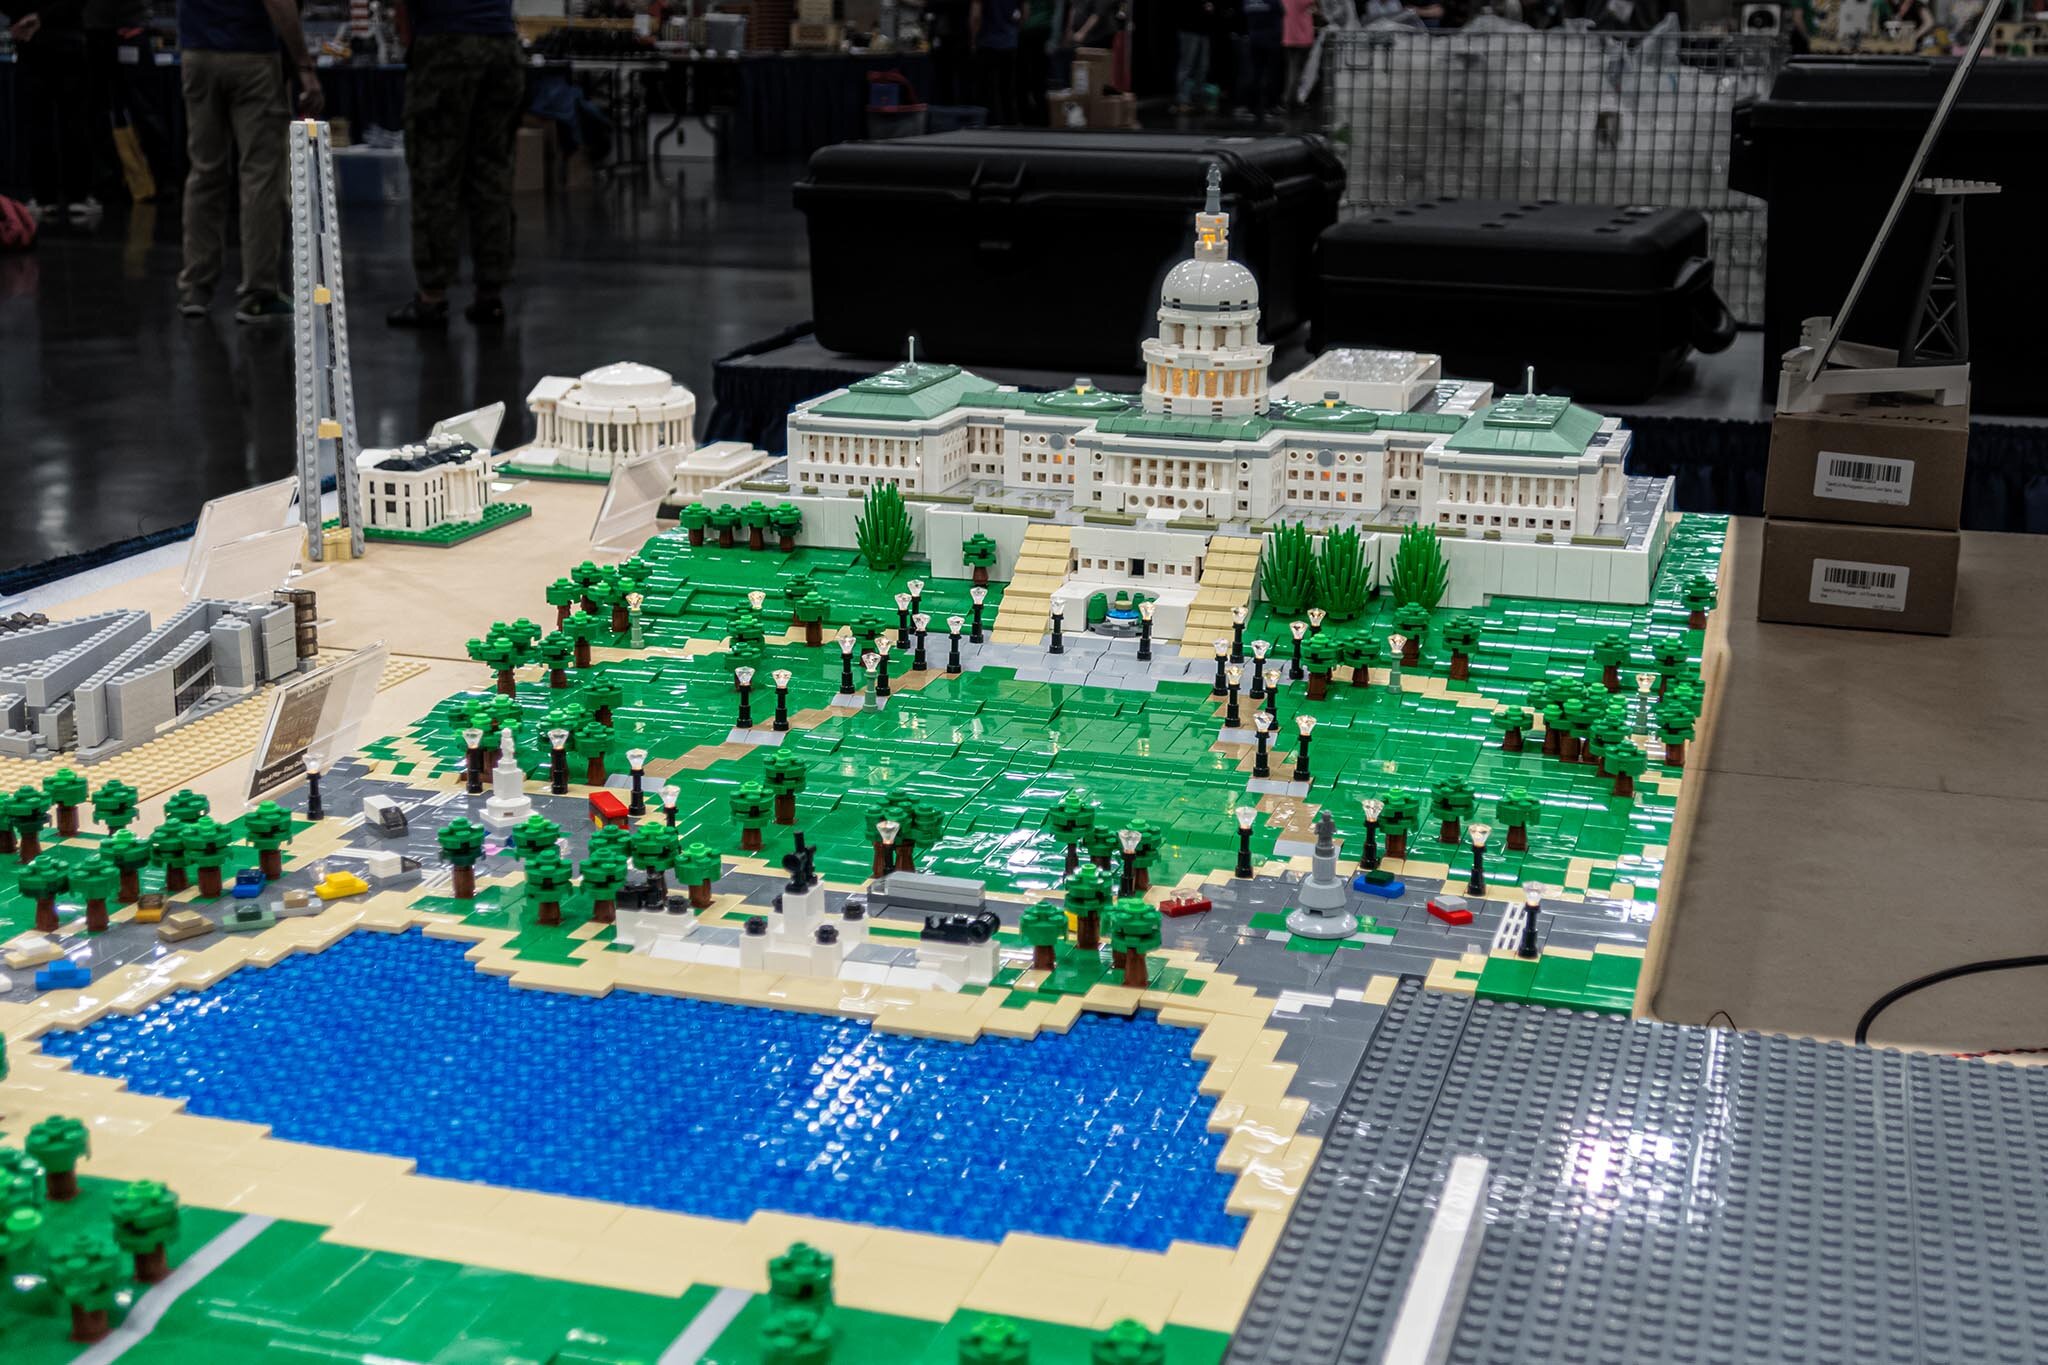
I was able to do all of these things because I started working with Rob Klingberg, owner of Brickstuff (a company dedicated to providing lighting products for LEGO sets). Rob was willing to build custom lighting and had some great ideas on how to make it look realistic. For example, he came up with the idea of using levers as the poles for the streetlights, which turned out to be the perfect size for the scale of the Mall. He also had the smallest LEDs I’d ever seen that worked really well for the lights themselves. As part of his custom work, he could set the amount of brightness for the lights by adding appropriate electrical components to the lights. And lastly, he had a new power connection system that involved using magnets instead of plugs to connect the wiring together between the individual sections.
Levers lit in the night… one if by Land, two if by sea?
The test with the Washington Monument Grounds was so successful, I decided to implement it for the rest of the National Mall project.
MAGNETS combined with lights! M-Tron look out.
Doug: We’ve explored where you’re at today, and we know you’re not done yet, so what’s the end goal? And how do you get there from here?
Wayne: The current 16’ x 3’ assembled build is only half of what I envision the completed National Mall will be. What prompted this whole project in the first place was that LEGO had produced two sets, the U.S. Capitol building (set 21030) and the Lincoln Memorial ( set 21021) that were in the same scale. Those two sets comprise the easternmost and westernmost points of the National Mall.
I am hoping to create everything between those two buildings for this National Mall project. I would also like to include a portion of the Tidal Basin so that the Jefferson and Martin Luther King Memorials become part of the display as well. Essentially, I’m wanting this project to show every monument, memorial, gallery and building that comprise what we commonly refer to as the National Mall.
Since I started this project in May of 2017, I’ve only worked on the Washington Monument Grounds and the eastern section of the Mall. The entire western section has been laid out but hasn’t been started, and the Tidal Basin section is still just an idea floating around in my head.
I had initially projected this to be a four-year project, but it’s going to take much longer than that. Right now, I’m projecting an additional four years will be needed to finish everything. And when complete, it will be twenty-six feet long and five feet wide at its widest portion.
The way of the future! Let’s check back in 2025 To see how he did!
Doug: It’s amazing to realize that you’ve built so much, and this thing is soooo huge, but there’s a significant portion still yet to go!
Thinking about the size… I’m sure readers will wonder the same as I am about the experience of displaying such a massive build. What’s it like transporting and setting up this beast at LEGO events and conventions?
Wayne: When I started this project, I had only attended one LEGO event, and only as a member of the public. I had no thoughts about displaying the Mall anywhere other than in my house. Two things happened to change that. First, the build became so big that there was no place in the house to completely set it up—unless some of the furniture in the living room and everything in the dining room was removed. The only places that had enough space were LEGO events. So, if I wanted to see everything assembled, I needed to participate. Second, in looking around at the world of LEGO, I found nothing comparable, or even similar, to what I was building. I thought it was unique enough that other people might enjoy seeing it.
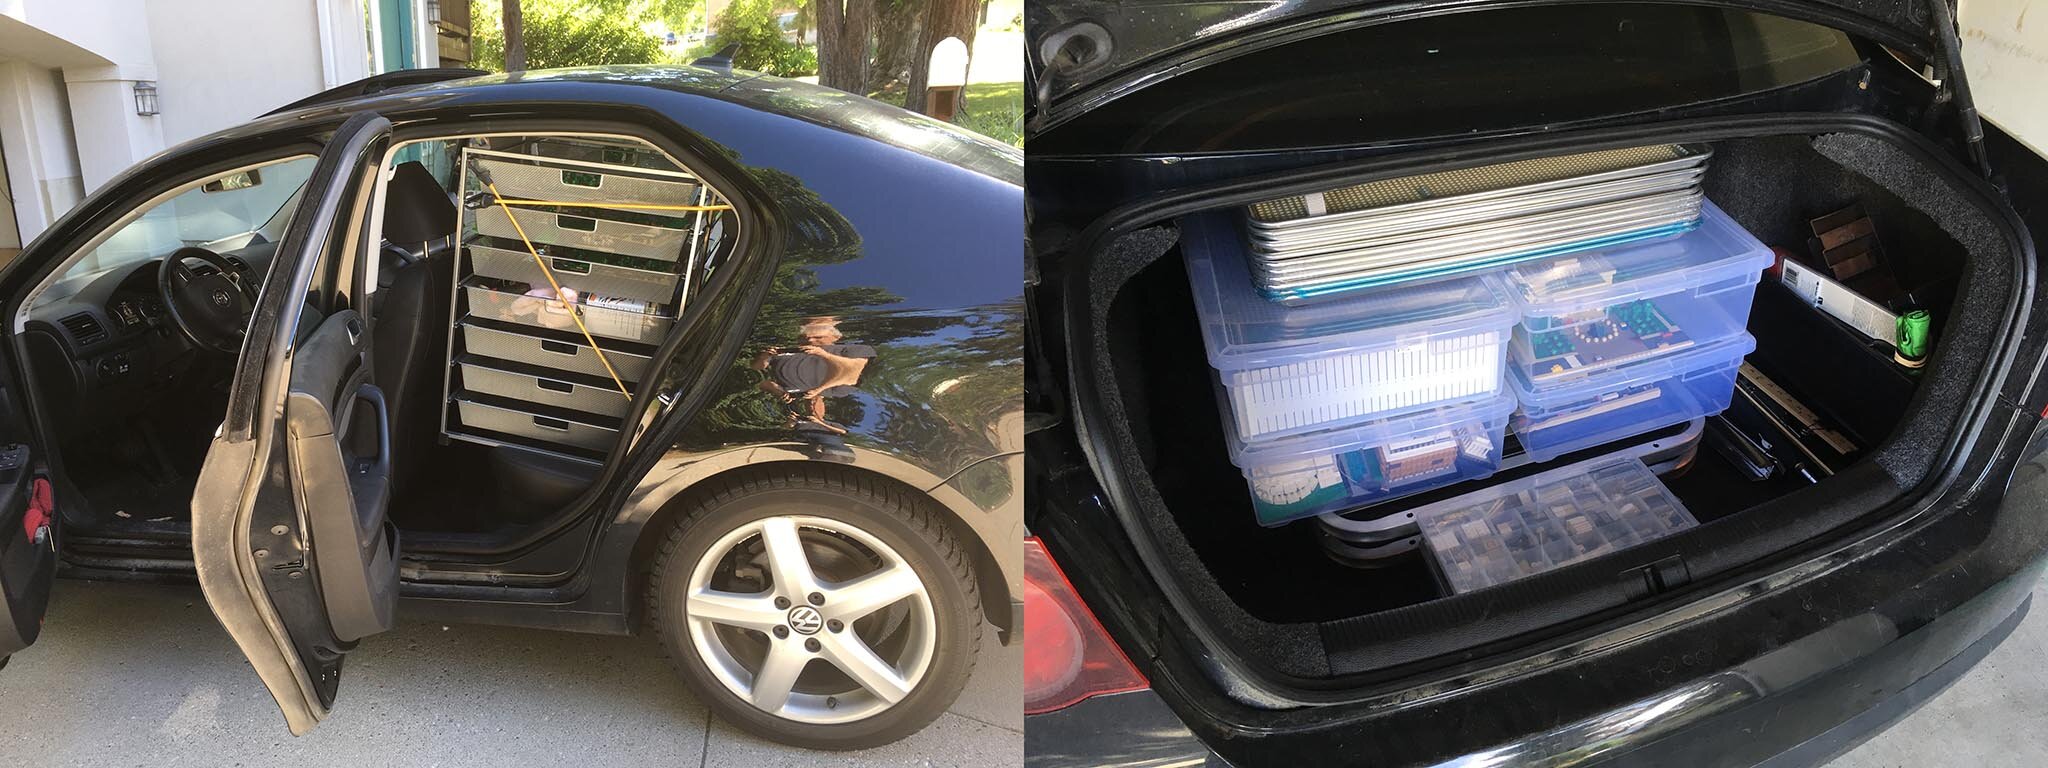
Initially, I chose to build the layout as a set of individual sections that could be seamlessly connected together. This was a lucky accident; it certainly wasn’t part of an overarching design approach. The entire Mall could be easily broken down into smaller components and each of those components could be stored in a separate container. For my first event, I loaded up my four-door sedan with all the containers (taking up the trunk, the back seat and the passenger seat).
The following year, the Mall project had grown large enough that it wouldn’t all fit in my car, so I rented a van to transport it. It was the smallest van the rental company had, and it was far too large for what I needed. That prompted a search for a personal vehicle that was “just right.” While no vehicle felt quite perfect, especially considering how the project is planned to grow over time, I did find a van that works for now and have been using that for every LEGO event I attend.
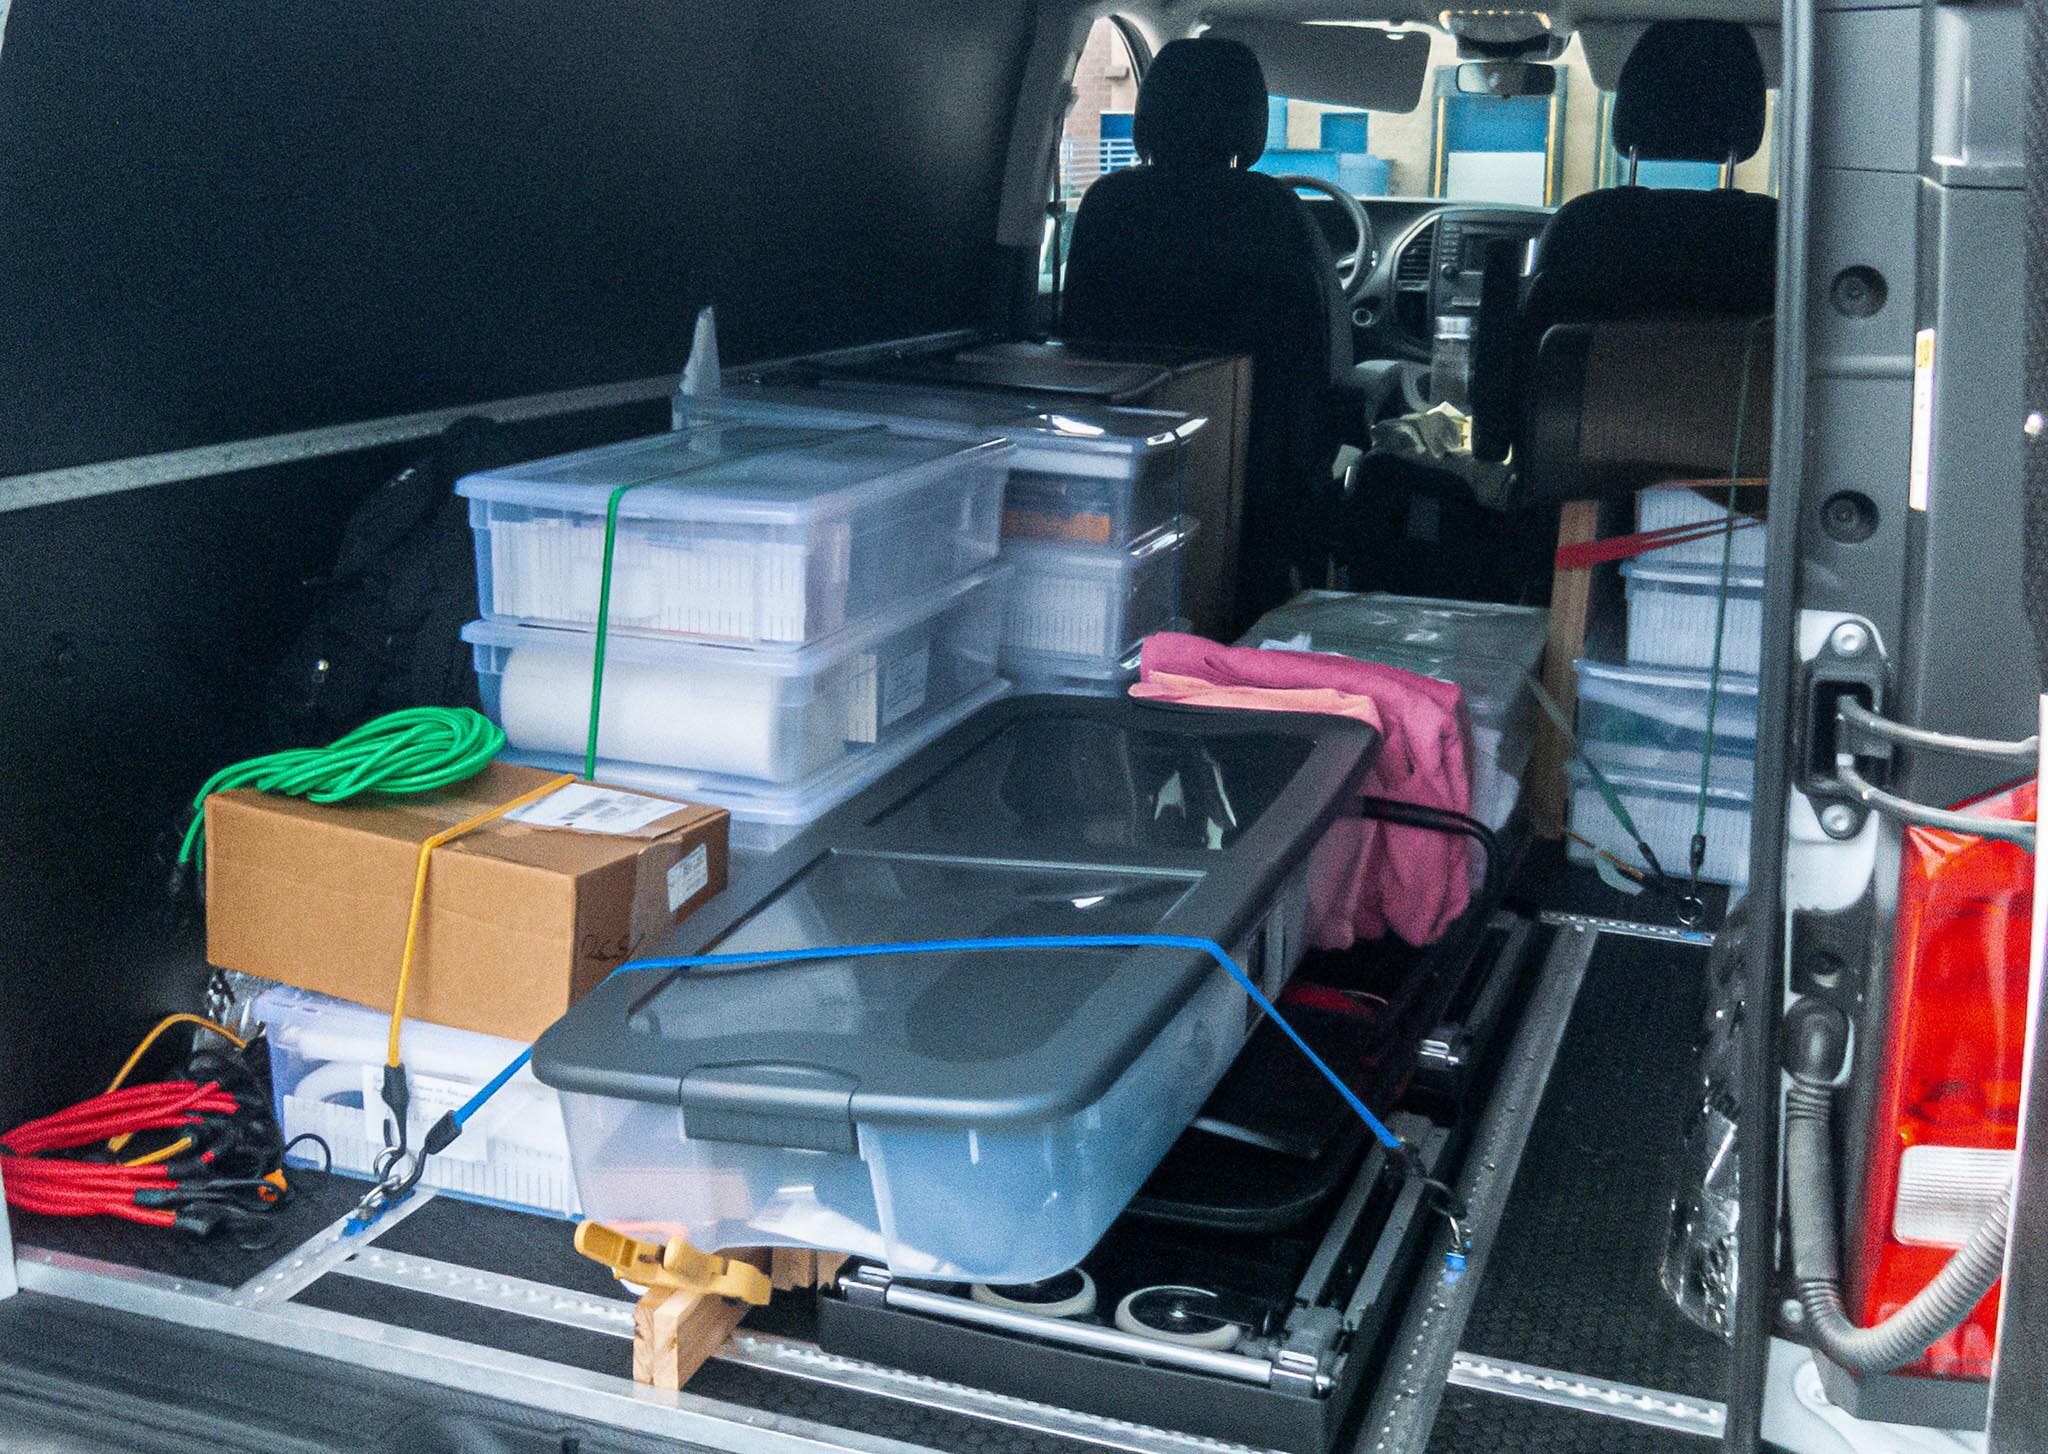
Who else has bought a vehicle just to transport Lego? … Bueller?
Currently, it takes about five and a half hours to set up the entire project and make sure everything is working. One of the things I have found is that to have sixteen feet of a display to look like it’s one long model, it needs to be set up on an absolutely flat and level surface. I have also found that despite assurances that the tables provided at a LEGO event are flat and even… they are not sufficient. So now when I go to a show, not only do I bring the project, I also bring my own platform on which to assemble it. I now know why the train folks spend the first part of their setup assembling platforms for their train displays.
Doug: Wow, what a job, though I have to say your organization shames many of us other builders who have a lot less foresight and planning which yields a messy setup of our MOCs.
Now I’m curious what sort of reaction you’ve been getting. I imagine this is quite a popular build with the public at conventions, as I know the LEGO builders stop and gawk all the time. If us snooty snobs are impressed the public must go bananas!
Wayne: The first couple of shows where I displayed were at a small event in the West, and they weren’t what I expected. Many of the people who stopped to look at the display didn’t really know about the National Mall and I spent more time explaining what it was than what I had built. I determined that I wanted to take it to a show back east, specifically to Brick Fair Virginia (BFVA) where the public would know all about the National Mall.
BFVA turned out to be an exceptional experience. First, it’s one of the biggest LEGO events in the US. I got to meet and interact with more people who shared my interest in microscale architecture than all the previous events I had attended put together. In fact, the public days at the show were incredibly rewarding as I watched people talking with friends or family about where they worked or buildings they had visited and used the National Mall project as a map. It was nice to know I had built something recognizable to people familiar with the area.
I knew I had nailed it when, on the second morning of the public days, I watched a woman looking at the display with a half-smile on her face and nodding every so slightly. She knew what I had done, she recognized it and that slight nod told me that it was done correctly.

A Happy Wayne!
Doug: Wayne, you and I have kept up some great dialogue over the last few years mainly on Flickr in regards to your regular updates on the project—it’s fascinating the different directions you’ve gone during this time. Can you expand here for our readers on some of the other areas you’ve learned about during the journey of working on the Mall?
Wayne: Part of my delight in building the National Mall is sharing it with others, either as something to look at or as something to show how I did it. Since I don’t display at a lot of shows throughout the year, the best way to share finished builds and techniques used to make them is with photographs.
I have an interest in photography and specifically macro photography. However, trying to take pictures of LEGO microscale architecture presented a whole new aspect where I’ve had to expand my techniques and rethink my approach.
LEGO bricks are very reflective, so how do you go about lighting a build yet avoid the myriad of bright spots caused by the lights? How do you get your camera in a position to get the photo you want without having to disassemble parts of the model? I am still in the beginning part of the learning curve needed to take great pictures of LEGO models.
While waiting for needed parts to finish portions of the Mall, I decided that I could see how something might look by creating digital brick-built versions of the final builds, complete with surrounding terrain and lighting. This led me to explore software for creating virtual LEGO models. I finally settled on using BrickLink’s Stud.io software package and have invested some time learning and using it to prototype upcoming work I’m going to be doing. I have to caution myself that this area of interest can claim all your time, exclusive to building models in real life.
Lastly, as part of upgrading the Mall to include lighting, Brickstuff has a computer control system for its lighting components. I will be incorporating it into the project for potential future uses other than just turning the lights on and off. That means I will be learning some computer programming to be able to enhance the Mall display.
Turns out that the National Mall project is MUCH more than just designing and building with LEGO. It has expanded the areas and opportunities for learning in seemingly unrelated fields—skills that help support and enhance this LEGO project.
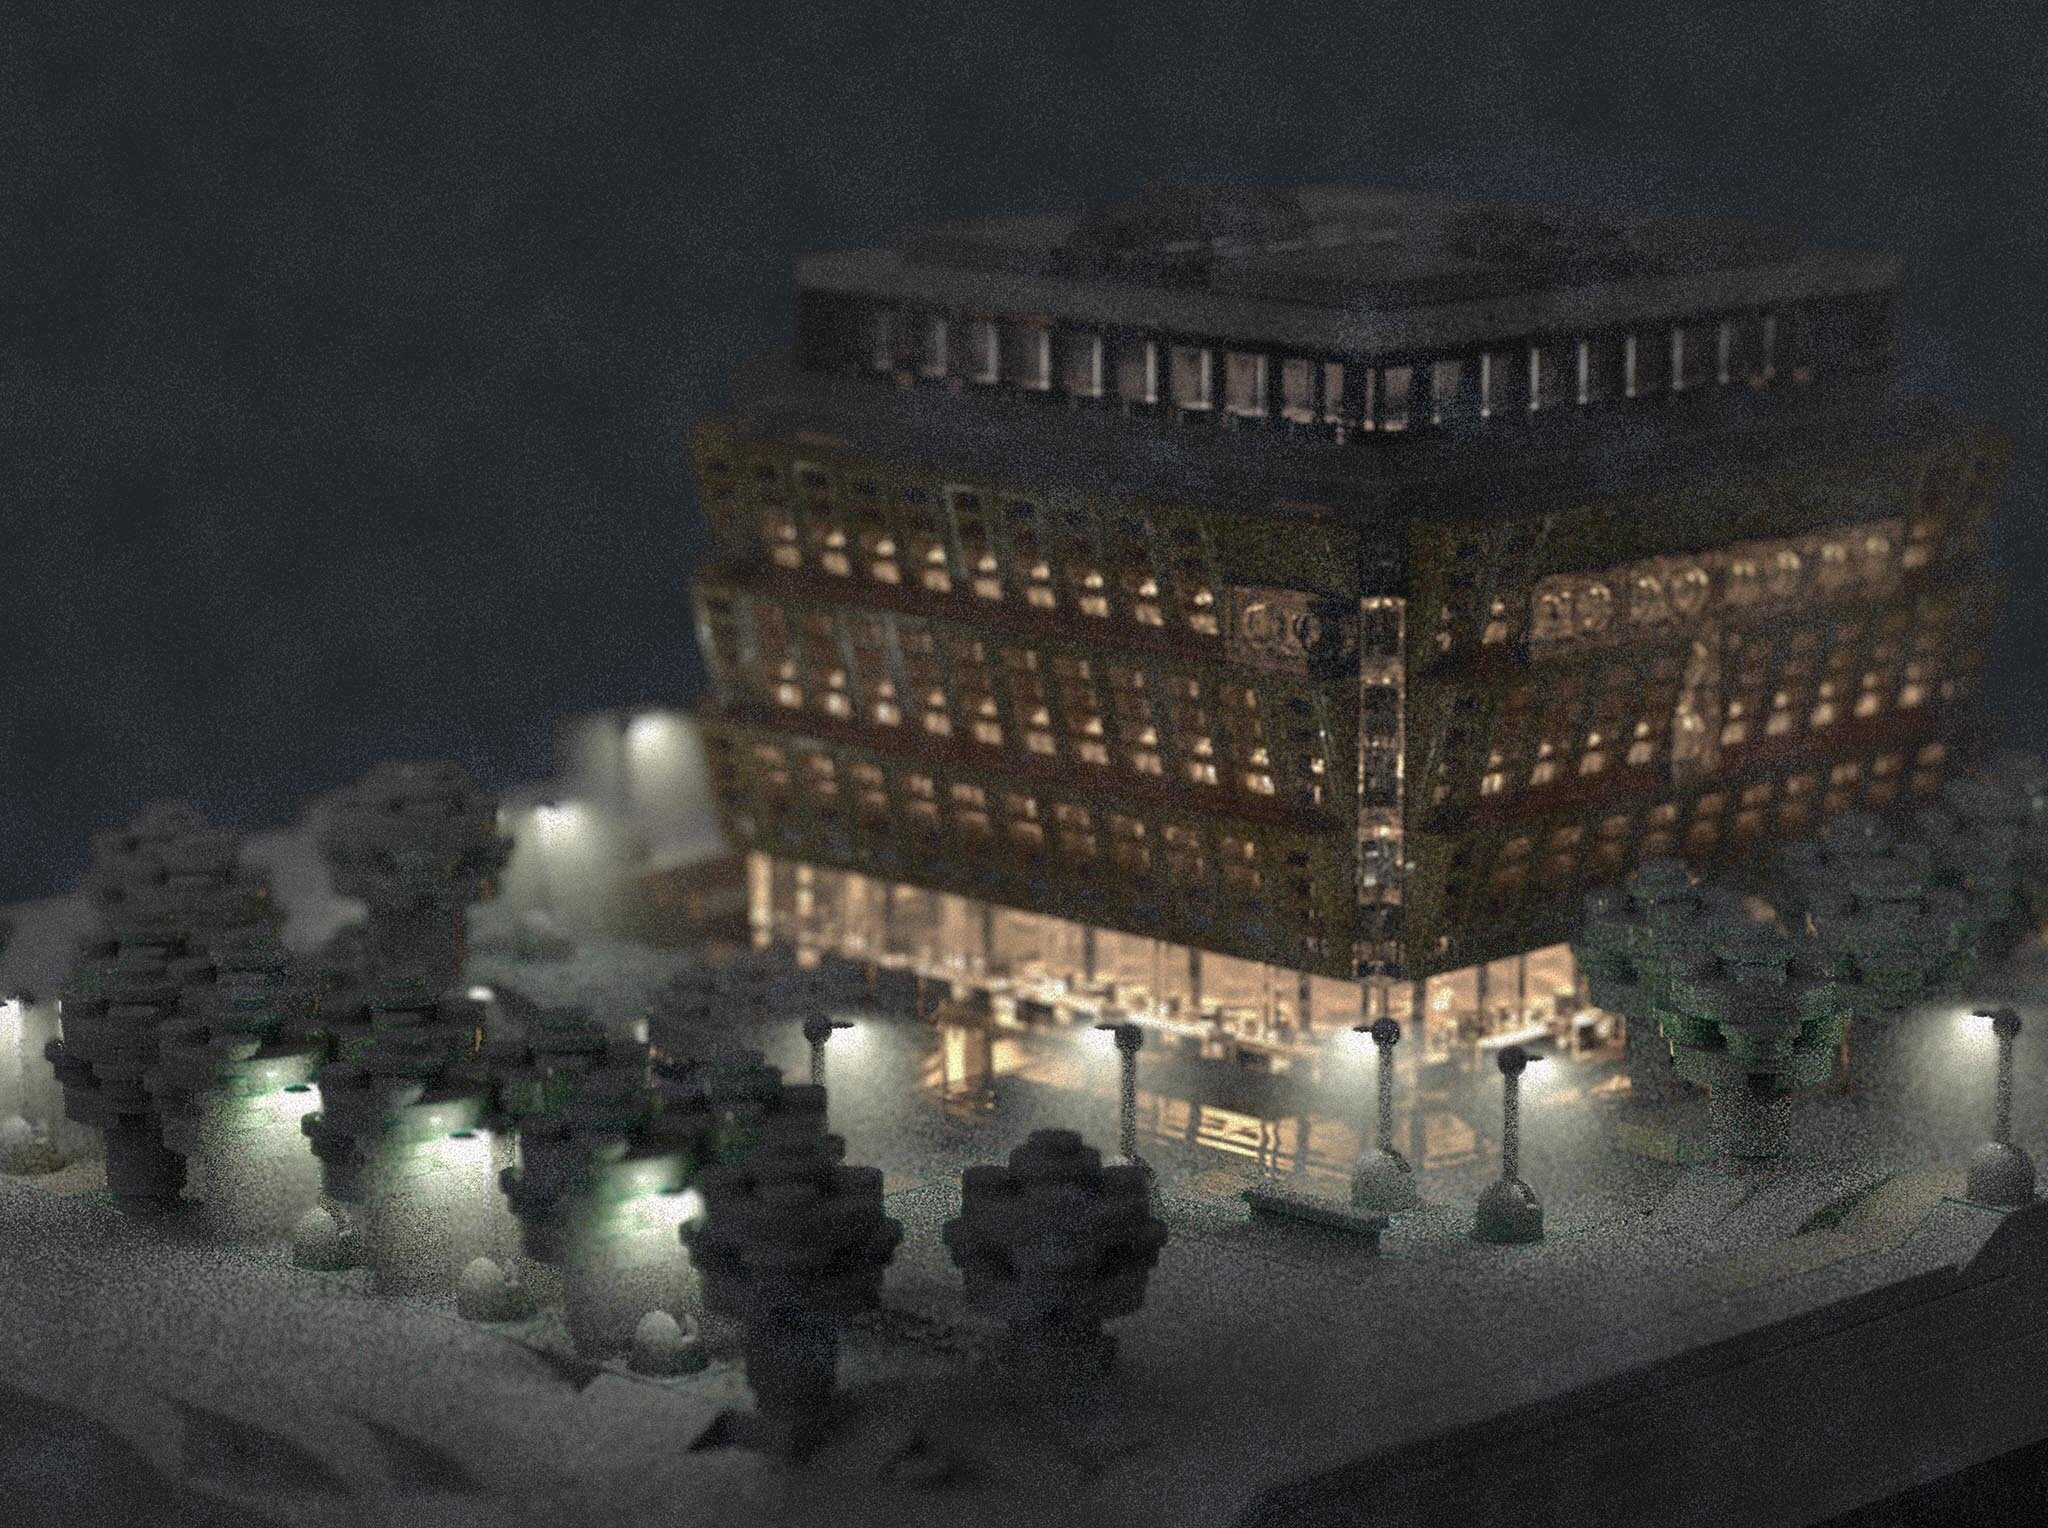
YUMMM, digital goodness. Is that a snowstorm?
Doug: Knowing that the National Mall is a real place and that your LEGO project is ongoing for many years, you must face a dilemma regarding the constant evolution of your subject, i.e. construction projects, renovations, etc. What’s your thought process regarding the element of change/accuracy over time?
Wayne: Some of the joys and headaches with a large multi-year project based on an actual place is that, in real life, that place changes over time. Renovations and upgrades to buildings and terrain, interesting events that occur at that place all lead to potential changes, redesigns, and rebuilds to what currently exists in your LEGO model.
The National Mall project is based on what the actual Mall looked like in 2017-2018. Since then, however, the Mall side access to the National Museum of Natural History has changed significantly. The National Air and Space Museum is currently undergoing a major multi-year renovation. The question becomes, do you stay with what you have or do you try to keep up with major changes in the actual venue. I am still undecided about that but am tending toward trying to keep up.
Also, there are special events that happen on the Mall that would be fun and interesting to depict in my project. The annual fireworks show on the Fourth of July or the yearly cherry blossom festival around the Tidal Basin. In 2019, there was the celebration of the 50th anniversary of Apollo 11. As a nod to that, I created a special version of the Washington Monument that had the Saturn V rocket printed on one side to replicate the evening presentation where video of the Apollo 11 Saturn V launch was projected on the Washington Monument. I’m constantly trying to come up with ways to keep the project fresh and interesting, both for those who look at it displayed at a LEGO event and for me as I keep working on it year after year.
Houston, we have a saturn v on the National Mall
Doug: Thanks so much for your time and all these juicy details Wayne! You’ll laugh but despite all the depth of your answers so far, the build is so special and complex that I already have ten more questions piled up, and I could look at a million more pictures of all the great details you’ve packed in here. Sadly though, the article must end. Before we go are there any final words you’d like to leave us with?
Wayne: Though I came to LEGO only recently it has provided an amazing outlet for both my artistic and technical interests, and now, I can't imagine not having it around. But what surprised me most, and what I find the most gratifying, was the welcome and support I've received (and continue to receive) from the LEGO community. I hope I can give back to the community what they have given me.
Like the 18th century L’Enfant, Wayne has a spectacular vision. This vision plus his passion has borne the fruit of an amazing MOC, which is in a class of its own for LEGO microscale. We here at BrickNerd can’t wait to see more updates over the years!
I hope that like myself, some of you readers have had the pleasure to meet Wayne and see this fantastic National Mall Build in person at various cons including Bricks Cascade in Portland, OR, and BFVA in Chantilly, VA. If you haven’t yet, then let’s hope he’s back on the convention circuit when in-person events return, so you can see and wonder at his genius as I have done!
Have you seen Wayne’s National Mall in person? How do you light your MOCs? Have you used any of Brickstuff lighting or other options? Leave your thoughts in the comments below.
Do you want to help BrickNerd continue publishing articles like this one? Become a top patron like Charlie Stephens, Marc & Liz Puleo, Paige Mueller, Rob Klingberg from Brickstuff, John & Joshua Hanlon from Beyond the Brick, Megan Lum, Andy Price, John A. and Lukas Kurth from StoneWars to show your support, get early access, exclusive swag and more.