LEGO SNOT: Advanced Techniques and Implementations
/Today, BrickNerd is featuring a guest article by Oscar Cederwall (o0ger). This is the third article in our SNOT series following “A Short History of SNOT” and “LEGO SNOT Basics: Geometry, Techniques and Pitfalls.”
SNOT Recap
In the LEGO world, SNOT stands for “Studs Not On Top” and it is a technique for building sideways. In my first article, we explored the origins of LEGO SNOT. My second article analyzed the geometry of SNOT construction and some basic building techniques. In this third article, we will cover some more advanced techniques and implementations of SNOT—with one in particular that really takes advantage of LEGO brick tolerances.
SNOT for Stability
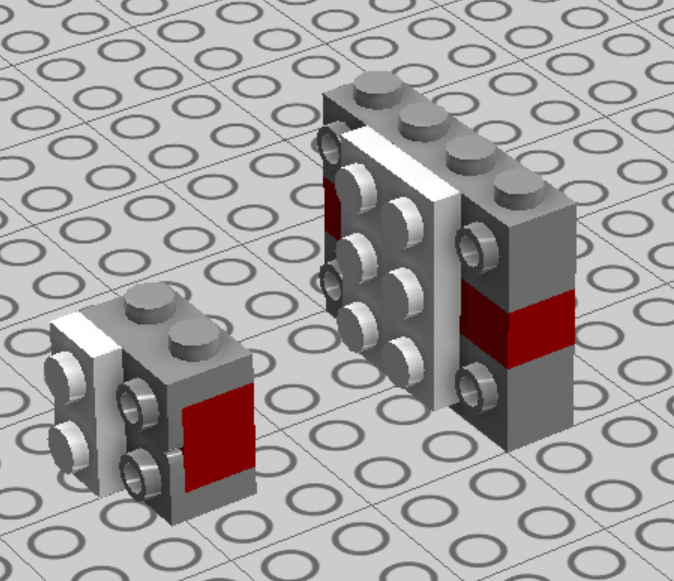
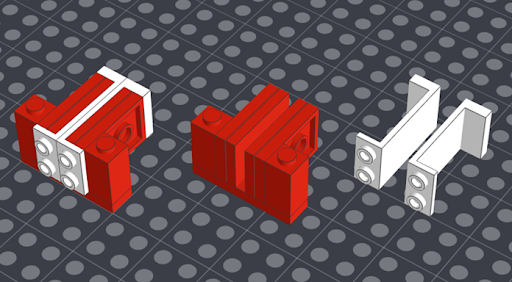
When the white part is attached, it locks the red parts between the grey ones.
LEGO designers make use of many new SNOT parts to give us more beautiful sets, but there is one more aspect of SNOT I haven’t talked about yet in my previous articles: stability. When you create a structure built sideways, you can essentially lock some parts in place, giving you the ability to build sideways and make your build more solid at the same time!
This technique can be used to give your MOCs a greater level of stability. As seen in last year’s LEGO Masters USA—where Amy and Tyler built their entry for the bridge-building contest with SNOT techniques—it can actually compete with structures built with LEGO Technic (which LEGO considers to be their strongest system).

(Image via Fox, LEGO Masters USA)
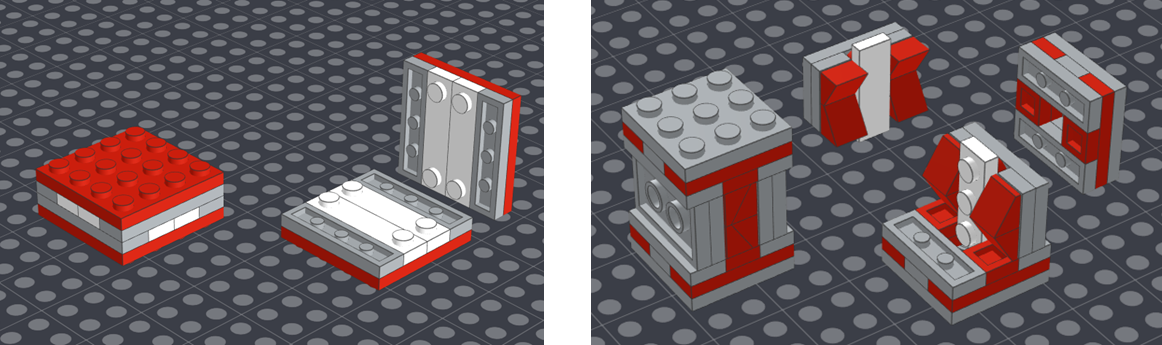
Below, you can see two structures. The upper one is built using Technic parts, the lower one using SNOT brackets. Most of you would probably use the Technic structure, but the SNOT structure is probably equally as strong, if not stronger. This method is frequently used by LEGO designers in official sets for strength and aesthetics. Implementing this technique in your own creations can certainly lead to a more robust result.

Examples from official LEGO sets using this technique are not hard to find. Here are a few:
For instance, the entire middle section in set 70008 Gorzan’s Gorilla Striker is locked with this technique, while simultaneously placing the curved parts sideways to achieve the round shape of the mech:

(image via LEGO)
In LEGO Star Wars 75277 Boba Fett Helmet, the core of the set is built with SNOT elements with studs pointing out in every direction. Beautifully crafted side panels are then attached sideways on each side to lock the core. This is done both for stability but to achieve a rounded look, essentially making curves sides attached to a central box to have the end result look round and locked in place.

(image via LEGO)
SNOT Stud Reversal
Sometimes, you might need to reverse the direction of the studs in the middle of building a MOC. There can be many reasons for this. For me, this mostly happens when I have two SNOTted flat structures that somehow need to meet.
Here are some examples of stud reversal. Above, you can see some of the easiest ways to achieve this using both versions of the 1x1 plate with vertical stud attachment (the older ones are thinner than the modern version) as well as the 1x1 brick with studs on opposite sides.

But what if you don’t have enough building space and need to switch directions in a tighter space? The finger hinge stud reversal technique is very handy when you want to keep the profile just one stud thick. This technique is often expertly used by the great space ship builder Nick Trotta.

Here are a few more stud reversal techniques that use a bit more space. The first utilizes a 1x4 bracket and a Technic brick. The second uses headlight bricks.

What happens when you don’t want the LEGO studs facing out and instead need access to the undersides? Try a round tile with a hole plus a 2x2 jumper plate, or a Technic brick plus 1x2 jumpers.

Other slightly more complex ways of achieving anti-studs on either side in a smaller building space include using a 2x4 Technic plate and older flowers with four petals for a very thin stud reversal or a 1x4 Technic plate and a 1x4 plate with only two studs for a reversal that is only three plates thick.

You can see some of these techniques being used in official LEGO sets. Here is the seat from 10252 Volkswagen Beetle using headlight bricks.

(IMage Via LEGO)
There is no limit to the ways you can reverse stud direction while building. One of the more creative examples in my opinion can be found in 10255 Assembly Square, where 1x1 “nipple” tiles are used ito connect to the negative space found in the tops of 1x4 bricks with grooves. So fun!

(Image via LEGO)
SNOTting the Void
Many LEGO parts have spaces in them, specifically arches, that might seem difficult to use if you don’t build studs-on-top. To unlock their full potential, SNOT is sometimes required. Here you can see by attaching a rounded 1x2 plate to SNOT bricks, you can fill the empty space of an arch with grille tiles to represent a barred window or gutter.

This can also be accomplished on a smaller footprint for microscale or architectural details.

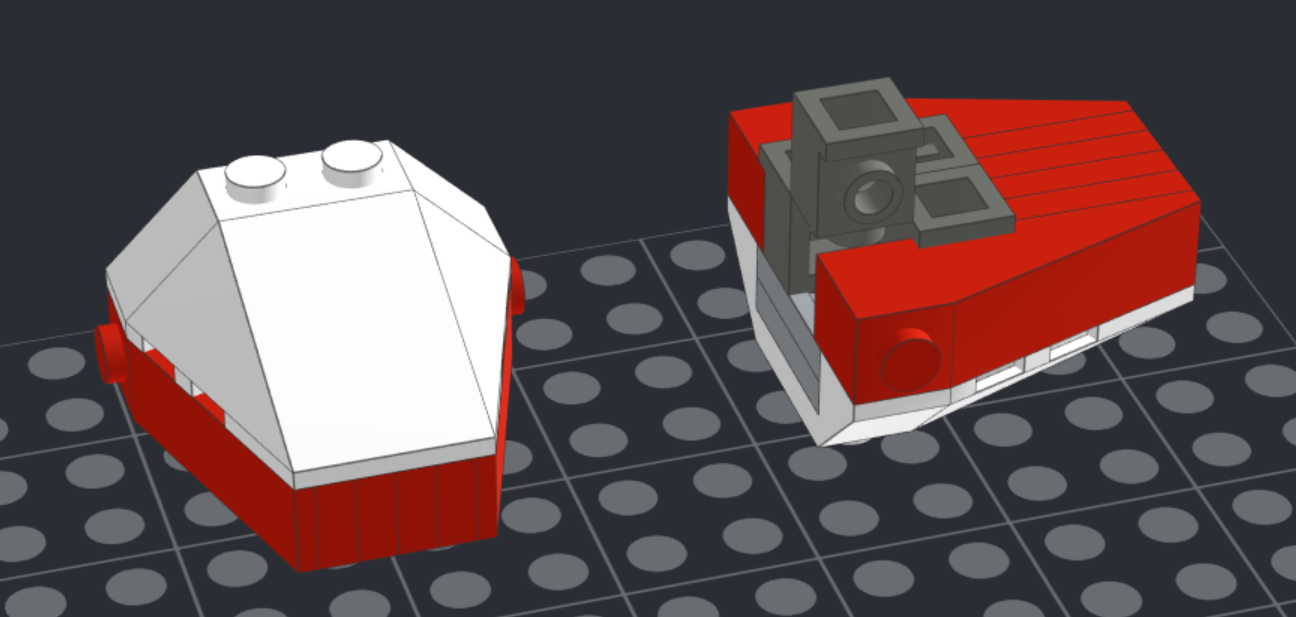
This is an example from one of my own builds, a space freighter. The detailing of the vents was accomplished with 2x4 brackets connected to Technic bricks in the middle which could then slide into the space under the arches to make a detailed subassembly.

SNOT with Slopes and Wedges
Let’s get a little more complex. In the geometry of the LEGO system, many slopes and wedges have similar angles. This not-so-random coincidence can be used to create smooth transitions in more angular situations. For example, a smooth transition in this image below is achieved with 45-degree cutout slopes mounted on brackets.

Here is another example attaching standard slopes to headlight bricks (one is removed so you can better see the interior) to match the geometry of the white element on top.
SNOT Striping
You can also use SNOT to achieve various kinds of striping, a brick-built detail that oftentimes fascinates fellow builders and leads to a very clean, sleek look. Brick-built striping can also be an alternative to using stickers.
SNOT bricks are used with Technic bricks to tesselate into an angled line here on the left, while thin brackets combined with headlight bricks are used to add a slender stripe on the right.

For a brick-built grid, consider using 2x2 brackets to create a repeating pattern for an impressive floor or wall detailing.

LEGO designers themselves use brick-built SNOT striping. Here we can see cheese slopes mounted on clips that are attached to a bar to produce the arrow-shaped striping effect on the side of the train in 10233 Horizon Express.

(Image via LEGO)
SNOT Text
Speaking of clips and bars, SNOT can be used to build textual signs. Though to be completely transparent, there is no easy way of doing this as several letters will always be difficult to achieve. There are some examples of letters you can build in this document that I mentioned in my first article about SNOT, but I am unaware of more resources. If you know of any, please mention them in the comments below.
Perhaps the most accessible example of SNOT text comes from LEGO’s Modular series. Both 10218 Pet Shop and 10224 Town Hall used the clip and bar technique to create letters out of flat elements.

Here is another example of SNOT text by Tim Schwalfenberg in his Battlecruiser combining flat elements and cheese slopes to achieve the shaping of the letters.

Advanced SNOT: ¼ Plate Offsets
So far, we have only talked about how the dimensions of bricks relate to each other in terms of plates, bricks, and studs. I mentioned that the width of a 1x2 brick equals the height of five stacked plates and that the width of one stud therefore equals the height of 2½ plates.
But can we get even smaller offsets? With jumper plates you can build a ¼ plate offset:

This gives us the possibility to build steps with ¼ plate increments enabling perhaps the smoothest studded gradation possible without using slopes.

But watch out, ¼ plate offsets can also get us into trouble. Consider this window on the left built by Aukbricks as a case study.

Let’s say we want to make the 1x1 tiles only protrude ½ plate from the wall. In that case, we would need to use headlight bricks. But when you put a headlight brick on a jumper plate above the window and try to fill the gap on the sides, nothing fits! Whatever you try you just can’t fill those gaps. Wouldn’t it be great if there was a part that was thin enough to fit?

Well surprise, there is a part that can do just that! These hinge plates are (almost) ¼ plate thick. That makes the brick on the right 2 ¾ plates high (almost). Getting a little nerdy (hey, we are in the right place for that, right?), the dimensions aren’t exactly perfect but it’s close enough to be useful. The hinge plates are 1,05mm thick and a plate is 3,2mm thick, so they are closer to ⅓ plate in thickness—but the tolerances on each side of bricks actually give us enough room. It’s a tight fit, but it works:

You can also use the hinge brick itself, but it leaves a tiny gap on each side.

Advanced SNOT: Trapping
Sometimes, it might feel impossible to get the exact result you want, especially when the geometry of studs gets in the way. There is a method that can help you in these instances. Trapping is when you arrange parts so they are locked in place, even though they are not connected.
That way, you can literally build any nearly any geometry you want. Here are two prime examples of the technique. The left build by Ryan Howerter, and the right build by Tyler Clites.
Another really neat example of trapping is panel stepping. Panel stepping can be used for decorations or microscale stairs. 21045 Trafalgar Square used a version of this for the main staircase in that set. Here are a few examples of how it is accomplished.

However, I have a warning about panel stepping. It seems like the new mold of panels with the rounded corners (introduced in 2004) has some extra material added in the inner corner, presumably for added support. This makes the panels harder to fit and the whole construction becomes a bit wobblier.

The upper panels are the older mold with sharp corners. The lower panels are the new mold variants which have a bit more wobble because of the added material in the corner.
The End?
That concludes my three-part introduction to SNOT (read Part 1 and Part 2), but there is more LEGO nerdiness to come! [EDIT: Part 4 is now available!] I hope you’ve learned something and feel eager to go try some of these SNOT techniques yourself. You’ll find if you build some of these examples yourself that they come in very handy exactly when you need them. And that’SNOT a lie!
Have I missed something? Do you have questions? Please let me know in the comments below.
What are some other LEGO SNOT techniques that you know of that aren’t mentioned in the article? Leave your thoughts in the comments below.
Do you want to help BrickNerd continue publishing articles like this one? Become a top patron like Charlie Stephens, Marc & Liz Puleo, Paige Mueller, Rob Klingberg from Brickstuff, John & Joshua Hanlon from Beyond the Brick, Megan Lum, and Andy Price to show your support, get early access, exclusive swag and more.