
This Old Motor Bogie: How To Refurbish LEGO 9V Train Motors
/The metal track 9V train era was unique and was missed by many modern LEGO train fans. Although the sunset of the 9V train era has long passed by in 2006, it is encouraging to see many LEGO train fans still using the superb and much-missed metal rail track and motors from this era (no batteries required!). But with this longevity comes the diminishing supply of original LEGO train motors, or bogies.
Even as we at Fx Bricks reintroduced a new system of compatible metal 9V tracks, a key missing ingredient to take advantage of metal track is the metal-wheeled train motor bogie. The LEGO 9V train motor is becoming increasingly more difficult to find, more expensive on the used market, and more likely to be worn out or performing poorly.
The goal of this article is to show you how to refurbish and maintain your LEGO 9V train motor bogies and hopefully breathe life back into either non-functioning or poorly performing units. With a little time and careful effort, nearly all 9V motor bogies can be refurbished and life-extended into reliable, hard-working prime-movers for your LEGO trains!
This article could be considered a spiritual successor to my previous “This Old…” articles:
However, its origin is part of a larger story—that of my journey at Fx Bricks to develop a replacement for the LEGO 9V motor bogie.
Background
At Fx Bricks, we have a “test fleet” of around 20x LEGO 9V motor bogies representing bogies of different ages, provenances, and general condition. This allows us to characterize their performance as a baseline to inform our design choices as well as being able to verify the compatibility of our 9V track and accessory products with LEGO products.
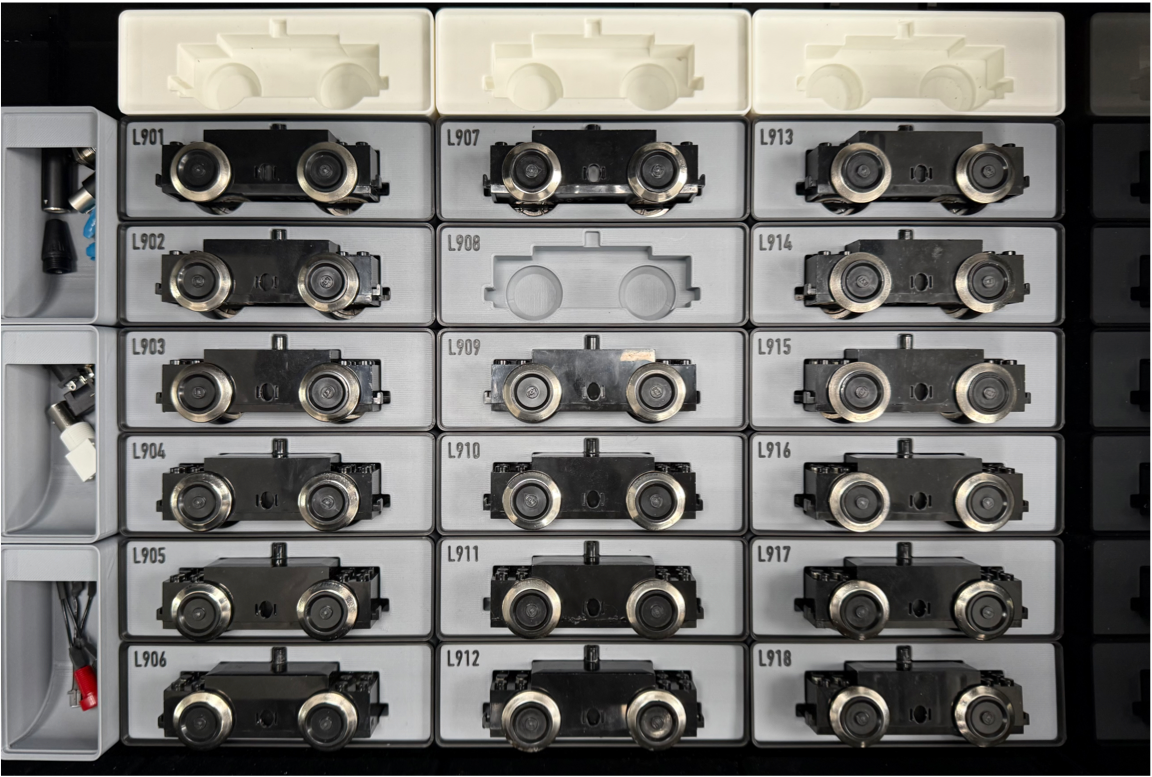
9V Motor test fleet! Each motor is engraved with an identification number on the bottom cover and are used for baseline performance testing and comparison.
One of the key features of our development lab is a five-track test layout. This contains five nested loops of track ranging from 56 to 120 studs radius with interconnected crossovers among each loop. This allows us to operate the trains over a variety of straight, curve and switched track geometries to ensure consistent performance and watch for any problems with challenging geometry. The layout is controlled either manually from a control console or fully automated by a dedicated computer test rack.
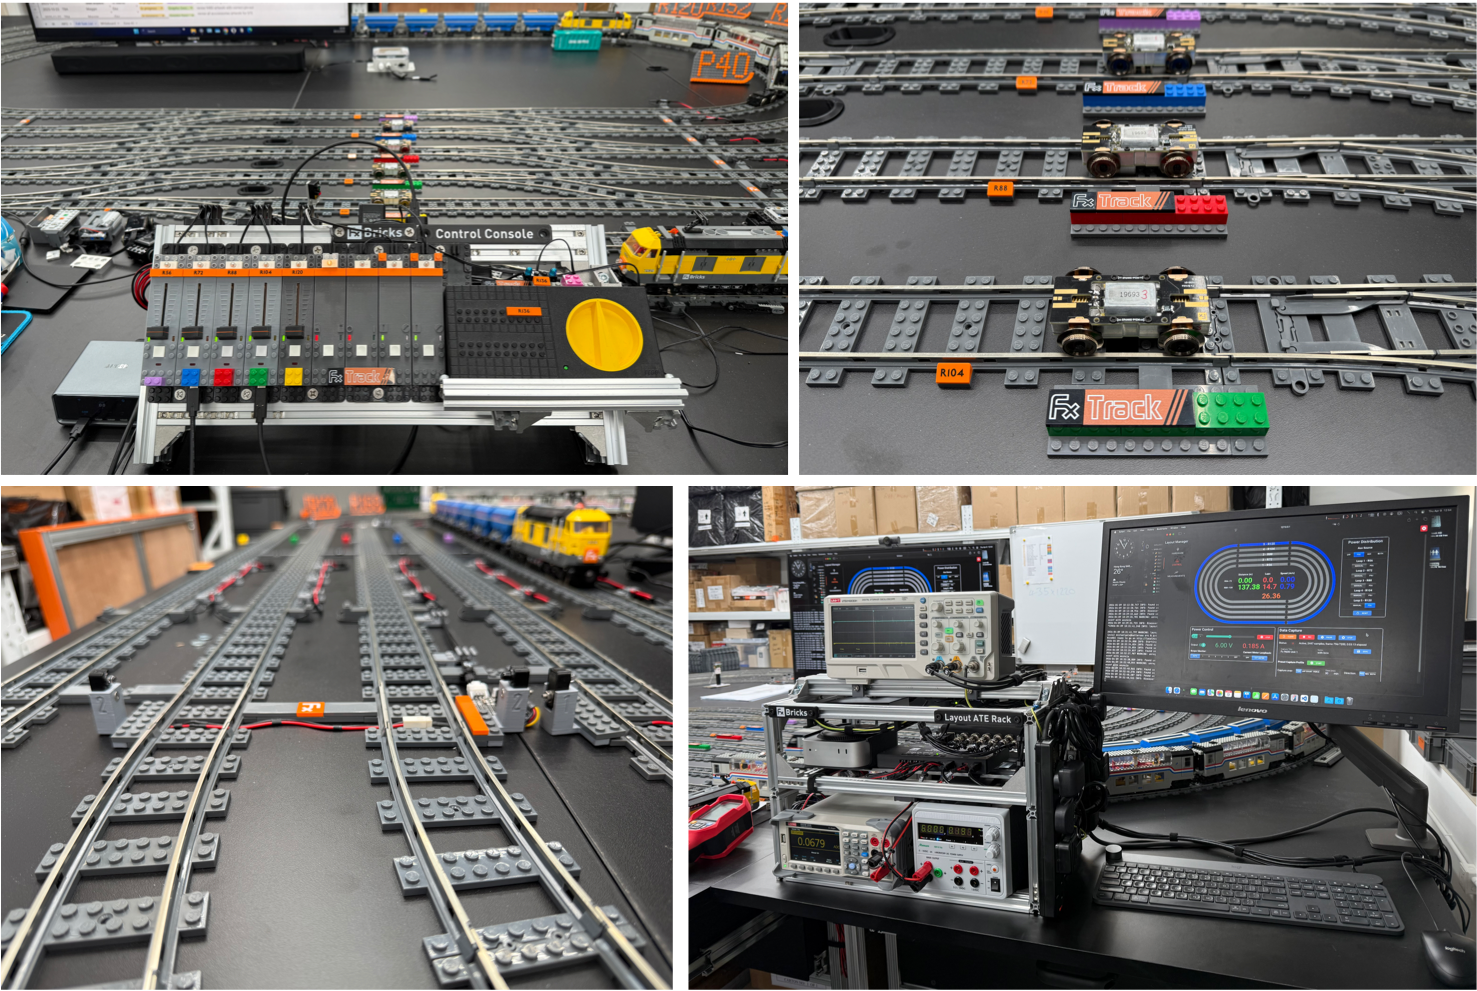
Fx Bricks test layout. Fully instrumented 5x track loop with realtime data acquisition used for product r&D and testing.
Each loop is independently powered from multiple feed points and is fitted with trackside sensors that detect the passage of trains and measure distance and speed. Our custom software tools allow us to configure each loop and perform both manual and automated test runs. The test rack performs comprehensive real-time data acquisition of voltage, current, power, distance, speed, frequency/duty cycle (for PWM speed control), as well as an overhead camera feed of the entire layout.
Since the main goal of this article is to show you how to care for and refurbish your LEGO 9V motor bogies, a suitable test subject was required to showcase the entire process. In almost all of my years using 9V motor bogies, I have been able to rehabilitate and restore them to good, healthy operation through a thorough yet worthwhile process of disassembly, cleaning, testing, and rebuilding.
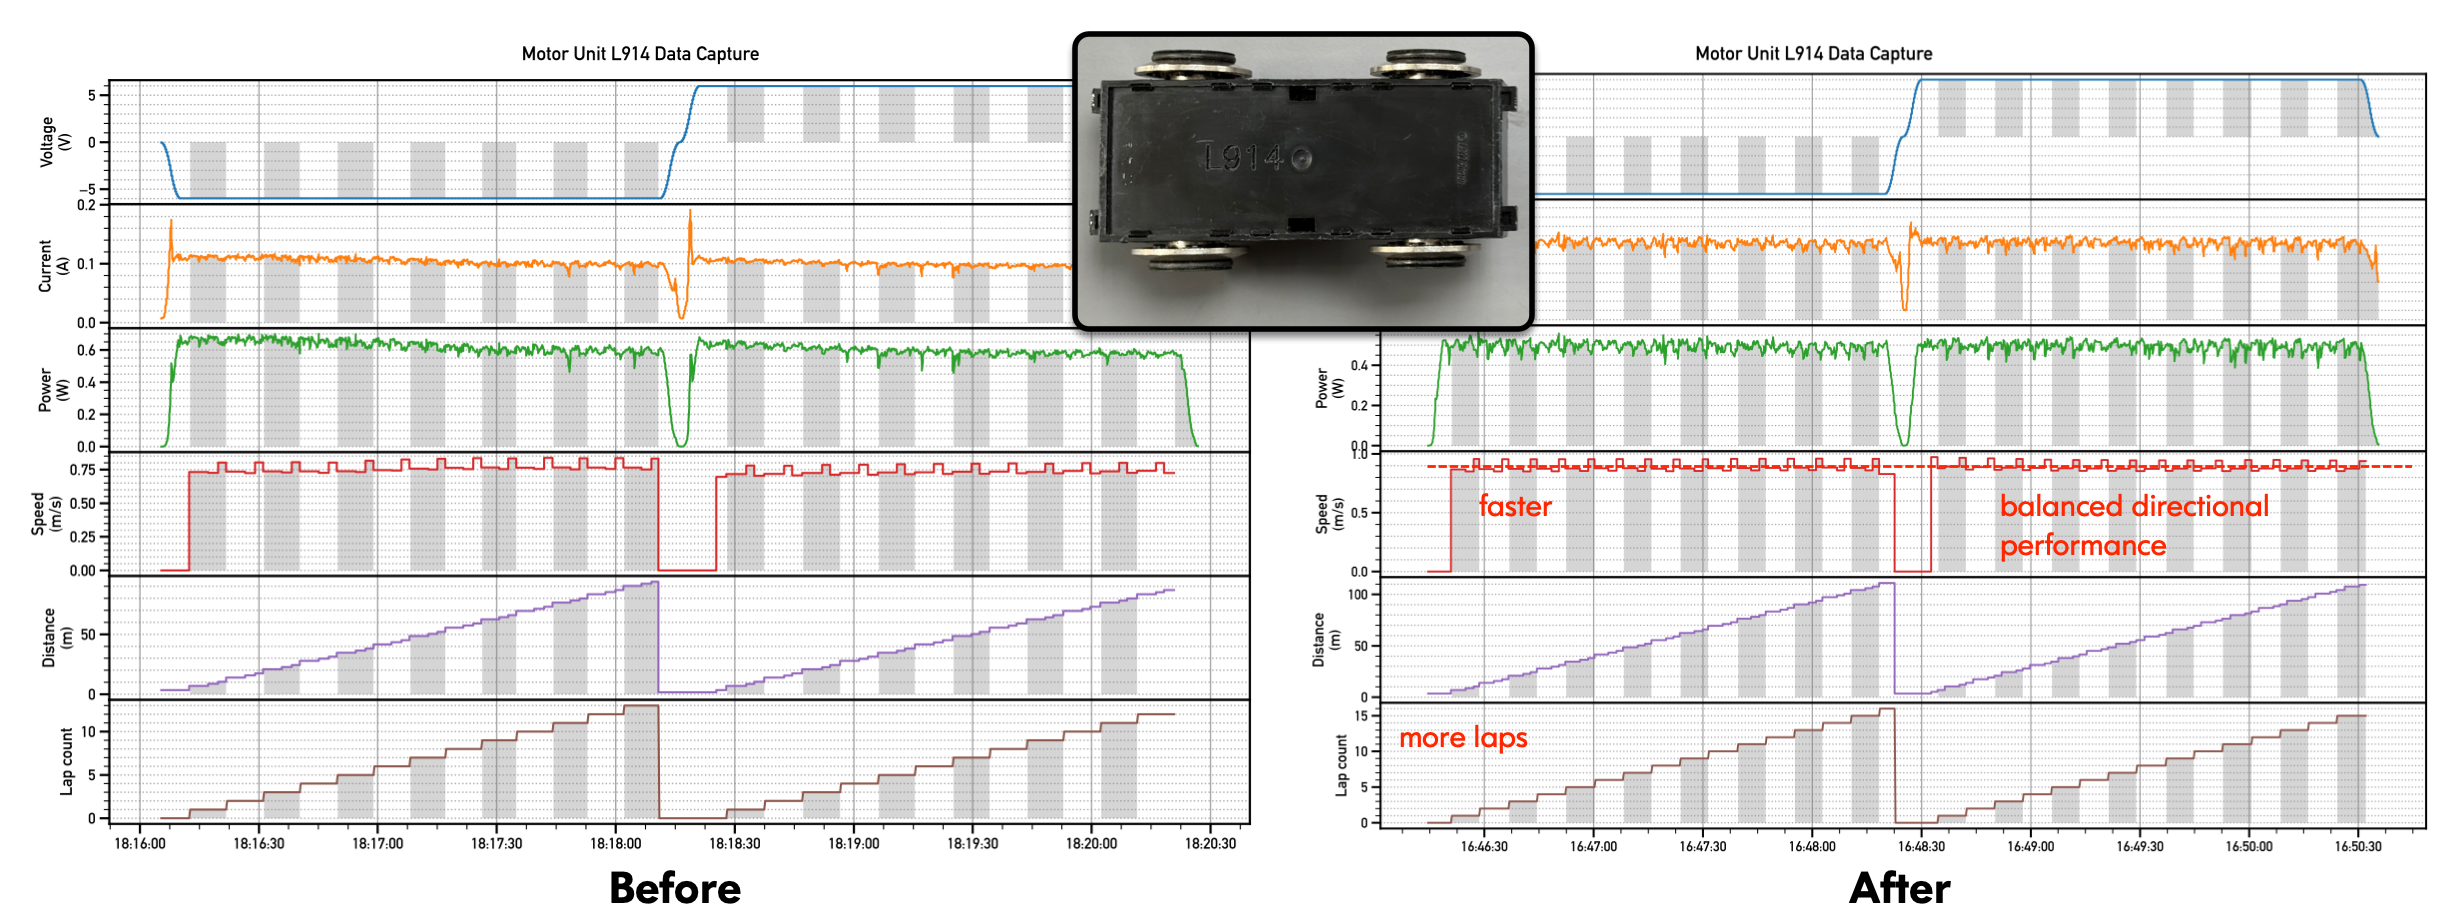
To select a suitable candidate for rehabilitation, I conducted an exhaustive performance test on 18 different LEGO 9V motors in our test fleet. Each motor was operated at a fixed voltage and time interval in both directions for several minutes on a loop of R72 radius track. An example of the data collection for a motor bogie unit is shown below:
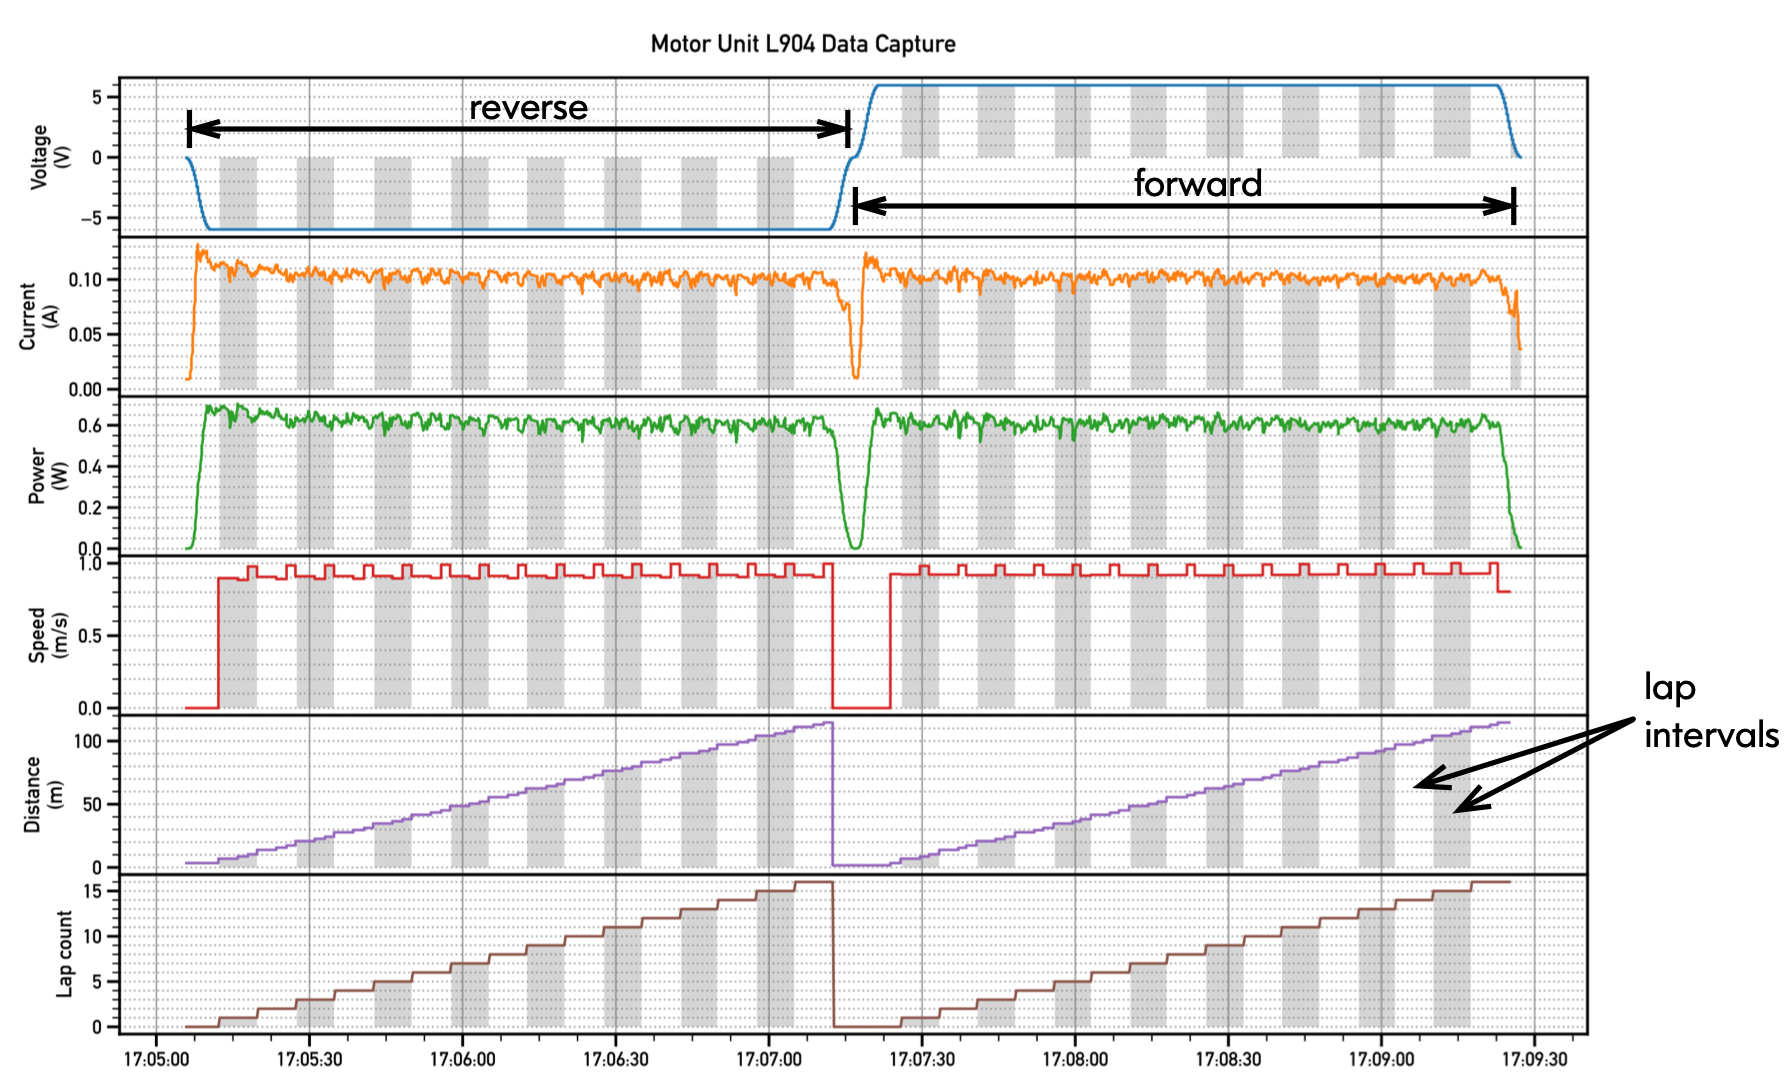
This data capture comprises thousands of time-stamped measurements from different sensors. The computer applies a pre-scripted voltage profile for operation in both directions and collects samples of current, power, speed, distance, etc. The grey/white bars overlayed in the data mark individual lap intervals. This helps us correlate data variation that is a function of loop location or geometry. Some interesting features to note from this capture:
Current/power sample data is very dynamic. This is expected since the motor’s current consumption dynamically changes depending on load, i.e., it draws more current going around a curve than a straight, and it also spikes dynamically when traversing rail gaps through switches, etc.
Speed measurements clearly show a difference between straight and curved track
Performance in forward and reverse directions is often mismatched
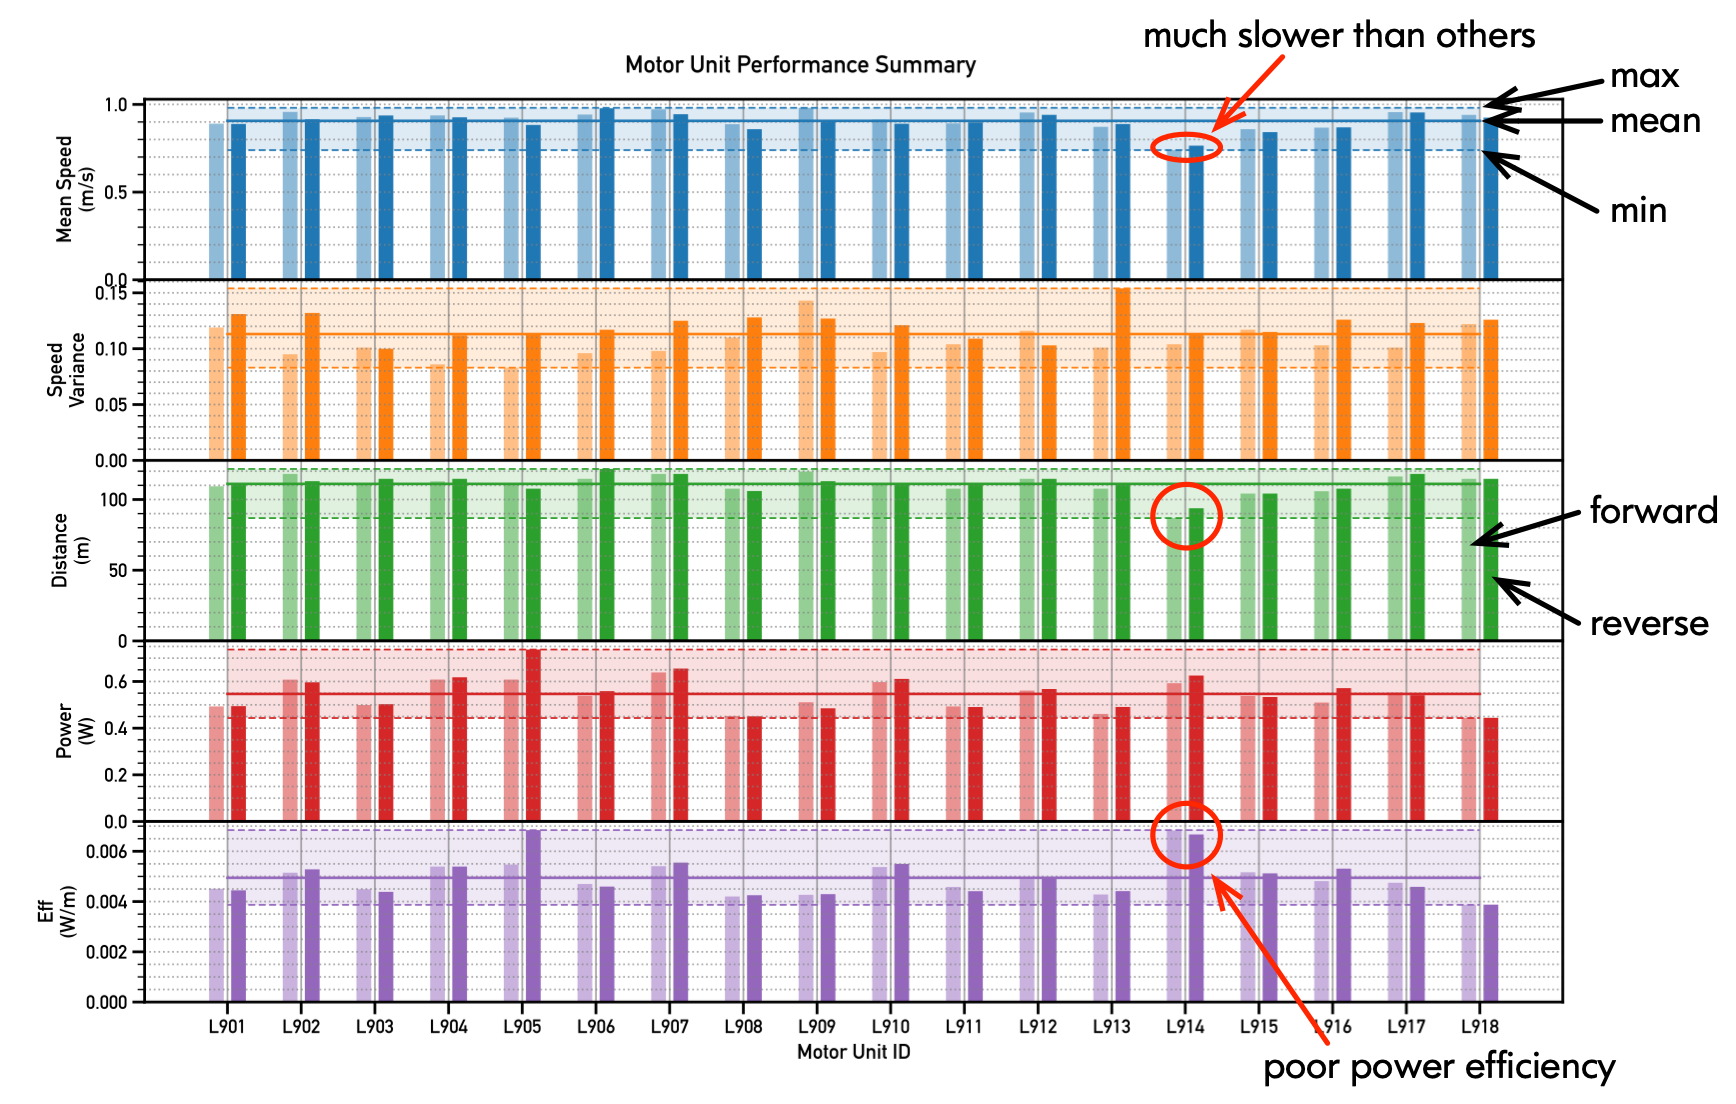
Performance data for all 18x 9V motor bogies was collected and analyzed so that the performance of each unit could be compared. The chart below shows comparisons of each motor’s speed, distance traveled, and average power consumption in both directions. Ideally, we would expect every motor to travel the same distance for a given fixed time interval in both directions. However, we can see some units performed much worse than the average of its peers; for example, unit L914 was much slower.
If we compare each motor’s performance in each direction, we would hope to see relatively balanced performance. However, for some units, their performance was noticeably different.
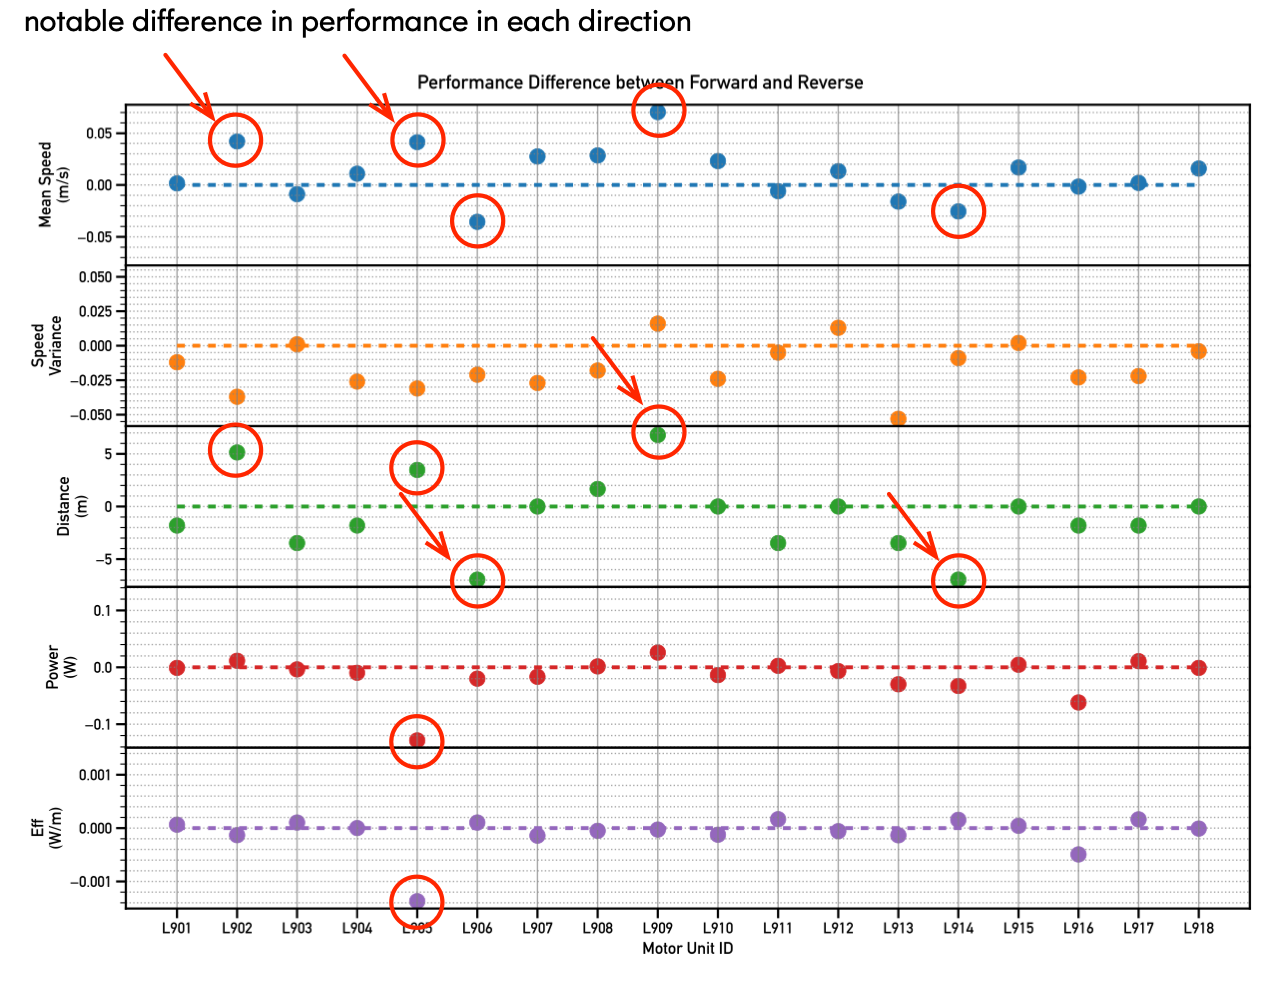
After examining the data, I nominated unit L914 as a suitable candidate for rehabilitation! As well as running much more slowly, it also exhibits unbalanced performance between forward and reverse directions.

Preparation
Materials and tools that you will need to perform motor bogie restoration are as follows:

Before we begin, we must also remember some important safety considerations!

I partitioned the restoration process into five sections:
Disassembly
Cleaning
Motor Test
Re-assembly
Lubrication
Let’s get started!
Part 1: Disassembly
The first step of disassembly is the most difficult: opening the motor bogie enclosure. The enclosure consists of a top shell with a bottom cover plate very tightly retained by 12 recessed clips.
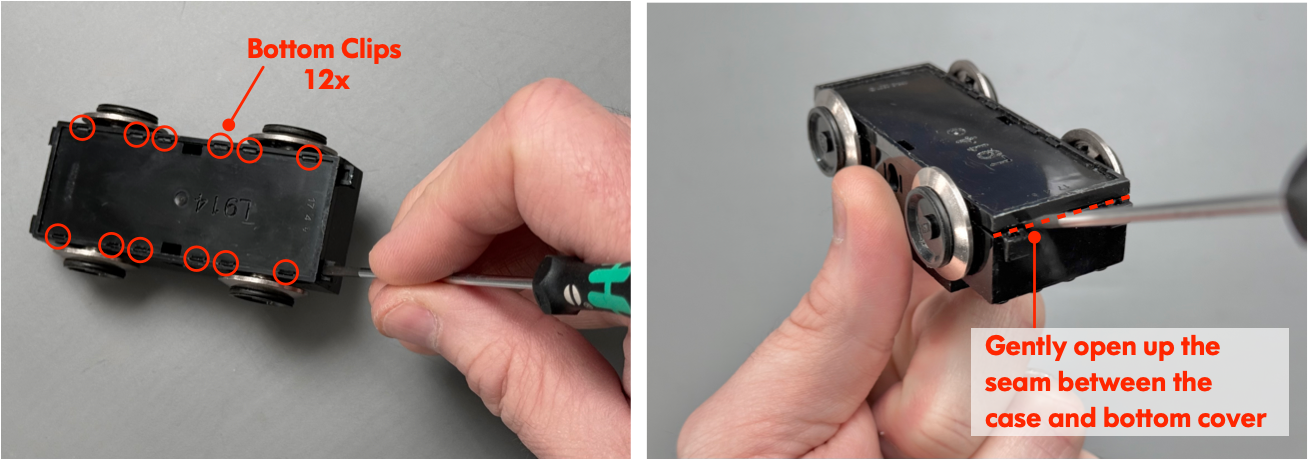
The process of removing the bottom cover plate consists of gently prying open one short end, and then hopefully being able to release the pair of clips closest to that end. Gently insert the tip of a small flat-head screwdriver into the seam between the cover and body shell. Then, very carefully work the screwdriver along the seam while also gently prying open the seam into a gap.
When you have a large enough gap, try to use your fingertips to pry open the seam enough to release the first pair of clips. Sometimes you will get lucky, and the clips will release. However, in many cases, the clips stubbornly refuse to release! I would advise against aggressively attempting to pry the end apart with progressively bigger screwdrivers, etc.—you will likely damage the plastic shell and/or break the protruding end clips.
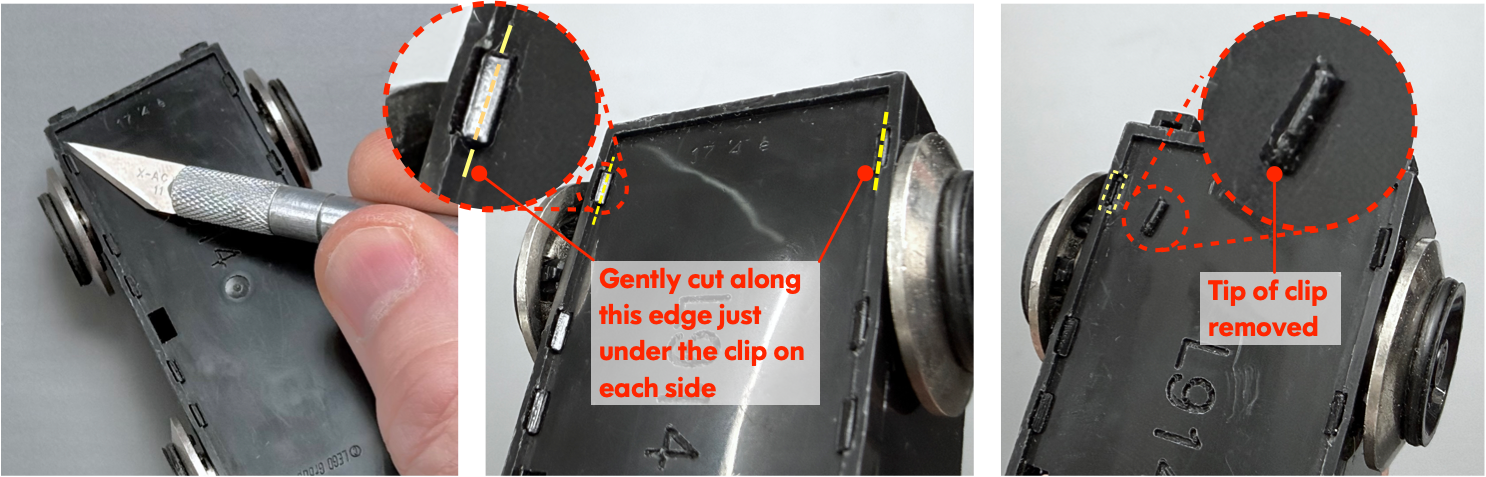
Instead, resort to a method that I found works well and minimizes damage to the bogie: Using a sharp hobby knife, gently slice away the tips of the first pair of clips which secure the bottom cover. To minimize the possibility of injury and damage to the bogie, use many gentle controlled cuts rather than a forceful cut to remove the clip tops. After a few passes with the knife, the tip should separate.
With the end clips trimmed, it should be possible to pry open the end such that you can get a secure grip with your fingertips to continue removing the bottom cover.
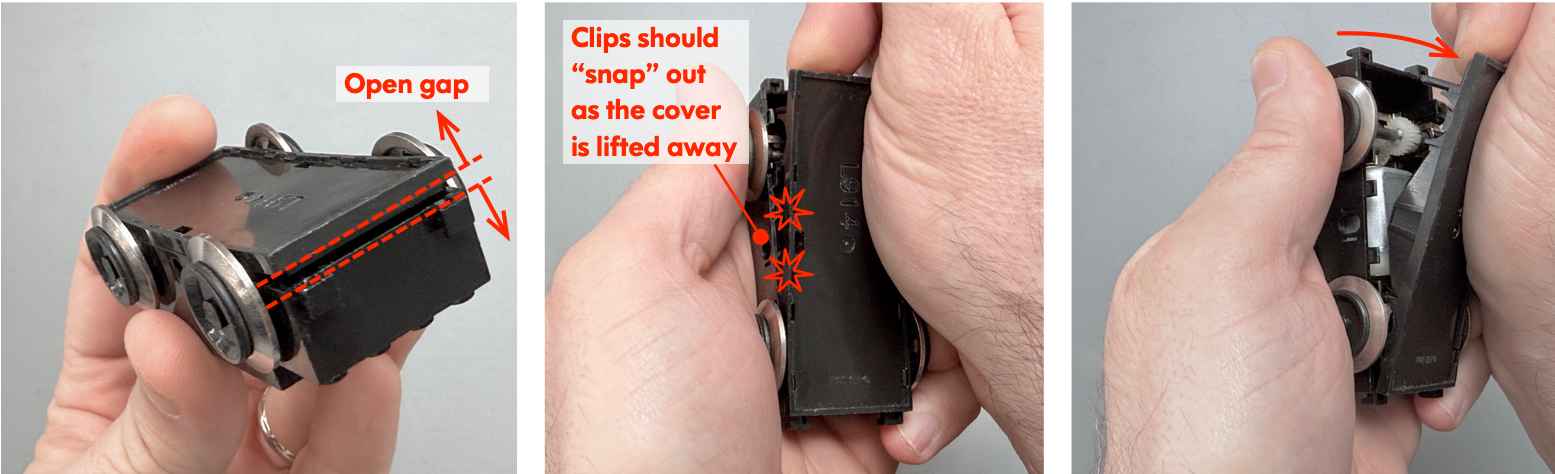
Hold the motor bogie upside down securely with one hand and use your other hand to progressively pry open the case. You may have to wiggle and pull strongly (but carefully) to release each successive pair of clips along the entire length of the bogie. Work slowly and methodically, and be ready to restrain your hand when each set of clips suddenly releases with a “snap”.
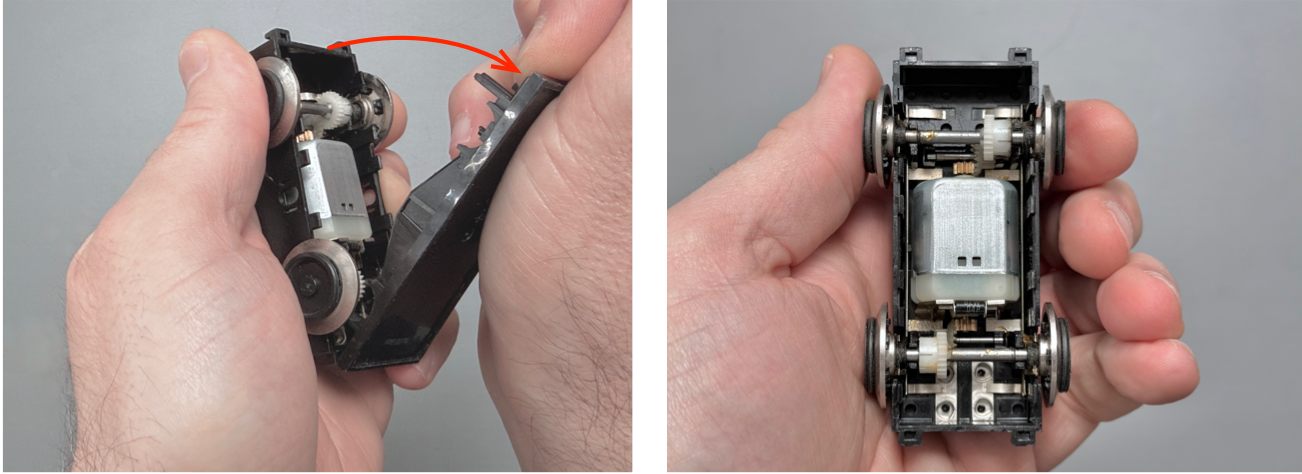
Continued DISASSEMBLY
With the motor bogie cover removed, we can now finish disassembly.
Remove the two wheel axle assemblies:
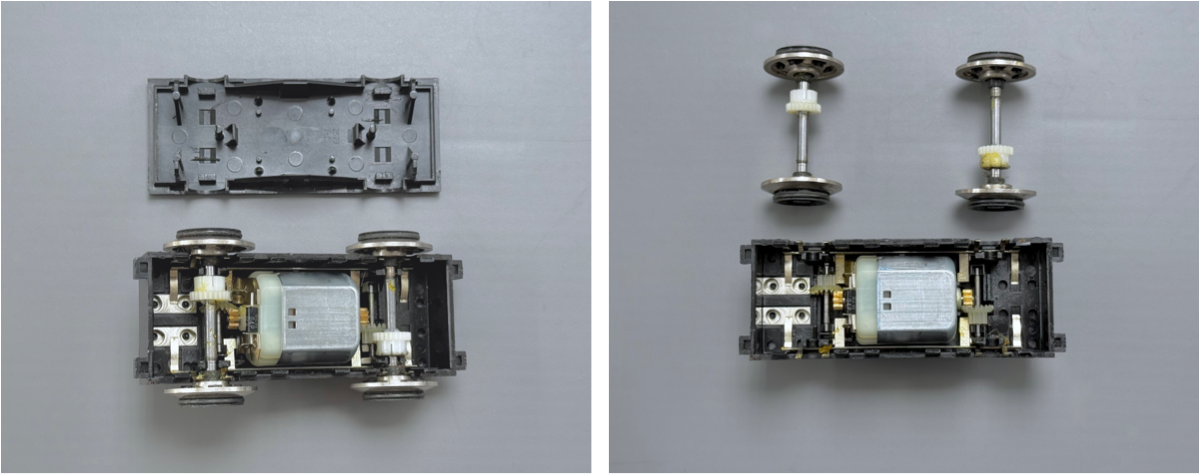
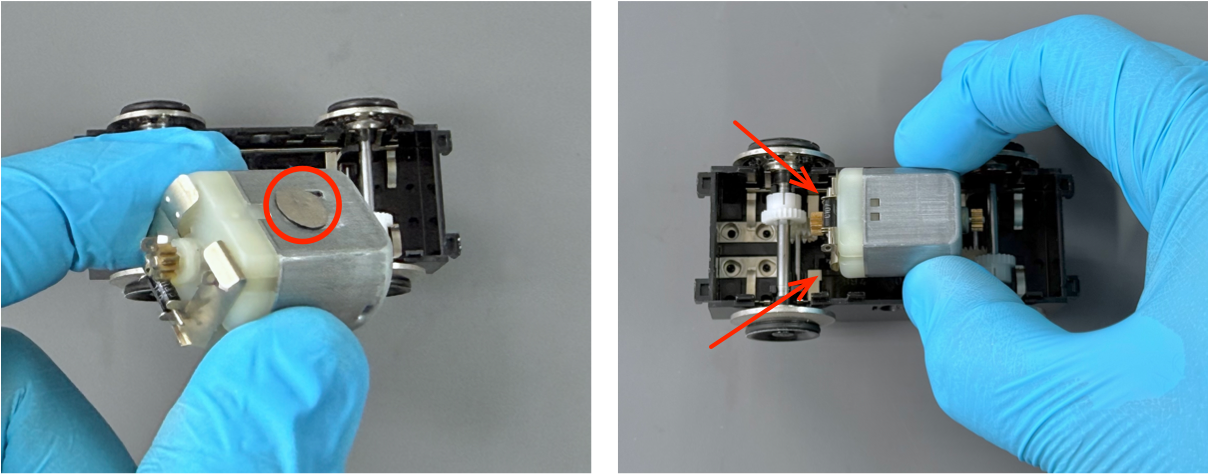
Gently tilt the centrally-mounted motor and lift it out of the bogie enclosure.
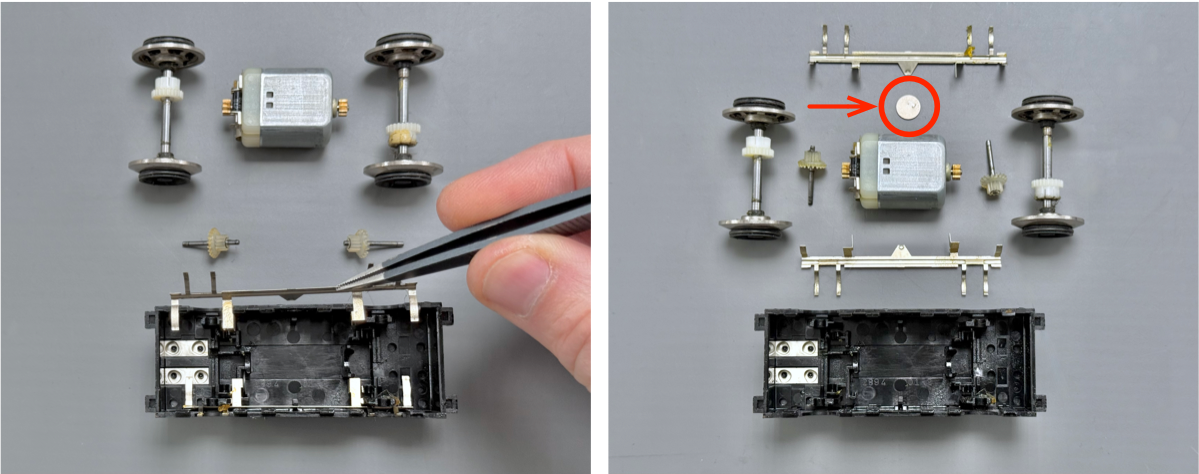
Using tweezers, lift out the crown gear axles. Be careful during removal, since the crown gears are not secured to the axles and easily slip off.
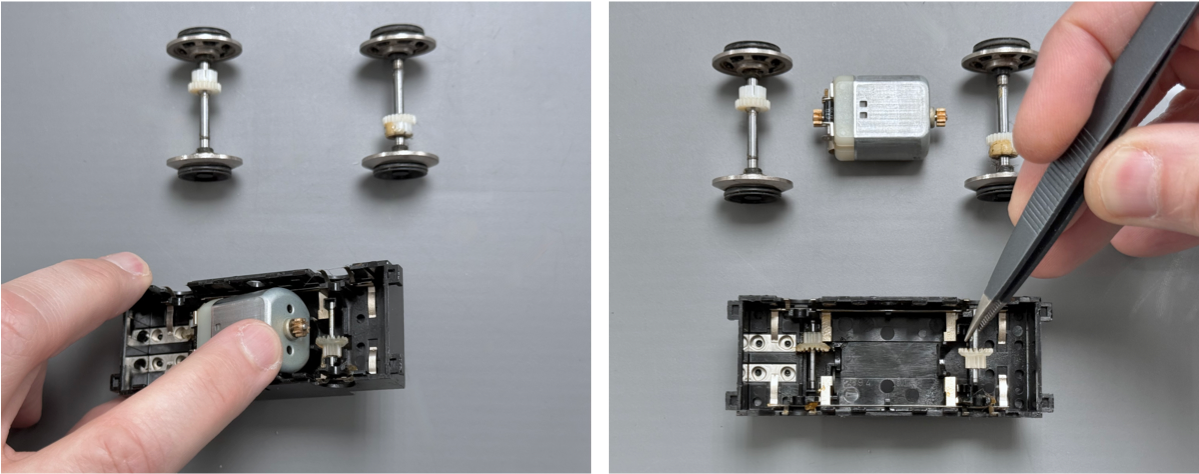
Gently pull out each power pickup tab frame. Lift out vertically and ensure it does not snag or bend.
Find the small disc-shaped motor spacer; it will either be magnetically attached to the motor casing or will have fallen into the bogie case during removal.
Depending on the age and condition of your motor bogie, you will see varying degrees of dirt, grease, pet hair, and other interesting forms of contamination!
Now with everything disassembled, we are ready to refurbish!
Part 2: Cleaning
The next step in the process is a thorough cleaning of all of the bogie mechanical components. One of the key contaminants we want to remove is old grease. Therefore, I find the best cleaning solution is 99% Isopropyl Alcohol (IPA).
Pour a shallow quantity (approximately 5 mm deep) of IPA into a medium-sized Pyrex or glass baking dish. Place all of the bogie mechanical components (wheel/axles, crown gears/axles, pickup tab frames) into the IPA.
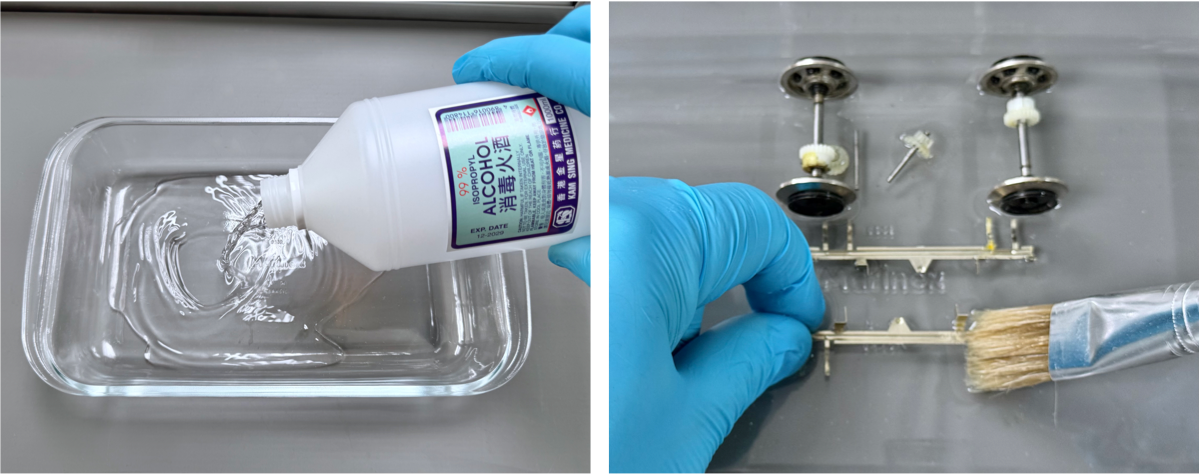
Ensure that you wear gloves while cleaning. Take each component and gently scrub with an old paintbrush soaked in IPA. Work the brush into every crease, gap, and surface of each component. Rinse the brush frequently in fresh IPA as you clean so that contaminants picked up by the brush can be released into the dish.
When you have cleaned the mechanical components, take them out of the IPA and pat mostly dry with lint-free tissue and set aside to dry.
Next, clean both the bogie enclosure and the bottom cover in the IPA bath. Again, ensure you work the brush into every gap and surface to ensure complete removal of grease and other contaminants.
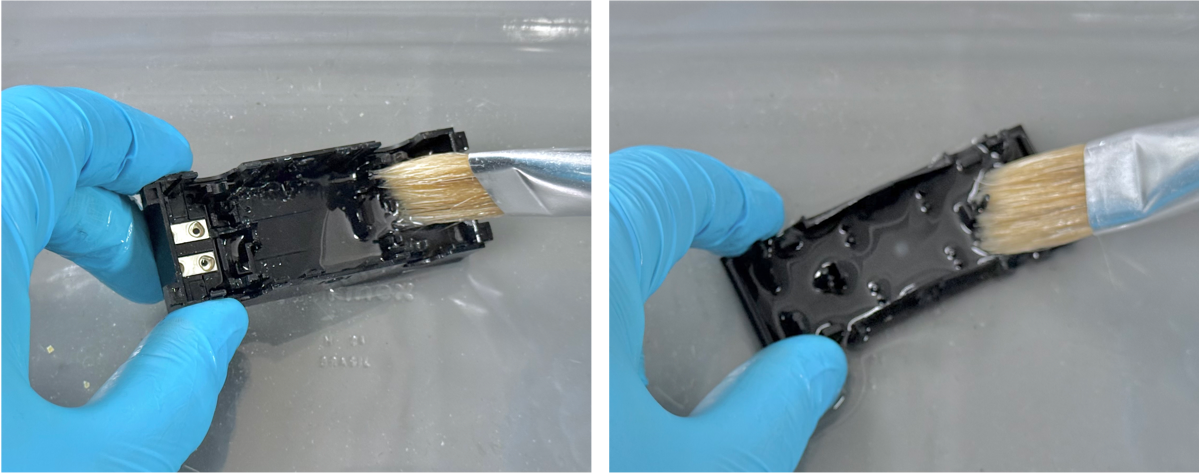
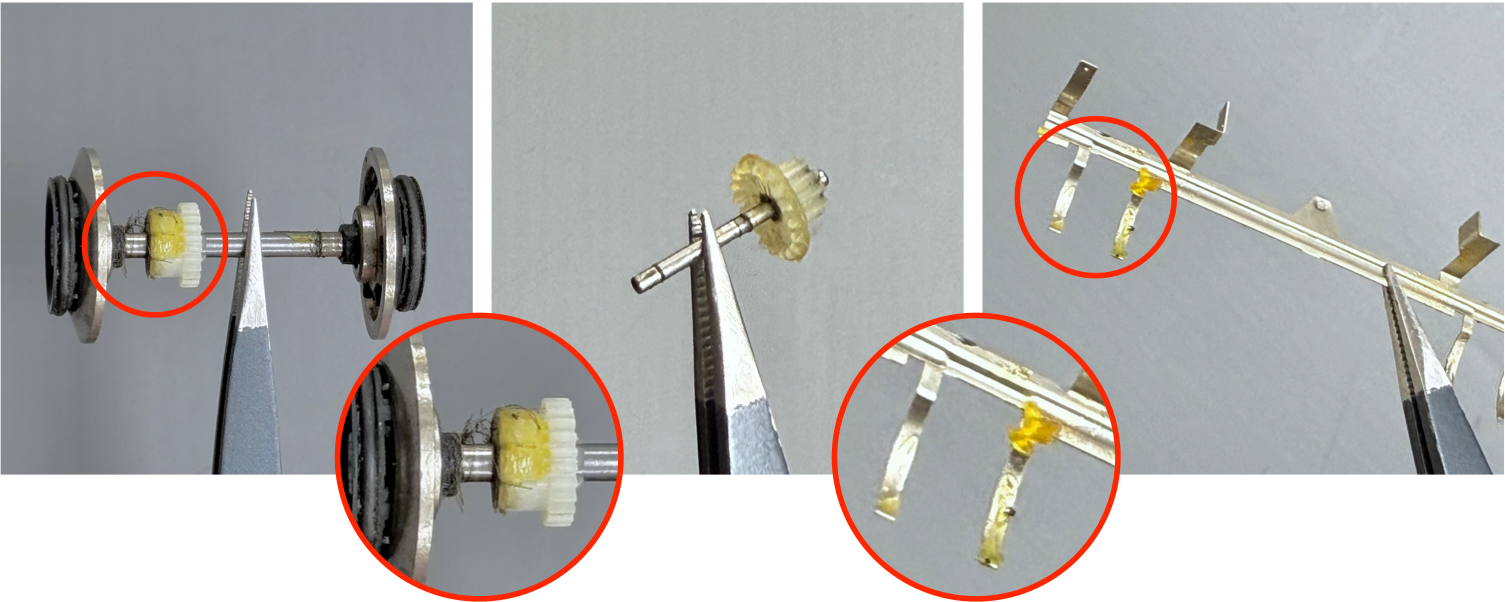
The key to smooth, reliable motor operation is ensuring that all electrical contact surfaces which pick up power from the track and conduct this power to the motor are clean and undamaged.
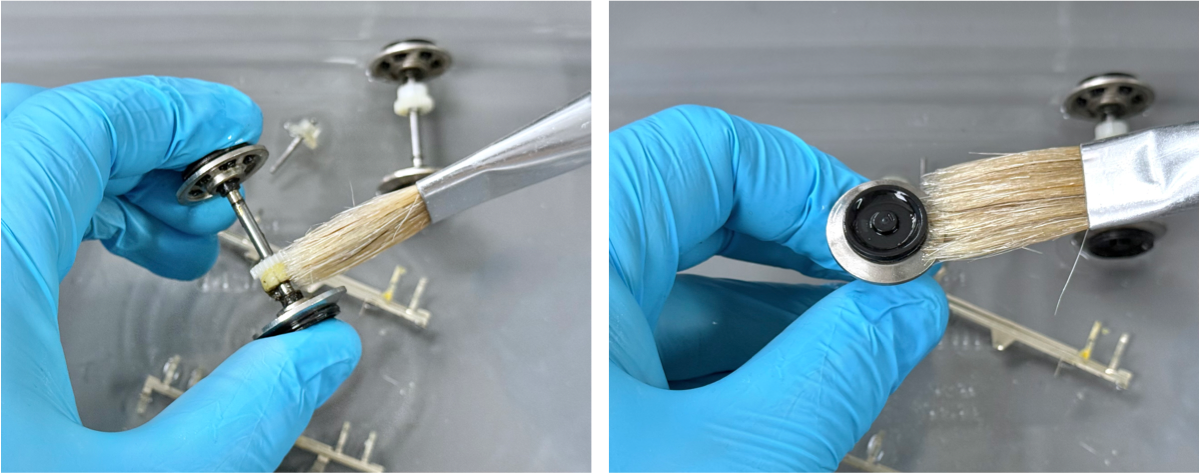
Therefore, I usually pay extra attention to cleaning the wheel flanges and backside wheel hubs with another cleaning pass using cotton buds soaked in IPA. I soak one end of the cotton bud with IPA and use the dry end to wipe over the wetted surface.

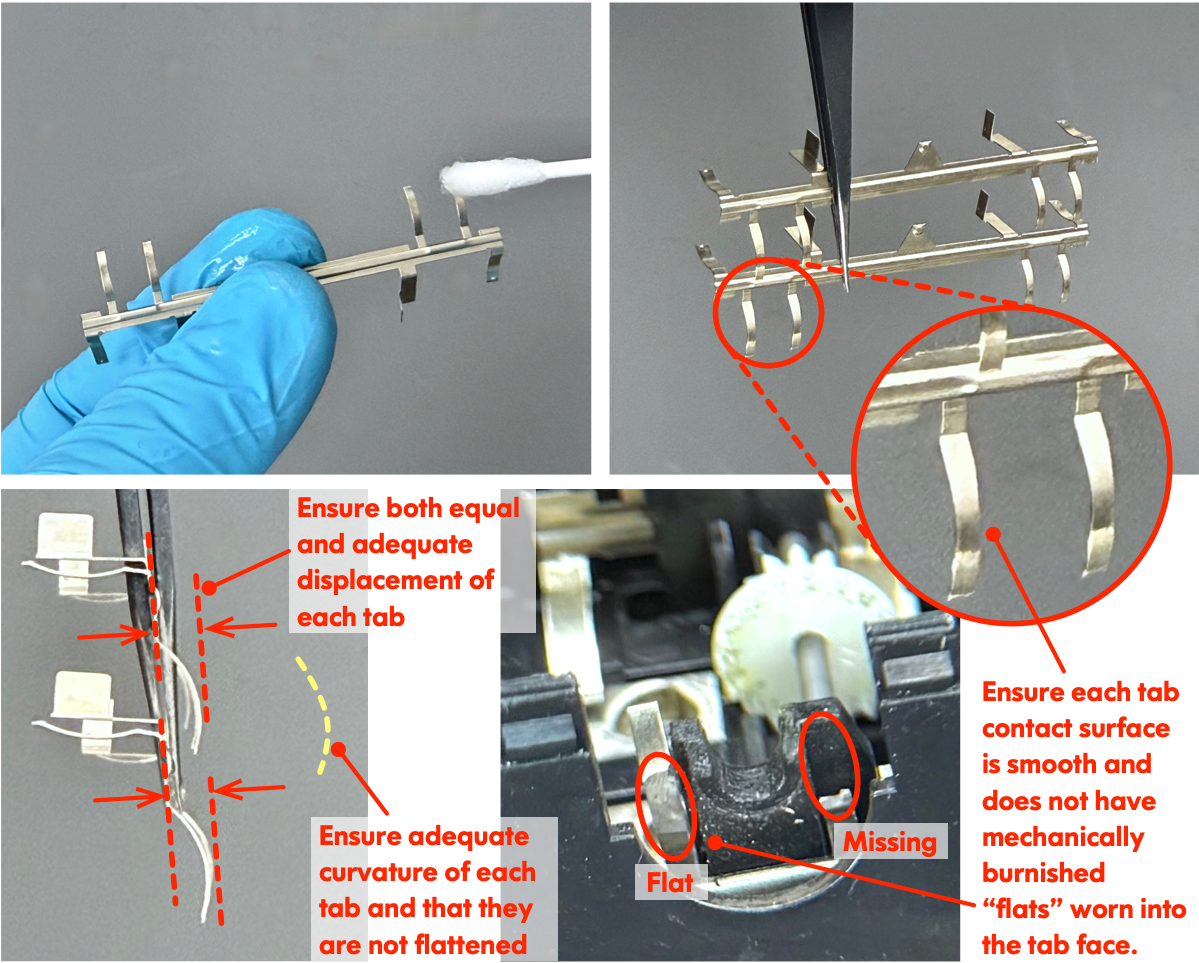
The two power pickup tab frames are components of underestimated importance. They perform two important roles:
Power pickup with contact against each wheel hub as well as being part of the electrical circuit to the motor and 9V external connector. The tab frame has several important contact surfaces—each of which must be cleaned and checked for damage.
Mechanical self-centering spring for each wheel axle assembly. There are two curved pickup tabs behind each wheel. These tabs are designed to operate as a gentle spring pushing against the back of its respective wheel. This ensures good electrical contact as well as being a lateral self-centering mechanism for each axle to help with wheel tracking when guided by the track.
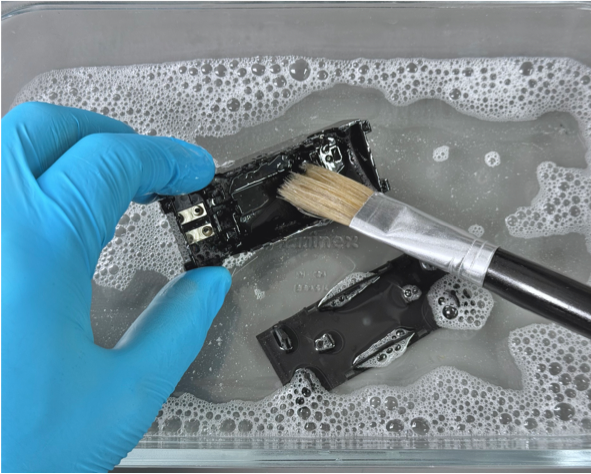
The last cleaning process is to re-clean the plastic bogie enclosure and bottom cover in warm soapy water. This will remove any residues from cleaning with IPA and remove any water-soluble dirt or staining. Pat dry with lint-free tissues and set aside to air dry thoroughly.
Part 3: Motor Test
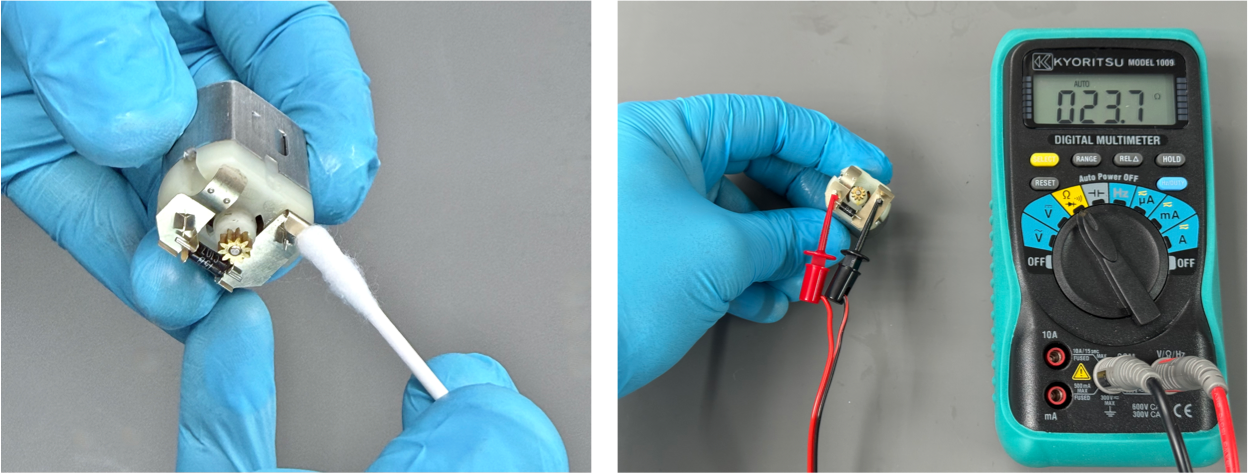
Now we can turn our attention to the motor itself. Gently clean all of the motor’s contact tab surfaces with a cotton bud soaked in IPA. Also, clean any other surfaces that have visible contamination from dirt, grease, etc.
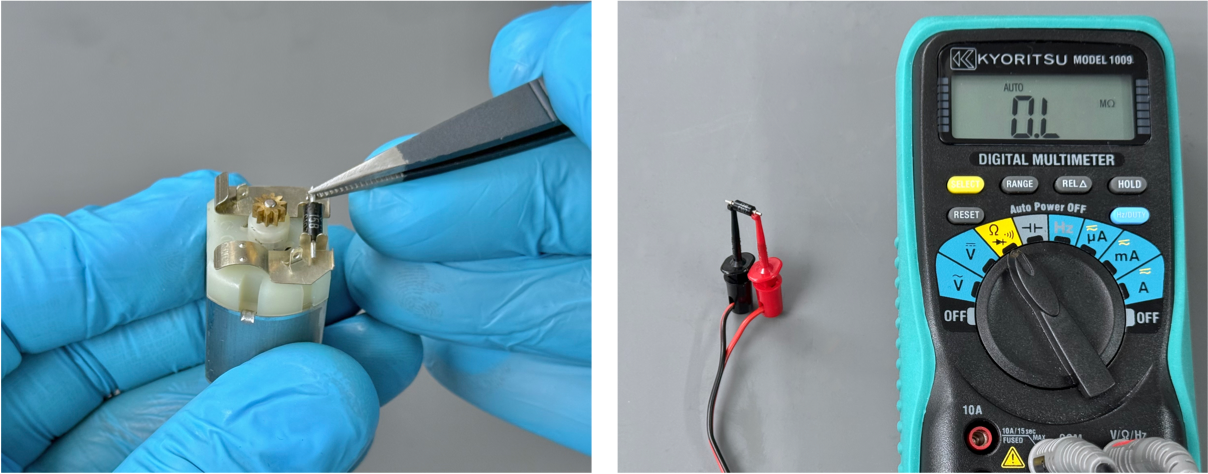
At this point, it is worth electrically checking the motor if you have the ability. Measure the electrical resistance across the motor terminals. You should measure a DC resistance of around 10 to 30 Ω.
If you measure a very low resistance or short circuit, this could be a failed thermistor protection device. You can remove the thermistor carefully with tweezers and measure its resistance.
The thermistor should have a very high or open circuit resistance when measured by itself.
If you measure either a very high (open circuit) or very low (short circuit) resistance between the motor terminals with the thermistor device removed, then it could indicate other issues.
If you measure high resistance, then this could indicate oxidized/contaminated motor brushes. This is repairable if you are confident and have the tools. Opening the motor casing is quite difficult. You have to remove both spur gears off of the motor shaft, then bend away the retaining metal tabs around the plastic shroud.
You should then be able to slide out the plastic shroud and separate the motor into 3x components: 1) metal case/permanent magnets, 2) drive shaft with rotor windings, and 3) plastic shroud with brushes. The brushes can be removed carefully, inspected and cleaned if required. Similarly, the rotor commutator surfaces can be inspected and cleaned. This process should be considered a last resort for a very poorly performing or dead motor.
Conversely, a short circuit measurement could indicate shorted or destroyed motor windings. Unfortunately, this scenario is not repairable and your best remedy is to find a replacement motor.
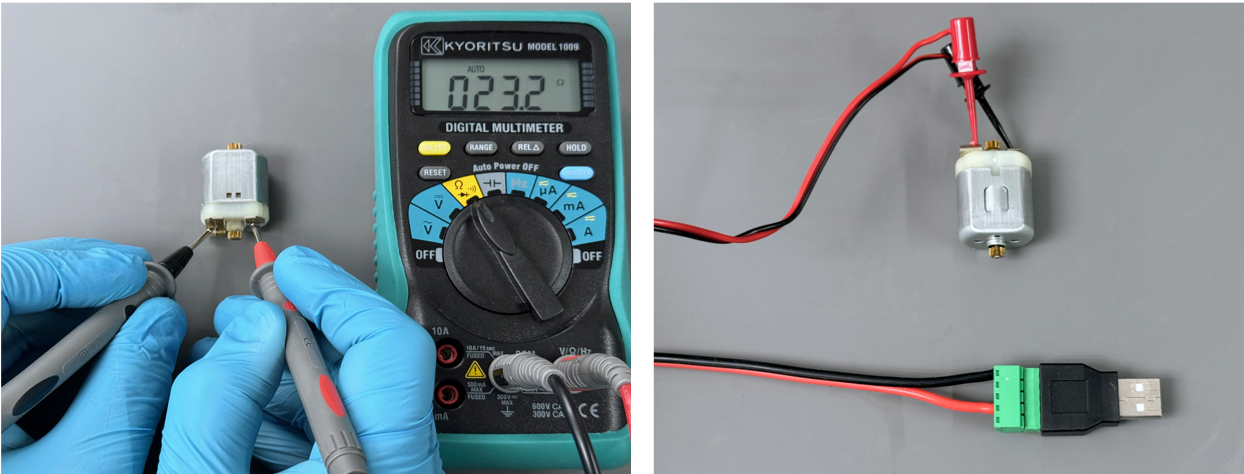
As a final test, I like to apply power to the motor in each polarity to verify that it works. I use a simple USB power break-out accessory with accessory clips to quickly check the motor, but you could use any available source of DC voltage from 3 ~ 9 V such as a power supply, battery pack, etc. The motor should spin freely and relatively quietly.
Part 4: Reassembly
Carefully insert each pickup tab frame back into its retaining slot, ensuring it is fully inserted and aligned. Then, carefully reinstall each crown gear axle assembly as shown. Remember those crown gears like to slip off their axles!
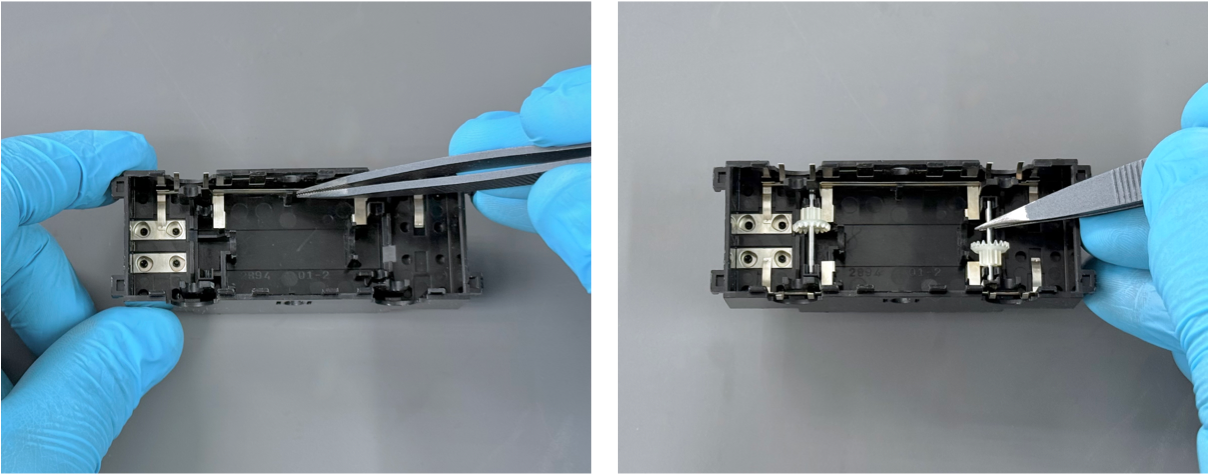
Drop in each wheel axle assembly, taking care to guide them gently over the curved pickup tabs. Spin each axle and ensure it spins freely and all the gears are correctly aligned and engaged.
Place the small round spacer disc on the motor casing as shown. It should magnetically retain itself in position while the motor is installed into the bogie.
Carefully insert the motor into the bogie as shown and ensure its spur gears correctly align and engage with the crown gears. Also ensure the motor tabs contact securely to the mating tabs on on tab frames.
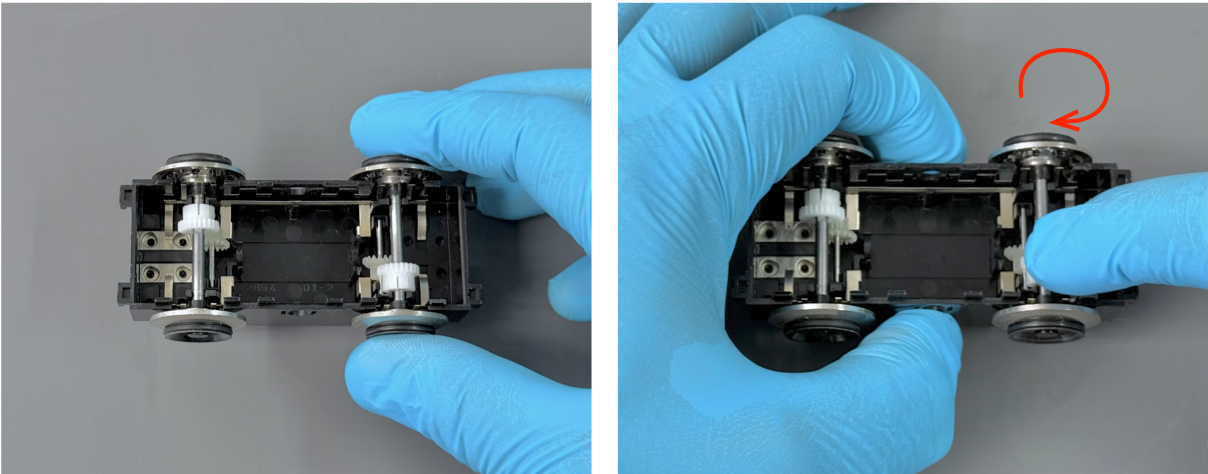
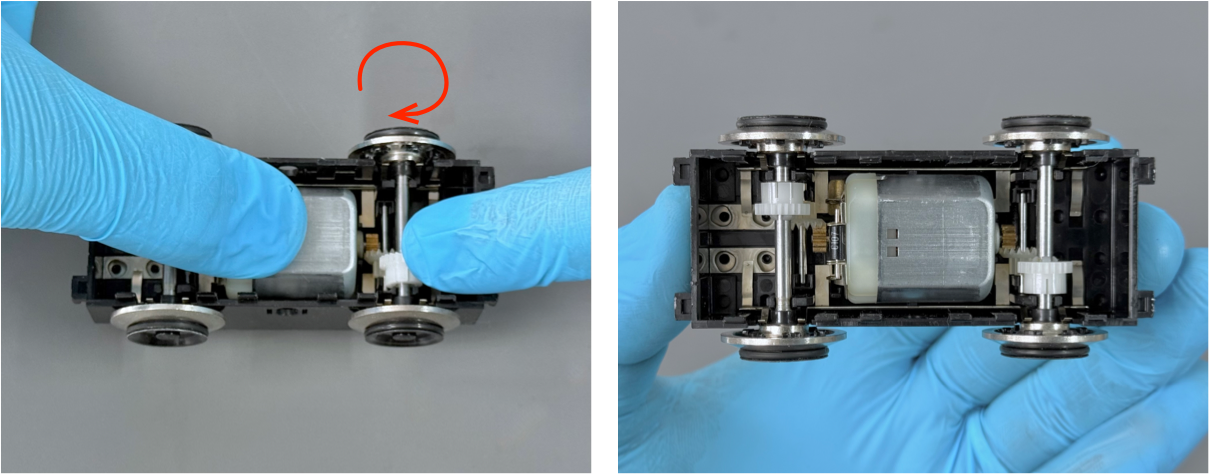
Finally, while holding down the motor with one finger, gently rotate each wheel axle and ensure all gears rotate smoothly including the motor shaft and spur gears.
Part 5: Lubrication
The final step in our refurbishment process is re-lubrication since we stripped all of the lubricating grease during cleaning.
Fortunately, there are several modern synthetic plastic-safe lubricants made specifically for models/toys I can recommend. These include Labelle 102, 106, 107 and Tamiya 4WD RC lubricant oil. My preference is Labelle 102, since it is a lightweight oil packaged with a precision needle-like metal dispensing shaft. When it comes to lubrication, applying too little is better than too much—usually, a single tiny drop is required for each lubrication surface.
Apply a drop of lubricant to each drive axle gear as shown:

Then add one drop of lubricant to each axle bearing, including the two small bearing posts on the bottom cover.
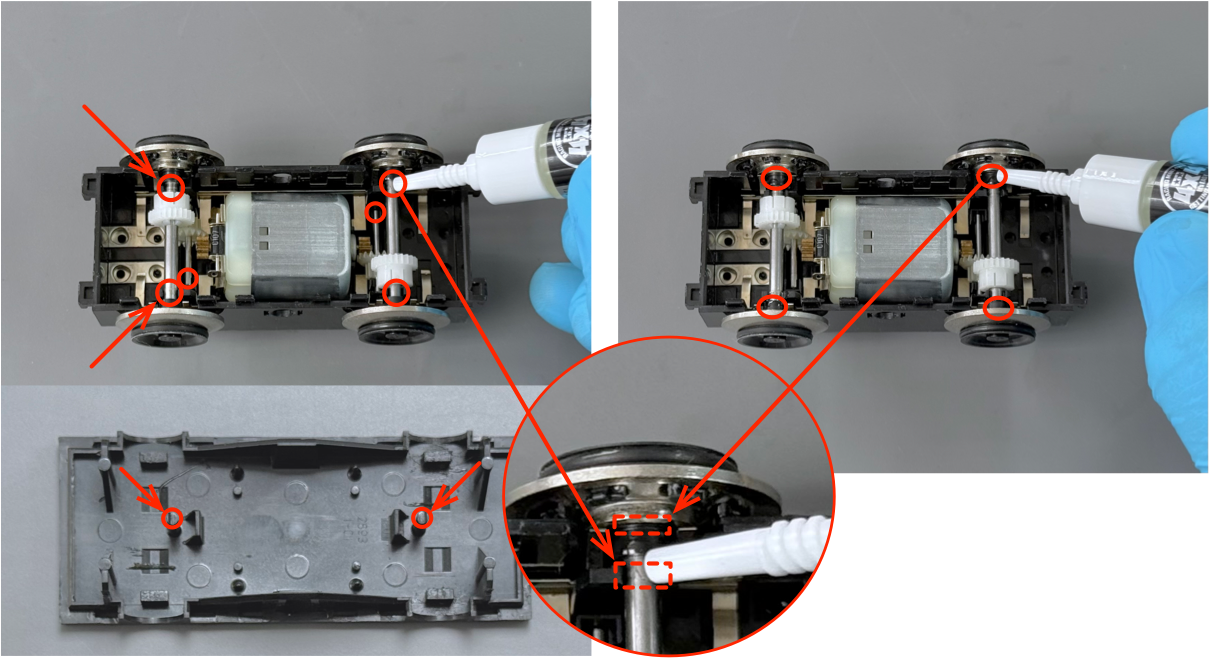
Finally, add a tiny drop of lubricant to back of each wheel hub. I learned that this location requires lubrication the hard way!
After rebuilding several motors, I noticed some of them squeaked with a high-pitched squeal. It took me a long time to discover that the curved contact tabs were vibrating like high-pitched “tuning forks”! Counterintuitively, these surfaces, despite being used for electrical contact, require lubrication to avoid squealing. As it turns out, this lubrication has no impact on the electrical performance of the pickups, and the bogies work reliably as expected.
With our freshly lubricated motor bogie, we can snap the bottom cover back on. Hold the motor bogie upside down and carefully align all of the clips. Press together firmly and evenly, ensuring each clip engages and that the bottom cover is mounted with no gaps in the seam between them.

With the bottom cover securely installed, place the bogie down onto its wheels and gently move it back and forth a few times. This will help the lubricants to disperse evenly among the gears and bearing surfaces. You might notice that the movement of the bogie will become more fluid and smooth as the lubricants work their way into the components.
The final test is simply to put the bogie on the track and run it! It should hopefully move smoothly and without excessive noise in both directions. It’s also a good idea to run the bogie a few minutes in both directions to “break in” the mechanical components and allow the lubricants to achieve maximum coverage.
Conclusions
So did our refurbishment process work? A new capture was performed on unit L914, and I am happy to report it was a worthwhile success!
I must admit, judging by the collected data from other motor bogie specimens, a few more of our motor bogie units would benefit from the same treatment as L914!
The demand for used 9V motor bogies and their increasing prices indicate a robust appetite from train fans for these units. Ironically, it is not helpful that Fx Bricks introduced a new system of 9V train tracks, which has only stimulated even more demand! In any case, until we introduce our long-awaited replacement motor bogie, the existing supply of LEGO 9V train motors will need to soldier on! To do so, we should make the effort to extend the life of these motors through maintenance and refurbishment, giving these motor bogies an opportunity to serve our hobby even longer.
Many of the techniques discussed in this article are general-purpose and can be applied to other motorized/mechanical products. The principle of repairing and refurbishing not only toys and models, but also any of the goods we buy, is a noble principle. It gives us longer service lives to enjoy our products, it saves unnecessary diversion of products to waste/landfill, it helps us develop new skills, and rewards us with the satisfaction of a successful refurbishment.
So break out your tools, roll up your sleeves, and fix those broken motor bogies—if not, at the very least, sell them to nerdy train fans like me!
What else do you want to know about LEGO trains? Leave your thoughts in the comments below.
Do you want to help BrickNerd continue publishing articles like this one? Become a top patron like Paige Mueller, Rob Klingberg from Brickstuff, John & Joshua Hanlon from Beyond the Brick, Megan Lum, Andy Price, Lukas Kurth from StoneWars, Wayne Tyler, Dan Church, and Roxanne Baxter to show your support, get early access, exclusive swag and more.


